DROPS Fabel
DROPS Fabel
75% Wool, 25% Polyamide
from 3.00 $ /50g
Get the yarn to make this pattern from 33.00$.

The yarn cost is calculated from the pattern’s smallest size and the yarn’s cheapest product type. Looking for an even better price? You might find it on the DROPS Deals!

DROPS SS24

Dragonfly

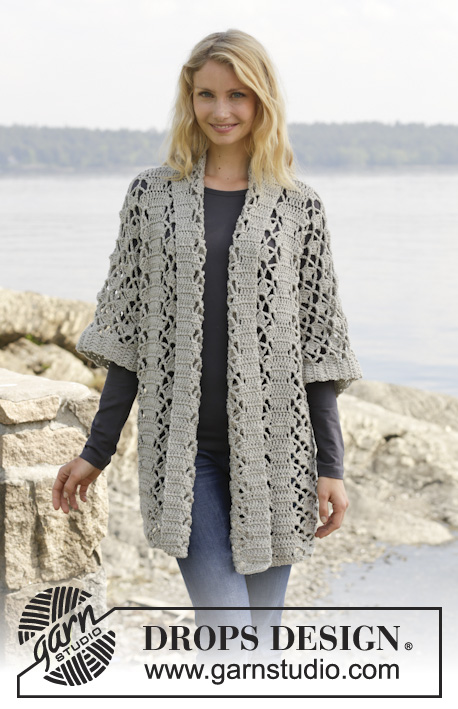
Knitted DROPS jacket with short rows and shawl collar in ”Fabel”. Size: S - XXXL.

DROPS 157-13
DROPS design: Pattern no fa-280
Yarn group A
-----------------------------------------------------------
Size: S - M - L - XL - XXL -XXXL
Finished measurements:
Bust: 80-88-96-108-116-132 cm / 31½"-34½"-37 3/4"-42½"-45 3/4"-52"
Full length: 60-62-64-66-68-70 cm / 23 5/8''-24 3/8''-25¼''-26''-26¾''-27½''

Materials:
DROPS FABEL from Garnstudio
350-400-400-450-500-550 g color no 913, chiaroscuro
200-200-200-250-250-250 g color no 400, black

DROPS DOUBLE POINTED NEEDLES and CIRCULAR NEEDLE (80 cm / 32'') SIZE 3 mm / US 2.5- or size needed to get 24 sts x 32 rows in stockinette st and 24 sts x 44 rows in garter st = 4'' x 4'' (10 x 10 cm).
DROPS CROCHET Hook size 3 mm / C - for edge.

DROPS SEASHELL W/HOLES NO 526 – 2 piece in all sizes.

-------------------------------------------------------

Alternative Yarn – See how to change yarns here
Yarn Groups A to F – Use the same pattern and change the yarn here
Yarn usage using an alternative yarn – Use our yarn converter here

-------------------------------------------------------

DROPS Fabel
DROPS Fabel
75% Wool, 25% Polyamide
from 3.00 $ /50g
Get the yarn to make this pattern from 33.00$.

The yarn cost is calculated from the pattern’s smallest size and the yarn’s cheapest product type. Looking for an even better price? You might find it on the DROPS Deals!

Pattern instructions

NOTE: This pattern is written in American English. All measurements in charts are in cm. For conversion from inches to cm - click here. There are different terms for crocheting in American and British English. If this pattern includes crochet, click for "crochet terms" here. For this pattern in British English, please click here.
GARTER ST (back and forth on needle):
K all rows. 1 ridge = K2 rows.

GARTER ST (in the round on circular needle):
* K 1 round and P 1 round *, repeat from *-*. 1 ridge = 2 rounds.

PATTERN:
* Switch color to black. Then work short rows, beg from RS as follows (always work the first 3 sts in garter st): Work 3 sts in garter st, stockinette st over the next 55 sts, turn and work back. Work 3 sts in garter st, stockinette st over the next 79 sts, turn and work back. Work 3 sts in garter st, stockinette st over the next 25 sts, turn and work back. Switch color to chiaroscuro. Work 4 ridges back and forth over all sts *, repeat from *-*. 1 repetition = 8 rows at the top and 14 rows at the bottom. NOTE: Work the 4 ridges in chiaroscuro and the short rows in black until finished measurements.

BUTTONHOLES:
Dec for buttonholes on right band. Beg from RS and work as follows: K 86-86-88-88-90-90, 1 YO, K 2 tog, K 12, 1 YO, K 2 tog, and K the rest of row. On next row K YOs.
--------------------------------------------------------

BACK PIECE:
Worked back and forth from side to side on circular needle to make room for all the sts. Cast on 144-148-154-158-164-168 sts on circular needle size 3 mm / US 2.5 with 2 strands chiaroscuro. Then continue piece with 1 strand chiaroscuro. Work 6 ridges in GARTER ST – see explanation above, AT THE SAME TIME on 1st row from RS insert 1 marker in piece when 46-48-50-52-54-56 sts remain on needle. This marks where to sew in sleeve. Work PATTERN - see explanation above. REMEMBER THE GAUGE! Continue with pattern until piece measures 15-17-18-21-22-26 cm / 6"-6 3/4"-7"-8 1/4"-8 3/4"-10 1/4" measured at the shortest, adjust to finish before the 4 ridges. On next row from WS, bind off the first 5 sts for neck, work the rest of row = 139-143-149-153-159-163 sts. Work pattern until piece measures 25-27-30-33-36-40 cm / 9 3/4"-10½"-11 3/4"-13"-14 1/4"-15 3/4" (10-10-12-12-14-14 cm / 4"-4"-4 3/4"-4 3/4"-5½"-5½" from dec for neck), adjust to finish before the 4 ridges. Cast on 5 new sts at the end of next row from RS = 144-148-154-158-164-168 sts. Continue as before. When piece measures 40-44-48-54-58-66 cm / 15 3/4"-17 1/4"-19"-21 1/4"-22 3/4"-26" - adjust to finish with a whole repetition of pattern, work 2 ridges over all sts with chiaroscuro AT THE SAME TIME insert a marker on last row from RS when 46-48-50-52-54-56 sts remain on needle. This marks where to sew in sleeve. Bind off with 2 strands chiaroscuro.

RIGHT FRONT PIECE:
Work from the side to mid front. Cast on 144-148-154-158-164-168 sts on circular needle size 3 mm / US 2.5 with 2 strands chiaroscuro. Then continue piece with 1 strand chiaroscuro. Work 6 ridges, AT THE SAME TIME on 1st row from RS insert 1 marker in piece when 46-48-50-52-54-56 sts remain on needle. This marks where to sew in sleeve. Work pattern until piece measures 15-17-18-21-22-26 cm / 6"-6 3/4"-7"-8 1/4"-8 3/4"-10 1/4" measured at the shortest, adjust to finish before the 4 ridges. At the end of the next row from RS, cast on 20-20-22-22-24-24 new sts for collar = 164-168-176-180-188-192 sts. Insert 1 marker in piece, NOW MEASURE PIECE FROM HERE. Now continue piece in chiaroscuro.

READ ALL OF THE FOLLOWING SECTION BEFORE CONTINUING!
Work short rows, beg from WS as follows: Work the first 68-68-90-90-108-108 sts, insert 1 marker, turn and work back. Work until 4 sts remain before marker, turn and work back. Continue like this by working 4 sts less on every turn until 13-13-18-18-22-22 ridges have been worked in total. When short rows are done, work in garter st over all sts until piece measures 10-10-12-12-14-14 cm / 4"-4"-4 3/4"-4 3/4"-5½"-5½". AT THE SAME TIME when piece measures 4 cm / 1½'' at the widest, inc 1 st at the end of next row from RS, repeat inc every 4th row 3-3-3-3-6-6 more times then on every row from RS 14-14-18-18-17-17 times = 182-186-198-202-212-216 sts. AT THE SAME TIME when piece measures 9-9-11-11-13-13 cm / 3½"-3½"-4½"-4½"-5"-5", dec for BUTTONHOLES - see explanation above, on next row from RS. Work 1 ridge in black. Bind off with 2 strands black.

LEFT FRONT PIECE:
Work from mid front to the side. Cast on 182-186-198-202-212-216 sts on circular needle size 3 mm / US 2.5 with 2 strands black. Then continue piece with 1 strand black. Work 1 ridge AT THE SAME TIME on row from WS insert 1 marker after 38-38-44-44-48-48 sts. Switch color to chiaroscuro.

READ ALL OF THE FOLLOWING SECTION BEFORE CONTINUING! Work in garter st over all sts AT THE SAME TIME on 1st row from RS, dec 1 st at the end of row by K tog the last 2 sts, repeat dec on every row from RS 13-13-17-17-16-16 more times, then every 4th row 4-4-4-4-7-7 times = 164-168-176-180-188-192 sts. AT THE SAME TIME when piece measures 4 cm / 1½'', work short rows as follows – beg from WS: Work until marker, turn and work back. Work 4 sts after marker, turn and work back. Continue like this by working 4 sts more on every turn until 13-13-18-18-22-22 ridges have been worked in total. When short rows have been worked, piece measures approx. 10-10-12-12-14-14 cm / 4"-4"-4 3/4"-4 3/4"-5½"-5½". Insert 1 marker in piece, now measure piece from here.

On next row from WS, bind off the first 20-20-22-22-24-24 sts = 144-148-154-158-164-168 sts on needle. Work pattern until piece measures 15-17-18-21-22-26 cm / 6"-6 3/4"-7"-8 1/4"-8 3/4"-10 1/4" measured at the shortest, adjust to finish before the 4 ridges. Work 6 ridges over all sts with chiaroscuro, AT THE SAME TIME on last row from RS insert 1 marker in piece when 46-48-50-52-54-56 sts remain on needle (seen from RS). This marks where to sew in sleeve. Bind off with 2 strands chiaroscuro.

SLEEVE:
Worked in the round on double pointed needles. Cast on 56-58-60-62-64-66 sts on double pointed needles size 3 mm / US 2.5 with 2 strands black. Then continue piece with 1 strand black. Work 1 ridge in GARTER ST - see explanation above. Switch color to chiaroscuro and work in garter st until piece measures 4 cm / 1½''. Then work in stockinette st. Insert 1 marker at the beg of round. When piece measures 8 cm / 3 1/8'', inc 1 st on each side of marker, repeat inc every 2½-2-2-2-1½-1½ cm / 7/8"-3/4"-3/4"-3/4"-½"-½" 17-18-19-20-21-22 more times = 92-96-100-104-108-112 sts. When piece measures 54-53-52-50-49-46 cm / 21 1/4"-21"-20½"-19 3/4"-19 1/4"-18" (shorter measurements in the larger sizes because of wider shoulders), bind off all sts.

ASSEMBLY:
Sew the shoulder seams. Sew side seams from marker and down. Sew in sleeves with WS outwards. Sew shawl collar tog mid back and sew it to the neckline. Sew the buttons on to left band.

CROCHET EDGE:
Crochet an edge around the bottom edge of jacket, beg at the bottom of left front piece. Work with black on hook size 3 mm / C as follows: 1 sc, * ch 3, 1 dc in 1st ch, skip approx. 1 cm / 3/8'', 1 sc *, repeat from *-* around the entire jacket. Fasten off.

Diagram

All measurements in charts are in cm.

symbols = knitting direction
diagram

Each of our patterns has specific tutorial videos to help you.

Do you have a question? See a list of frequently asked questions (FAQ)

Knitting tension is what determines the final measurements of your work, and is usually measured per 10 x 10 cm. It is provided like so: number of stitches in width x number of rows in height - eg: 19 stitches x 26 rows = 10 x 10 cm.

The knitting tension is very individual; some people knit/crochet loosely while others work tightly. You adjust the knitting tension with the needle size, which is why the suggested needle size only serve as a guide! You need to adjust this (up or down) to ensure that YOUR knitting tension matches the knitting tension provided in the pattern. If you work with a different knitting tension than provided you will have a different yarn consumption, and your work will have different measurements than what the pattern suggests.

The knitting tension also determines which yarns can replace each other. As long as you achieve the same knitting tension you can replace one yarn with another.

See DROPS lesson: How to measure your tension/gauge

See DROPS video: How to make a gauge tension swatch

The required amount of yarn is provided in grams, eg: 450 g. To calculate how many balls you’ll need you first need to know how many grams are in 1 ball (25g, 50g or 100g). This information is available if you click on the individual yarn quality on our pages. Divide the amount required with the amount of each ball. For example, if each ball is 50g (the most common amount), the calculation will be as follows: 450 / 50 = 9 balls.

The important thing when changing from one yarn to another is that the knitting/crochet tension remains the same. This is so that the measurements of the finished piece will be the same as on the sketch provided. It is easier to achieve the same knitting tension using yarns from the same yarn group. It is also possible to work with multiple strands of a thinner yarn to achieve the knitting tension of a thicker one. Please try our yarn converter. We recommend you to always work a test swatch.

Please NOTE: when changing yarn the garment might have a different look and feel to the garment in the photo, due to individual properties and qualities of each yarn.

See DROPS lesson: Can I use a different yarn than the one mentioned in the pattern?

All our yarns are categorised into yarn groups (from A to F) according to thickness and knitting tension – group A contains the thinnest yarns and group F the thickest. This makes it easier for you to find alternative yarns to our patterns, should you wish to switch yarn. All yarns within the same group have a similar knitting tension and can easily replace each other. However, different yarn qualities have different structures and properties which will give the finished work a unique look and feel.

Click here for an overview of the yarns in each yarn group

At the top of all our patterns you’ll find a link to our yarn converter, which is a helpful tool should you wish to use a different yarn than suggested. By filling in the yarn quality you wish to replace, the amount (in your size) and number of strands, the converter will present good alternative yarns with the same knitting tension. Additionally it will tell you how much you’ll require in the new qualities and whether you’ll need to work with multiple strands. Most skeins are 50g (some are 25g or 100g).

If the pattern is worked with multiple colours, every colour will have to be converted separately. Similarly, if the pattern is worked with several strands of different yarns (for example 1 strand Alpaca and 1 strand Kid-Silk) you will have to find alternatives for each, individually.

Click here to see our yarn converter

Since different yarns have different qualities and textures we have chosen to keep the original yarn in our patterns. However, you can easily find options among our available qualities by using our yarn converter, or simply pick a yarn from the same yarn group.

It is possible that some retailers still have discontinued yarns in stock, or that someone has a few skeins at home that they would like to find patterns for.

The yarn converter will provide both alternative yarn as well as required amount in the new quality.

If you think it's hard to decide what size to make, it can be a good idea to measure a garment you own already and like the size of. Then you can pick the size by comparing those measures with the ones available in the pattern's size chart.

You'll find the size chart at the bottom of the pattern.

See DROPS lesson: How to read size chart

The needle size provided in the pattern serves only as a guide, the important thing is to follow the knitting tension. And since knitting tension is very individual, you will have to adjust the needle size to ensure that YOUR tension is the same as in the pattern – maybe you’ll have to adjust 1, or even 2 needle sizes, up or down to achieve the correct tension. For this, we recommend that you work test swatches.

Should you work with a different knitting tension than the one provided, the measurements of the finished garment might deviate from the measurement sketch.

See DROPS lesson: How to measure your tension/gauge

See DROPS video: How to make a gauge tension swatch

Working a garment top-down provides more flexibility and room for personal adjustment. For example it is easier to try the garment on while working, as well as making adjustments to length of yoke and shoulder caps.

The instructions are carefully explaining every step, in the correct order. Diagrams are adjusted to the knitting direction and are worked as usual.

The diagram depicts all rows/rounds, and every stitch seen from the right side. It is read from bottom to top, from right to left. 1 square = 1 stitch.

When working back and forth, every other row is worked from the right side and every other row is worked from the wrong side. When working from the wrong side, the diagram will have to be worked reversed: from left to right, knit stitches are purled, purl stitches are knit etc.

When working in the round every round is worked from the right side and the diagram are worked from right to left on all rounds.

See DROPS lesson: How to read knitting diagrams

The diagram depicts all rows/rounds, and every stitch seen from the right side. It is worked from bottom to top, from right to left.

When working back and forth every other row is worked from the right side: from right to left and every other row is worked from the wrong side: from left to right.

When working in the round, every row in the diagram are worked from the right side, from right to left.

When working a circular diagram you start in the middle and work your way outwards, counter clockwise, row by row.

The rows usually start with a given number of chain stitches (equivalent to the height of the following stitch), this will either be depicted in the diagram or explained in the pattern.

See DROPS lesson: How to read crochet diagrams

Instructions for working several diagrams after each other on the same row/round, will often be written like so: “work A.1, A.2, A.3 a total of 0-0-2-3-4 times". This means you work A.1 once, then A.2 is worked once, and A.3 is repeated (in width) the number of times provided for your size – in this case like so: S = 0 times, M = 0 times, L=2 times, XL= 3 times and XXL = 4 times.

The diagrams are worked as usual: begin with the first row in A.1, then work the first row in A.2 etc.

See DROPS lesson: How to read knitting diagrams

See DROPS lesson: How to read crochet diagrams

The total width of the garment (from wrist-to-wrist) will be larger in the larger sizes, despite the actual sleeves being shorter. The larger sizes have longer sleeve caps and wider shoulders, so there will be a good fit in all sizes.

The measurement sketch/schematic drawing provides information regarding the full length of the garment. If it’s a jumper or a jacket the length is measured from the highest point on the shoulder (usually closest to the neckline), and straight down to the bottom of the garment. It is NOT measured from the tip of shoulder. Similarly, the length of yoke is measured from the highest point on the shoulder and down to where yoke is split into body and sleeves.

See DROPS lesson: How to read a schematic drawing

Diagrams are often repeated on the round or in height. 1 repeat is the diagram the way it appears in the pattern. If it says to work 5 repeats of A.1 in the round, then you work A.1 a total of 5 times after/next to each other in the round. If it says to work 2 repeats of A.1 vertically/in height you work the entire diagram once, then begin again at the start and work the entire diagram one more time.

Chain stitches are slightly narrower than other stitches and to avoid working the cast-on edge too tight, we simply chain more stitches to begin with. The stitch count will be adjusted on the following row to fit the pattern and measurement sketch.

The rib edge is more elastic and will contract slightly compared to, for example, stocking stitch. By increasing before the rib edge, you avoid a visible difference in width between the rib edge and the rest of the body.

It’s very easy to cast off too tightly, and by making yarn overs while casting off (and simultaneously casting these off) you avoid a too tight cast off edge.

See DROPS video: How to bind off with yarn overs (yo)

To achieve an even increase (or decrease) you can increase on, for example: every 3rd and 4th row alternately, like so: work 2 rows and increase on the 3rd row, work 3 rows and increase on the 4th. Repeat this until the increase is complete.

See DROPS lesson: Increase or decrease 1 st on every 3rd and 4th row alternately

Should you prefer to work in the round instead of back and forth, you may of course adjust the pattern. You’ll need to add steeks mid-front (usually 5 stitches), and follow the instructions. When you would normally turn and work from the wrong side, simply work across the steek and continue in the round. At the end you’ll cut the piece open, pick up stitches to work bands, and cover the cut edges.

See DROPS video: How to knit steeks and cut open

Should you prefer to work back and forth instead of in the round, you may of course adjust the pattern so you work the pieces separately and then assemble them at the end. Divide the stitches for the body in 2, add 1 edge stitch in each side (for sewing) and work the front and back pieces separately.

See DROPS lesson: Can I adapt a pattern for circular needles into straight needles?

Pattern repeats can vary slightly in the different sizes, in order to get the correct proportions. If you’re not working the exact same size as the garment in the photo, yours might deviate slightly. This has been carefully developed and adjusted so that the complete impression of the garment is the same in all sizes.

Make sure to follow instructions and diagrams for your size!

If you have found a pattern you like which is available in women’s size it’s not very difficult to convert it to men’s size. The biggest difference will be the length of sleeves and body. Start working on the women size that you think would fit across the chest. The additional length will be worked right before you cast off for the armhole/sleeve cap. If the pattern is worked top-down you can add the length right after the armhole or before the first decrease on sleeve.

Regarding additional yarn amount, this will depend on how much length you add, but it is better with a skein too many than too few.

All yarns will have excess fibres (from production) that might come off as lint or shedding. Brushed yarns (ie hairier yarns) have more of these loose, excess fibres, causing more shedding.

Shedding also depends on what is worn under or over the garment, and whether this pulls at the yarn fibres. It’s therefore not possible to guarantee that there will be no shedding

Below are some tips on how to get the best result when working with hairier yarns:

1. When the garment is finished (before you wash it) shake it vigorously so the looser hairs come off. NOTE: do NOT use a lint roller, brush or any method that pulls at the yarn.

2. Place the garment in a plastic bag and put it in your freezer - the temperature will cause the fibres to become less attached to each other, and excess fibres will come off easier.

3. Leave in the freezer for a few hours before taking it out and shaking it again.

4. Wash the garment according to the instructions on the yarn label.

Pilling is a natural process that happens to even the most exclusive of fibers. It's a natural sign of wear and tear that is hard to avoid, and that is most visible in high friction areas of your garment like a sweater's arms and cuffs.

You can make your garment look as new by removing the pilling, using a fabric comb or a pill/lint remover.

Still can't find the answer you need? Then scroll down and leave your question so one of our experts can try to help you. This will be done normally within 5 to 10 working days.
In the meantime, you can read the questions and answers that others have left to this pattern or join the DROPS Workshop on Facebook to get help from fellow knitters/crocheters!

You might also like...

Post a comment to pattern DROPS 157-13

We would love to hear what you have to say about this pattern!

If you want to leave a question, please make sure you select the correct category in the form below, to speed up the answering process. Required fields are marked *.

Comments / Questions (73)

country flag Gil Danielle wrote:

Dans l'explication du point fantaisie du modèle 157-13 j'aimerai avoir confirmation du 3 rang :tricoter 3 m point mousse,jersey sur les 25 m suivantes (après les 55 m du premier rang,les 79 m du second ,on revient à 25 m sur le troisième ? °) je vous remercie .

13.02.2015 - 16:55

DROPS Design answered:

Bonjour Mme Gil, on tricote 2 rangs sur 3 m point mousse + 55 m jersey, puis 2 rangs sur 3 m point mousse + 79 m jersey, puis 2 rangs sur 3 m point mousse + 25 m jersey, puis on change de couleur et on tricote 4 côtes mousse sur toutes les mailles (= 8 rangs) = 1 série des rangs raccourcis, soit 14 rangs en bas du gilet (à droite, vu sur l'endroit), et 8 rangs en haut (à gauche, vu sur l'endroit). Bon tricot!

13.02.2015 - 18:18

country flag Andrea wrote:

Liebes DROPS-Team. Ich bin mit der Anleitung vom rechten Vorderteil nicht zurechtgekommen. Ich habe erst das linke gestrickt und dann das rechte spiegelverkehrt. Wenn ich den Schalkragen an der rückwärtigen Mitte zusammennähe und an den Halsausschnitt nähe, läuft der Schalkragen spitz nach unten zu. Es sieht hinten aus wie ein Dreieck. Ist das so richtig?

03.02.2015 - 16:04

DROPS Design answered:

Sie können in der Maßskizze sehen, wie die eine Seite des Kragens geschnitten ist, er hat tatsächlich eine Art Dreiecksform. Wenn die Spitze bei Ihnen genauso aussieht wie in der Skizze, haben Sie alles richtig gemacht.

04.02.2015 - 18:01

country flag Miekelien wrote:

Juiste maat

05.01.2015 - 00:44

Miekelien wrote:

Hoe kan ik 'opmerkingen' openen die gemaakt zijn naar aanleiding van een breipatroon? Dank u.

03.01.2015 - 00:14

DROPS Design answered:

Hoi Mikkelien. Je drukt op "Opmerkingen" zoals je hebt gedaan om deze vraag te stellen. Scroll een beetje naar beneden om reeds gemaakte opmerkingen te zien.

06.01.2015 - 16:59

country flag Riet Neuenschwander wrote:

Ik ben met het achterpand bezig en heb het garen en naald bij jullie besteld. Precies het patroon gevolgd 158 steken opzetten maar nu ik een eind op weg ben zie ik dat ik geen 66cm maar 55 cm lengte heb. Is er een fout in het patroon? Moet ik overnieuw beginnen en dan met meer steken maar dan klopt het patroon natuurlijk niet meer Kunt u mij helpen?

13.12.2014 - 11:34

DROPS Design answered:

Hoi Riet. Kijk of je stekenverhouding klopt. Ik denk dat je te strak breit. Voor dit patroon moet je 24 st hebben per 10 cm. Met 158 st zou dat met de juiste stekenverhouding ongeveer 66 cm zijn.

15.12.2014 - 15:23

country flag Kerry Hullett wrote:

The second yarn color is incorrect. Only 100 gr are required

29.11.2014 - 13:20

country flag Lis Fredborg wrote:

Jeg har opdaget at det opgivne mængde garn i opskriften er alt for meget. Den sorte har jeg købt 200g, som opgivet, men der går max 1oog. der er irriterende, da jeg har købt garnet online, og kan ikke retunere det.

27.11.2014 - 14:36

country flag Mw. Janssen wrote:

Geweldig patroon! Ik ben nu bezig met het rechter voorpand. De plaatsing van de hoogte van deknoopsgaten is mij niet helemaal duidelijk. Kunt u dit aangeven?

20.11.2014 - 23:56

DROPS Design answered:

Hoi Mw Janssen. Je hebt 2 knoopsgaten in dit vest. En omdat het overdwars wordt gebreid, wordt de hoogte niet vermeld, maar het aantal steken voordat de knoopsgaten worden gemaakt: "Begin aan de goede kant en brei als volgt: 86-86-88-88-90-90 r, 1 omsl, 2 r samen, 12 r, 1 omsl, 2 r samen, en brei de rest van de nld r. Brei in de volgende nld de omsl r." Maar met de juiste stekenverhouding en 86 st (24 st per 10 cm) komt u uit op 35-36 cm voor het eerste knoopsgat en ongeveer 5 cm (12 st) tussen knoopsgat 1 en 2.

21.11.2014 - 13:37

country flag Anna Söderval wrote:

Undrar om man kunde beställa hem era mönster färdigt stickat. Har ni möjlighet på det? Mvh, Anna

07.11.2014 - 20:55

country flag åse Petersen wrote:

Hej jeg har lige strikket denne trøje men der er fejl i opskriftens venstre forstykke og antal af garn man skal bruge passer heller ikke og den har en forkert pasform jeg kan godt forstå man ikke har vist ryggen øv øv , split arbejde og penge Venlig hilsen Åse Petersen

07.11.2014 - 18:56

DROPS Design answered:

Hej Åse, Det var kedeligt at høre, hvis du skriver helt konkret hvor du ikke får det til at stemme, så kan vi se på det. Har du bedt en af vore DROPS forhandlere at se på det? Venlige hilsner DROPS Design

17.11.2014 - 15:30