
Popular categories
Looking for a yarn?


Comments / Questions (22)
![]() Pavlína wrote:
Pavlína wrote:
Dobrý den, sháním návod na takovýto svetr z šestiúhelníku, ale háčkovaný. Jednoduše dl. sloupky. Měli byste?? Děkuji
20.02.2019 - 20:17DROPS Design answered:
Hi Pavlina, please look for crocheted circle jacket on the website. Happy crocheting!
25.02.2020 - 07:52
![]() Pavlína wrote:
Pavlína wrote:
Dobrý den, sháním návod na takovýto svetr z šestiúhelníku, ale háčkovaný. Jednoduše dl. sloupky. Měli byste?? Děkuji
20.02.2019 - 20:15
![]() Bernadette wrote:
Bernadette wrote:
Also, can I knit the sleeves on normal pointed needles? Why does the pattern ask for circular needles but knit back and forth? Could this be worsening the distortion? Thanks for your help again!
24.09.2017 - 23:06DROPS Design answered:
Dear Bernadette, the sleeves are knitted with circulars to have the number of stitches comfortably fit onto the needle, but, if you prefer, you can knit them on straights. However, I do not think that the type of the needle you are knitting with affects the distortion. Happy Knitting!
25.09.2017 - 00:20
![]() Bernadette wrote:
Bernadette wrote:
I've ripped out the whole sleeve and started again with particular attention to tension. The stitches are neither increased not decreased but the distortion is still there. Please can I check that I've interpreted the pattern correctly? A3 is worked as follows: 1 edge stitch,knit 2 together (k2t) yarn over (YO), k2t, YO etc ending in k2t, YO, edge stitch. Knit row. 1 edge stitch, knit 1, k2t, YO, k2t, YO etc, ending in YO knit 1, edge stitch. Is that right?
24.09.2017 - 23:01DROPS Design answered:
Dear Bernadette, sorry to hear you are still having troubles with the sleeve. You read the pattern correctly, however the second row is a purl row (from the wrong side, the diagram shows every row from the right side). And please do try to block the piece out (wet and pin into shape, then let it dry). I hope this helps. Happy Knitting!
25.09.2017 - 00:17
![]() Bernadette wrote:
Bernadette wrote:
Please help! I have completed the main body of the garment, which is fine. However the sleeves are completely out of shape - it looks as though there is a consistent increase on one side and a decrease on the other! I don't think it is the tension. Rather than a rectangle, it looks like a parallelogram! The pattern looks right and I have definitely not added or dropped any stitches. When I fold in two to stitch together, the seams don't match.
16.09.2017 - 19:54DROPS Design answered:
Dear Bernadette, the sleeves should be more or less symmetric, when folded. Granted that the ajour pattern has a tendency to slightly distort the shape, but if you look at the dieagram, there is equal number of decreases and increases, the number of stitches do not chnage. Try to wet-block the piece and pull it into shape, while it is wet. I hope this helps. Happy Knitting!
17.09.2017 - 23:46
![]() Bernadette Buckley wrote:
Bernadette Buckley wrote:
After casting off and then on again to make the armholes, do I YO after every 7 markers as previously? The pattern doesn't say to do this. Also when casting off, the pattern says that 57 stitches should remain "on the needle". Is this a mistake? (Circular needles are being used here. Does it mean ' 57 stitches should remain AT THE END OF THE ROW? The wording is very unclear!
01.07.2017 - 20:00DROPS Design answered:
Dear Mrs Buckley, correct, 57 sts should remain before end of round, then continue pattern as before with YOs to inc circle. Happy knitting!
03.07.2017 - 09:28
![]() Anne wrote:
Anne wrote:
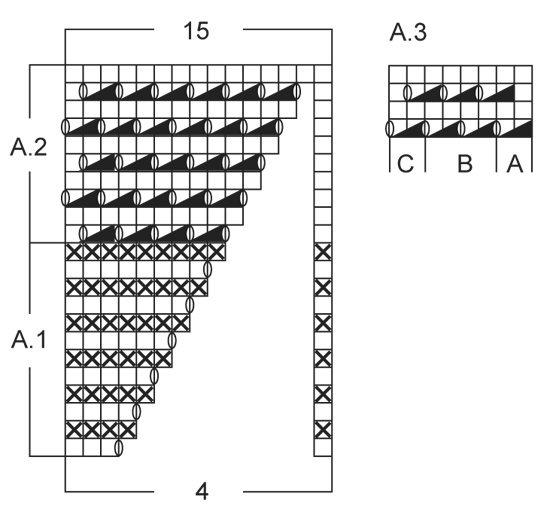
Chart A2 has YO at the beginning and end of each repeat. This is 2YO next to each other. Working the following row, you lose one of the YO and end up not increasing and one big hole. Could you please explain how to work this to stay in pattern and keep the increase?
27.10.2015 - 17:10DROPS Design answered:
Dear Anne, diagram A.2 starts with K1 on every round (first st in A.2 = white square in the column at the right side). Read more about diagram here. Happy knitting!
28.10.2015 - 11:19
![]() Kerstin wrote:
Kerstin wrote:
Hallo liebes Drops-Team, jedesmal bewundere ich Eure schönen Kreisjacken, sowie auch dieses Model. Gestrickt habe ich noch keine, weil ich schon beim ermitteln der Grösse scheitere. Die angegebenen Masse sagen mir gar nichts!!?? Wie ermittele ich meine Grösse? Vielen Dank
19.08.2015 - 14:21DROPS Design answered:
Liebe Kerstin, dann wählen Sie am besten die Grösse, die Sie üblicherweise tragen. Die Zahlen sind die cm-Angaben an der Stelle, an der sie eingezeichnet sind. Vielleicht kann Ihnen jemand beim messen helfen.
19.11.2015 - 17:42
![]() Elena wrote:
Elena wrote:
Grazie mille, ci riprovo!
29.12.2014 - 16:51
![]() Elena wrote:
Elena wrote:
Salve, purtroppo non riesco ad avanzare nel lavoro. dopo il primo A.2 bisogna ricominciare dall'inizio di A.2 ??? non riesco proprio a capire
29.12.2014 - 15:03DROPS Design answered:
Buongiorno Elena. Sì è corretto: dopo aver completato A,2 una prima volta, continua a lavorare iniziando di nuovo dalla prima riga del diagramma A.2. Proseguirà con il diagramma A.2 finchè il lavoro non misura 17-18-19-20 cm (a seconda della taglia). Buon lavoro!
29.12.2014 - 15:28
|
|||||||||||||||||||
Saralyn#saralyncardigan |
|||||||||||||||||||
 |
 |
||||||||||||||||||
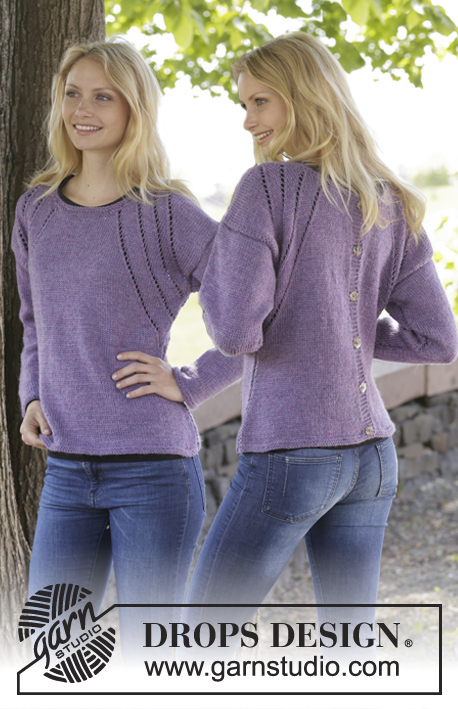
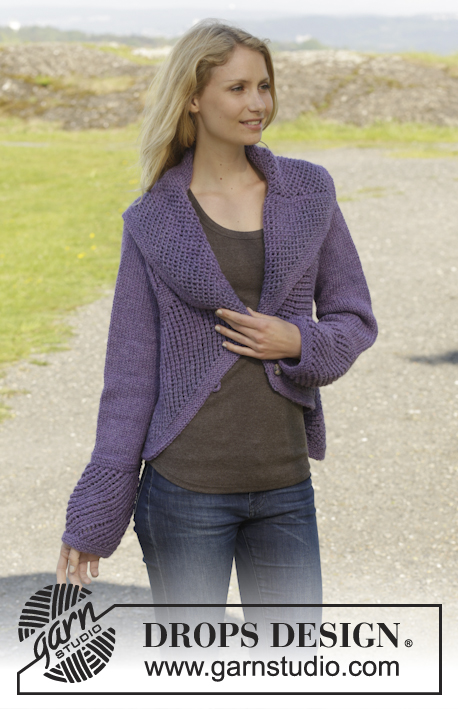
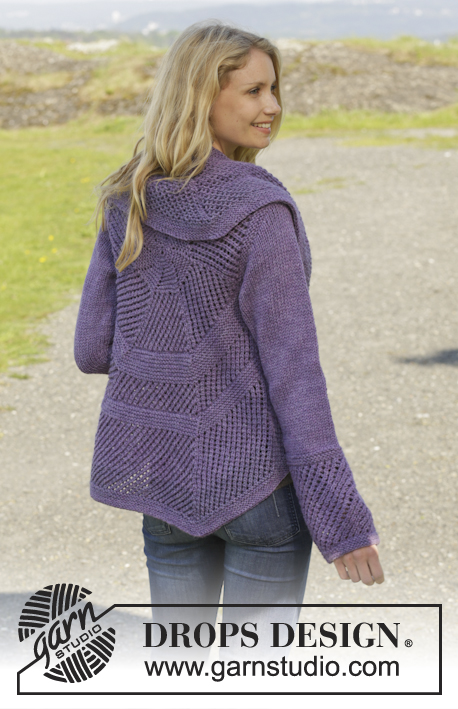
Knitted DROPS jacket worked in a circle in garter st with lace pattern in ”Big Merino”. Size: S - XXXL.
DROPS 156-37 |
|||||||||||||||||||
|
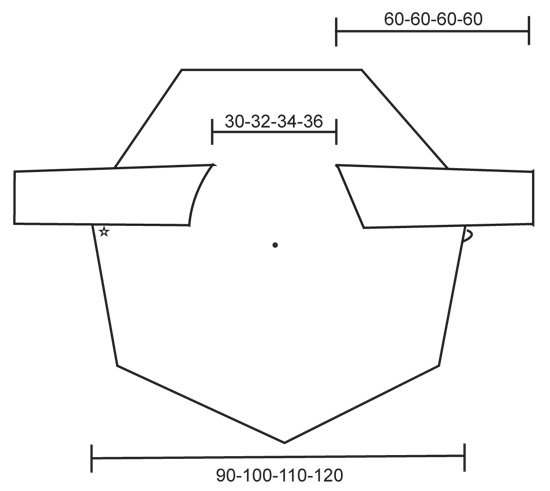
GARTER ST (in the round on circular needle): * K 1 round and P 1 round *, repeat from *-*. 1 ridge = 2 rounds. GARTER ST (back and forth on needle): K all rows. 1 ridge = K2 rows. PATTERN: See diagrams A.1-A.3. The diagrams show all rows in pattern seen from RS. INCREASE TIP: Inc 1 st by making a YO. On next row work YO twisted (i.e. work in the back loop of st instead of front) to avoid holes. ---------------------------------------------------------- BODY: Worked in the round in a circle from mid back. Cast on 7 sts with Big Merino and divide them on 4 double pointed needles size 5 mm / US 8. K 1 round while AT THE SAME TIME K 2 sts in every st = 14 sts. Insert 7 markers in the piece, 2 sts apart. 1st marker = at beg of round = back of neck. P 1 round. On next round K while AT THE SAME TIME working 2 sts in every other st = 21 sts. P 1 round. On next round K with 2 sts in every 3rd st = 28 sts. P 1 round. Then work according to A.1, work 1 repetition over the 4 sts between every marker. When A.1 has been worked, continue according to A.2. After A.2 continue pattern in A.2 the same way with 7 inc on every other round, work the inc sts in pattern. Switch to circular needle size 5 mm / US 8 when needed. REMEMBER THE GAUGE! When piece measures 17-18-19-20 cm / 6¾"-7"-7½"-8" from middle, work 3 ridges in GARTER ST – see explanation above - over all sts. NOTE! Continue inc every other round, inc with a YO after every marker (= 7 inc). Work next round as follows: Work 25-27-29-31 sts, bind off 32-34-37-40 sts (= armhole), work until 57-61-66-71 sts remain on needle, bind off 32-34-37-40 sts (= armhole) and work 25-27-29-31 sts. P 1 round - AT THE SAME TIME cast on 32-34-37-40 new sts over each armhole, same no of sts that were bind off for armhole. Work 4 ridges. Continue with A.2 and inc for 4-5-7-9 cm / 1½"-2"-2¾"-3½", work 5 ridges with inc, work A.2 with inc for 13-16-18-20 cm / 5"-6¼"-7"-8", finish with 5 ridges with inc – piece measures approx. 45-50-55-60 cm / 17¾"-19¾"-22"-23½" from middle and outwards. LOOSELY bind off. SLEEVE: The sleeve is worked back and forth on circular needle. Cast on 44-46-48-50 sts (includes 1 edge st in each side) on needle size 5 mm / US 8 with Big Merino, work 3 ridges in GARTER ST - see explanation above (= 1st row = WS). Work next row as follows from RS: 1 edge st in garter st, A.3A (= 2 sts) A.3B until 3 sts remain, finish with A.3C (= 2 sts) and 1 edge st in garter st. When piece measures 17 cm / 6¾", work 3 ridges. Then work in stockinette st with 1 edge st in garter st in each side – AT THE SAME TIME on next row from RS inc 1 st in each side – read INCREASE TIP, repeat inc every 3½-3-2½-2 cm / 1¼"-1"-⅞"-¾" 9-10-12-15 times in total = 62-66-72-80 sts. When piece measures 52 cm / 20½" in all sizes, bind off for sleeve cap at beg of every row in each side as follows: 5 sts 1 time, then 2-2-3-3 sts in each side until piece measures approx. 60 cm / 23½" - NOTE! For size XL-XXL bind off 3 sts only 6 times in each side, then 2 sts. Bind off the remaining sts. ASSEMBLY: Sew the sleeve seams inside 1 edge st. Sew in the sleeves so that middle of sleeve cap is placed where armholes are the closest tog (i.e where 1st st was dec for first armhole and where last st was dec on second armhole) and sleeve seams are placed where the armholes are the furthest apart (i.e. in opposite side - see chart). BUTTON AND LOOP: Lay the jacket down as shown in chart with RS up and sleeves straight out, sew button in the left side under sleeve from RS. Crochet 1 buttonhole loop on hook size 4 mm / G/6 in bind-off edge under sleeve in the right side as follows: 1 sc in bind-off edge on jacket, ch 5, skip approx. 1 cm / ½" and fasten with 1 sc in bind-off edge. |
|||||||||||||||||||
Diagram explanations |
|||||||||||||||||||
|
|||||||||||||||||||
 |
|||||||||||||||||||
 |
|||||||||||||||||||
Have you finished this pattern?Tag your pictures with #dropspattern #saralyncardigan or submit them to the #dropsfan gallery. Do you need help with this pattern?You'll find 24 tutorial videos, a Comments/Questions area and more by visiting the pattern on garnstudio.com. © 1982-2026 DROPS Design A/S. We reserve all rights. This document, including all its sub-sections, has copyrights. Read more about what you can do with our patterns at the bottom of each pattern on our site. |
|||||||||||||||||||


With over 40 years in knitting and crochet design, DROPS Design offers one of the most extensive collections of free patterns on the internet - translated to 17 languages. As of today we count 324 catalogs and 12290 patterns - 12280 of which are translated into English (US/in).
We work hard to bring you the best knitting and crochet have to offer, inspiration and advice as well as great quality yarns at incredible prices! Would you like to use our patterns for other than personal use? You can read what you are allowed to do in the Copyright text at the bottom of all our patterns. Happy crafting!
Post a comment to pattern DROPS 156-37
We would love to hear what you have to say about this pattern!
If you want to leave a question, please make sure you select the correct category in the form below, to speed up the answering process. Required fields are marked *.