
Popular categories
Looking for a yarn?


Comments / Questions (121)
![]() GILDA wrote:
GILDA wrote:
Adesso è un po più chiaro, ma le maglie che devo mettere sul fermamaglie sono le 10 rimanenti (taglia M) dopo aver terminato l alzata per il collo? e quelle che devo riprendere tra i segnapunti, devo arrivare a 60-90 comprese quelle già esistenti tra il fermamaglia e l alzata?
12.12.2020 - 08:04DROPS Design answered:
Buongiorno Gilda, alla fine dell'alzata deve mettere in sospeso tutte le maglie per proseguire con la lavorazione del bordo, in cui riprenderà le maglie, comprese quelle che ha appena messo in sospeso. Buon lavoro!
12.12.2020 - 11:32
![]() GILDA wrote:
GILDA wrote:
Salve, non mi è chiaro il punto " alzata sul collo"; ho lavorato come indicato, per una taglia M , fino al " lavorare 10 m". quali maglie devo trasferire sul fermamaglie? Tutte? o una parte? quali? Poi dice di riprendere le 60-90 maglie ( ma io ne avevo 55 sul ferro, dopo le diminuzioni per il collo) e i segnapunti dove li dovevo mettere sulla parte finale non accenna a nessun segnapunti.. Insomma la maglia è bellissima, molto fine, ma dovrei terminarla....
11.12.2020 - 08:27DROPS Design answered:
Buongiorno Gilda, dopo aver lavorato l'alzata deve trasferire le maglie su un fermamaglie e poi riprendere le maglie indicate: i segnapunti sono quelli che ha messo all'inizio della lavorazione del corpo. Nelle maglie riprese deve conteggiare anche quelle messe in sospeso. Buon lavoro!
11.12.2020 - 08:46
![]() Petronella Van Hout wrote:
Petronella Van Hout wrote:
Ik krijg de telling voor de raglan niet goed uitgeteld,, kunt u mij deze stap voor stap even uitleggen want er staat in drie keer minderen. de rest is klaar de mouwen zijn al ingebreid maar nu zit ik vast
15.10.2019 - 15:02DROPS Design answered:
Dag Petronella,
Misschien een idee om in Exel of op ruitjes papier alle minderingen voor de raglan uit te schrijven en dan tijdens het breien elke naald afvinken.
15.10.2019 - 15:23
![]() Ellinor Lie wrote:
Ellinor Lie wrote:
Hadde vært greitt om dere hadde forkortelsesforklaringer med hver oppskrift. I dette tilfelle: Hva betyr dette: Hekle 1 fm, * 3 lm, hopp over 1 m/p, 1 fm i ytterste ledd av ytterste neste m/p ? M/P er ikke foklart noe sted!
10.08.2019 - 12:49
![]() Ulla Seppänen wrote:
Ulla Seppänen wrote:
Onko hihan lisäyksessä todella oikein, että lisätään 13 kertaa JOKA krs:lla ne silmukat...? Levenee kyllä liian nopeasti...
22.07.2019 - 07:08DROPS Design answered:
Hei, ohje on oikein.
19.12.2019 - 14:08Oksana wrote:
Please help with this part (in last paragraph of body description): Insert 1 marker in each side of piece in band sts mid front. Work an edge in garter st later between markers. Please specify. thank you!
28.11.2018 - 17:10DROPS Design answered:
Dear Oksana, it means that at the specified point, you have to put a marker into the stitches you knit for the button band. Later you will have to knit an edge of garter stitch, between the two markers. Happy Knitting!
29.11.2018 - 00:47Oksana wrote:
In PATTERN it says: When dec for raglan, dec in sts in pattern A.1. Does it mean decreasing according to "Decreasing tip 1" on outermost sts of the back piece or smth different. Please specify. Thank you!
21.11.2018 - 19:57DROPS Design answered:
Dear Oksana, you decrease for raglan on right front piece before A.2 (at the end of front piece), on back piece: after A.2 at the beginning of back piece and before A.2 at the end of back piece and after A.2 at the beg of left front piece. Happy knitting!
22.11.2018 - 08:52
![]() MaritLW wrote:
MaritLW wrote:
Hva med maskeantallet på ermene? Det stemmer ikke. Hvis du f.eks legger opp 32 m og skal øke tilsammen 13 g. 32 + 26 = 58, IKKE 72 som det står. Kan dere være så snille å rette det opp i alle str?
17.07.2018 - 11:40
![]() Enareth wrote:
Enareth wrote:
Bonjour Drops Design, J'ai fini ce modèle mais j'ai un souci avec l'encolure, les devants sont un peu froncés, ce n'est pas joli. J'ai relevé environ 15 mailles de chaque côté de mes 53 mailles en attente, et pour ajuster à 60 mailles j'ai dû faire beaucoup de diminutions. Est-ce que le problème vient de ces dimunutions ou est-ce que c'est seulement le rang rabattu qui est trop serré? Merci d'avance!!
13.07.2018 - 16:44DROPS Design answered:
Bonjour Mme Enareth, si les devants sont un peu froncés, peut-être aviez vous besoin de faire moins de diminutions et d'avoir plus de 60 m, pour savoir si c'est le rang rabattu qui est trop serré, défaites-le et mettez les mailles en attente sur un fil en les répartissant joliment, si c'est toujours un peu froncé, essayez de diminuer moins, 60 m est un minimum vous pouvez en avoir un peu plus. Bon tricot!
16.07.2018 - 08:03
![]() Katrin wrote:
Katrin wrote:
Hi, Ich habe den Cardigan jetzt fertig, habe es mit 3/4 Ärmeln gestrickt, aber an den Ärmeln ist viel zu viel Platz! Das wirft überall Falten. Ansonsten passt es gut. Ist das Normal? Die Masse stimmen mit der Anleitung überein. So schade, es sieht nicht so gut aus am Ärmel.
09.07.2017 - 12:35
|
||||||||||||||||||||||||||||||||||
Diamonds And Pearls#diamondsandpearlscardigan |
||||||||||||||||||||||||||||||||||
 |
 |
|||||||||||||||||||||||||||||||||
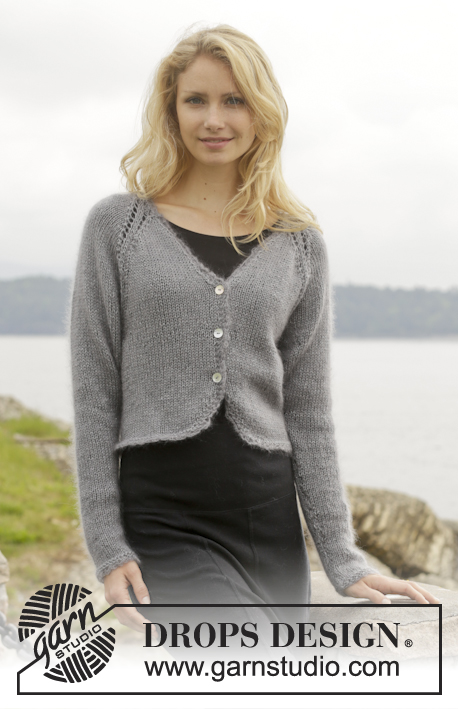
Knitted DROPS bolero with lace pattern and raglan "BabyAlpaca Silk", "Kid-Silk" and "Glitter". Size: S - XXXL.
DROPS 157-12 |
||||||||||||||||||||||||||||||||||
|
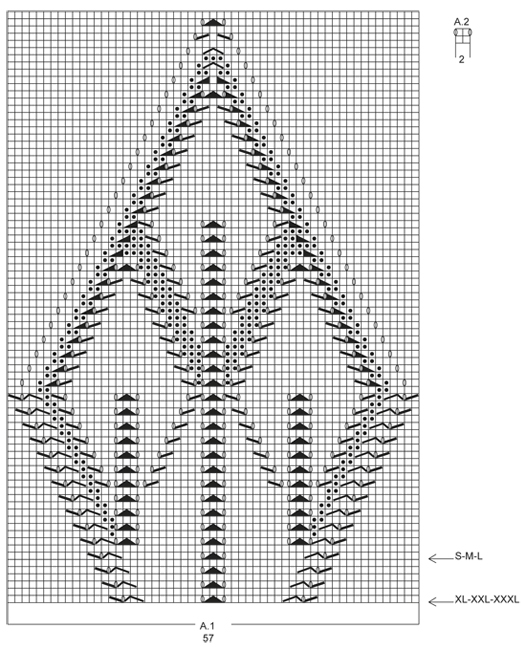
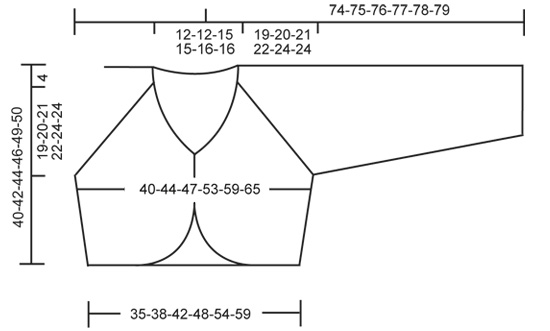
GARTER ST (back and forth on needle): K all rows. 1 ridge = K2 rows. GARTER ST (in the round on double pointed needles): * K 1 round and P 1 round *, repeat from *-*. 1 ridge = 2 rounds. PATTERN: See diagrams A.1-A.2. The diagrams show all rows in pattern seen from RS. When dec for raglan, dec in sts in pattern A.1. NOTE: Do not work YOs twisted, they should make holes. INCREASE TIP 1 (applies to mid front) All inc are done from RS. Inc 1 st by making 1 YO, on next row P YO twisted (i.e. work in back loop of st instead front) to avoid holes. INCREASE TIP 2 (applies to inc in the sides + sleeves) All inc are done from RS. Inc 1 st by making 1 YO before marker, K 1, 1 YO (= 1 st inc on each side of marker). On next row/round K/P YOs twisted to avoid holes. DECREASE TIP 1 (applies to raglan dec): Dec 1 st before A.2 as follows: Work until 3 sts remain before A.2, K 3 tog (i.e. 1 st for raglan and 1 st for YO in A.2 has been dec). Dec 1 st after A.2 as follows: K 3 twisted tog (i.e. 1 st for raglan and 1 st for YO in A.2 has been dec). Dec 2 sts before A.2 as follows: Work until 4 sts remain before A.2, K 4 tog (i.e. 2 sts for raglan and 1 st for YO in A.2 have been dec). Dec 2 st after A.2 as follows: K 4 twisted tog (i.e. 2 st for raglan and 1 st for YO in A.2 has been dec). DECREASE TIP 2 (applies to neck dec): Dec inside 2 band sts in each side. All dec are done from RS! Dec after 2 band sts as follows: Slip 1 st as if to K, K 1, psso. Dec as follows before 2 band sts: K 2 tog. BUTTONHOLES: Dec for buttonholes on right band. 1 buttonhole = K tog third and fourth st from edge and make 1 YO. Dec for buttonholes when piece measures (measured from cast-on edge): SIZE S: 7, 13 and 19 cm / 2¾",5",7½" SIZE M: 8, 14 and 20 cm / 3",5½",8" SIZE L: 7, 14 and 21 cm / 2¾",5½",8¼" SIZE XL: 8, 15 and 22 cm / 3",6",8¾" SIZE XXL: 7, 15 and 23 cm / 2¾",6",9" SIZE XXXL: 8, 16 and 24 cm / 3",6¼",9½" ---------------------------------------------------------- BODY: Worked back and forth on circular needle to make room for all the sts. Cast on 105-117-129-149-169-189 sts on circular needle size 5 mm / US 8 with 1 strand of each yarn (= 3 strands). Work 1 ridge in GARTER ST - see explanation above. P 1 row from WS with 2 edge sts in garter st in each side of piece. Then work as follows from RS: 2 sts in garter st (= band sts), 21-24-27-32-37-42 sts in stockinette st (= right front piece), insert 1 marker, 1-4-7-12-17-22 sts in stockinette st, A.1 (= 57), 1-4-7-12-17-22 sts in stockinette st (= back piece), insert 1 marker, 21-24-27-32-37-42 in stockinette st, finish with 2 sts in garter st (= band sts). Work band sts in garter st until finished measurements. Work 2 rows in garter st, stockinette st and A.1. REMEMBER THE GAUGE! READ ALL OF THE FOLLOWING SECTION BEFORE CONTINUING! INC MID FRONT AND IN THE SIDES AT THE SAME TIME AS FOLLOWS: INC MID FRONT: Inc 1 st in each side of piece inside 2 band sts - READ INCREASE TIP 1. Repeat inc every row from RS 7 more times. Work inc sts in stockinette st. Remember BUTTONHOLES - see explanation above. INC IN THE SIDES: When piece measures 3-3-4-4-5-5 cm / 1⅛"-1⅛"-1½"-1½"-2"-2", inc 1 st on each side of markers (= 4 sts inc) – see INCREASE TIP 2. Repeat inc every 3 cm / 1" 4 more times. Work inc sts in stockinette st. When all inc are done there are 141-153-165-185-205-225 sts. Continue in garter st, stockinette st and A.1 until piece measures 17-18-19-20-21-22 cm / 6¾"-7"-7½"-8"-8¼"-8¾". Then bind off 3 sts on each side of each marker for sleeve = 129-141-153-173-193-213 sts (= 33-36-39-44-49-54 sts on each front piece and 63-69-75-85-95-105 sts on back piece). Insert 1 marker in each side of piece in band sts mid front. Work an edge in garter st later between markers. Put piece aside and knit the sleeves. SLEEVE: Worked in the round on double pointed needles. Cast on 32-34-36-38-40-42 sts on double pointed needles size 5 mm / US 8 with 1 strand of each yarn (= 3 strands). Work 1 ridge in GARTER ST - see explanation above. Insert 1 marker at the beg of the round. Then work piece in stockinette st. When piece measures 11 cm / 4½", inc 1 st on each side of marker - remember INCREASE TIP 2! Repeat inc every 4-4-3½-3-2½-2½ cm / 1½"-1½"-1¼"-1"-⅞"-⅞" 6-6-7-8-9-9 more times. Switch to circular needle when needed. Then inc 1 st on each side of marker every round 13 times in total = 72-74-78-82-86-88 sts. Work until piece measures 45-45-44½-44½-44-44 cm / 17¾"-17¾"-17½"-17½"-17¼"-17¼". Then bind off 6 sts mid under sleeve (i.e. Bind off 3 sts on each side of marker) = 66-68-72-76-80-82 sts. Put piece aside and make another sleeve. YOKE: Slip sleeves on to same circular needle as body where armholes were bind off = 261-277-297-325-353-377 sts. Work as follows from WS: Work 2 sts in garter st (= band sts), 31-34-37-42-47-52 sts in stockinette st (= left front piece), A.2 (= 2 sts), 62-64-68-72-76-78 sts in stockinette st, A.2 (= left sleeve), stockinette st and A.1 as before over back piece (= 63-69-75-85-95-105 sts), A.2, 62-64-68-72-76-78 sts in stockinette st, A.2 (= right sleeve), 31-34-37-42-47-52 stockinette st, finish with 2 sts in garter st (= band sts). Continue as before in garter st, stockinette st, A.1 and A.2 AT THE SAME TIME dec for raglan – read DECREASE TIP 1. Dec is different on sleeves/back piece and front piece. ON SLEEVE/BACK PIECE: Dec 1 st on every row from RS 21-22-23-24-26-27 times = 24-24-26-28-28-28 sts on each sleeve and 21-25-29-37-43-51 sts on back piece. ON FRONT PIECE: Dec 1 st on every row from RS 19-19-19-16-16-13 times, then 2 sts on every row from RS 2-3-4-8-10-14 times, i.e. on last dec, dec 1 band st. AT THE SAME TIME on 6th row in raglan dec 1 st for neck inside the 2 band sts in garter st in each side of piece – READ DECREASE TIP 2, repeat after 6th row 1 more time, then dec every 4th row 7-7-7-8-9-10 times, then every other row 0-1-2-1-1-0 times. After all dec on front piece 1 band st remains on front piece. On the next 2 rows, bind off the 1 band st and A.2 (= 2 sts) in each side of piece. After all bind off and dec are done, 65-69-77-89-95-103 sts remain on needle. Now work an elevation in the neck as follows: Size S-M-L: Now continue piece in stockinette. Work 1 row over all sts AT THE SAME TIME dec 12-14-18 sts evenly = 53-55-59 sts. Work 26-27-29 sts (= mid back), turn piece. Work 15-16-20 sts, turn piece and work 30-32-40 sts, turn piece. Work 24-26-32 sts, turn piece and work 18-20-24 sts, turn piece. Work 14-15-17 sts, turn piece and work 10 sts. Cut the yarn and slip sts on a stitch holder. Size XL-XXL-XXXL: Continue raglan dec until sts have been slipped on a stitch holder (i.e. dec 1 st on each side of A.2 where it is possible). AT THE SAME TIME work an elevation as follows: * Work the first 6 sts, then slip them on a stitch holder and work the rest of the row. Do the same in the opposite side of the piece *, repeat from *-* 2 more times. Cut the yarn and slip the remaining sts on a stitch holder. Then pick up approx. 60-90 sts (includes sts from stitch holder) between markers on body. Work 1 ridge AT THE SAME TIME on 1st row adjust no of sts to 60-62-70-74-82-82. Bind off. EDGE: Crochet edge around front piece, the neck and in bottom edge of back piece and in sleeve edge on hook size 5 mm / H/8 with 1 strand Kid-Silk. Work 1 sc, * ch 3, skip 1 st/row, 1 sc in outer loop of outermost next st/row *, repeat from *-* around opening. Finish with 1 sl st in first sc. Fasten off. ASSEMBLY: Sew tog under sleeves. Sew the buttons on to left front piece. |
||||||||||||||||||||||||||||||||||
Diagram explanations |
||||||||||||||||||||||||||||||||||
|
||||||||||||||||||||||||||||||||||
 |
||||||||||||||||||||||||||||||||||
 |
||||||||||||||||||||||||||||||||||
Have you finished this pattern?Tag your pictures with #dropspattern #diamondsandpearlscardigan or submit them to the #dropsfan gallery. Do you need help with this pattern?You'll find 33 tutorial videos, a Comments/Questions area and more by visiting the pattern on garnstudio.com. © 1982-2026 DROPS Design A/S. We reserve all rights. This document, including all its sub-sections, has copyrights. Read more about what you can do with our patterns at the bottom of each pattern on our site. |
||||||||||||||||||||||||||||||||||


With over 40 years in knitting and crochet design, DROPS Design offers one of the most extensive collections of free patterns on the internet - translated to 17 languages. As of today we count 324 catalogs and 12290 patterns - 12280 of which are translated into English (US/in).
We work hard to bring you the best knitting and crochet have to offer, inspiration and advice as well as great quality yarns at incredible prices! Would you like to use our patterns for other than personal use? You can read what you are allowed to do in the Copyright text at the bottom of all our patterns. Happy crafting!
Post a comment to pattern DROPS 157-12
We would love to hear what you have to say about this pattern!
If you want to leave a question, please make sure you select the correct category in the form below, to speed up the answering process. Required fields are marked *.