
Popular categories
Looking for a yarn?


Comments / Questions (23)
![]() Maria Van Gils wrote:
Maria Van Gils wrote:
Har svårt förstå hur man ska kunna sticka fram och tillbaka med rundsticka samtidigt som ärmen sitter fast i resten? Blir det inte väldigt mycket uttöjt när man ska vända?
05.04.2021 - 17:22DROPS Design answered:
Hej Maria, sæt ærmerne på en tråd når du strikker bolen :)
06.04.2021 - 14:16
![]() Antonella wrote:
Antonella wrote:
Complimenti vivissimi per il vostro sito ,lo sto ammirando ora da Pinterest,peccato che io con i ferri sia negata so fare solo dritto e rovescio,ma non si sa mai che impari a fare qualcosa in più.Bravi continuate così ancora complimenti e Buon Anno:-)
30.12.2018 - 10:26
![]() Mariola wrote:
Mariola wrote:
Hola, podría aclararme qué significa«montar 6 puntos bajo la manga» es al final del canesú. Esos puntos son para la manga o para el delantero? Muchas gracias
07.11.2018 - 23:31DROPS Design answered:
Hola Mariola. Los puntos que montamos bajo la manga forman parte de la sisa (la mitad de los puntos es para el delantero y la otra mitad para la espalda). Al finalizar la chaqueta cosemos estos puntos con los puntos de la parte bajo la manga.
11.11.2018 - 19:17
![]() Anne wrote:
Anne wrote:
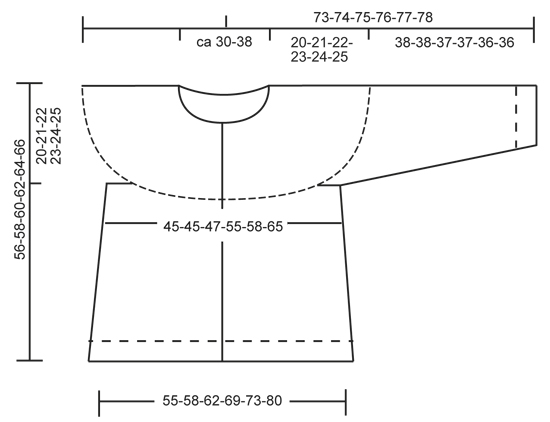
Sur le patron on lit que le gilet fait entre 56 et 66cm de long. Sur la photo in a l'air bcp plus long... Où est l'erreur?
19.06.2016 - 18:43DROPS Design answered:
Bonjour Anne, les mesures du schéma sont correctes, le gilet mesure 56-66 cm de l'épaule jusqu'en bas. Bon tricot!
20.06.2016 - 08:57
![]() Herma wrote:
Herma wrote:
Ik wil het vest breien van cloud ,hoeveel gram heb ik nodig ?( maat S )
25.01.2016 - 14:33DROPS Design answered:
Hoi Herma. Lees hier hoe je de hoeveelheid kan berekenen. Veel breiplezier.
26.01.2016 - 14:41Carmelita wrote:
Er is mij gevraag om DROPS 158-27 te breien in maat XS. Kunt u mij uitleggen hoe ik de berekening moet maken in die maat? (qua minderringen,meerderingen en cm)
20.01.2016 - 09:34DROPS Design answered:
Hoi Carmelita. Ik kan helaas niet helpen met individuele aanpassingen op de gratis patronen.
20.01.2016 - 15:26
![]() Ingrid Pedersen wrote:
Ingrid Pedersen wrote:
Jeg har lige trævlet cardiganen op igen, fordi pasformen var helt forkert. Efter vask blev den alt for lang, og den faldt ned over skuldrene.øv. Den så fin ud. Men spild af mange timers strikning.
19.12.2015 - 13:26
![]() Heike Olbrich wrote:
Heike Olbrich wrote:
Welcher Kleidergröße entspricht bei diesem Modell die Gr. L?
12.10.2015 - 12:30DROPS Design answered:
Schauen Sie sich am besten die Maßskizze unterhalb der Anleitung an, dort sind alle wichtigen Maße eingezeichnet und Sie können sehen und messen, ob Größe L zu Ihren Maßen passt.
13.10.2015 - 17:42
![]() Sabine wrote:
Sabine wrote:
Bonjour, je voudrai réaliser ce gilet en fil "peak" en taille XL. pouvez-vous svp me combien de pelote je dois commander ? d'avance merci :) !
06.09.2015 - 10:39DROPS Design answered:
Bonjour Sabine, cliquez ici pour calculer la quantité nécessaire en Peak. Rappelez-vous que votre magasin DROPS saura également vous aider si besoin. Bon tricot!
07.09.2015 - 13:27
![]() Isa wrote:
Isa wrote:
Bonsoir, je fais ce gilet en taille XXL et, à la fin de l'empiècement, j'ai 212 mailles, soit 84m+88 (11*8m)+36(3*12m)+4(2*2m). Comment trouvez-vous 220m svp ? Je lis et relis et je ne trouve pas mon erreur de 8m...
17.08.2015 - 22:31DROPS Design answered:
Bonjour Isa, en taille XXL, on augmente 12 fois 8 m au total au début de l'empiècement: 1ère augm + encore 11 fois, soit: 84 + (12x8) + 36 (3*12) + 4 (2x2)= 220 m. Bon tricot!
18.08.2015 - 09:34
|
|
Ruby My Dear#rubymydearcardigan |
|
|
|
|
Knitted DROPS jacket in garter st with round yoke, worked top down in "Andes". Size: S - XXXL.
DROPS 158-27 |
|
|
GARTER ST (back and forth on needle): K all rows. 1 ridge = K2 rows. INCREASE TIP: Inc 1 st by making a YO. On next row K YO twisted (i.e. work in back loop of st instead of front) to avoid holes. DECREASE TIP: Dec 1 st before marker as follows: Work until 2 sts remain before marker, slip 1 st as if to K, K 1, psso. Dec 1 st after marker as follows: K 2 tog. BUTTONHOLES: Dec for buttonholes on right band. 1 buttonhole = bind off 3rd st from mid front and cast on 1 new st on next row over this st.Dec for buttonholes when piece measures: SIZE S: 2, 10, 18, 26 and 34 cm / ¾", 4", 7", 10¼", 13½" SIZE M: 2, 10, 18, 26 and 34 cm / ¾", 4", 7", 10¼", 13½" SIZE L: 2, 10, 18, 26 and 34 cm / ¾", 4", 7", 10¼", 13½" SIZE XL: 2, 11, 20, 29 and 38 cm / ¾", 4½", 8", 11½", 15" SIZE XXL: 2, 11, 20, 29 and 38 cm / ¾", 4½", 8", 11½", 15" SIZE XXXL: 2, 11, 20, 29 and 38 cm / ¾", 4½", 8", 11½", 15" ---------------------------------------------------------- JACKET: Worked top down, back and forth on circular needle. YOKE: Cast on 79-79-82-82-85-85 sts (includes 5 band sts in each side of piece) on circular needle size 7 mm / US 10.75 with Andes. Work 5 band sts in GARTER ST - see explanation above - rib = K 1/P 2 until 5 sts remain, finish with 5 band sts in garter st. Continue like this until piece measures 2 cm / ¾". Remember BUTTONHOLES - see explanation above. Switch to circular needle size 8 mm / US 11. Then work piece in garter st. On 1st row dec 3-3-2-2-1-1 st evenly = 76-76-80-80-84-84 sts. REMEMBER THE GAUGE! On next row from RS insert 8 markers in the piece as follows: 5 band sts in garter st, K 10-10-11-11-12-12, insert 1st marker, K 2 (= left front piece), insert 2nd marker, K 9 (= sleeve), insert 3rd marker, K 2, insert 4th marker, K 20-20-22-22-24-24, insert 5th marker, K 2 (= back piece), insert 6th marker, K 9 (= sleeve), insert 7th marker, K 2, insert 8th marker, K 10-10-11-11-12-12, finish with 5 band sts in garter st (= right front piece). Then inc 1 st – READ INCREASE TIP, before 1st-3rd-5th and 7th marker and after 2nd-4th-6th and 8th marker (= 8 sts inc). Repeat inc every 4th row 9-9-9-10-11-12 more times. AT THE SAME TIME when piece measures 4-3-2-2-2-1½ cm / 1½"-1"-¾"-¾"-¾"-½", inc as follows: Inc 0-0-0-1-1-2 sts evenly on each front piece (NOTE: Do not inc over band sts), 3-4-4-4-4-4 sts on each sleeve and 0-0-0-2-2-4 sts evenly on back piece. Repeat inc evenly every 8 cm / 3⅛" 2 more times. When piece measures 19 cm / 7½", inc 1-0-2-2-2-2 sts evenly on each sleeve. When all inc are done there are 176-180-188-208-220-240 sts on needle. Then work in garter st until piece measures 20-21-22-23-24-25 cm / 8"-8¼"-8¾"-9"-9½"-9¾". Work next row as follows: Work 5 band sts in garter st, K 22-22-23-27-29-33 sts, slip the next 39-41-43-45-47-49 sts on a stitch holder for sleeve, cast on 6 new sts, insert 1 marker in the middle of the new sts, work the next 44-44-46-54-58-66 sts, slip the next 39-41-43-45-47-49 sts on a stitch holder for sleeve, cast on 6 new sts under sleeve, insert 1 marker in the middle of the new sts, K 22-22-23-27-29-33, finish with 5 band sts in garter st = 110-110-114-130-138-154 sts. NOW MEASURE PIECE FROM HERE! BODY: When piece measures 3 cm / 1", inc 1 st on each side of markers (= 4 sts inc). Repeat inc every 6-4-4-4-4-4 cm / 2½"-1½"-1½"-1½"-1½"-1½" 4-6-7-7-7-7 more times = 130-138-146-162-170-186 sts. When piece measures 34-35-36-37-38-39 cm / 13⅜"-13¾"-14¼"-14½"-15"-15¼", inc 6-4-5-4-5-4 st evenly = 136-142-151-166-175-190 sts. Switch to circular needle size 7 mm / US 10.75 and work rib K 1/P 2 with 5 band sts in garter st in each side of piece. Bind off when piece measures 36-37-38-39-40-41 cm / 14¼"-14½"-15"-14¼"-15¾"-16⅛". SLEEVE: The sleeve is worked back and forth on circular needle. Slip the 39-41-43-45-47-49 sts from stitch holder back on circular needle size 8 mm / US 11. Cast on 3 sts in each side of piece at the end of the next 2 rows = 45-47-49-51-53-55 sts. Work in garter st. When piece measures 3 cm / 1", dec 1 st in each side of piece. Repeat dec every 3-3-3-2½-2½-2½ cm / 1⅛"-1⅛"-1⅛"-⅞"-⅞"-⅞" 8-8-8-9-9-10 more times = 27-29-31-31-33-33 sts. Work in garter st until piece measures 35-35-34-34-33-33 cm / 13¾"-13¾"-13½"-13½"-13"-13". Then inc 3-4-5-5-6-6 sts evenly = 30-33-36-36-39-39 sts. Switch to circular needle size 7 mm / US 10.75. Work rib = K 1/P 2. Bind off when piece measures 38-38-37-37-36-36 cm / 15"-15"-14½"-14½"-14¼"-14¼" (shorter measurements in the larger sizes because of wider shoulders). Work the other sleeve the same way. ASSEMBLY: Sew sleeve seams in outer loops of edge sts. Sew tog under sleeves. Sew the buttons on to the left band. |
|
 |
|
Have you finished this pattern?Tag your pictures with #dropspattern #rubymydearcardigan or submit them to the #dropsfan gallery. Do you need help with this pattern?You'll find 24 tutorial videos, a Comments/Questions area and more by visiting the pattern on garnstudio.com. © 1982-2026 DROPS Design A/S. We reserve all rights. This document, including all its sub-sections, has copyrights. Read more about what you can do with our patterns at the bottom of each pattern on our site. |


With over 40 years in knitting and crochet design, DROPS Design offers one of the most extensive collections of free patterns on the internet - translated to 17 languages. As of today we count 325 catalogs and 12298 patterns - 12288 of which are translated into English (US/in).
We work hard to bring you the best knitting and crochet have to offer, inspiration and advice as well as great quality yarns at incredible prices! Would you like to use our patterns for other than personal use? You can read what you are allowed to do in the Copyright text at the bottom of all our patterns. Happy crafting!
Post a comment to pattern DROPS 158-27
We would love to hear what you have to say about this pattern!
If you want to leave a question, please make sure you select the correct category in the form below, to speed up the answering process. Required fields are marked *.