
Popular categories
Looking for a yarn?


Comments / Questions (178)
![]() Pascale wrote:
Pascale wrote:
Bonjour. A la fin des augumentations raglan, j'obtient un total de 328 mailles sur le modèle large. Est-ce que c'est normal ou je dois tout recommencer? Merci de votre réponse.
29.09.2015 - 17:04DROPS Design answered:
Bonjour Pascale, en taille L, on doit avoir 325 m quand toutes les augmentations du raglan sont faites: on commence avec 133 m et on augmente 8 m pour le raglan (2 m à chaque marqueur) 4 fois tous les rangs et 20 fois tous les 2 rangs soit: 133 + (4x8) + (20x8) = 325 m. Bon tricot!
30.09.2015 - 09:12
![]() Sigrid wrote:
Sigrid wrote:
Volgens het patroon moet je voor de raglan 2st meerderen voor de markeerder? Moet ik niet telkens 1 st voor en na de markeerder meerderen?
26.09.2015 - 18:14DROPS Design answered:
Hoi Sigrid. Nee, je breit tot 1 st voor de markeerder en breit: 1 omsl, 2 r, 1 omsl, dan zit de markeerder tussen de 2 r en heb je 1 st gemeerderd voor en na.
14.10.2015 - 13:52
![]() Francoise wrote:
Francoise wrote:
Est t il dur comme modele merci
02.09.2015 - 20:30
![]() Anja wrote:
Anja wrote:
Gerade die Jacke fertig gestrickt, ist supertoll geworden. Noch eine Anmerkung: Ich habe die Jacke in Gr. L genau nach Anleitung (alle Maße eingehalten) und mit Drops Nepal gestrickt, leider sind ganze 4 Knäuel (200g) übrig geblieben! Das ist ein bißchen viel, würde die Mengenangaben nochmal überprüfen!
31.07.2015 - 15:34DROPS Design answered:
Liebe Anja, haben Sie denn auch die Maschenprobe eingehalten oder ist sie etwas fester geworden? Wobei Sie ja schreiben, dass Sie alle Maße eingehalten haben, also wohl auch die Breitenmaße? Stöbern Sie doch einfach für das Restgarn in den Accessoires, dort kommen Sie oft mit 200g Nepal aus, dann haben Sie eine schöne Resteverwertung.
01.08.2015 - 09:56
![]() Anja wrote:
Anja wrote:
Erst mal vielen Dank für die wunderbare Anleitung! Meine Schwester hat sich sofort in die Jacke verliebt und ich stricke sie ihr gerade. Hier mein Frage: Kann man nicht die 10 Maschen, die für den Arm aufgenommen werden sollen, direkt aus den 10 abgenommenen Maschen der Vorreihe stricken? So würde kein Loch enstehen, was man später zunähen muß.
10.07.2015 - 17:32DROPS Design answered:
Es wird etwas stabiler, wenn man die Nähte durch Zusammennähen schließt, aber Sie können theoretisch die M auch direkt auffassen, wie von Ihnen beschrieben. Es kann dann allerdings auch etwas unbequemer beim Stricken werden, weil Sie ja mehr Gewicht an der Nadel hängen haben.
13.07.2015 - 09:12
![]() Simone Vollmer wrote:
Simone Vollmer wrote:
Vielen Dank! Werde die Zunahmen frisch machen, damit am Schluss alles perfekt ist! Lieben Dank für die rasche Antwort. Hab Eure Seite schon weiterempfohlen😀
22.06.2015 - 08:30
![]() Simone Vollmer wrote:
Simone Vollmer wrote:
Ich bins nochmal. Ich arbeite die Grösse S. Bei den Raglanzunahmen heisst es: bei den Hinreihen je 8 M zunehemen, und das 21 mal. Ich komme auf 288 M und bin bei 20 mal. Liegt der Fehler vielleicht bei Euch???
21.06.2015 - 19:17DROPS Design answered:
Nein, die Rechnung in der Anleitung stimmt. Sie haben 112 M und nehmen insgesamt 22 x zu (1x am Anfang, dann 21x in jeder 2. R), also 22 x 8 M = 176 M, + 112 M = 288 M. Und noch ein Tipp, wenn Sie die Raglanpasse noch mal neu stricken sollten: Messen Sie zwischendurch ab und bauen Sie ggf. gegen Ende der Raglanzunahmen noch 2 Zwischenreihen ohne Zunahmen ein (d.h. am Ende 1x in der 4. R zunehmen statt in der 2.), wenn Sie merken, dass Sie die erforderliche Höhe nicht ganz erreichen.
21.06.2015 - 19:40
![]() Simone Vollmer wrote:
Simone Vollmer wrote:
Hallo zusammen. Habe nun die Raglanzunahem fertig, habe in jeder Hinreihe diese 8 M zugenommen, ausser die am Anfang. Da wR es ja eine hin und eine zurück je 8, richtig? Ich komme nur auf 18 cm. (Bei der Kapuze haben die 38 cm gestimmt) Soll ich nun einfach 2 cm stricken ohne Zunahmen, damit es aufgeht? Lieben Dank für Eure Hilfe. Simone Vollmer
21.06.2015 - 12:37DROPS Design answered:
Sie nehmen in der Rück-R am Anfang nicht zu. Für Größe S machen Sie die für "jede R" beschriebene Zunahme ja nur 1x, also nur in der Hin-R, dann folgen die nächsten Zunahmen im Abstand von 2 R. Sie haben also am Anfang etwas zu "eng" zugenommen, was dann auch erklärt, dass Sie die erforderliche Höhe noch nicht erreicht haben. Sie können nun entweder tatsächlich etwas "pfuschen", indem Sie 2 cm ohne Zunahmen stricken, allerdings geht dann die Raglanlinie optisch nicht bis ganz unten zum Armausschnitt, sondern endet eher, der Sitz ändert sich dadurch auch leicht. Besser ist auf jeden Fall, den Fehler zu beheben... Nicht, dass Sie sich sonst hinterher ärgern.
21.06.2015 - 19:46
![]() Simone Vollmer wrote:
Simone Vollmer wrote:
Oh ich hab rausgefunden, den Fehler von der Frage vom 31.5.15 Liebe Grüsse
01.06.2015 - 21:50DROPS Design answered:
Viel Spaß beim Weiterstricken!
02.06.2015 - 23:42
![]() Simone Vollmer wrote:
Simone Vollmer wrote:
Hallo! Bin nun bei den Raglanzunahmen. Läuft soweit toll. Die Borte im Bambusmuster sollte am Schluss 38 M breit sein, richtig? Auf beiden Seiten? Am Anfang der Hinreihe wo dann die Zunahmen stattfinden, klappt das super, aber am Ende hab ichs auf 2M( ein Bambusraport) geschafft. Es werden einfach nicht mehr und ich sehe nicht wo der Fehler liegen könnte. Andernfalls wäre das so ja auch nicht schlimm. Könnt ihr mir helfen?! Thanks a lot, Simone
31.05.2015 - 20:38
|
|
Snow Princess#snowprincessjacket |
|
 |
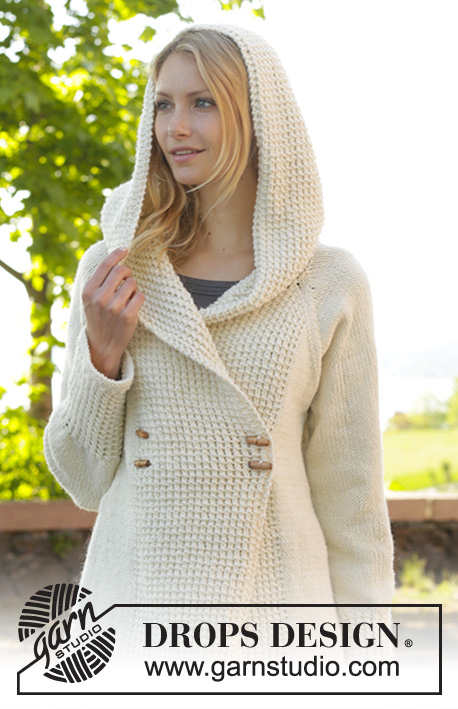 |
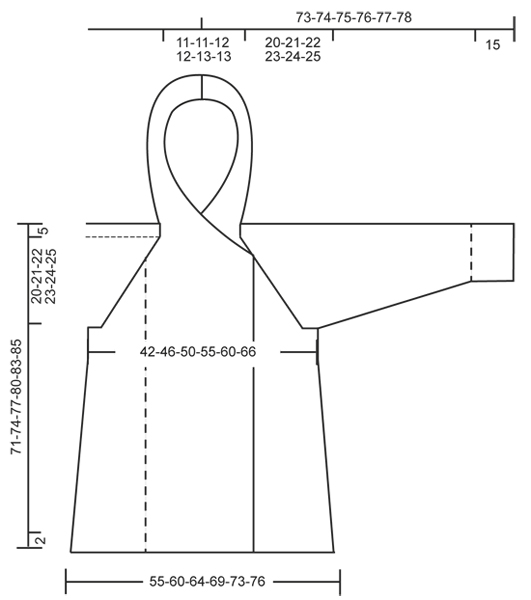
Knitted DROPS jacket with raglan, hood and bamboo pattern, worked top down in ”Nepal”. Size: S - XXXL.
DROPS 156-1 |
|
|
GARTER ST (back and forth on needle): K all rows. 1 ridge = K2 rows. GARTER ST (in the round on double pointed needles): * K 1 round and P 1 round *, repeat from *-*. 1 ridge = 2 rounds. BAMBOO PATTERN (back and forth on needle): Row 1 (= RS): * 1 YO, K 2, pass YO over 2 K sts *, repeat from *-*. Row 2 (= WS): P all sts. Repeat rows 1 and 2. BAMBOO PATTERN (in the round on double pointed needles): Round 1: * 1 YO, K 2, pass YO over 2 K sts *, repeat from *-*. Round 2: K all sts. Repeat rounds 1 and 2. DECREASE TIP: Dec 1 st before marker as follows: Work until 2 sts remain before marker, slip 1 st as if to K, K 1, psso. Dec 1 st after marker as follows: K 2 tog. RAGLAN: Inc as follows at every marker: Work until 1 st remains before marker, 1 YO, K 2, 1 YO = 2 sts inc. Repeat at the remaining markers in piece = 8 sts inc on needle. On next row work YOs twisted (i.e. work in back loop of st instead of front) to avoid holes. ---------------------------------------------------------- JACKET: Worked back and forth, top down on circular needle/double pointed needles. HOOD: Cast on 116 sts in all sizes (includes 2 edge sts in GARTER ST – see explanation above, in each side of piece) on circular needle size 5 mm / US 8 with Nepal. Work 1 ridge in garter st. Then work BAMBOO PATTERN back and forth – see explanation above, with 2 edge sts in garter st in each side (continue the 2 edge sts in garter st in each side until finished measurements). REMEMBER THE GAUGE! When piece measures 38 cm / 15", work as follows from RS: Pattern as before over the first 30-32-36-40-44-48 sts, garter st over the next 56-52-44-36-28-20 sts AT THE SAME TIME dec 12-11-10-6-4-0 sts evenly, pattern over the remaining 30-32-36-40-44-48 sts = 104-105-106-110-112-116 sts. Continue back and forth until 3 ridges have been worked over the middle sts, AT THE SAME TIME on 2nd row from RS inc 4-8-14-19-25-32 sts evenly over sts in garter st, and on 3rd row from RS inc 4-7-13-18-25-31 sts evenly over sts in garter st = 112-120-133-147-162-179 sts. Now work an elevation in back of neck in garter st as follows from RS: Work until 30-32-36-40-44-48 sts remain, turn, work until 30-32-36-40-44-48 sts remain, turn, work until 40-42-46-50-55-58 sts remain, turn, work until 40-42-46-50-55-58 sts remain, turn, work until 50-52-56-60-65-68 sts remain, turn, work until 50-52-56-60-65-68 sts remain, turn, work until 55-57-61-65-70-73 sts remain, turn, work until 55-57-61-65-70-73 sts remain, turn and work the rest of row (pattern over the last 30-32-36-40-44-48 sts). YOKE: Now work pattern as before over the first 30-32-36-40-44-48 sts, 1 st in stockinette st, insert 1st marker here, stockinette st over the next 15 sts, insert 2nd marker here, stockinette st over the next 20-24-29-35-42-51 sts, insert 3rd marker here, stockinette st over the next 15 sts, insert 4th marker here, 1 st in stockinette st, pattern as before over the remaining 30-32-36-40-44-48 sts. Now start inc for RAGLAN – see explanation above! Repeat inc every row 1-1-4-6-8-10 times (i.e. from RS and WS), and every row from RS 21-22-20-19-18-17 times = 288-304-325-347-370-395 sts. NOTE: Work the new inc sts on back piece and sleeves in stockinette st, and work the first 8 new inc sts on front piece in bamboo pattern (i.e. inc 2 sts before there is enough sts to work bamboo pattern), then work the remaining inc sts in stockinette st. Piece now measures 20-21-22-23-24-25 cm / 8"-8¼"-8¾"-9"-9½"-9¾" (measure from 1st row after edge in garter st at the back). Now work next row as follows: Work the first 52-55-60-65-70-75 sts, slip the next 61-63-65-67-69-71 sts on a stitch holder for sleeve, cast on 10 new sts under sleeve (insert a marker in the middle of the new sts), work the next 62-68-75-83-92-103 sts, slip the next 61-63-65-67-69-71 sts on a stitch holder for sleeve, cast on 10 new sts under sleeve (insert a marker in the middle of the new sts), work the remaining 52-55-60-65-70-75 sts. There are now 186-198-215-233-252-273 sts for body. NOW MEASURE PIECE FROM HERE! BODY: Continue back and forth with pattern as before. Work the new sts under sleeve in stockinette st. When piece measures 4 cm / 1½" from marker under sleeves, inc 1 st on each side of each marker as follows: Work until 1 st before first marker, 1 YO, 2 sts in stockinette st, 1 YO, repeat at the other marker = 190-202-219-237-256-277 sts. Repeat inc every 3½-3½-3½-4-4½-6 cm / 1¼"-1¼"-1¼"-1½"-1¾"-2½" 11-12-12-12-11-8 more times = 234-250-267-285-300-309 sts. When piece measures 46-48-50-52-54-55 cm / 18"-19"-19¾"-20½"-21¼"-21½" from marker under sleeves, work 3 ridges. Loosely bind off. SLEEVE: Worked in the round on double pointed needles. Slip sts from stitch holder back on double pointed needles size 5 mm / US 8. Work 1 row from RS and cast on 10 new sts under sleeve (insert a marker in the middle of the new sts) = 71-73-75-77-79-81 sts. NOW MEASURE THE PIECE FROM HERE. When piece measures 4 cm / 1½", beg dec on each side of marker - READ DECREASE TIP. Repeat dec every 2-2-2-1½-1½-1½ cm/ ¾"-¾"-¾"-½"-½"-½" 12-13-13-14-14-15 more times = 45-45-47-47-49-49 sts. When piece measures 32-32-32-32-31-31 cm / 12½"-12½"-12½"-12½"-12¼"-12¼", inc 3 sts evenly in all sizes = 48-48-50-50-52-52 sts. Now work BAMBOO PATTERN in the round on double pointed needles - see explanation above. When piece measures 47-47-47-47-48-48 cm / 18½"-18½"-18½"-18½"-19"-19", dec 4 sts in all sizes = 44-44-46-46-48-48 sts. Work 3 ridges in GARTER ST in the round on double pointed needles - see explanation above. Bind off. ASSEMBLY: Sew the holes under the sleeves. Sew tog hood st by st in cast-on edge. Sew on buttons on section with bamboo pattern on left front piece as follows: Sew 1 button approx. 2 cm / ¾" in from edge and 43-45-47-49-51-53 cm / 17"-17¾"-18½"-19¼"-20"-21" from bind-off edge and 1 button 47-49-51-53-55-57 cm / 18½"-19¼"-20"-21"-21⅝"-22½" from bind-off edge. Repeat in the other side of section with bamboo pattern. Button through a hole in bamboo texture. |
|
 |
|
Have you finished this pattern?Tag your pictures with #dropspattern #snowprincessjacket or submit them to the #dropsfan gallery. Do you need help with this pattern?You'll find 27 tutorial videos, a Comments/Questions area and more by visiting the pattern on garnstudio.com. © 1982-2026 DROPS Design A/S. We reserve all rights. This document, including all its sub-sections, has copyrights. Read more about what you can do with our patterns at the bottom of each pattern on our site. |
|


With over 40 years in knitting and crochet design, DROPS Design offers one of the most extensive collections of free patterns on the internet - translated to 17 languages. As of today we count 325 catalogs and 12298 patterns - 12288 of which are translated into English (US/in).
We work hard to bring you the best knitting and crochet have to offer, inspiration and advice as well as great quality yarns at incredible prices! Would you like to use our patterns for other than personal use? You can read what you are allowed to do in the Copyright text at the bottom of all our patterns. Happy crafting!
Post a comment to pattern DROPS 156-1
We would love to hear what you have to say about this pattern!
If you want to leave a question, please make sure you select the correct category in the form below, to speed up the answering process. Required fields are marked *.