
Popular categories
Looking for a yarn?


Comments / Questions (178)
![]() Mette wrote:
Mette wrote:
Hej jeg er i gang med at strikke den skønhed i str. xl og er i gang men raglan. jeg er blevet i tvivl om jeg skal strikke mønster mens jeg strikker rangler eller om det først skal gøres efter de 23 cm?
30.09.2017 - 12:20DROPS Design answered:
Hej Mette, ja den er bare så flot. Jo du skal fortsætte med mønsteret så langt du kan. God fornøjelse!
03.10.2017 - 11:52
![]() Lucka L. wrote:
Lucka L. wrote:
Hello, I would like to ask how many (approximately) skeins of that yarn were used and I'd like to know which difficulty this pattern has. Thank you for your answer :)
04.08.2017 - 20:30DROPS Design answered:
Dear Lucka, the pattern uses 22-24-27-29-32-35 balls of DROPS Nepal yarn. As for difficulty, some experience with shaping (increases and decreases) are useful, so I would say, while it is not very complicated peace, it is somehwat above the beginner, maybe advanced beginner level. I hope this helps. Happy Knitting!
06.08.2017 - 10:10
![]() Bettina Sørvin wrote:
Bettina Sørvin wrote:
Hej ! Jeg er nået til udtagningerne på ryg/forstykker. De efterlader huller hele vejen ned. Er det meningen ? Jeg tænker at enten skal jeg lave udtagningerne anderledes, eller også skal jeg gøre et eller andet på vrangpinden......! Den bliver ellers god :-)
06.05.2017 - 13:35DROPS Design answered:
Hej, Hvis du ikke vil have hul i udtagningerne, så strikker du dem drejet (altså i bagerste lænke af masken) på næste pind. God fornøjelse!
08.05.2017 - 15:29
![]() Kickie Sävenskog wrote:
Kickie Sävenskog wrote:
Easy to knit, fits perfect and so comfy. I love it and will knit more!
11.12.2016 - 21:34
![]() Eva wrote:
Eva wrote:
Hallo, ich stecke im Moment beim Passe fest. Verstehe ich die Anleitung richtig, dass nach der Hin-R mit dem Abstecken der Markierer quasi wie folgt zugenommen wird: 1. R (Rück-R)+0M, 2. R (Hin-R) +8M, 3. R (Rück-R.) +0M, 4. R (Hin-R) +8M, 5. R (Rück-R) +0M, dann genauso weiter, jede Hin-R +8M und jede Rück-R +0 etc pp? Sodass am Ende in der Größe M 45 Reihen entstehen müssten? Danke im Voraus!!
06.10.2016 - 15:11DROPS Design answered:
Liebe Eva, Die erste Zunahme ist jede R. gemacht, so an der nächsten R. nach der mit Markierer, nehmen Sie 8 Maschen zu; dann jede 2. R (= jede R. von der Vorderseite) nehmen Sie 8 M 22 x zu = 184 Zunhamen = 304 M.
06.10.2016 - 15:31
![]() Morineki Melvin wrote:
Morineki Melvin wrote:
I'm doing a size large & have come upon a problem. When you start to divide for the body, your pattern says the back should be 60 sts for the front sections, 65 sts for the sleeves, 75 sts for the back. But I came out with 61 sts for the front sections, 65 sts for the sleeves, 79 sts for the back. This is going by your pattern of inc 4 times every row and 20 times every other row. Please help me on where I went wrong.
04.10.2016 - 14:47DROPS Design answered:
Dear Mrs Melvin, after all inc are done you should have: 60 sts (front piece), 2 sts (raglan), 61 sts (sleeve), 2 sts (raglan), 75 sts (back piece), 2 sts (raglan), 60 sts (front piece) = 60+2+61+2+75+2+60=325 sts - you will put aside the 61 sts for sleeve + the 2 sts (raglan line) on each side= 65 sts. Happy knitting!
04.10.2016 - 15:47
![]() Paule wrote:
Paule wrote:
C'est justement cette partie qui me mélange. Par exemple, pour la première fois que je dois faire une augmentation, est-ce que je dois faire 2 jetés, tricoter la maille avant le marqueur et passer le premier jeté par-dessus le 2e jeté et la maille tricotée, puis, à l'envers, tricoter à l'envers et tricoter la maille torse du jeté?
01.09.2016 - 19:19DROPS Design answered:
Bonjour Paule, quand vous augmentez la 1ère m du point de bambou, tricotez-la en jersey end jusqu'à ce que la 2ème augmentation soit faite et que vous puissiez tricoter ces 2 m au point de bambou. Bon tricot!
02.09.2016 - 08:49
![]() Paule wrote:
Paule wrote:
Bonjour, je suis à faire les augmentations pour l'empiècement et je dois faire 8 augmentations en point de bambou. On mentionne que ça prend 2 augmentations pour faire le point de bambou, ça me mêle un peu. Est-ce que ça veut dire que je tricote l'augmentation en point de bambou seulement à chaque 2 rangs endroit? Comment je fais?
01.09.2016 - 01:11DROPS Design answered:
Bonjour Paule, les 8 premières augmentations du raglan se tricotent au point de bambou, mais il faudra que vous ayez augmenté 2 m pour tricoter ces augmentations en point de bambou (qui se tricote lui-même sur 2 m). Bon tricot!
01.09.2016 - 09:50
![]() Kathi Rüll wrote:
Kathi Rüll wrote:
Ich arbeite die Jacke in XXXL, so mein problem ist jetzt eigentlich die Raglanzunahme. Es heißt ja 48M - 1 re M - Makierung - 15M - Markierung - 51M - Makierung - 15M - Makierung - 1 re M - 48M. Die 48 Maschen sind im Bambusmuster, soweit klar. ABER was ich jetzt nicht weis, verändert sich da die Maschenanzahl beim Muster oder bleiben das da immer 48 M? Ich steig grade wirklich nicht durch
31.08.2016 - 20:07DROPS Design answered:
Liebe Frau Rüll, die 8 erste zugenommenen M an den Vorderteilen werden im Bambusmuster gestrickt, dann werden alle weitere Zunahmen an den Vorderteilen glatt gestrickt.
01.09.2016 - 09:23
![]() Kathi Rüll wrote:
Kathi Rüll wrote:
"Die zugenommenen M am Rückenteil und an den Ärmeln glatt re stricken und die ersten 8 zugenommenen M an den Vorderteilen im Bambusmuster stricken (d.h. es müssen 2 M zugenommen worden sein, damit 1 Bambusmusterrapport aufgeht), die restlichen zugenommenen M glatt re stricken". Wie ist das gemeint bei der Raglanzunahme, also das für das Bambusmuster?
31.08.2016 - 12:47DROPS Design answered:
Liebe Kathi, um das Bambusmuster stricken zu können, müssen Sie 2 neue Maschen aufgenommen haben, da das Muster aus 2 Maschen besteht.
31.08.2016 - 14:01
|
|
Snow Princess#snowprincessjacket |
|
 |
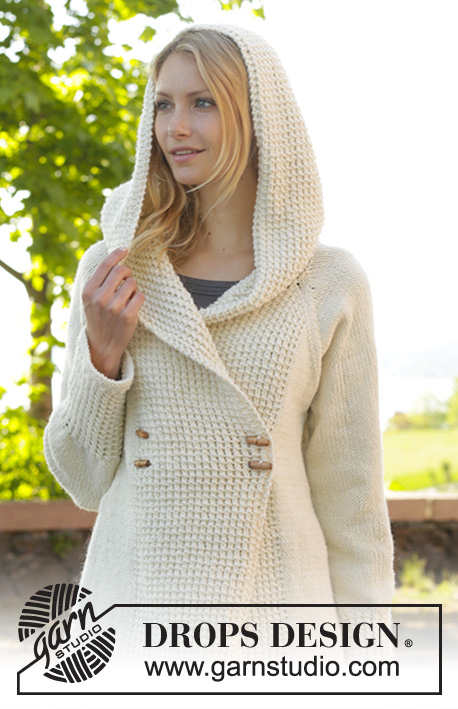 |
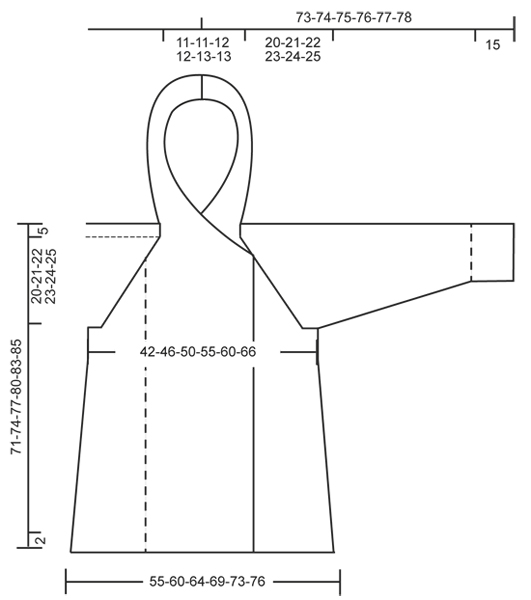
Knitted DROPS jacket with raglan, hood and bamboo pattern, worked top down in ”Nepal”. Size: S - XXXL.
DROPS 156-1 |
|
|
GARTER ST (back and forth on needle): K all rows. 1 ridge = K2 rows. GARTER ST (in the round on double pointed needles): * K 1 round and P 1 round *, repeat from *-*. 1 ridge = 2 rounds. BAMBOO PATTERN (back and forth on needle): Row 1 (= RS): * 1 YO, K 2, pass YO over 2 K sts *, repeat from *-*. Row 2 (= WS): P all sts. Repeat rows 1 and 2. BAMBOO PATTERN (in the round on double pointed needles): Round 1: * 1 YO, K 2, pass YO over 2 K sts *, repeat from *-*. Round 2: K all sts. Repeat rounds 1 and 2. DECREASE TIP: Dec 1 st before marker as follows: Work until 2 sts remain before marker, slip 1 st as if to K, K 1, psso. Dec 1 st after marker as follows: K 2 tog. RAGLAN: Inc as follows at every marker: Work until 1 st remains before marker, 1 YO, K 2, 1 YO = 2 sts inc. Repeat at the remaining markers in piece = 8 sts inc on needle. On next row work YOs twisted (i.e. work in back loop of st instead of front) to avoid holes. ---------------------------------------------------------- JACKET: Worked back and forth, top down on circular needle/double pointed needles. HOOD: Cast on 116 sts in all sizes (includes 2 edge sts in GARTER ST – see explanation above, in each side of piece) on circular needle size 5 mm / US 8 with Nepal. Work 1 ridge in garter st. Then work BAMBOO PATTERN back and forth – see explanation above, with 2 edge sts in garter st in each side (continue the 2 edge sts in garter st in each side until finished measurements). REMEMBER THE GAUGE! When piece measures 38 cm / 15", work as follows from RS: Pattern as before over the first 30-32-36-40-44-48 sts, garter st over the next 56-52-44-36-28-20 sts AT THE SAME TIME dec 12-11-10-6-4-0 sts evenly, pattern over the remaining 30-32-36-40-44-48 sts = 104-105-106-110-112-116 sts. Continue back and forth until 3 ridges have been worked over the middle sts, AT THE SAME TIME on 2nd row from RS inc 4-8-14-19-25-32 sts evenly over sts in garter st, and on 3rd row from RS inc 4-7-13-18-25-31 sts evenly over sts in garter st = 112-120-133-147-162-179 sts. Now work an elevation in back of neck in garter st as follows from RS: Work until 30-32-36-40-44-48 sts remain, turn, work until 30-32-36-40-44-48 sts remain, turn, work until 40-42-46-50-55-58 sts remain, turn, work until 40-42-46-50-55-58 sts remain, turn, work until 50-52-56-60-65-68 sts remain, turn, work until 50-52-56-60-65-68 sts remain, turn, work until 55-57-61-65-70-73 sts remain, turn, work until 55-57-61-65-70-73 sts remain, turn and work the rest of row (pattern over the last 30-32-36-40-44-48 sts). YOKE: Now work pattern as before over the first 30-32-36-40-44-48 sts, 1 st in stockinette st, insert 1st marker here, stockinette st over the next 15 sts, insert 2nd marker here, stockinette st over the next 20-24-29-35-42-51 sts, insert 3rd marker here, stockinette st over the next 15 sts, insert 4th marker here, 1 st in stockinette st, pattern as before over the remaining 30-32-36-40-44-48 sts. Now start inc for RAGLAN – see explanation above! Repeat inc every row 1-1-4-6-8-10 times (i.e. from RS and WS), and every row from RS 21-22-20-19-18-17 times = 288-304-325-347-370-395 sts. NOTE: Work the new inc sts on back piece and sleeves in stockinette st, and work the first 8 new inc sts on front piece in bamboo pattern (i.e. inc 2 sts before there is enough sts to work bamboo pattern), then work the remaining inc sts in stockinette st. Piece now measures 20-21-22-23-24-25 cm / 8"-8¼"-8¾"-9"-9½"-9¾" (measure from 1st row after edge in garter st at the back). Now work next row as follows: Work the first 52-55-60-65-70-75 sts, slip the next 61-63-65-67-69-71 sts on a stitch holder for sleeve, cast on 10 new sts under sleeve (insert a marker in the middle of the new sts), work the next 62-68-75-83-92-103 sts, slip the next 61-63-65-67-69-71 sts on a stitch holder for sleeve, cast on 10 new sts under sleeve (insert a marker in the middle of the new sts), work the remaining 52-55-60-65-70-75 sts. There are now 186-198-215-233-252-273 sts for body. NOW MEASURE PIECE FROM HERE! BODY: Continue back and forth with pattern as before. Work the new sts under sleeve in stockinette st. When piece measures 4 cm / 1½" from marker under sleeves, inc 1 st on each side of each marker as follows: Work until 1 st before first marker, 1 YO, 2 sts in stockinette st, 1 YO, repeat at the other marker = 190-202-219-237-256-277 sts. Repeat inc every 3½-3½-3½-4-4½-6 cm / 1¼"-1¼"-1¼"-1½"-1¾"-2½" 11-12-12-12-11-8 more times = 234-250-267-285-300-309 sts. When piece measures 46-48-50-52-54-55 cm / 18"-19"-19¾"-20½"-21¼"-21½" from marker under sleeves, work 3 ridges. Loosely bind off. SLEEVE: Worked in the round on double pointed needles. Slip sts from stitch holder back on double pointed needles size 5 mm / US 8. Work 1 row from RS and cast on 10 new sts under sleeve (insert a marker in the middle of the new sts) = 71-73-75-77-79-81 sts. NOW MEASURE THE PIECE FROM HERE. When piece measures 4 cm / 1½", beg dec on each side of marker - READ DECREASE TIP. Repeat dec every 2-2-2-1½-1½-1½ cm/ ¾"-¾"-¾"-½"-½"-½" 12-13-13-14-14-15 more times = 45-45-47-47-49-49 sts. When piece measures 32-32-32-32-31-31 cm / 12½"-12½"-12½"-12½"-12¼"-12¼", inc 3 sts evenly in all sizes = 48-48-50-50-52-52 sts. Now work BAMBOO PATTERN in the round on double pointed needles - see explanation above. When piece measures 47-47-47-47-48-48 cm / 18½"-18½"-18½"-18½"-19"-19", dec 4 sts in all sizes = 44-44-46-46-48-48 sts. Work 3 ridges in GARTER ST in the round on double pointed needles - see explanation above. Bind off. ASSEMBLY: Sew the holes under the sleeves. Sew tog hood st by st in cast-on edge. Sew on buttons on section with bamboo pattern on left front piece as follows: Sew 1 button approx. 2 cm / ¾" in from edge and 43-45-47-49-51-53 cm / 17"-17¾"-18½"-19¼"-20"-21" from bind-off edge and 1 button 47-49-51-53-55-57 cm / 18½"-19¼"-20"-21"-21⅝"-22½" from bind-off edge. Repeat in the other side of section with bamboo pattern. Button through a hole in bamboo texture. |
|
 |
|
Have you finished this pattern?Tag your pictures with #dropspattern #snowprincessjacket or submit them to the #dropsfan gallery. Do you need help with this pattern?You'll find 27 tutorial videos, a Comments/Questions area and more by visiting the pattern on garnstudio.com. © 1982-2026 DROPS Design A/S. We reserve all rights. This document, including all its sub-sections, has copyrights. Read more about what you can do with our patterns at the bottom of each pattern on our site. |
|


With over 40 years in knitting and crochet design, DROPS Design offers one of the most extensive collections of free patterns on the internet - translated to 17 languages. As of today we count 325 catalogs and 12298 patterns - 12288 of which are translated into English (US/in).
We work hard to bring you the best knitting and crochet have to offer, inspiration and advice as well as great quality yarns at incredible prices! Would you like to use our patterns for other than personal use? You can read what you are allowed to do in the Copyright text at the bottom of all our patterns. Happy crafting!
Post a comment to pattern DROPS 156-1
We would love to hear what you have to say about this pattern!
If you want to leave a question, please make sure you select the correct category in the form below, to speed up the answering process. Required fields are marked *.