
Popular categories
Looking for a yarn?


Comments / Questions (178)
![]() Julie Broch Rasmussen wrote:
Julie Broch Rasmussen wrote:
Jeg lavede strikkeprøve med bambusmønster, men nu hvor jeg er kommet til glatstrik delen, passer maskeantallet ikke til strikkeprøven i glatstrik. I opskrift er den 17mx22p, men min er 20mx26p. Bliver jakken så ikke for smal? Skal jeg strikke en str størrere eller bruge pindestr der passer til glatstrik prøven? Mvh Julie
08.01.2019 - 12:43DROPS Design answered:
Hei Julie. I og med at det meste av jakken er strikket i glattstrikk blir det nok riktigst om du overholder denne strikkefastheten. Hvis din strikkefasthet er strammere enn angitt (du sier 20 masker x 26 pinner) vil jakken bli for liten. Juster pinnestørrelsen slik at glattstrikken din blir 17 masker x 22 pinner, og så får du eventuelt prøve å strikke noe strammere over bambusmønsteret. Du kan selvfølgelig bytte pinner over bambusmønsteret, om du ønsker det, men det blir opp til deg. God fornøyelse
15.01.2019 - 08:09
![]() Despina Christensen wrote:
Despina Christensen wrote:
Når der står de første 8 nye m på forstk strikkes i bambus, betyder det at der er 4 på \"hver side\" af for stykket ? På forhånd tak ☺
03.12.2018 - 07:41DROPS Design answered:
Hei Despina. Du skal strikke de første 8 økte maskene på hver side i bambus. Altså totalt 16 masker. God fornøyelse
05.12.2018 - 11:05
![]() Lilian Bille wrote:
Lilian Bille wrote:
Jeg er kommet til bætrstykket i opskrift 156-1. Desværre kan jeg ikke se i opskriften hvor mange omgange i bærestykket der tages ud i bambus mønster, før det bliver rent retstrik
24.10.2018 - 15:58DROPS Design answered:
Hej Lilian, sådan her står det: OBS: De nye m på rygstk og ærmerne strikkes i glatstrik, og de første 8 nye m på forstk strikkes i bambus (dvs der skal tages 2 m ud før der er nok m til at strikke bambus), videre strikkes de resterende nye m i glatstrik. God fornøjelse!
30.10.2018 - 10:14
![]() Emily wrote:
Emily wrote:
Bonjour, je veux réaliser ce modéle avec des aiguilles n°4. combien de mailles me vaut t'il pour chaque parti ?
17.10.2018 - 17:56DROPS Design answered:
Bonjour Emily, ce modèle a été réalisé dans une laine du groupe C soit pour une tension "basique" de 17 m x 22 rangs jersey = 10 x 10 cm. Nous ne sommes malheureusement pas en mesure de pouvoir adapter chacun de nos modèles à chaque demande, n'hésitez pas à contacter le magasin où vous avez acheté votre fil pour toute assistance complémentaire. Bon tricot!
18.10.2018 - 09:10
![]() Sisili wrote:
Sisili wrote:
Bonjour, ma question concerne les augmentations pour le raglan. Lorsque vous dîtes que les 8 premières augmentations des devants se font au point de bambou, cela signifie-t-il que ces 8 augmentations se répartissent sur 2 rangs (4 sur l'endroit et 4 sur l'envers au niveau des devants/manches) ou doit-on faire les 8 premières augmentations au point de bambou sur le 1er rang du raglan ( au niveau devants/manches et manches/dos)? Merci pour votre retour. Belle journée
18.06.2018 - 09:15DROPS Design answered:
Bonjour Sisili, les 8 premières augmentations faites sur le devant se tricotent au point de bambou (= bordure des devants), toutes les autres augmentations (celles du dos et des manches) vont se tricoter en jersey. Bon tricot!
18.06.2018 - 09:36
![]() Merilyn wrote:
Merilyn wrote:
Tere! Palun abi passe kudumise juures. Nimelt jääb segaseks see koht, kus on öeldud, et Koo uued kasvatatud silmused seljaosal ja varrukatel parempidises koes ning esimesed 8 uut silmust hõlmadel bambuse mustriga (st. kasvata 2 s, enne kui on võimalik kududa mustrit), siis koo ülejäänud silmused parempidises koes. Kuidas tuleb siis silmusemärkija juures need 2 silma kasvatada, et kududa bambuse mustrit, kui samas peab tegema ka raglaani kasvatused?
23.05.2018 - 15:45DROPS Design answered:
Tere Marilyn! Silmused mis ei lähe mustrisse, koo parempidises koes. Head kudumist!
30.06.2018 - 16:57
![]() Sabine Meyer wrote:
Sabine Meyer wrote:
Ich sricke die grösse S es sind keine 11 maschen sondern 12 bambusmuster sind 30 maschen am anfang
14.02.2018 - 09:58DROPS Design answered:
Liebe Frau Meyer, in der 1. Größe stricken Sie die ersten 30 M im Bambusmuster wie zuvor, dann nehmen Sie 12 Maschen gleichmäßig verteilt über die nächsten 56 M (= 56-12= 44 M bleiben) und die letzten 30 M im Bambusmuster wie zuvor stricken = 30 + 44 + 30 = 104 M. Viel Spaß beim stricken!
14.02.2018 - 11:30
![]() Sabine Meyer wrote:
Sabine Meyer wrote:
Wo müssen die 30 Maschen übrig sein am Anfang oder am Ende vor dem Bambus Muster Habe alle Abnahmen und zum Schluss die Zunahmen es sind 52 Maschen in der Mitte
13.02.2018 - 22:49DROPS Design answered:
Liebe Frau Meyer, Sie stricken die ersten 32 M im Bambusmuster, dann nehmen Sie 11 M über die nächsten 52 M ab (= es bleiben nur noch 41 M) und stricken die letzten 30 M im Bambusmuster = 32+41+32=105 M in der 2. Größe. Viel Spaß beim stricken!
14.02.2018 - 08:56
![]() Hanne wrote:
Hanne wrote:
Hallo, Voor het meerderen voor de raglan staat dat je het meerderen in elke naald één keer herhaald en elke naald aan de goede kant 21 keer (voor maat S). Nu vraag ik me af of je na de laatste keer meerderen aan de goede kant nog een keer moet terug breien aan de verkeerde kant zodat je de gemeerderde steken omgekeerd kunt breien. Of brei je meteen de naald (aan de verkeerde kant dan) waarin je na 52 steken de eerste 61 op een hulpdraad zet? Alvast bedankt voor het antwoord.
07.02.2018 - 21:24DROPS Design answered:
Hoi Hanne, Je hoeft niet perse een naald terug te breien want deze steken kom je later wel tegen als je het lijf of de mouwen breit, en dan kun je ze als nog gedraaid breien. Het hangt er denk ik vanaf of je al op de juiste afmetingen bent om het werk te verdelen in lijf en mouwen en of je het zelf prettig vind om nog een naald aan de verkeerde kant te breien.
16.02.2018 - 11:52
![]() Anna wrote:
Anna wrote:
Hi I'm wondering if it is absolutely necessary to use double pointed needles for this pattern. I know the pattern says it does but could it be worked with single pointed needles and circular needles or not? Thanks.
16.01.2018 - 04:29DROPS Design answered:
Dear Anna, you will find here relevant informations about adapting a pattern to straight needles. Happy knitting!
16.01.2018 - 09:20
|
|
Snow Princess#snowprincessjacket |
|
 |
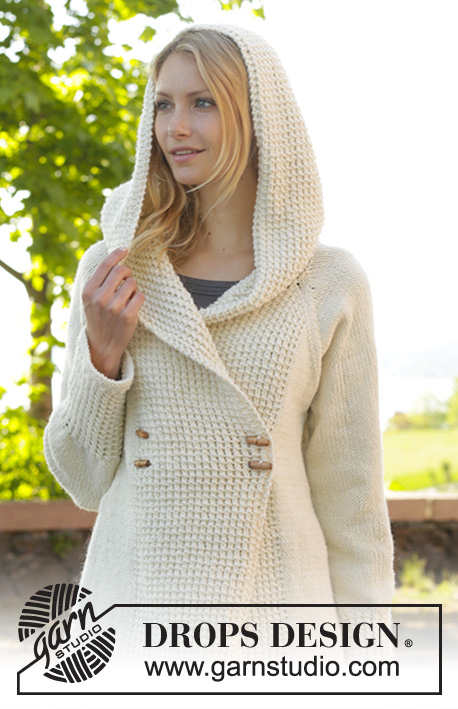 |
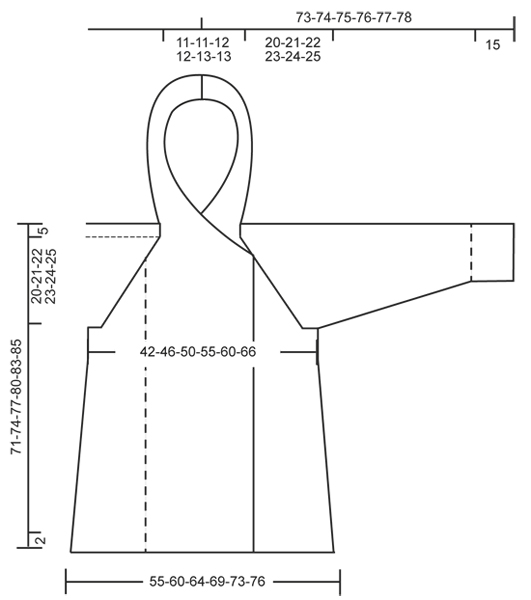
Knitted DROPS jacket with raglan, hood and bamboo pattern, worked top down in ”Nepal”. Size: S - XXXL.
DROPS 156-1 |
|
|
GARTER ST (back and forth on needle): K all rows. 1 ridge = K2 rows. GARTER ST (in the round on double pointed needles): * K 1 round and P 1 round *, repeat from *-*. 1 ridge = 2 rounds. BAMBOO PATTERN (back and forth on needle): Row 1 (= RS): * 1 YO, K 2, pass YO over 2 K sts *, repeat from *-*. Row 2 (= WS): P all sts. Repeat rows 1 and 2. BAMBOO PATTERN (in the round on double pointed needles): Round 1: * 1 YO, K 2, pass YO over 2 K sts *, repeat from *-*. Round 2: K all sts. Repeat rounds 1 and 2. DECREASE TIP: Dec 1 st before marker as follows: Work until 2 sts remain before marker, slip 1 st as if to K, K 1, psso. Dec 1 st after marker as follows: K 2 tog. RAGLAN: Inc as follows at every marker: Work until 1 st remains before marker, 1 YO, K 2, 1 YO = 2 sts inc. Repeat at the remaining markers in piece = 8 sts inc on needle. On next row work YOs twisted (i.e. work in back loop of st instead of front) to avoid holes. ---------------------------------------------------------- JACKET: Worked back and forth, top down on circular needle/double pointed needles. HOOD: Cast on 116 sts in all sizes (includes 2 edge sts in GARTER ST – see explanation above, in each side of piece) on circular needle size 5 mm / US 8 with Nepal. Work 1 ridge in garter st. Then work BAMBOO PATTERN back and forth – see explanation above, with 2 edge sts in garter st in each side (continue the 2 edge sts in garter st in each side until finished measurements). REMEMBER THE GAUGE! When piece measures 38 cm / 15", work as follows from RS: Pattern as before over the first 30-32-36-40-44-48 sts, garter st over the next 56-52-44-36-28-20 sts AT THE SAME TIME dec 12-11-10-6-4-0 sts evenly, pattern over the remaining 30-32-36-40-44-48 sts = 104-105-106-110-112-116 sts. Continue back and forth until 3 ridges have been worked over the middle sts, AT THE SAME TIME on 2nd row from RS inc 4-8-14-19-25-32 sts evenly over sts in garter st, and on 3rd row from RS inc 4-7-13-18-25-31 sts evenly over sts in garter st = 112-120-133-147-162-179 sts. Now work an elevation in back of neck in garter st as follows from RS: Work until 30-32-36-40-44-48 sts remain, turn, work until 30-32-36-40-44-48 sts remain, turn, work until 40-42-46-50-55-58 sts remain, turn, work until 40-42-46-50-55-58 sts remain, turn, work until 50-52-56-60-65-68 sts remain, turn, work until 50-52-56-60-65-68 sts remain, turn, work until 55-57-61-65-70-73 sts remain, turn, work until 55-57-61-65-70-73 sts remain, turn and work the rest of row (pattern over the last 30-32-36-40-44-48 sts). YOKE: Now work pattern as before over the first 30-32-36-40-44-48 sts, 1 st in stockinette st, insert 1st marker here, stockinette st over the next 15 sts, insert 2nd marker here, stockinette st over the next 20-24-29-35-42-51 sts, insert 3rd marker here, stockinette st over the next 15 sts, insert 4th marker here, 1 st in stockinette st, pattern as before over the remaining 30-32-36-40-44-48 sts. Now start inc for RAGLAN – see explanation above! Repeat inc every row 1-1-4-6-8-10 times (i.e. from RS and WS), and every row from RS 21-22-20-19-18-17 times = 288-304-325-347-370-395 sts. NOTE: Work the new inc sts on back piece and sleeves in stockinette st, and work the first 8 new inc sts on front piece in bamboo pattern (i.e. inc 2 sts before there is enough sts to work bamboo pattern), then work the remaining inc sts in stockinette st. Piece now measures 20-21-22-23-24-25 cm / 8"-8¼"-8¾"-9"-9½"-9¾" (measure from 1st row after edge in garter st at the back). Now work next row as follows: Work the first 52-55-60-65-70-75 sts, slip the next 61-63-65-67-69-71 sts on a stitch holder for sleeve, cast on 10 new sts under sleeve (insert a marker in the middle of the new sts), work the next 62-68-75-83-92-103 sts, slip the next 61-63-65-67-69-71 sts on a stitch holder for sleeve, cast on 10 new sts under sleeve (insert a marker in the middle of the new sts), work the remaining 52-55-60-65-70-75 sts. There are now 186-198-215-233-252-273 sts for body. NOW MEASURE PIECE FROM HERE! BODY: Continue back and forth with pattern as before. Work the new sts under sleeve in stockinette st. When piece measures 4 cm / 1½" from marker under sleeves, inc 1 st on each side of each marker as follows: Work until 1 st before first marker, 1 YO, 2 sts in stockinette st, 1 YO, repeat at the other marker = 190-202-219-237-256-277 sts. Repeat inc every 3½-3½-3½-4-4½-6 cm / 1¼"-1¼"-1¼"-1½"-1¾"-2½" 11-12-12-12-11-8 more times = 234-250-267-285-300-309 sts. When piece measures 46-48-50-52-54-55 cm / 18"-19"-19¾"-20½"-21¼"-21½" from marker under sleeves, work 3 ridges. Loosely bind off. SLEEVE: Worked in the round on double pointed needles. Slip sts from stitch holder back on double pointed needles size 5 mm / US 8. Work 1 row from RS and cast on 10 new sts under sleeve (insert a marker in the middle of the new sts) = 71-73-75-77-79-81 sts. NOW MEASURE THE PIECE FROM HERE. When piece measures 4 cm / 1½", beg dec on each side of marker - READ DECREASE TIP. Repeat dec every 2-2-2-1½-1½-1½ cm/ ¾"-¾"-¾"-½"-½"-½" 12-13-13-14-14-15 more times = 45-45-47-47-49-49 sts. When piece measures 32-32-32-32-31-31 cm / 12½"-12½"-12½"-12½"-12¼"-12¼", inc 3 sts evenly in all sizes = 48-48-50-50-52-52 sts. Now work BAMBOO PATTERN in the round on double pointed needles - see explanation above. When piece measures 47-47-47-47-48-48 cm / 18½"-18½"-18½"-18½"-19"-19", dec 4 sts in all sizes = 44-44-46-46-48-48 sts. Work 3 ridges in GARTER ST in the round on double pointed needles - see explanation above. Bind off. ASSEMBLY: Sew the holes under the sleeves. Sew tog hood st by st in cast-on edge. Sew on buttons on section with bamboo pattern on left front piece as follows: Sew 1 button approx. 2 cm / ¾" in from edge and 43-45-47-49-51-53 cm / 17"-17¾"-18½"-19¼"-20"-21" from bind-off edge and 1 button 47-49-51-53-55-57 cm / 18½"-19¼"-20"-21"-21⅝"-22½" from bind-off edge. Repeat in the other side of section with bamboo pattern. Button through a hole in bamboo texture. |
|
 |
|
Have you finished this pattern?Tag your pictures with #dropspattern #snowprincessjacket or submit them to the #dropsfan gallery. Do you need help with this pattern?You'll find 27 tutorial videos, a Comments/Questions area and more by visiting the pattern on garnstudio.com. © 1982-2026 DROPS Design A/S. We reserve all rights. This document, including all its sub-sections, has copyrights. Read more about what you can do with our patterns at the bottom of each pattern on our site. |
|


With over 40 years in knitting and crochet design, DROPS Design offers one of the most extensive collections of free patterns on the internet - translated to 17 languages. As of today we count 325 catalogs and 12298 patterns - 12288 of which are translated into English (US/in).
We work hard to bring you the best knitting and crochet have to offer, inspiration and advice as well as great quality yarns at incredible prices! Would you like to use our patterns for other than personal use? You can read what you are allowed to do in the Copyright text at the bottom of all our patterns. Happy crafting!
Post a comment to pattern DROPS 156-1
We would love to hear what you have to say about this pattern!
If you want to leave a question, please make sure you select the correct category in the form below, to speed up the answering process. Required fields are marked *.