
Popular categories
Looking for a yarn?


Comments / Questions (178)
![]() Ann wrote:
Ann wrote:
Toch nog een vraagje ivm de meerderingen voor de raglan. Ik brei maat S, dus ik moet van 112st naar 288 st. Hoe ik het begrijp moet ik elke naald 8st meerderen , dus 288-112=176:8=22. Na 22 rijen kom ik op 288st maar wat bedoelt men dan met enerzijds elke naald meerderen en daarna nog eens 21 keer in elke goede naald....dan zou ik op veel meer steken uitkomen.
07.04.2020 - 16:49DROPS Design answered:
Dag Ann,
Voor maat S komt het er op neer dat je in totaal 22 keer aan de goede kant meerdert en verder niet. dus het klopt precies zoals je het omschrijft met het aantal steken.
30.06.2020 - 16:28
![]() Alexandra wrote:
Alexandra wrote:
Hallo, in der Strickanleitung (156/1) steht in dem Abschnitt "Passe", dass im Muster weiter gestrickt werden soll. Ist damit das Bambusmuster gemeint? Lg
23.01.2020 - 13:30DROPS Design answered:
Liebe Alexandra, meinen Sie die ersten 30-32-36-40-44-48 M sowie die die restlichen 30-32-36-40-44-48 M am Ende der Reihe ? Dann ja stimmt, diese Maschen werden im Bambusmuster wie zuvor gestrickt. Viel Spaß beim Stricken!
23.01.2020 - 16:12
![]() Sarah wrote:
Sarah wrote:
Bonjour, j’aimerais bien tenter de tricoter ce modèle mais je trouve les explications dures à suivre auriez-vous une vidéo car je n’ai jamais tricoté de haut vers le bas
10.01.2020 - 16:07
![]() Susi Müller wrote:
Susi Müller wrote:
Und auf der Rückseite nich da in der Anleitung steht hin und Rückseite
03.01.2020 - 10:46
![]() Susi Müller wrote:
Susi Müller wrote:
Danach 20 x in jeder zweiten Reihe
02.01.2020 - 20:37
![]() Susi Müller wrote:
Susi Müller wrote:
Ich stricke Größe L Und meinte die Zunahmen in der hin und rückreihe 4 mal wie funktioniert das
02.01.2020 - 19:16DROPS Design answered:
Liebe Frau Müller, diese Zunahmen bei der Passe sind für den Raglan - siehe RAGLANZUNAHMEN: Sie sollen jetzt 1 Maschen beidseitg jeder Markierer zunehmen (= 1 M bei jedem Vorderteil, und 2 Maschen bei jedem Ärmel und beim Rückenteil = 8 Maschen pro Zunahmenreihe).Viel Spaß beim stricken!
03.01.2020 - 10:30
![]() Susi Müller wrote:
Susi Müller wrote:
In der Anleitung steht das in der Rückreihe zugenommen wird das funktioniert nicht
01.01.2020 - 15:20DROPS Design answered:
Liebe Frau Müller, ich misverstehe leider Ihre Meinung, können Sie bitte mal erklären, welche Zunahmen Sie meinen? (und dann vielleicht auch mal Ihre Größe). Danke im voraus!
02.01.2020 - 16:57
![]() Marieke Reisinger wrote:
Marieke Reisinger wrote:
Beste mensen van garnstudio, Ik heb zojuist de benodigde Drops Nepal voor dit patroon besteld, maar zie dat het een rondbreipatroon is. Kunnen jullie me ondersteunen in het omzetten van dit patroon op rechte breinaalden? Dat zou super zijn! Groet, Marieke
11.12.2019 - 14:03DROPS Design answered:
Dag Marieke,
Op de site staat een instructie waarin is uitgelegd hoe je een patroon aan kunt passen, zodat je hem met de rondebreinaald kunt breien. Deze vind je hier
12.12.2019 - 08:58
![]() Elizabeth Moore wrote:
Elizabeth Moore wrote:
Hi. I am interested in making a winter coat using this pattern. How warm is the wool? Can I add a liner to give it extra warmth?
05.06.2019 - 19:17DROPS Design answered:
Dear Mrs Moore, you will read more about this yarn here - depending on how warm you'd like the coat to be, you might have to addd a liner - please contact your DROPS store - even per mail or telephone - for any assistance choosing the yarn. Happy knitting!
06.06.2019 - 09:41
![]() Mitsuko Fredrickson wrote:
Mitsuko Fredrickson wrote:
Here I am again on Raglan increase and incorporating some increase into bamboo stitches. You told me previously ; *work the first 8 new inc stitches on front piece in bamboo pattern *(i.e. inc 2 stitches before there is enough stitches to work bamboo pattern), then work the remaining inc stitches in stocking st. Happy Knitting! *Does this mean wait for 8 inc. sts before adding 4 bamboo stitches on the first marker? Or add one bamboo sts (2sts) each side?
28.05.2019 - 21:21DROPS Design answered:
Dear Mrs Fredrickson, bamboo pattern is a 2 stitches repeat, work the first 1st increased in stocking st (= P from WS and K from RS), purl the 2nd increased from WS, and on next row work these 2 new sts in bamboo pattern (while continuing increasing). When the first 8 sts increased on raglan are worked in bamboo pattern, work the next increased in stocking stitch. Happy knitting!
29.05.2019 - 08:39
|
|
Snow Princess#snowprincessjacket |
|
 |
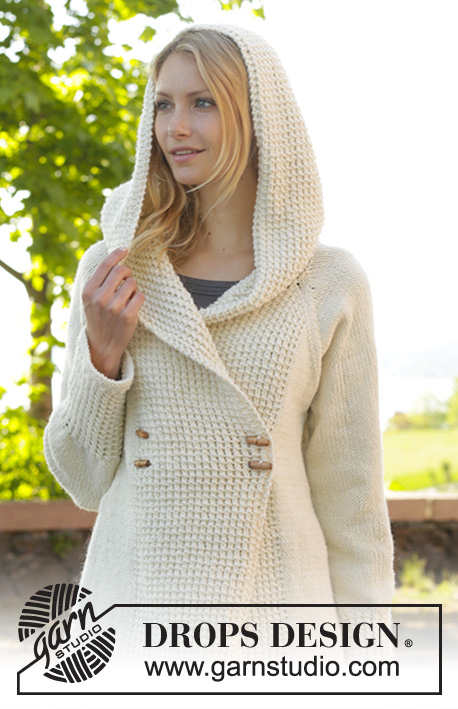 |
Knitted DROPS jacket with raglan, hood and bamboo pattern, worked top down in ”Nepal”. Size: S - XXXL.
DROPS 156-1 |
|
|
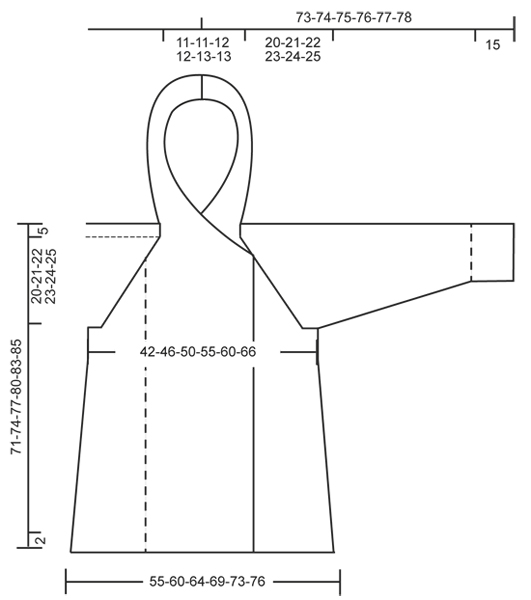
GARTER ST (back and forth on needle): K all rows. 1 ridge = K2 rows. GARTER ST (in the round on double pointed needles): * K 1 round and P 1 round *, repeat from *-*. 1 ridge = 2 rounds. BAMBOO PATTERN (back and forth on needle): Row 1 (= RS): * 1 YO, K 2, pass YO over 2 K sts *, repeat from *-*. Row 2 (= WS): P all sts. Repeat rows 1 and 2. BAMBOO PATTERN (in the round on double pointed needles): Round 1: * 1 YO, K 2, pass YO over 2 K sts *, repeat from *-*. Round 2: K all sts. Repeat rounds 1 and 2. DECREASE TIP: Dec 1 st before marker as follows: Work until 2 sts remain before marker, slip 1 st as if to K, K 1, psso. Dec 1 st after marker as follows: K 2 tog. RAGLAN: Inc as follows at every marker: Work until 1 st remains before marker, 1 YO, K 2, 1 YO = 2 sts inc. Repeat at the remaining markers in piece = 8 sts inc on needle. On next row work YOs twisted (i.e. work in back loop of st instead of front) to avoid holes. ---------------------------------------------------------- JACKET: Worked back and forth, top down on circular needle/double pointed needles. HOOD: Cast on 116 sts in all sizes (includes 2 edge sts in GARTER ST – see explanation above, in each side of piece) on circular needle size 5 mm / US 8 with Nepal. Work 1 ridge in garter st. Then work BAMBOO PATTERN back and forth – see explanation above, with 2 edge sts in garter st in each side (continue the 2 edge sts in garter st in each side until finished measurements). REMEMBER THE GAUGE! When piece measures 38 cm / 15", work as follows from RS: Pattern as before over the first 30-32-36-40-44-48 sts, garter st over the next 56-52-44-36-28-20 sts AT THE SAME TIME dec 12-11-10-6-4-0 sts evenly, pattern over the remaining 30-32-36-40-44-48 sts = 104-105-106-110-112-116 sts. Continue back and forth until 3 ridges have been worked over the middle sts, AT THE SAME TIME on 2nd row from RS inc 4-8-14-19-25-32 sts evenly over sts in garter st, and on 3rd row from RS inc 4-7-13-18-25-31 sts evenly over sts in garter st = 112-120-133-147-162-179 sts. Now work an elevation in back of neck in garter st as follows from RS: Work until 30-32-36-40-44-48 sts remain, turn, work until 30-32-36-40-44-48 sts remain, turn, work until 40-42-46-50-55-58 sts remain, turn, work until 40-42-46-50-55-58 sts remain, turn, work until 50-52-56-60-65-68 sts remain, turn, work until 50-52-56-60-65-68 sts remain, turn, work until 55-57-61-65-70-73 sts remain, turn, work until 55-57-61-65-70-73 sts remain, turn and work the rest of row (pattern over the last 30-32-36-40-44-48 sts). YOKE: Now work pattern as before over the first 30-32-36-40-44-48 sts, 1 st in stockinette st, insert 1st marker here, stockinette st over the next 15 sts, insert 2nd marker here, stockinette st over the next 20-24-29-35-42-51 sts, insert 3rd marker here, stockinette st over the next 15 sts, insert 4th marker here, 1 st in stockinette st, pattern as before over the remaining 30-32-36-40-44-48 sts. Now start inc for RAGLAN – see explanation above! Repeat inc every row 1-1-4-6-8-10 times (i.e. from RS and WS), and every row from RS 21-22-20-19-18-17 times = 288-304-325-347-370-395 sts. NOTE: Work the new inc sts on back piece and sleeves in stockinette st, and work the first 8 new inc sts on front piece in bamboo pattern (i.e. inc 2 sts before there is enough sts to work bamboo pattern), then work the remaining inc sts in stockinette st. Piece now measures 20-21-22-23-24-25 cm / 8"-8¼"-8¾"-9"-9½"-9¾" (measure from 1st row after edge in garter st at the back). Now work next row as follows: Work the first 52-55-60-65-70-75 sts, slip the next 61-63-65-67-69-71 sts on a stitch holder for sleeve, cast on 10 new sts under sleeve (insert a marker in the middle of the new sts), work the next 62-68-75-83-92-103 sts, slip the next 61-63-65-67-69-71 sts on a stitch holder for sleeve, cast on 10 new sts under sleeve (insert a marker in the middle of the new sts), work the remaining 52-55-60-65-70-75 sts. There are now 186-198-215-233-252-273 sts for body. NOW MEASURE PIECE FROM HERE! BODY: Continue back and forth with pattern as before. Work the new sts under sleeve in stockinette st. When piece measures 4 cm / 1½" from marker under sleeves, inc 1 st on each side of each marker as follows: Work until 1 st before first marker, 1 YO, 2 sts in stockinette st, 1 YO, repeat at the other marker = 190-202-219-237-256-277 sts. Repeat inc every 3½-3½-3½-4-4½-6 cm / 1¼"-1¼"-1¼"-1½"-1¾"-2½" 11-12-12-12-11-8 more times = 234-250-267-285-300-309 sts. When piece measures 46-48-50-52-54-55 cm / 18"-19"-19¾"-20½"-21¼"-21½" from marker under sleeves, work 3 ridges. Loosely bind off. SLEEVE: Worked in the round on double pointed needles. Slip sts from stitch holder back on double pointed needles size 5 mm / US 8. Work 1 row from RS and cast on 10 new sts under sleeve (insert a marker in the middle of the new sts) = 71-73-75-77-79-81 sts. NOW MEASURE THE PIECE FROM HERE. When piece measures 4 cm / 1½", beg dec on each side of marker - READ DECREASE TIP. Repeat dec every 2-2-2-1½-1½-1½ cm/ ¾"-¾"-¾"-½"-½"-½" 12-13-13-14-14-15 more times = 45-45-47-47-49-49 sts. When piece measures 32-32-32-32-31-31 cm / 12½"-12½"-12½"-12½"-12¼"-12¼", inc 3 sts evenly in all sizes = 48-48-50-50-52-52 sts. Now work BAMBOO PATTERN in the round on double pointed needles - see explanation above. When piece measures 47-47-47-47-48-48 cm / 18½"-18½"-18½"-18½"-19"-19", dec 4 sts in all sizes = 44-44-46-46-48-48 sts. Work 3 ridges in GARTER ST in the round on double pointed needles - see explanation above. Bind off. ASSEMBLY: Sew the holes under the sleeves. Sew tog hood st by st in cast-on edge. Sew on buttons on section with bamboo pattern on left front piece as follows: Sew 1 button approx. 2 cm / ¾" in from edge and 43-45-47-49-51-53 cm / 17"-17¾"-18½"-19¼"-20"-21" from bind-off edge and 1 button 47-49-51-53-55-57 cm / 18½"-19¼"-20"-21"-21⅝"-22½" from bind-off edge. Repeat in the other side of section with bamboo pattern. Button through a hole in bamboo texture. |
|
 |
|
Have you finished this pattern?Tag your pictures with #dropspattern #snowprincessjacket or submit them to the #dropsfan gallery. Do you need help with this pattern?You'll find 27 tutorial videos, a Comments/Questions area and more by visiting the pattern on garnstudio.com. © 1982-2026 DROPS Design A/S. We reserve all rights. This document, including all its sub-sections, has copyrights. Read more about what you can do with our patterns at the bottom of each pattern on our site. |
|


With over 40 years in knitting and crochet design, DROPS Design offers one of the most extensive collections of free patterns on the internet - translated to 17 languages. As of today we count 325 catalogs and 12298 patterns - 12288 of which are translated into English (US/in).
We work hard to bring you the best knitting and crochet have to offer, inspiration and advice as well as great quality yarns at incredible prices! Would you like to use our patterns for other than personal use? You can read what you are allowed to do in the Copyright text at the bottom of all our patterns. Happy crafting!
Post a comment to pattern DROPS 156-1
We would love to hear what you have to say about this pattern!
If you want to leave a question, please make sure you select the correct category in the form below, to speed up the answering process. Required fields are marked *.