
Popular categories
Looking for a yarn?


Comments / Questions (178)
![]() Simona wrote:
Simona wrote:
Risolto...sbagliavo facendo il gettato. Scusate...
13.01.2015 - 18:54
![]() Simona wrote:
Simona wrote:
Gentilissimi, ho appena iniziato a fare la giacca. Lavorando avanti e indietro nei ferri circolari Ho avviato le 116 maglie, i primi due ferri a dritto (legaccio) e ho iniziato il punto bamboo come da istruzioni. Il problema è che il motivo non mi appare come nel video. Il vostro dritto del lavoro (dove si vede il filo passato) corrisponde al mio rovescio e quest`ultimo non è identico (come ci fosse una cresta legaccio tra i ferri con il motivo a fili " in orizzontale". Grazie
13.01.2015 - 18:33Silvia wrote:
Podrían enviarme el patrón de este modelo, pero confeccionado con agujas tradicionales? No sé tejer con agujas circulares y por un problema severo en mi columna, tampoco puedo hacerlo por el peso que implica estar trabajando con toda la pieza tejida a la vez. Gracias. Soy de Argentina, fanática seguidora de la página, pero últimamente bastante desencantada con que la mayoría de los modelos vienen tejidos con aguja circular.
09.01.2015 - 13:09DROPS Design answered:
hola Silvia! Lamento que no puedas usar las agujas redondas. Con las agujas tradicionales tendrías que elaborar la prenda por separado: delanteros y espalda haciendo los cálculos necesarios (dividir los pts y no olvidar hacer pts orillo para la costura final) e igualmente en las mangas. La capucha tendrías que trabajar también por separado. Podrías guiarte un poco con el patrón 120-13 por ejemplo.
13.01.2015 - 15:42
![]() PABST Caroline wrote:
PABST Caroline wrote:
Bonjour, je découvre vos superbes modèles et aimerais me lancer sur le manteau Snow Princess. Je souhaite le tricoter en taille L comment savoir le nombre de pelotes qu'il me faut svp?? Merci d'avance pour votre réponse! :-)
05.01.2015 - 20:43DROPS Design answered:
Bonjour Mme Pabst, vous trouverez la quantité de fil, au poids, sous l"onglet "Fournitures", soit en taille L: 1350 g DROPS Nepal / 50 g la pelote Nepal = 27 pelotes - sur la base de 17 m x 22 rangs jersey = 10 x 10 cm et 20 m au point de bambou = 10 cm de large. Bon tricot!
06.01.2015 - 09:20
![]() Zwuck wrote:
Zwuck wrote:
Ich habe die Strickjacke mit der alternativ Wolle Alaska gestrickt. Jetzt habe ich das Problem das mein Rückenteil kürzer ist als der Teil der im Bambus Muster gestrickt ist. Hängt sich das aus? Es sind bestimmt 10 cm.
17.12.2014 - 09:34DROPS Design answered:
Das ist recht viel... Sie können versuchen, das Rückenteil zu spannen, indem Sie es anfeuchten, auf das passende Maß ziehen, feststecken und trocknen lassen. Zumindest müsste sich damit der Unterschied deutlich verkleinern lassen.
21.12.2014 - 23:01
![]() Esther Seyfried wrote:
Esther Seyfried wrote:
Leider scheitere ich schon ganz am Anfang... Ich habe nach der ersten Krausrippe der Kapuze hin und zurück im Bambusmuster gestrickt. Nun steht da, dass in den folgenden 6 Reihen in der ersten Hinreihe zugenommen, in der zweiten und dritten Hinreihe abgenommen wird. Aber wie und wieviel Maschen insgesamt? Und wird dann bis zu einer Gesamtlänge von 38 cm weiter im Bambusmuster (ohne Zu- und Abnahmen) gestrickt?
29.11.2014 - 17:26DROPS Design answered:
Liebe Esther, die Anleitung war an dieser Stelle nicht korrekt, der Passus mit den Abnahmen und Zunahmen wurde nun gestrichen, jetzt sollte die Anleitung klar sein. Wenn Sie noch Fragen haben, melden Sie sich gerne wieder! Gutes Gelingen und viel Spaß beim Stricken!
01.12.2014 - 13:19
![]() Cerruti Sylvie wrote:
Cerruti Sylvie wrote:
Modele snow princess 156 1, je suis arrivée au niveau ou l'on doit tricoter 55 m puis mettre en attente 63 mailles pour les manches , tricoter 68 mailles, remettre en attente 63 mailles pour la deuxieme manche, tricoter 55 mailles . je me trouve avec plus de mailles en tout, lorsque vous dites tricoter les 55 premieres mailles , est ce les 55 mailles jersey apres la bordure point de bambou ?
28.11.2014 - 09:50DROPS Design answered:
Bonjour Mme Cerruti, ce rang correspond au moment où on met les mailles des manches en attente pour tricoter le dos et les devants, tricotez les 55 premières m (y compris la bordure), mettez les 63 m suivantes en attente (1ère manche), montez 10 m sous la manche et tricotez les 68 m suiv (dos), mettez les 53 m suiv en attente (2e manche), montez 10 m (emmanchure), et tricotez les 55 dernières m pour le 2ème devant = il vous reste 198 m sur l'aiguille et 2 x 63 m en attente pour les manches. Bon tricot!
28.11.2014 - 11:13Ans wrote:
Ik heb de pas bijna af en lees: Brei nu de naald als volgt: brei de eerste ....st. Blijf ik in patroon breien? Met vriendelijke groet Ans
16.11.2014 - 09:06DROPS Design answered:
Hoi Ans. Je breit de st zoals eerst, dus zoals je de hele tijd hebt gebreid
19.11.2014 - 15:17
![]() Silvana Riveros wrote:
Silvana Riveros wrote:
Salve, vorrei capire cos'e un'alzata? Grazie
12.11.2014 - 16:12DROPS Design answered:
Buongiorno Silvana. Un’alzata consiste nel lavorare alcuni ferri solo sulle maglie centrali dello scollo, sul dietro del lavoro. Questo serve per ottenere una migliore vestibilità del capo. Buon lavoro!
12.11.2014 - 17:31
![]() Maria Saggese wrote:
Maria Saggese wrote:
Ringraziandovi per la vostra risposta sono ancora in difficolta non riesco a capire dopo aver finito gli aumenti dello scalfo la divisione e il conteggio per proseguire il cappotto perche 52-61-62-61-52 piu le 20 messe a nuovo non mi trovo con le maglie della spiegazione 186 in attesa della vostra risposta vi ringrazio
06.11.2014 - 07:58DROPS Design answered:
Buongiorno Maria. Dopo tutti gli aumenti, nella taglia S, dovrebbe avere 288 m. Adesso lavori le prime 52 m, metta su un ferma maglie / filo di scarto le 61 m successive per la manica, avvii 10 nuove m, lavori le 62 m successive, metta in attesa su un altro ferma maglie le 61 m successive, avvii 10 nuove m e lavori le ultime 52 m. Le maglie in tutto sono (non deve contare le m messe in attesa): 52 +10 + 62 + 10+ 52 = 186 m. Ci riscriva se ancora in difficoltà. Buon lavoro!
06.11.2014 - 09:40
|
|
Snow Princess#snowprincessjacket |
|
 |
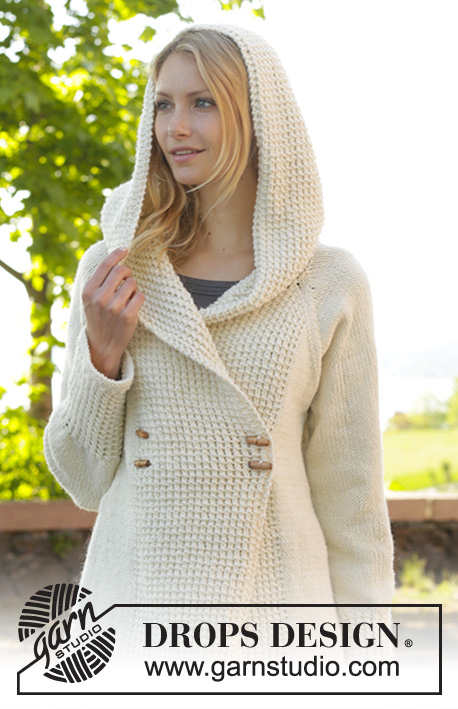 |
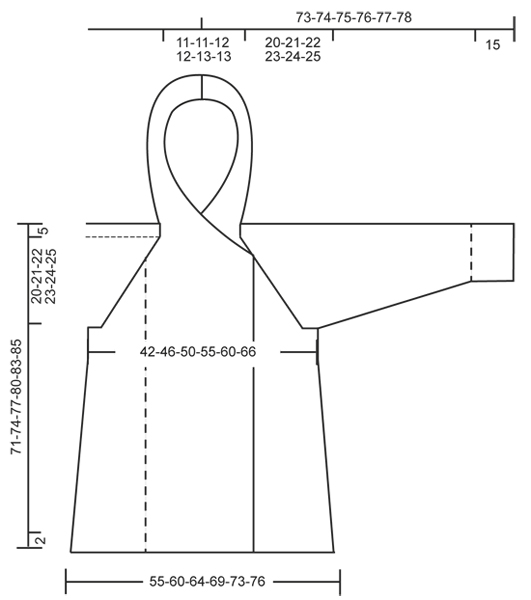
Knitted DROPS jacket with raglan, hood and bamboo pattern, worked top down in ”Nepal”. Size: S - XXXL.
DROPS 156-1 |
|
|
GARTER ST (back and forth on needle): K all rows. 1 ridge = K2 rows. GARTER ST (in the round on double pointed needles): * K 1 round and P 1 round *, repeat from *-*. 1 ridge = 2 rounds. BAMBOO PATTERN (back and forth on needle): Row 1 (= RS): * 1 YO, K 2, pass YO over 2 K sts *, repeat from *-*. Row 2 (= WS): P all sts. Repeat rows 1 and 2. BAMBOO PATTERN (in the round on double pointed needles): Round 1: * 1 YO, K 2, pass YO over 2 K sts *, repeat from *-*. Round 2: K all sts. Repeat rounds 1 and 2. DECREASE TIP: Dec 1 st before marker as follows: Work until 2 sts remain before marker, slip 1 st as if to K, K 1, psso. Dec 1 st after marker as follows: K 2 tog. RAGLAN: Inc as follows at every marker: Work until 1 st remains before marker, 1 YO, K 2, 1 YO = 2 sts inc. Repeat at the remaining markers in piece = 8 sts inc on needle. On next row work YOs twisted (i.e. work in back loop of st instead of front) to avoid holes. ---------------------------------------------------------- JACKET: Worked back and forth, top down on circular needle/double pointed needles. HOOD: Cast on 116 sts in all sizes (includes 2 edge sts in GARTER ST – see explanation above, in each side of piece) on circular needle size 5 mm / US 8 with Nepal. Work 1 ridge in garter st. Then work BAMBOO PATTERN back and forth – see explanation above, with 2 edge sts in garter st in each side (continue the 2 edge sts in garter st in each side until finished measurements). REMEMBER THE GAUGE! When piece measures 38 cm / 15", work as follows from RS: Pattern as before over the first 30-32-36-40-44-48 sts, garter st over the next 56-52-44-36-28-20 sts AT THE SAME TIME dec 12-11-10-6-4-0 sts evenly, pattern over the remaining 30-32-36-40-44-48 sts = 104-105-106-110-112-116 sts. Continue back and forth until 3 ridges have been worked over the middle sts, AT THE SAME TIME on 2nd row from RS inc 4-8-14-19-25-32 sts evenly over sts in garter st, and on 3rd row from RS inc 4-7-13-18-25-31 sts evenly over sts in garter st = 112-120-133-147-162-179 sts. Now work an elevation in back of neck in garter st as follows from RS: Work until 30-32-36-40-44-48 sts remain, turn, work until 30-32-36-40-44-48 sts remain, turn, work until 40-42-46-50-55-58 sts remain, turn, work until 40-42-46-50-55-58 sts remain, turn, work until 50-52-56-60-65-68 sts remain, turn, work until 50-52-56-60-65-68 sts remain, turn, work until 55-57-61-65-70-73 sts remain, turn, work until 55-57-61-65-70-73 sts remain, turn and work the rest of row (pattern over the last 30-32-36-40-44-48 sts). YOKE: Now work pattern as before over the first 30-32-36-40-44-48 sts, 1 st in stockinette st, insert 1st marker here, stockinette st over the next 15 sts, insert 2nd marker here, stockinette st over the next 20-24-29-35-42-51 sts, insert 3rd marker here, stockinette st over the next 15 sts, insert 4th marker here, 1 st in stockinette st, pattern as before over the remaining 30-32-36-40-44-48 sts. Now start inc for RAGLAN – see explanation above! Repeat inc every row 1-1-4-6-8-10 times (i.e. from RS and WS), and every row from RS 21-22-20-19-18-17 times = 288-304-325-347-370-395 sts. NOTE: Work the new inc sts on back piece and sleeves in stockinette st, and work the first 8 new inc sts on front piece in bamboo pattern (i.e. inc 2 sts before there is enough sts to work bamboo pattern), then work the remaining inc sts in stockinette st. Piece now measures 20-21-22-23-24-25 cm / 8"-8¼"-8¾"-9"-9½"-9¾" (measure from 1st row after edge in garter st at the back). Now work next row as follows: Work the first 52-55-60-65-70-75 sts, slip the next 61-63-65-67-69-71 sts on a stitch holder for sleeve, cast on 10 new sts under sleeve (insert a marker in the middle of the new sts), work the next 62-68-75-83-92-103 sts, slip the next 61-63-65-67-69-71 sts on a stitch holder for sleeve, cast on 10 new sts under sleeve (insert a marker in the middle of the new sts), work the remaining 52-55-60-65-70-75 sts. There are now 186-198-215-233-252-273 sts for body. NOW MEASURE PIECE FROM HERE! BODY: Continue back and forth with pattern as before. Work the new sts under sleeve in stockinette st. When piece measures 4 cm / 1½" from marker under sleeves, inc 1 st on each side of each marker as follows: Work until 1 st before first marker, 1 YO, 2 sts in stockinette st, 1 YO, repeat at the other marker = 190-202-219-237-256-277 sts. Repeat inc every 3½-3½-3½-4-4½-6 cm / 1¼"-1¼"-1¼"-1½"-1¾"-2½" 11-12-12-12-11-8 more times = 234-250-267-285-300-309 sts. When piece measures 46-48-50-52-54-55 cm / 18"-19"-19¾"-20½"-21¼"-21½" from marker under sleeves, work 3 ridges. Loosely bind off. SLEEVE: Worked in the round on double pointed needles. Slip sts from stitch holder back on double pointed needles size 5 mm / US 8. Work 1 row from RS and cast on 10 new sts under sleeve (insert a marker in the middle of the new sts) = 71-73-75-77-79-81 sts. NOW MEASURE THE PIECE FROM HERE. When piece measures 4 cm / 1½", beg dec on each side of marker - READ DECREASE TIP. Repeat dec every 2-2-2-1½-1½-1½ cm/ ¾"-¾"-¾"-½"-½"-½" 12-13-13-14-14-15 more times = 45-45-47-47-49-49 sts. When piece measures 32-32-32-32-31-31 cm / 12½"-12½"-12½"-12½"-12¼"-12¼", inc 3 sts evenly in all sizes = 48-48-50-50-52-52 sts. Now work BAMBOO PATTERN in the round on double pointed needles - see explanation above. When piece measures 47-47-47-47-48-48 cm / 18½"-18½"-18½"-18½"-19"-19", dec 4 sts in all sizes = 44-44-46-46-48-48 sts. Work 3 ridges in GARTER ST in the round on double pointed needles - see explanation above. Bind off. ASSEMBLY: Sew the holes under the sleeves. Sew tog hood st by st in cast-on edge. Sew on buttons on section with bamboo pattern on left front piece as follows: Sew 1 button approx. 2 cm / ¾" in from edge and 43-45-47-49-51-53 cm / 17"-17¾"-18½"-19¼"-20"-21" from bind-off edge and 1 button 47-49-51-53-55-57 cm / 18½"-19¼"-20"-21"-21⅝"-22½" from bind-off edge. Repeat in the other side of section with bamboo pattern. Button through a hole in bamboo texture. |
|
 |
|
Have you finished this pattern?Tag your pictures with #dropspattern #snowprincessjacket or submit them to the #dropsfan gallery. Do you need help with this pattern?You'll find 27 tutorial videos, a Comments/Questions area and more by visiting the pattern on garnstudio.com. © 1982-2026 DROPS Design A/S. We reserve all rights. This document, including all its sub-sections, has copyrights. Read more about what you can do with our patterns at the bottom of each pattern on our site. |
|


With over 40 years in knitting and crochet design, DROPS Design offers one of the most extensive collections of free patterns on the internet - translated to 17 languages. As of today we count 325 catalogs and 12298 patterns - 12288 of which are translated into English (US/in).
We work hard to bring you the best knitting and crochet have to offer, inspiration and advice as well as great quality yarns at incredible prices! Would you like to use our patterns for other than personal use? You can read what you are allowed to do in the Copyright text at the bottom of all our patterns. Happy crafting!
Post a comment to pattern DROPS 156-1
We would love to hear what you have to say about this pattern!
If you want to leave a question, please make sure you select the correct category in the form below, to speed up the answering process. Required fields are marked *.