
Popular categories
Looking for a yarn?


Comments / Questions (58)
![]() Anette wrote:
Anette wrote:
Hej, jag saknar ett svar på min fråga till er 01.03.2026 och undrar hur lång tid det tar ungefär? Mitt arbete har nu stått still i 10 dagar.
10.03.2026 - 20:34DROPS Design answered:
Hej Anette. Se svar under. Mvh DROPS Design
11.03.2026 - 11:13
![]() Anette wrote:
Anette wrote:
Efter A1 är klar står det att man ska sticka 1:a varv i A2 samtidigt öka jämt fördelat, varvet efter ska man lägga över maskor för armarna på en tråd. Ska man då lägga över omslagen på tråd eller ska man fördela omslagen på de maskor som ska vara för fram och bakstycke?
01.03.2026 - 08:56DROPS Design answered:
Hej Anette. Ja, du ökar jämnt fördelat över varvet och omslagen på ärmarna sätter du då på en tråd. Mvh DROPS Design
11.03.2026 - 11:13
![]() Anette Lejdebo wrote:
Anette Lejdebo wrote:
Ska diagrammet läsas från höger till vänster på rätsidan och från vänster till höger på avigsidan?
10.02.2026 - 22:19DROPS Design answered:
Hej Anette. Ja det stämmer, du kan läsa mer om hur man läser diagram här. Mvh DROPS Design
11.02.2026 - 10:03
![]() Sophie wrote:
Sophie wrote:
Bonjour Je ne comprends pas l extension du dos Si on retourne plusieurs fois et on tricote un nombre de mailles demandées comment reprend t on tout le rang à la fin Merci
27.01.2025 - 09:40DROPS Design answered:
Bonjour Sophie, après le dernier des rangs raccourcis pour la réhausse de l'encolure dos, tournez et tricotez les mailles jusqu'à la fin du rang, tournez et tricotez maintenant toutes les mailles, continuez comme indiqué. Bon tricot!
27.01.2025 - 17:26
![]() Jeannette Van Hulten wrote:
Jeannette Van Hulten wrote:
Op patroontekening A1 de 12e tour, als ik 11 x het patroon brei en er de ribbels van 5 steken erbij optel kom ik aan 155 steken ipv 153. Ik zie ook nu pas dat het patroon over die 5 toeren helemaal.niet juist is. Waar zit de fout?
01.10.2023 - 10:06DROPS Design answered:
Dag Jeanette,
Je begint A.1 als je 153 steken op de naald hebt. Als je beide voorbiessteken eraf haalt kom je op 143 en als je deze deelt door 11 kom je op 13 herhalingen van A.1. Je begint A.1 onderaan bij de pijl in jouw maat en niet op toer 12.
03.10.2023 - 06:31
![]() Sybille wrote:
Sybille wrote:
Liebes Drops-Team, habe ich die Anleitung richtig verstanden, dass nach Teilung für die Ärmel nur 2 Runden A2 gestrickt werden und das Rumpfteil glatt rechts weiter gestrickt wird? Also ohne A2 am Rumpfteil zu Ende zu stricken? Vielen Dank für Ihre Antwort Sybille
20.02.2021 - 11:06DROPS Design answered:
Liebe Sybille, ja ganz genau, nur die 2 ersten Reihen in A.2 werden beim Rumpfteil gestrickt, A.2 wird dann bis zur Ende nur bei den Ärmeln gestrickt. Viel Spaß beim stricken!
22.02.2021 - 07:55
![]() Sofia Coelho wrote:
Sofia Coelho wrote:
Bom dia. Quando se diz «Tricotar 69-76-81-88-93-105 ms/pts» (portanto, quando se faz a primeira carreira encurtada), estas malhas incluem as 5 malhas da orla? Isto é, por exemplo para o tamanho Small, devo fazer as 5 malhas da orla, tricotar 64 malhas e virar? Ou devo fazer as 5 malhas da orla, tricotar 69 malhas e virar? Muito obrigada.
04.11.2020 - 12:45
![]() Heidi Elleman wrote:
Heidi Elleman wrote:
Hej. Jeg vil gerne vide, hvordan jeg i størrelse XL tager 59 masker ud jævnt fordelt på første pind når der kun er 94 masker at gøre det over? Hilsen Heidi
09.05.2020 - 00:05DROPS Design answered:
Hei Heidi. I løpet av økeomgangen kan du strikke 1 maske, så øke 1 gang 25 ganger, og strikke 34 ganger 2 masker før det økes med 1 maske (men bytte på hva du strikker jevnt fordelt) + 1 maske. God Fornøyelse!
11.05.2020 - 09:48
![]() Jonna Nielsen wrote:
Jonna Nielsen wrote:
Kan ikke nå op på 182 m efter udtagning. 4x4 udtagning 1-3-2-4 =16 m. Udtagning 5-6 3x 4 = 12 ialt 178 m. Hvad gør jeg forkert? Efter mønster 3 (slutter på r-siden) skal man tage ud på vrangpinden?
19.02.2019 - 10:57DROPS Design answered:
Hei Jonna. Du skal øke ved merkene 4 ganger TIL (altås i tillegg til den første økingen beskrevet) = totalt 5 økinger, 20 masker økt. da får du 182 masker. God fornøyelse
21.02.2019 - 11:24
![]() Elvia McCormack wrote:
Elvia McCormack wrote:
Hello. I just finished Chart A1. I’m not sure what to do next. I’m supposed to work on chart A2. Is it just for two rows? After which I continue in stockinette for the body? Thanks.
06.04.2018 - 03:56DROPS Design answered:
Dear Mrs McCormack, work first the first row in A.2 inc evenly (see your size), then on 2nd row in A.2 divide pieces for armholes (= you will work row 2 in A.2 only on front and back pieces, stitches for sleeves will be slipped on a stitch holder). Continue then body in stocking stitch, A.2 will continue on the sleeves (= when working sleeves start with row 2 in A.2). Happy knitting!
06.04.2018 - 08:45
|
||||||||||
Elinor Dashwood Cardigan#elinordashwoodcardigan |
||||||||||
|
|
||||||||||
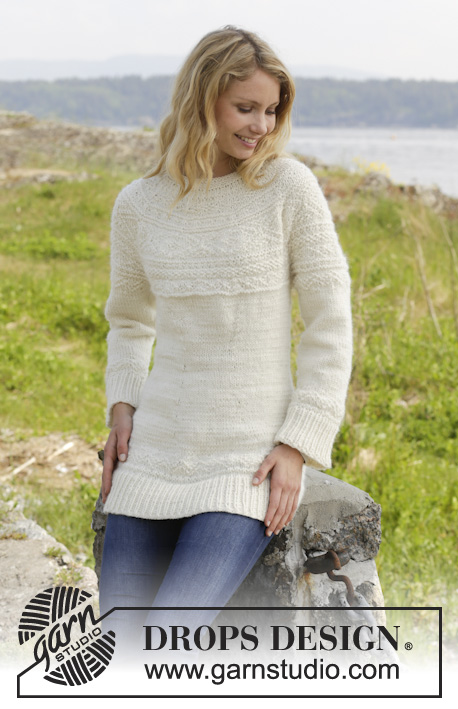
Knitted DROPS jacket with round yoke and textured pattern, worked top down in "Alaska". Size: S - XXXL.
DROPS 157-4 |
||||||||||
|
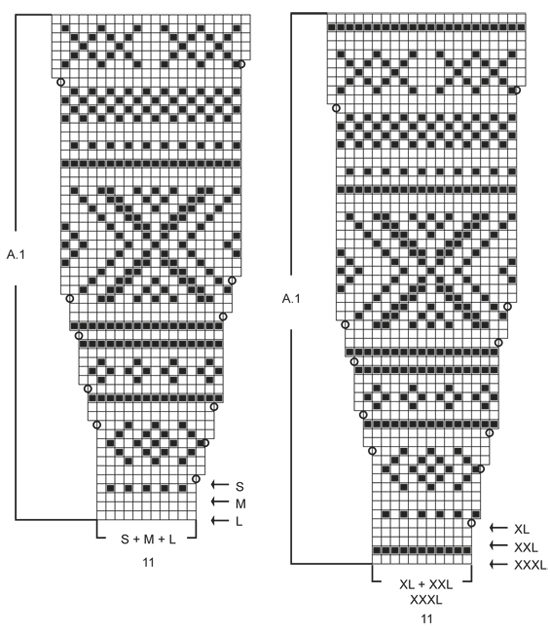
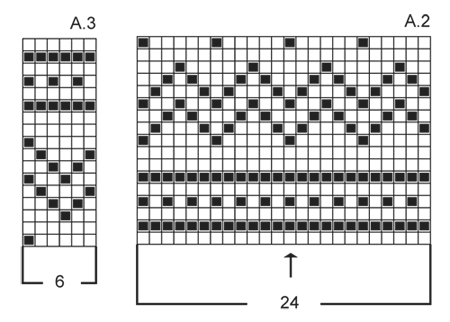
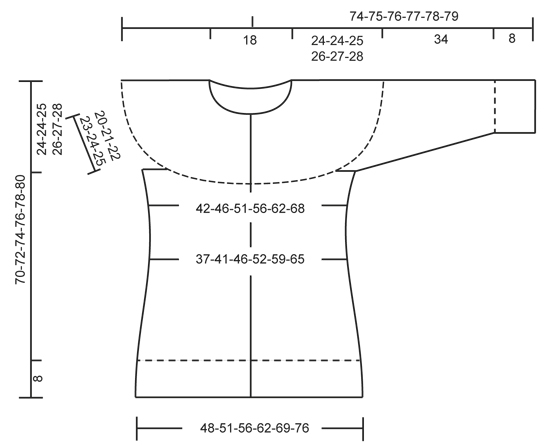
GARTER ST (back and forth on needle): K all rows. 1 ridge = K2 rows. PATTERN: See diagrams A.1 to A.3. The diagrams show all rows in pattern seen from RS. INCREASE TIP 1 (applies to yoke + waist): All inc are done from RS. Inc 1 st by making 1 YO, on next row work YO twisted (i.e. work in the back loop of st instead front) to avoid holes. INCREASE TIP 2 (applies to sides): Work until 1 st remains before marker, 1 YO, K 2 (marker is between these), 1 YO. On next row work YO twisted (i.e. work in the back loop of YO instead of front) to avoid holes. DECREASE TIP (applies to waist + sleeve): Dec as follows after marker: Slip 1 st as if to K, K 1, psso. Dec as follows 2 sts before marker: K 2 tog. BUTTONHOLES: Dec for buttonholes on right band. 1 buttonhole = K tog third and fourth st from edge and make 1 YO. Dec for buttonholes when piece measures (measured from cast-on edge): SIZE S: 2, 9, 16, 23, 30, 38, 45 and 53 cm / 3/4",3½",6 1/4",9",11 3/4",15",17 3/4",21". SIZE M: 2, 9, 16, 23, 31, 39, 47 and 55 cm / 3/4",3½",6 1/4",9",12 1/4",15 1/4",18½",21½". SIZE L: 2, 10, 17, 24, 32, 40, 48 and 56 cm / 3/4",4",6 3/4",9½",12½",15 3/4",19",22''. SIZE XL: 2, 10, 18, 26, 34, 42, 50 and 58 cm / 3/4",4",7",10 1/4",13½",16½",19 3/4",22 3/4" SIZE XXL: 2, 10, 18, 26, 35, 43, 51 and 59 cm / 3/4",4",7",10 1/4",13 3/4",17",20",23 1/4" SIZE XXXL: 2, 10, 18, 26, 36, 44, 52 and 60 cm / 3/4",4",7",10 1/4",14 1/4",17 1/4",20½",23½" ---------------------------------------------------------- JACKET: Worked back and forth, top down. YOKE: Cast on 79-86-90-94-97-101 sts on circular needle size 4 mm / US 6 with Alaska. Work 4 ridges in GARTER ST - see explanation above. Now switch to circular needle size 5 mm / US 8. Work in stockinette st with 5 band sts in garter st in each side (continue band sts until piece is finished), AT THE SAME TIME inc 41-45-52-59-67-85 sts evenly from RS – READ INCREASE TIP 1! There are now 120-131-142-153-164-186 sts on needle. Remember BUTTONHOLES - see explanation above. Now work an elevation in the back of neck as follows: Work 69-76-81-88-93-105 sts, turn, work 18-20-20-22-22-24 sts, turn, work 27-30-30-33-33-36 sts, turn, work 36-40-40-44-44-48 sts, turn, work 45-50-50-55-55-60 sts, turn, work 54-60-60-66-66-72 sts, turn, work rest of row. On next row from RS, work and inc according to pattern A.1 – choose diagram for correct size. REMEMBER THE GAUGE! When entire diagram A.1 has been worked 1 time vertically, there are 230-252-274-296-318-362 sts on needle. On next row work 1st row in A.2, AT THE SAME TIME inc 8-8-8-10-16-0 sts evenly = 238-260-282-306-334-362 sts. Work next row as follows: 5 band sts in garter st, 2nd row in A.2 over the next 31-35-39-43-48-53 sts (= front piece), slip the next 51-55-57-61-65-69 sts on a stitch holder for sleeve, cast on 8 new sts (= under sleeve), continue with A.2 over the next 64-70-80-88-98-108 sts (= back piece), slip the next 51-55-57-61-65-69 sts on a stitch holder for sleeve, cast on 8 new sts under sleeve, A.2 over the next 31-35-39-43-48-53 sts (= front piece), 5 band sts in garter st. There are now 152-166-184-200-220-240 sts for body. BODY: Continue back and forth with 5 band sts in garter st in each side and stockinette st. When piece measures 4 cm / 1½'' from new sts under sleeve, insert 6 markers in piece as follows: 5 band sts in garter st, 17-20-23-25-28-31 sts in stockinette st, insert a marker, 36-38-40-44-48-52 sts in stockinette st, insert a marker, 36-40-48-52-58-64 sts in stockinette st, insert a marker, 36-38-40-44-48-52 sts in stockinette st, insert a marker, 17-20-23-25-28-31 sts in stockinette st, 5 band sts in garter st. On next row from RS beg dec - READ DECREASE TIP! Dec 1 st before 1st and 3rd marker and 1 st after 2nd and 4th marker (NOTE! 1st marker is 1st marker on row from RS!). Repeat dec every 1-1-1½-2-3½-3½ cm / 3/8"-3/8"-½"-3/4"-1 1/4"-1 1/4" 4-4-4-3-2-2 times in total = 136-150-168-188-212-232 sts. Now insert a marker in the middle of the 36-38-40-42-48-52 sts in each side (i.e. between 1st and 2nd marker and between 3rd and 4th marker) = 5th and 6th marker. When piece measures 14-15-16-17-18-19 cm / 5½''-6''-6¼''-6¾''-7''-7½'' from the new sts under sleeve, beg inc – remember INCREASE TIP 1! Inc before 1st and 3rd marker and after 2nd and 4th marker. Repeat inc every 3 cm / 1'' 4 more times, AT THE SAME TIME on 2nd, 3rd and 4th inc, inc 1 st on each side of 5th and 6th marker (= sides) – READ INCREASE TIP 2! When all inc are done there are 168-182-200-220-244-264 sts on needle. When piece measures 31-32-33-34-35-36 cm / 12¼''-12½''-13''-13 3/8''-13¾''-14¼'' from new sts under sleeve, inc 4-2-2-0-0-4 sts = 172-184-202-220-244-268 sts. Then work A.3 with 5 band sts in garter st in each side. When A.3 has been worked vertically, inc 43-46-52-67-79-91 sts evenly = 215-230-254-287-323-359 sts. Work 1 row. Then switch to circular needle size 4 mm / US 6 and work rib as follows: 5 band sts in garter st, * K 1, P 2 *, repeat from *-* until 6 sts remain on row, K 1, 5 band sts in garter st. Continue like this until rib measures 8 cm / 3 1/8''. Bind off with K over K and P over P. SLEEVE: Worked in the round on double pointed needles. Slip the 51-55-57-61-65-69 sts from stitch holder back on double pointed needles size 5 mm / US 8. Work 2nd row in A.2, cast on 8 new sts under sleeve at the end of row = 59-63-65-69-73-77 sts. Insert a marker in the middle of the 8 new sts (i.e. 4 sts on each side of marker). Then work in the round. Continue with pattern according to diagram A.2 – NOTE: Adjust pattern according to the middle, arrow in diagram marks middle st on top of sleeve, AT THE SAME TIME when piece measures 4 cm / 1½'' from marker, beg dec – READ DECREASE TIP! Repeat dec every 2-1½-1½-1½-1½-1 cm / 3/4"-½"-½"-½"-½"-3/8" 8-10-11-10-12-14 more times = 41-41-41-47-47-47 sts remain. When piece measures 34 cm / 13½'' in all sizes, inc 1 st = 42-42-42-48-48-48 sts. Then work pattern according to diagram A.3. When A.3 has been worked 1 time vertically, inc 3 sts evenly = 45-45-45-51-51-51 sts. Then switch to double pointed needles size 4 mm / US 6 and work rib (K 1/P 2). Bind off with K over K and P over P when rib measures 8 cm / 3 1/8''. ASSEMBLY: Sew the holes under the sleeves. Sew the buttons on to left band. |
||||||||||
Diagram explanations |
||||||||||
|
||||||||||
 |
||||||||||
 |
||||||||||
 |
||||||||||
Have you finished this pattern?Tag your pictures with #dropspattern #elinordashwoodcardigan or submit them to the #dropsfan gallery. Do you need help with this pattern?You'll find 24 tutorial videos, a Comments/Questions area and more by visiting the pattern on garnstudio.com. © 1982-2026 DROPS Design A/S. We reserve all rights. This document, including all its sub-sections, has copyrights. Read more about what you can do with our patterns at the bottom of each pattern on our site. |
||||||||||


With over 40 years in knitting and crochet design, DROPS Design offers one of the most extensive collections of free patterns on the internet - translated to 17 languages. As of today we count 324 catalogs and 12290 patterns - 12280 of which are translated into English (US/in).
We work hard to bring you the best knitting and crochet have to offer, inspiration and advice as well as great quality yarns at incredible prices! Would you like to use our patterns for other than personal use? You can read what you are allowed to do in the Copyright text at the bottom of all our patterns. Happy crafting!
Post a comment to pattern DROPS 157-4
We would love to hear what you have to say about this pattern!
If you want to leave a question, please make sure you select the correct category in the form below, to speed up the answering process. Required fields are marked *.