
Popular categories
Looking for a yarn?


Comments / Questions (106)
![]() Marga Van Dijk wrote:
Marga Van Dijk wrote:
Is het de bedoeling dat je begint bij de hoodie en dan doorgaat met het lijf ik begrijp er niets van
21.07.2020 - 17:34DROPS Design answered:
Dag Marga,
Ja, breit eerst de capuchon en daarna ga je verder met de pas. Je breit aan beide kanten 6 steken in ribbelsteken en deze 6 steken lopen straks door als biezen op de voorkant. Op het einde wordt de capuchon aan de bovenkant (dus opzetrand) dicht genaaid.
23.07.2020 - 12:10
![]() Eeva wrote:
Eeva wrote:
Hei, neulotaanko kainalosaumat vaakassa vaiko pystyssä? Ja jos vaakassa niin miksei hihaan tulevia kainalon kuutta silmukkaa vain poimittu työn reunasta? Teen työn kohokuviot eri värisellä langalla enkä tiedä miten saan tehtyä värin vaihdon tasaisesti, löysin sivuiltanne ohjeen vain suljettuun sileään neuleeseen raidoitettuna, mutta miten värin vaihto tapahtuu kun samalla vaihdetaan oikeasta nurjaan ja nurjasta oikeaan?
03.01.2020 - 11:41DROPS Design answered:
Hei, tässä ohjeessa kainalon silmukat luodaan työhön, mutta voit yhtä hyvin poimia silmukat työn reunasta.
14.01.2020 - 19:22
![]() Eeva wrote:
Eeva wrote:
Hei, en ihan ymmärrä raglanlisäyksiä, leveneekö etu, hiha ja takakappaleet vaiko niiden väliin jäävät kaistaleet? Eli leveneekö 4s leveämmäksi joka kerroksella vai pysyykö ko väli loppuun asti neljänä silmukkana jättäen lisäykset etu, hiha ja takakappaleisiin?
29.11.2019 - 21:09DROPS Design answered:
Hei, raglanlinjojen 4 silmukkaa pysyvät koko ajan 4 silmukkana, lisäykset tehdään näiden silmukoiden molemmin puolin. Eli etukappaleet, takakappale ja hihat levenevät.
18.12.2019 - 16:43
![]() San wrote:
San wrote:
Hallo, ik wil graag garen C (Drops Air) gebruiken voor dit patroon. Maar de garenvervanger geeft Air niet als optie als ik het origineel gebruikte garen Alpaca invoer. Hoeveel Air heb ik nodig (maat L)? Hartelijks San
13.10.2019 - 14:39DROPS Design answered:
Dag San,
Voor het vervangen van een samengesteld garen kun je het beste naar de looplengte kijken. Als je bijvoorbeeld maat S wilt breien heb je 300 gram Alpaca nodig. Dit heeft een totale looplengte van (167 x 6 bollen =) 1002 meter. Air heeft per pol een looplente van ca. 150 meter, waardoor je op (1002 / 150 =) 6,7 bollen komt. LET OP: dit is een indicatie! Neem evt. een extra bol en vraag je verkooppunt binnen welke termijn je overgebleven bollen in kunt leveren.
15.10.2019 - 16:18
![]() Lena wrote:
Lena wrote:
Hallo, Ich bin nun bei der Passe angekommen und verstehe nicht wie viele Maschen ich pro Reihe Zu nehmen soll . Soll ich dann bei jedem Markierer zunehmen und insgesamt in der Reihe dann z.B. 18 Maschen zunehmen? Was bedeutet das x hinter dieser Angabe: 2-4-6-4-6-8 x ?
21.09.2019 - 20:17DROPS Design answered:
Liebe Lena, die ersten Nummer sind für die Größe, dh es wird zuerst in jeder Reihe zugenommen (2 Mal in die 1. Größe, 4 Mal in die 2. und 4. Größe, 6 Mal in die 3. und 5. Größe und 8 Mal in die letzte Größe), und dann in jeder Hinreihe (=18 Mal in die 3 ersten Größen und 20 Mal in die 3 größeren Größen). Bei jeder Raglanzunahmenreihe nehmen Sie 8 Maschen wie unter RAGLANZUNAHMEN beschrieben. Viel Spaß beim stricken!
23.09.2019 - 08:52
![]() Mary wrote:
Mary wrote:
It would be more helpful if you had a diagram concerning the body ,not only for the pattern ,but also about the way the P stiches are knitted towards mid front/mid back. In this way mistakes would be avoided for knitters that are not very experienced like myself. I had to use more yarn and the result is not the expected. If you could make this diagram I would be very grateful Thank you Mary
09.09.2019 - 07:49
![]() Mary wrote:
Mary wrote:
Hello again! I would like to express my opinion for this cardigan. I finally achieved to finish it but it does not look like the cardigan in the photo but something close to it. If I had not been knitting for about 1 month I would have already undone it and knit it again. Although your instructions for other projects (knitting and crocheting) are very thorough,this specific one is quite vague.
09.09.2019 - 07:43
![]() Mary wrote:
Mary wrote:
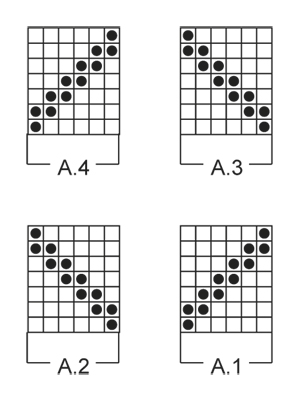
Hello again! Thank you so much for your help.I am knitting the body and my question is we display the P sts in each side of piece,apart from A.1,A.2,A.3,A.4, every new P st we have to knit towards the sides only in RS. Then in WS we have to K them. We do not display P sts in WS. Am I correct? Thank you
13.08.2019 - 07:52DROPS Design answered:
Dear Mary, yes you do, diagrams shows every row from the pattern, ie the P-stitches seen from RS should be displaced from both RS and WS as shown in the diagrams. Happy knitting!
13.08.2019 - 08:40
![]() Mary wrote:
Mary wrote:
You mean that I will have to repeat A.1/A.2 as many times as needed until I reach the bands? Thank you
11.08.2019 - 14:03DROPS Design answered:
- see below :)
12.08.2019 - 08:21
![]() Mary wrote:
Mary wrote:
Hello I am know knitting the body. I do not understand what I have to do after I have worked a sencond time A.1/A.2 vertically.What do you mean continue to display P sts on every row? Thank you
11.08.2019 - 13:36DROPS Design answered:
Dear Mary, continue repeating the diagrams in height so that the P stitches are displaced on every row until 1st P st meets the band stitches on each side. Happy knitting!
12.08.2019 - 08:20
|
|||||||
Autumn Getaway#autumngetawayjacket |
|||||||
 |
 |
||||||
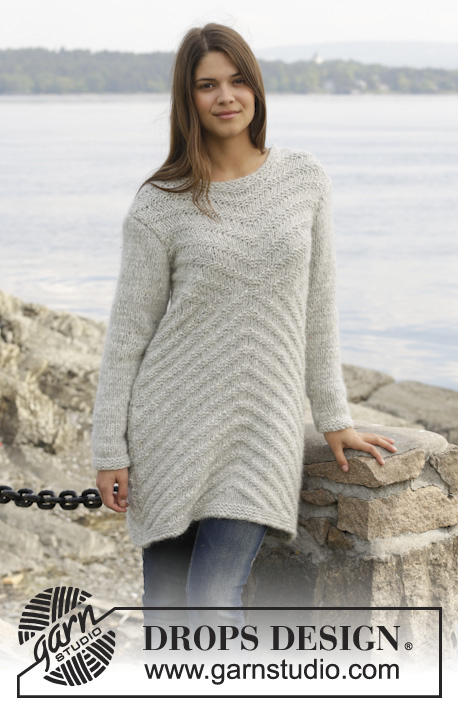
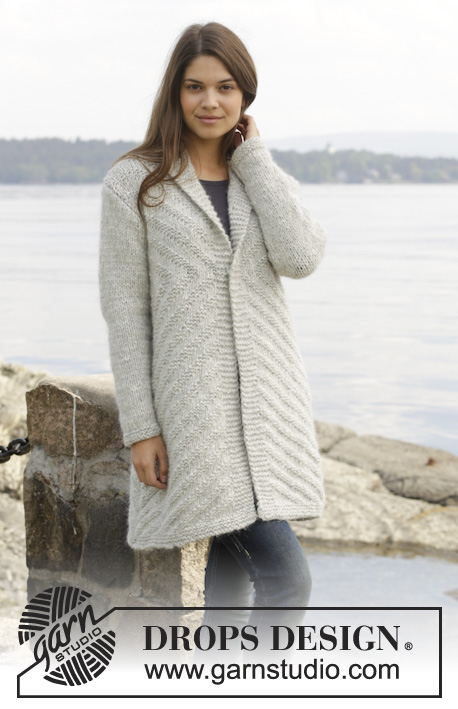
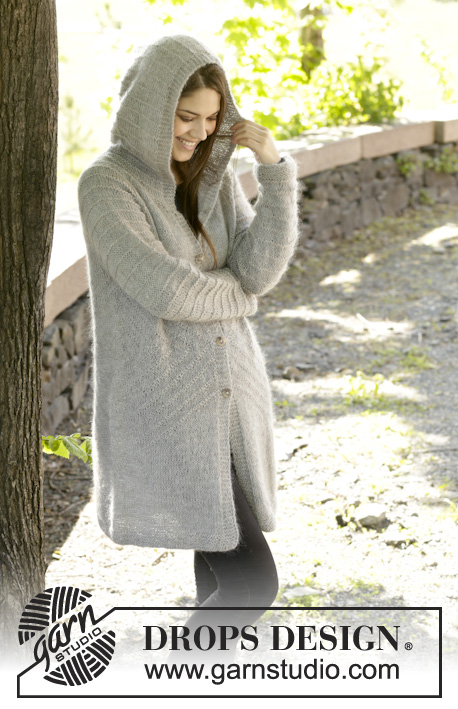
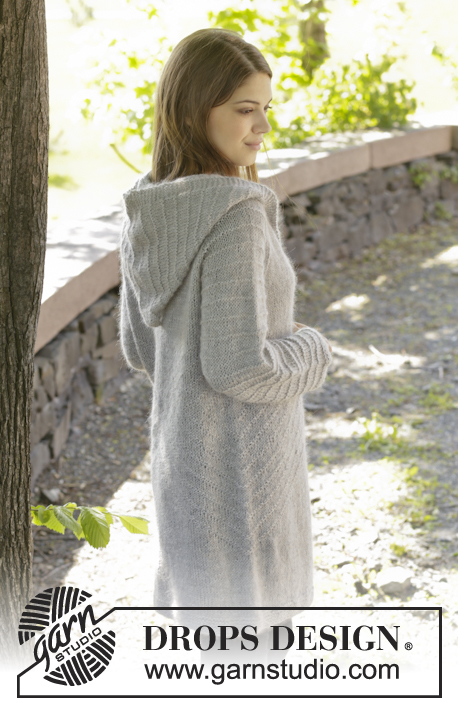
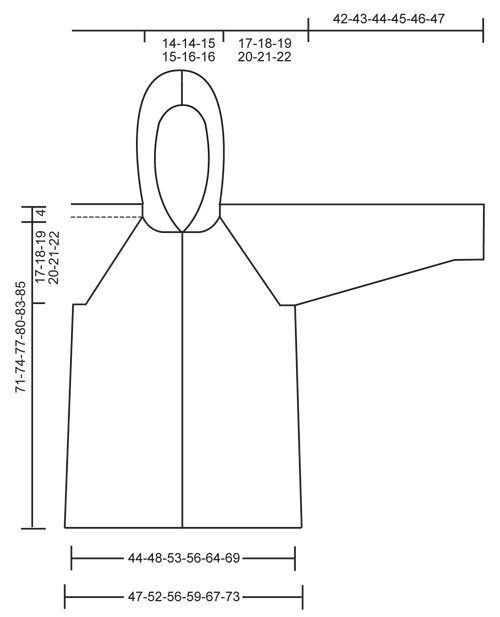
Knitted DROPS jacket with raglan, hood and textured pattern, worked top down in "Alpaca" and "Kid-Silk". Size: S - XXXL.
DROPS 157-3 |
|||||||
|
GARTER ST (back and forth on needle): K all rows. 1 ridge = K2 rows. GARTER ST (in the round on double pointed needles): * K 1 round and P 1 round *, repeat from *-*. 1 ridge = 2 rounds. PATTERN 1: See diagrams A.1-A.4. The diagrams show all rows in pattern seen from RS. PATTERN 2: Row 1: K from RS. Row 2: P from WS. Row 3: K from RS. Row 4: K from WS. Row 5: K from RS. Row 6: P from WS. Repeat rows 1-6. MEASURING TIP: All measurements must be done when holding the piece up on needle. DECREASE TIP: All dec are done from RS! Dec 1 st before marker as follows: Work until 2 sts remain before marker, slip 1 st as if to K, K/P 1, psso. Dec 1 st after marker as follows: K/P 2 tog. NOTE: Adjust dec according to pattern 2 whether st is worked P or K. RAGLAN: Inc 1 st before 1st-3rd-5th-7th marker and 1 st after 2nd-4th-6th-8th marker. Inc as follows from RS: Work until marker, 1 YO. P YO twisted on next row. Inc as follows from WS: Work until marker, 1 YO. K YO twisted on next row. NOTE: Adjust YO on sleeve according to pattern 2 whether st is worked twisted P or K. BUTTONHOLES: Dec for buttonholes on right band. 1 buttonhole = K tog third and fourth st from edge and make 1 YO. Dec for buttonholes when piece measures: SIZE S: 4, 14, 24, 34 and 42 cm / 1½",5½",9½",13½",16½" SIZE M: 2, 10, 19, 28, 37 and 46 cm / ¾",4",7½",11",14½",18" SIZE L: 2, 11, 20, 30, 40 and 50 cm / ¾",4½",8",11¾",15¾",19¾" SIZE XL: 2, 10, 18, 26, 34, 42 and 50 cm / ¾",4",7",10¼",13½",16½",19¾" SIZE XXL: 2, 10, 19, 28, 37, 46 and 55 cm / ¾",4",7½",11",14½",18",21½" SIZE XXXL: 2, 11, 20, 29, 39, 49 and 59 cm / ¾",4½",8",11½",15¼",19¼",23¼" ---------------------------------------------------------- JACKET: Worked top down, back and forth on circular needle. HOOD: Cast on 98-98-106-106-114-114 sts on circular needle size 5 mm / US 8 with 1 strand Alpaca and 1 strand Kid-Silk (= 2 strands). Work 1 ridge in GARTER ST - see explanation above. Work next row as follows: Work 6 sts in garter st, PATTERN 2 – see explanation above, until 6 sts remain, AT THE SAME TIME insert 1 marker after 49-49-53-53-57-57 sts, finish with 6 sts in garter st. When piece measures 26-26-27-27-28-28 cm / 10¼"-10¼"-10½"-10½"-11"-11", dec 1 st on each side of marker – see DECREASE TIP. Repeat dec every 8th row 3 more times = 90-90-98-98-106-106 sts. REMEMBER THE GAUGE! Work until piece measures 38-38-39-39-40-40 cm / 15"-15"-15¼"-15¼"-15¾"-15¾"– READ MEASURING TIP, adjust so that last row is from WS. Insert 1 marker in the piece. NOW MEASURE PIECE FROM HERE! YOKE: Work 1 ridge while AT THE SAME TIME on 1st row dec 6-6-10-6-10-10 sts evenly = 84-84-88-92-96-96 sts. Work 1 ridge while AT THE SAME TIME on last row inc 8-16-20-36-44-56 sts evenly = 92-100-108-128-140-152 sts. Remember BUTTONHOLES - see explanation above. On next row insert 8 markers in the piece as follows: Work 6 band sts in garter st, 10-12-14-18-21-24 sts in stockinette st (= left front piece), insert 1st marker, work 4 sts in stockinette st, insert 2nd marker, 12-12-12-14-14-14 sts pattern 2 (= left sleeve), insert 3rd marker, work 4 sts in stockinette st, insert 4th marker, 20-24-28-36-42-48 sts in stockinette st (= back piece), insert 5th marker, 4 sts in stockinette st, insert 6th marker, 12-12-12-14-14-14 sts pattern 2 (= right sleeve), insert 7th marker, 4 sts in stockinette st, insert 8th marker, 10-12-14-18-21-24 sts in stockinette st and finish with 6 band sts in garter st (= right front piece). Work band sts in garter st until finished measurements. Work sleeves in pattern 2 until finished measurements. Then inc for RAGLAN - see explanation above, as follows: Inc on every row 2-4-6-4-6-8 times, then inc on every row from RS 18-18-18-20-20-20 times = 252-276-300-320-348-376 sts. Piece now measures approx. 17-18-19-20-21-22 cm / 6¾"-7"-7½"-8"-8¼"-8¾". Now work next row as follows: Work the first 40-44-48-52-57-62 sts, slip the next 52-56-60-62-66-70 sts on a stitch holder for sleeve, cast on 6 new sts under sleeve, work the next 68-76-84-92-102-112 sts, slip the next 52-56-60-62-66-70 sts on a stitch holder for sleeve, cast on 6 new sts under sleeve, work the remaining 40-44-48-52-57-62 sts. There are now 160-176-192-208-228-248 sts on body. Insert 1 marker in the piece. NOW MEASURE PIECE FROM HERE! BODY: Then work as follows: 6 band sts in garter st, 31-35-39-43-48-53 sts in stockinette st, A.1 (= 6 sts), A.2, 62-70-78-86-96-106 sts in stockinette st, A.1, A.2, 31-35-39-43-48-53 sts in stockinette st, finish with 6 band sts in garter st. P sts in A.1/A.2 are displaced 1 st towards mid front/mid back on every row. When there are 10 sts in stockinette st between P sts in each side of piece, beg 1 new repetition of A.1/A.2 vertically. When A.1/A.2 have been worked 1 time vertically, continue to displace P sts on every row until 1st P st meets band in each side of piece. Then work A.3 over A.1 and A.4 over A.2, i.e. now displace P sts towards the side, P sts in 3 are displaced 1 st on every row. When A.3/A.4 have been worked 1 time vertically, continue to displace P sts on every row until they meet in the side. AT THE SAME TIME beg a new repetition of A.3/A.4 every 8th row towards mid front and mid back 3 times in total. When piece measures 28-30-32-34-36-38 cm / 11"-11¾"-12½"-13⅜"-14¼"-15", inc as follows from RS: Work in garter st and stockinette st as before until first P st, 1 YO, work pattern A.3/A.4 as before to and with last P st, 1 YO, work in stockinette st over back piece until first P st, 1 YO, work pattern A.3/A.4 as before to and with last P st, 1 YO, work in stockinette st and finish with 6 sts in garter st (= 4 sts inc). P YO twisted. Repeat inc every 5 cm / 2" 2 more times = 172-188-204-220-240-260 sts. When last P sts meet in the side, continue piece in stockinette st with 6 band sts in garter st in each side. When piece measures 50-52-54-56-58-59 cm / 19¾"-20½"-21¼"-22"-22¾"-23 ¼", switch to circular needle size 4.5 mm / US 7 and work 6 ridges. Bind off. SLEEVE: Worked in the round on double pointed needles. Slip sts from stitch holder back on double pointed needles size 5 mm / US 8. Continue with pattern 2 AT THE SAME TIME on 1st row cast on 6 new sts under sleeve (insert a marker in the middle of the new sts) = 58-62-66-68-72-76 sts. NOW MEASURE THE PIECE FROM HERE. When piece measures 4 cm / 1½", dec 1 st on each side of marker. Repeat dec every 3-3-2½-2½-2½-2½-2 cm / 1"-1"-⅞"-⅞"-⅞"-⅞"-¾" 10-11-12-12-13-15 more times = 36-38-40-42-44-44 sts. When piece measures 38-39-40-41-42-43 cm / 15-15¼"-15¾"-16⅛"-16½"-17", switch to double pointed needles size 4.5 mm / US 7 and work 6 ridges in GARTER ST - see explanation above! bind off. ASSEMBLY: Sew the openings under the sleeves tog. Place the hood double and sew it tog at the top. Sew the buttons on to left front piece. |
|||||||
Diagram explanations |
|||||||
|
|||||||
 |
|||||||
 |
|||||||
Have you finished this pattern?Tag your pictures with #dropspattern #autumngetawayjacket or submit them to the #dropsfan gallery. Do you need help with this pattern?You'll find 24 tutorial videos, a Comments/Questions area and more by visiting the pattern on garnstudio.com. © 1982-2026 DROPS Design A/S. We reserve all rights. This document, including all its sub-sections, has copyrights. Read more about what you can do with our patterns at the bottom of each pattern on our site. |
|||||||


With over 40 years in knitting and crochet design, DROPS Design offers one of the most extensive collections of free patterns on the internet - translated to 17 languages. As of today we count 325 catalogs and 12298 patterns - 12288 of which are translated into English (US/in).
We work hard to bring you the best knitting and crochet have to offer, inspiration and advice as well as great quality yarns at incredible prices! Would you like to use our patterns for other than personal use? You can read what you are allowed to do in the Copyright text at the bottom of all our patterns. Happy crafting!
Post a comment to pattern DROPS 157-3
We would love to hear what you have to say about this pattern!
If you want to leave a question, please make sure you select the correct category in the form below, to speed up the answering process. Required fields are marked *.