
Popular categories
Looking for a yarn?


Comments / Questions (10)
![]() Jacqueline Baudillon wrote:
Jacqueline Baudillon wrote:
Dans ce modèles 7320 il y a dans le premier rang du diagramme 2 jetés cote à cote comme les tricoter pour que cela ne fasse pas un trou énorme . D\'avance merci
24.07.2020 - 12:00
![]() Baudillon wrote:
Baudillon wrote:
Par quellle qualité remplacer la laine Vivaldi que je ne trouve pas pour ce modèle
13.07.2020 - 12:05
![]() BAUDILLON wrote:
BAUDILLON wrote:
Par quellle qualité remplacer la laine Vivaldi que je ne trouve pas pour ce modèle
13.07.2020 - 12:04DROPS Design answered:
Bonjour Mme Baudillon, vous pouvez remplacer 1 fil DROPS Vivaldi par 2 fils DROPS Kid-Silk ou bien par 1 fil DROPS Brushed Alpaca Silk. Bon tricot!
13.07.2020 - 13:47
![]() Barbara Orfeld wrote:
Barbara Orfeld wrote:
In der Anleitung für die Rüschenkante muss es "R" statt "Ndl" heißen!
28.05.2018 - 08:43
![]() Stein, Claudia wrote:
Stein, Claudia wrote:
Meine Frage bezieht sich auf die Abnahme für die Armkugel. Nachdem 1x3 M, 3 x2 M und 5x1 M abgenommen wurde, soll nun bis die Arbeit 57 cm misst weiter 2 M abgenommem werden. Heißt das, ich muss in jeder Reihe jeweils 2 M abnehmen bis die 57 cm erreicht werden?
04.02.2018 - 15:23DROPS Design answered:
Liebe Frau Stein, ja genau, 2 M am Anfang jeder Reihe (Hin- sowie Rückreihe) abketten, bis Ärmel 57 cm mist. Viel Spaß beim stricken!
05.02.2018 - 09:43
![]() Frieda Guijt wrote:
Frieda Guijt wrote:
Bedankt, ik bekijk adhv proeflapje wat beste keus is. Bij de mouwen heb ik naald 6 voor tricot gedeelte gebruikt. Ik verwacht dat het dan minderen aan wordt
12.11.2014 - 09:09
![]() Frieda Guijt wrote:
Frieda Guijt wrote:
In de beschrijving zie ik niet terug dat ik van heupbreedte naar borstbreedte moet minderen, terwijl model a-lijn heeft. Wat adviseert u hierin?
09.11.2014 - 20:53DROPS Design answered:
Hoi Frieda. Je breit het eerste gedeelte met breinaald 5 en na M.3 brei je door met naald 4.5. Dit maakt de onderkant wat wijder dan boven. Wil je nog meer a-lijn in het model, dan kan je eventueel nog een paar steken minderen aan de zijkanten (tussen zijkant en achterpand) in het gedeelte met tricotst.
11.11.2014 - 15:59
![]() Johanna wrote:
Johanna wrote:
Underbar
06.03.2006 - 10:30
![]() Greta wrote:
Greta wrote:
Jo, den var fin!
06.03.2006 - 10:17
![]() Pia Christensson wrote:
Pia Christensson wrote:
Stickade den i #27 till jul. En underbar fin kofta
28.12.2005 - 08:41
|
|||||||||||||||||||
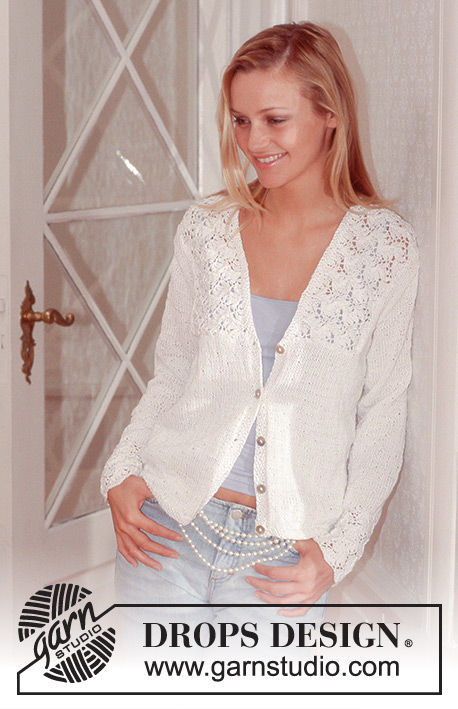
DROPS 73-20 |
|||||||||||||||||||
|
|
|||||||||||||||||||
DROPS Cardigan in Vivaldi
DROPS 73-20 |
|||||||||||||||||||
|
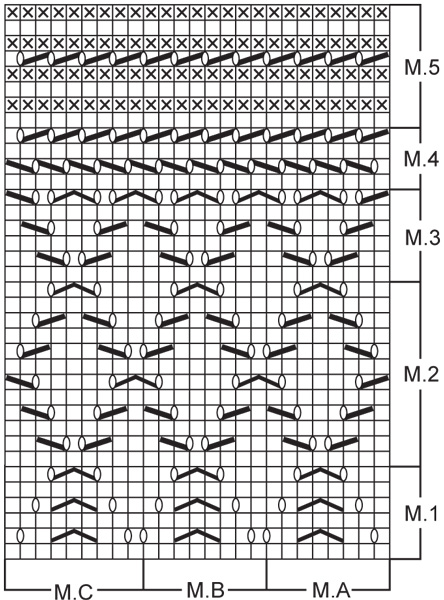
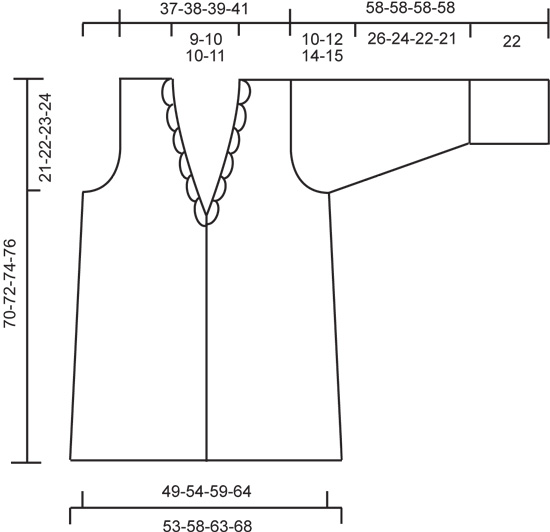
Gauge: 17 sts x 24 rows on larger needles in stockinette st = 10 x 10 cm. Patterns 1 through 5: 16 sts = 10 cm wide. For Patterns 4 and 5 you will need to knit on smaller needles to obtain the same gauge. Garter st, when knitting flat: Knit all sts, all rows. Pattern: The pattern is seen from the right side. On the bottom of the chart there are 3 sections (M.A, M.B and M.C) – each of these is a «sub-pattern» of Patterns 1 through 5 shown along the right side of the chart. You will repeat M.B multiple times in the row – M.A and M.C are the edges. Buttonhole: Make buttonholes along right buttonband. 1 buttonhole = bind off the 3rd st from center front edge and cast on 1 new sts over the bound off st on the next row. Make buttonholes when the piece measures: Size S/M: 36, 40 and 44 cm. Size M/L: 37, 41 and 45 cm. Size L/XL: 38, 42 and 46 cm. Size XXL: 38, 43 and 47 cm. Decreasing tips (for neck): All decs are made on right side rows. Dec 1 st inside 4 edge st knit in garter st as follows: After 4 sts: Slip 1 as if to knit, K 1, psso. Before 4 sts: K 2 tog. Ruffle edge: 1 row stockinette st, 1 row stockinette st increasing 1 st between every st (inc 1 st by pulling up yarn between 2 sts). Then 3 rows stockinette st, 1 row stockinette st increasing 1 st between every other st, 3 rows stockinette st. Bind off as follows: Picot edge: * K 2 tog the first 2 sts, leaving those 2 sts on left needle, and put the new st onto the left needle, K 1 in the first st on left needle, leave the st on needle and put the new st onto the left needle. K 2, pass the first st over the second st to bind off 1 st. Then K 2 tog – there are now 2 sts on the right needle, pass the first st over the second to bind off 1 st. There is now 1 st on the right needle, put it back onto the left needle *, now bind off 1 st, repeat from * - *. ------------------------------------------------------------------ Body: Cast on 177-193-209-225 sts on larger circular needles with 2 strands black. Take away 1 strand and knit 2 rows garter st (single strand). Establish Pattern 1 on the next row as follows: K 4 (buttonband sts knit in garter st throughout), M.A (8 sts), M.B over 152-168-184-200 sts, M.C (9 sts), K 4 (buttonband sts knit in garter st throughout). Make buttonholes along right buttonband as you go along - see instructions above. After Pattern 1 knit Pattern 2 above it until piece measures approx. 20 cm - adjust to end after a complete repeat. Then knit Pattern 3 once, and then change to smaller needles (to maintain the same gauge) and knit Pattern 4 until piece measures approx. 35 cm, then knit Pattern 5 once. Change back to larger needles and knit stockinette st to finished measurements. At the same time put a marker 46-50-54-58 sts in from each side (85-93-101-109 sts between markers). Read the entire next section before knitting: Neck: When the piece measures 45-46-47-48 cm dec 1 st for the neck - see knitting tips. Dec every 4 rows 11-12-12-13 times. Armhole: When the piece measures 49-50-51-52 cm bind off 6 sts at each side for armhole (3 sts each side of markers). Knit each piece separately. Right front: Continue to dec for the neck and at the same time bind off for armhole at the side every other row: 3 sts 1-1-1-2 times, 2 sts 1-2-3-3 times and 1 st 3-4-5-5 times. After all armhole and neck shaping is complete 24-24-25-25 remain on shoulder. Bind off when the piece measures 70-72-74-76 cm. Left front: Knit the same as right front, reversing all shaping. Back: = 79-87-95-103 sts. Bind off for armhole at each side as on front = 63-65-67-69 sts remain. When the piece measures 67-69-71-73 cm knit 4 rows garter st over the center 21-23-23-25 sts (keep the remaining sts in stockinette). On the next row bind off the center 13-15-15-17 sts. Then dec 1 st at each neck edge on the next row - see knitting tips = 24-24-25-25 sts remain on each shoulder. Bind off the remaining sts when the piece measures 70-72-74-76 cm. Sleeve: Cast on 35-43-43-51 sts on larger needles with 2 strands black. Take away 1 strand and knit 2 rows garter st (single strand). Establish Pattern 1 on the next row as follows: K 1 (edge st), M.A (8 sts), M.B over 16-24-24-32 sts, M.C (9 sts), K 1 (edge st). After Pattern 1 knit Pattern 2 twice. The piece measures approx. 12-13 cm. Read the entire next section before knitting: Knit Pattern 3, change to smaller needles (in order to maintain the same gauge) and knit Pattern 4 until piece measures approx. 22 cm, then knit Pattern 5 once. Change back to larger needles and stockinette st to finished measurements. At the same time when the piece measures 14 cm inc 1 st at each side every 2 cm a total of 16-14-15-13 times = 67-71-73-77 sts. When the piece measures 48-46-44-43 cm bind off for sleeve cap at each side every other row: 3 sts 1 time, 2 sts 3-3-2-2 times, 1 st 4-5-11-12 times, then bind off 2 sts at each side until the piece measures 57 cm and then bind off 3 sts 1 time. The piece measures approx. 58 cm. Bind off the remaining sts. Assembly: Sew shoulder seams. Collar: Pick up around neck from wrong side in outermost sts in garter st on smallest needles with black: approx. 120-140 sts (start and end where neck shaping begins). Knit ruffle edge - see instructions above. When the collar folds out, the outside of collar will be stockinette st. Sew sleeve seams and sew in sleeves. Sew on buttons. |
|||||||||||||||||||
Diagram explanations |
|||||||||||||||||||
|
|||||||||||||||||||
 |
|||||||||||||||||||
 |
|||||||||||||||||||
Have you finished this pattern?Tag your pictures with #dropspattern or submit them to the #dropsfan gallery. Do you need help with this pattern?You'll find 22 tutorial videos, a Comments/Questions area and more by visiting the pattern on garnstudio.com. © 1982-2026 DROPS Design A/S. We reserve all rights. This document, including all its sub-sections, has copyrights. Read more about what you can do with our patterns at the bottom of each pattern on our site. |
|||||||||||||||||||


With over 40 years in knitting and crochet design, DROPS Design offers one of the most extensive collections of free patterns on the internet - translated to 17 languages. As of today we count 324 catalogs and 12290 patterns - 12280 of which are translated into English (US/in).
We work hard to bring you the best knitting and crochet have to offer, inspiration and advice as well as great quality yarns at incredible prices! Would you like to use our patterns for other than personal use? You can read what you are allowed to do in the Copyright text at the bottom of all our patterns. Happy crafting!
Post a comment to pattern DROPS 73-20
We would love to hear what you have to say about this pattern!
If you want to leave a question, please make sure you select the correct category in the form below, to speed up the answering process. Required fields are marked *.