
Popular categories
Looking for a yarn?


Comments / Questions (50)
![]() Ella wrote:
Ella wrote:
Approximately what are the chest measurements for S, M, L,
03.02.2015 - 22:27DROPS Design answered:
Dear Ella, you will find finished measurements for each size in the measurement chart at the bottom of the pattern. They are taken flat, from side to side, ie in first size, 45 cm in width = 90 cm around chest. Happy knitting!
04.02.2015 - 08:46Marit wrote:
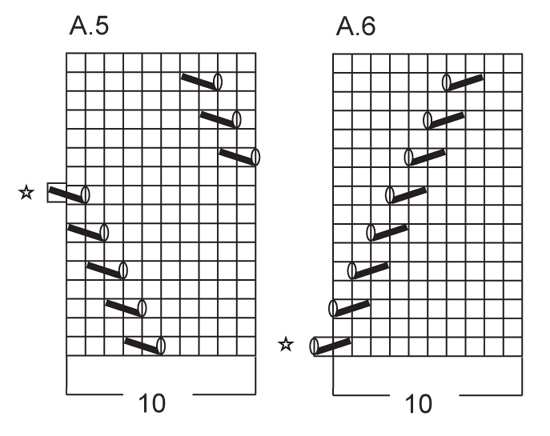
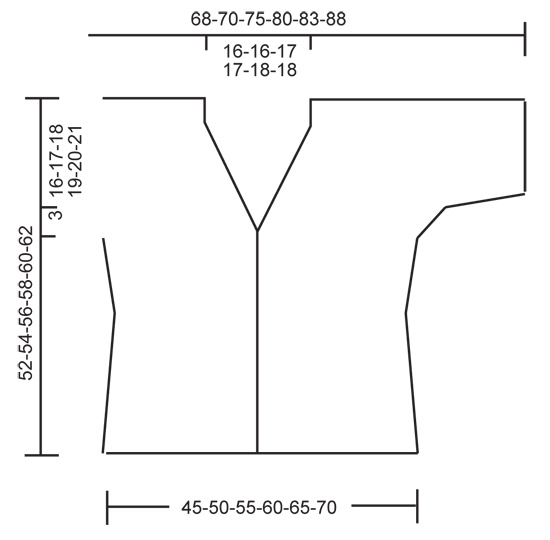
Naar A.4 og A.6 mötes midt bak er det forklart innledningsvis i oppskriften hva man skal gjöre. Hva naar A.3 og A.5 mötes midt bak? Det er ikke forklart. Blir det 2 hull ved siden av hverandre? Det ser ikke slik ut paa bilde av modellen.
10.10.2014 - 16:30DROPS Design answered:
Hej igen Marit, De mødes på samme måde som A.4 og A.6. Spørg også gerne hos din forhandler hvor du har købt garnet. God fornøjelse!
22.10.2014 - 10:36Marit Santoa wrote:
Diag A5, omg nr. 9 staar det 9 m glattstrikk mellom hver hullrad. Samme med diag. A3 omg. nr. 11 hvor det ogsaa staar 9 m glattstrikking mellom hullradene. Faar ikke dette til aa passe med forskyvningene av hullradene.
09.10.2014 - 19:13DROPS Design answered:
Hej Marit, men hvis du strikker efter diagrammet så får du automatisk 9 m glatstrik mellem hver hulrække, hvis du er usikker på hvor diagrammet starter og slutter i din strikning, så sæt gerne nogle mærketråde. God fornøjelse!
22.10.2014 - 10:35
![]() Angelika wrote:
Angelika wrote:
KOmm in der reihe 11 mit dem Übergang von A3 zu A5 nicht zurecht..wie strickt ihr das..
29.08.2014 - 09:27DROPS Design answered:
Liebe Angelika, ich hoffe ich habe Ihre Frage richtig verstanden: da das Muster sich ja diagonal verschiebt, wird in der 11. Reihe ein Lochmusterstreifen fortgesetzt (oder es beginnt ein neuer). Vielleicht hilft es Ihnen, wenn Sie das Muster auf dem Foto genau anschauen.
02.09.2014 - 09:11
![]() Evy Sandklef wrote:
Evy Sandklef wrote:
Hej, jag har kört fast med detta mönster. Har stickat A3 och A5 10 varv. Hur gör jag sedan och hur stickar jag när jag börjar med ett nytt hålvarv i mitten? Hur många maskor före och efter?
04.04.2014 - 12:47DROPS Design answered:
Hej Evy. Du skal fortsaette med mönstret i höjden, mönstret (2 m räta tills, 1 omslag mellan 2 m) forskyder sig hele tiden 1 m til höjre og i varv 11 kan du se den naeste mönster begynde, hvilket betyder der er 8 m mellem hvert hulmönster i A.3 og 7 m i A.5.
08.04.2014 - 13:08
![]() Aase Guldmann wrote:
Aase Guldmann wrote:
Håber snart opskriften kommer, den er så flot
31.01.2014 - 10:43
![]() Petra wrote:
Petra wrote:
Schönes Modell, ich hoffe ebenfalls, dass dieAnleitung bald kommt, möchte es nacharbeiten, LG
26.01.2014 - 20:08
![]() Sibylle wrote:
Sibylle wrote:
Klasse Modell. Ich hoffe die Anleitung kommt bald!!
26.01.2014 - 17:48
![]() Bente Rasmusseen wrote:
Bente Rasmusseen wrote:
Spændende, glæder mig til opskriften.
26.01.2014 - 11:50
![]() Alice Zakis wrote:
Alice Zakis wrote:
Virkelig smuk bluse. Håber snart mønsteret bliver lagt ud,så den er strikket til sommer.
20.01.2014 - 12:54
|
||||||||||||||||||||||
Mykonos#mykonoscardigan |
||||||||||||||||||||||
 |
 |
|||||||||||||||||||||
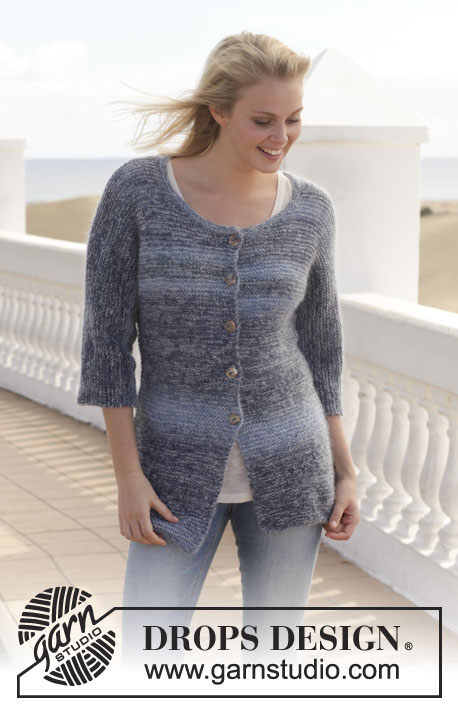
Knitted DROPS jacket with lace pattern in ”Muskat”. Size: S - XXXL.
DROPS 152-22 |
||||||||||||||||||||||
|
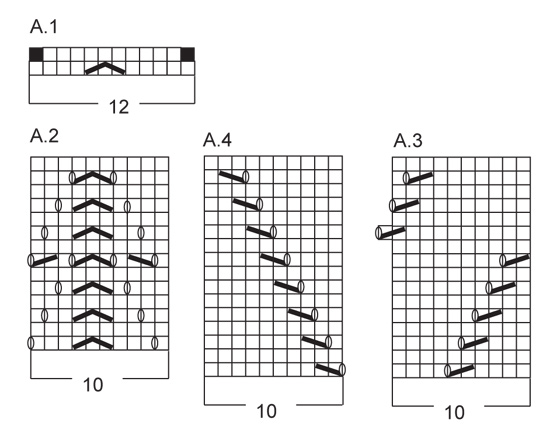
KNITTING TIP: When neck dec beg, continue eyelet rows that have been started, but do not beg new eyelet rows. NOTE! Adjust to not dec for neck on the first 4 rows of diagram A.4/A.6. GARTER ST (back and forth on needle): K all rows. 1 ridge = K2 rows. PATTERN: See diagrams A.1-A.6. The diagrams show all rows in pattern seen from RS. NOTE: Diagrams do not fit vertically when repeated, but continue eyelet rows as before, AT THE SAME TIME beg a new eyelet row every 16th row. When A.4 and A.6 meet mid back, work 1 hole more in A.6, but do not work in A.4 (i.e. there is 1 hole in the middle between A.4 and A.6). DECREASE TIP (applies to neck dec): Dec inside 2 sts in garter st. All dec are done from RS! Dec as follows before 2 sts: Start 2 sts before and K 2 tog. Dec as follows after 2 sts: Slip 1 st as if to K, K 1, psso. BUTTONHOLES: Dec for buttonholes on right band. 1 buttonhole = K tog second and third st from edge and make 1 YO. Dec for buttonholes when piece measures (measured in the side where piece is shortest): SIZE S: 7, 13, 19, 25, 31 and 37 cm / 2¾",5⅛",7½",9¾",12¼",14½" SIZE M: 9, 15, 21, 27, 33 and 39 cm / 3½",6",8¼",10⅝",13",15¼" SIZE L: 4, 10, 16, 22, 28, 34 and 40 cm / 1½",4",6¼",8¾",11",13⅜",15¾" SIZE XL: 6, 12, 18, 24, 30, 36 and 42 cm / 2⅜",4¾",7",9½",11¾",14¼",16½" SIZE XXL: 7, 13, 19, 25, 31, 37 and 43 cm / 2¾",5⅛",7½",9¾",12¼",14½",17" SIZE XXL: 9, 15, 21, 27, 33, 39 and 45 cm / 3½",6",8¼",10⅝",13",15¼",17¾" ---------------------------------------------------------- BODY: Worked back and forth on circular needle from mid front. Cast on 229-253-277-301-325-349 sts (includes 6 band sts in each side towards mid front) on circular needle size 4 mm / US 6 with Muskat. Work 1 ridge in GARTER ST - see explanation above. Work 6 band sts in each side in garter st until finished measurements. Continue as follows: K 6 (= band), A.1 (= 12 sts) 18-20-22-24-26-28 times total in width, then 1 st in stockinette st (work like this so that both sides are the same) and K 6 (= band). REMEMBER THE GAUGE! When A.1 has been worked 1 time vertically, there are 193-213-233-253-273-293 sts on needle. Then work A.2 (= 10 sts) over A.1 1 time vertically, finish row with 1st st in A.2 before the last 6 K sts (so that pattern is the same in each side towards bands at the front). Remember BUTTONHOLES on right band - see explanation above. Then work 6 sts in garter st (= band), A.3 (= 10 sts) over A.2 9-10-11-12-13-14 times in total in width (= mid back), then work A.5 (= 10 sts) over A.2 9-10-11-12-13-14 times in total in width, then 1 st in stockinette st, finish with 6 sts in garter st (= band). Pattern A.3/A.5 is displaced towards the 6 band sts in each side worked in garter st until finished measurements. NOTE: Work 9th row in A.5 as follows: Work pattern and in garter st as before until 8 sts remain, 1 YO, slip 1 st, K 1, psso – see diagram, finish with 6 sts in garter st (= band). Continue pattern until piece measures 13 cm / 5". On next row from RS dec in A.3 as follows: Instead of K 2 tog as shown in diagram, K 3 tog (= 1 st dec) on every other vertical eyelet row (i.e. every other repetition of A.3), on same row dec on every other vertical eyelet row in A.5 as follows: Instead of "slip 1 st, work 1 st, psso", work as follows: Slip 1 st, K 2 tog, psso (= 9-10-11-12-13-14 sts dec in total). Repeat dec 1 more time in the remaining vertical eyelet rows when piece measures 15 cm / 6" (= 18-20-22-24-26-28 sts dec in total) = 175-193-211-229-247-265 sts remain on needle. NOTE: Dec only 1 st in every repetition (i.e. 1 repetition = 9 sts). Continue with pattern on every other row until piece measures 23 cm / 9". On next row from RS inc in A.3 and A.5 as follows: Instead of K 2 tog as shown in diagram, work first row from RS as follows: K until YO, 1 YO (YO = inc st), K after YO, continue to work as before. Repeat inc on every other vertical eyelet row (= 9-10-11-12-13-14 sts inc). Repeat inc on the remaining vertical eyelet row when piece measures 25 cm / 9¾" = 193-213-233-253-273-293 sts on needle. NOTE: Inc only 1 st in every repetition (i.e. 1 repetition = 10 sts). AT THE SAME TIME when piece measures 25 cm / 9¾" (adjust to work 1 whole repetition of A.3/A.5), work A.4 over A.3 and A.6 over A.5. Pattern is displaced and worked until finished measurements. NOTE: Work 1st row in A.6 as follows: Work pattern and in garter st as before until 8 sts remain, K 2 tog, 1 YO – see diagram, finish with 6 sts in garter st (= band). When piece measures 33-34-35-36-37-38 cm / 13"-13⅜"-13¾"-14¼"-14½"-15", divide the piece, finish front and back piece separately as follows: Slip the first 51-56-61-66-71-76 sts (= right front piece) and the last 52-57-62-67-72-77 sts (= left front piece) on a stitch holder (NOTE: There is 1 st more on left front piece so that pattern is the same in both sides), cut the yarn, then work only over the middle 90-100-110-120-130-140 sts (= back piece). BACK PIECE: Continue pattern as before AT THE SAME TIME cast on new sts for sleeves in each side of piece at the end of every row as follows: cast on 4 sts 2 times in total in each side, then 9-8-8-8-7-7 sts 2 times in total in each side = 142-148-158-168-174-184 sts on needle. Work inc sts in pattern and when all sts have been inc, work 4 sts in garter st in each side of piece for sleeve edges. Continue lace pattern as before. When piece measures 38-40-41-43-44-46 cm / 15"-15¾"-16⅛"-17"-17¼"-18" - see KNITTING TIP above, work 2 ridges in garter st over the middle 4 sts (= 69-72-77-82-85-90 sts on each side), work the other sts as before. Then continue working in garter st over the 4 sts and pattern as before, AT THE SAME TIME divide the piece for v-neck and finish each shoulder separately (= 71-74-79-84-87-92 sts on each shoulder). Continue to work in garter st over the 2 outermost sts towards the neck, AT THE SAME TIME on next row from RS dec 1 st for neck inside the 2 sts in garter st - read DECREASE TIP, repeat dec on every row from RS 16-16-17-17-18-18 more times (= 17-17-18-18-19-19 times in total) = 54-57-61-66-68-73 sts remain on the shoulder. Work until piece measures 51-53-55-57-59-61 cm / 20"-21"-21⅝"-22½"-23¼"-24". Work 1 ridge in garter st over all sts. Bind off. Piece measures approx. 52-54-56-58-60-62 cm / 20½"-21¼"-22"-22¾"-23⅝"-24⅜". RIGHT FRONT PIECE: = 51-56-61-66-71-76 sts. Now cast on new sts for sleeve at the end of every row from RS as follows: cast on 4 sts 2 times in total, then 9-8-8-8-7-7 sts 2 times in total = 77-80-85-90-93-98 sts on row (NOTE: There is 1 st more on left front piece, i.e. after inc there are 78-81-86-91-94-99 sts on needle). Work inc sts in pattern and when all sts have been inc, work the last 4 sts in garter st for sleeve edge. Continue lace pattern as before. REMEMBER BUTTONHOLES! When piece measures 38-40-41-43-44-46 cm / 15"-15¾"-16⅛"-17"-17¼"-18" – see KNITTING TIP above - bind off the 4 band sts at beg of next row from RS = 73-76-81-86-89-94 sts remain on needle. Continue to work in garter st over the 2 outermost band sts towards the neck and pattern as before, AT THE SAME TIME on next row from RS dec 1 st for neck inside the 2 band sts - read DECREASE TIP, repeat dec on every row from RS 19-19-20-20-21-21 times = 54-57-61-66-68-73 sts remain on the shoulder. Work until piece measures 51-53-55-57-59-61 cm / 20"-21"-21⅝"-22½"-23¼"-24". Work 1 ridge in garter st over all sts. Bind off. Piece measures approx. 52-54-56-58-60-62 cm / 20½"-21¼"-22"-22¾"-23⅝"-24⅜". LEFT FRONT PIECE: Work as right front piece but reversed. When binding off for neck, bind off the outermost 4 band sts at beg of next row from WS, work 2 sts in garter st, P the next 2 sts in stockinette st tog (i.e. same no of sts on right and left front piece). Then work as right front piece. ASSEMBLY: Sew shoulder seams and underarm seams. Sew the buttons on to left front piece. |
||||||||||||||||||||||
Diagram explanations |
||||||||||||||||||||||
|
||||||||||||||||||||||
 |
||||||||||||||||||||||
 |
||||||||||||||||||||||
 |
||||||||||||||||||||||
Have you finished this pattern?Tag your pictures with #dropspattern #mykonoscardigan or submit them to the #dropsfan gallery. Do you need help with this pattern?You'll find 19 tutorial videos, a Comments/Questions area and more by visiting the pattern on garnstudio.com. © 1982-2026 DROPS Design A/S. We reserve all rights. This document, including all its sub-sections, has copyrights. Read more about what you can do with our patterns at the bottom of each pattern on our site. |
||||||||||||||||||||||


With over 40 years in knitting and crochet design, DROPS Design offers one of the most extensive collections of free patterns on the internet - translated to 17 languages. As of today we count 324 catalogs and 12290 patterns - 12280 of which are translated into English (US/in).
We work hard to bring you the best knitting and crochet have to offer, inspiration and advice as well as great quality yarns at incredible prices! Would you like to use our patterns for other than personal use? You can read what you are allowed to do in the Copyright text at the bottom of all our patterns. Happy crafting!
Post a comment to pattern DROPS 152-22
We would love to hear what you have to say about this pattern!
If you want to leave a question, please make sure you select the correct category in the form below, to speed up the answering process. Required fields are marked *.