
Popular categories
Looking for a yarn?


Comments / Questions (179)
![]() Roos wrote:
Roos wrote:
Prachtig vest, ik wil deze haken, kleinste maat maar snap absoluut niets van toer 1. Een uitgeschreven patroon zou makkelijker zijn
10.03.2014 - 11:00DROPS Design answered:
Hoi Roos. Toer 1 is uitgeschreven in het patroon. Daarna haak je door volgens de telpatronen. Je kan hier lezen hoe je onze telpatronen moet lezen.
10.03.2014 - 12:30
![]() Sandra Wever wrote:
Sandra Wever wrote:
Hallo, ik heb het linker voorpand nu af,en nu moet ik het rechtervoorpand in spiegelbeeld haken, maar als ik nu links in de hoek begin, dan heb ik de verkeerde kant boven, hoe los ik dat op? Kom er niet uit!
09.03.2014 - 19:08DROPS Design answered:
Hoi Sandra. Je moet de teltekening en het werk spiegelen. Je meerdert dus nu aan de linkerkant ipv aan de rechterkant. Je begint dus nu met A.6, dan A.5 en eindigt met A.4.
10.03.2014 - 12:46
![]() Sandra Wever wrote:
Sandra Wever wrote:
👍 Bedankt voor de snelle reactie, kan ik gauw weer verder!
07.03.2014 - 11:43
![]() Sandra Wever wrote:
Sandra Wever wrote:
Vraagje, ik ben nu klaar met toer 3, nu staat er geschreven,ga zo verder in patroon, betekent dat ik nu toer 2 en 3 steeds moet herhalen? Maar dat klopt niet volgens de teltekening.of lees ik het verkeerd? Alvast bedankt.
07.03.2014 - 10:02DROPS Design answered:
Hoi Sandra. Je haakt door volgens de teltekeningen A.4, A.5 en A.6 - zie onderaan het patroon. Je hebt al toer 1, 2 en 3 gehaakt, dus je haakt nu door vanaf toer 4.
07.03.2014 - 10:25
![]() Eva wrote:
Eva wrote:
Hej! Jag har börjat med bakstycket och undrar ifall mönstret verkligen är rätt. Ska mönstret verkligen skilja sig åt på bak- och framstycke? Jag tycker att det saknas markering för fastmaska mellan luftmaskbågarna på första mönstervarver och det saknas också "x" mellan dubbelstolparna på nästa varv. På vilket varv hör fastmaskorna hemma som är angivna bredvid looparna?
06.03.2014 - 10:08DROPS Design answered:
Hej, Der er lagt en rettelse ud på opskriften. God fornøjesle!
30.05.2014 - 07:29
![]() Paula wrote:
Paula wrote:
Thank you!
05.03.2014 - 12:31
![]() Paula wrote:
Paula wrote:
Hi, I see where I was making a mistake on row 2. Do you think that Roxane's question for Row 3 will be answered shortly? I am also there. thanks Paula
03.03.2014 - 12:51DROPS Design answered:
Dear Paula, on left front piece, Row 3 should be worked vas follows : Work A.4, then work A.5 3-4-5-6 times in total, and finish with A.6 (correction will be added). Thank you. Happy crocheting!
05.03.2014 - 11:57
![]() Paula wrote:
Paula wrote:
Thanks--I see where I was making my mistakes on row 2. But like Roxane, I am stuck on Row 3; will the correction by forthcoming? thanks Paula
03.03.2014 - 12:30
![]() Paula wrote:
Paula wrote:
I am on row 2 and I am stuck. I am supposed to repeat A.5 four times, but I just don't seem to have enough stitches on row 1 to do so. Perhaps I am reading it wrong...help
02.03.2014 - 21:27DROPS Design answered:
Dear Paula, on row 2, work A.6 over the first 9 sts (ch3, skip 2 sts, sc in next st, ch 5, skip ch 6), then repeat A.5 a total of 4 times (sc in next st, ch 5, skip 3 sts, sc in next st, ch 5, skip 6 sts), and finish with A.4 (sc in next st, skip 1 st, ch 2, 1 tr in last st). (US-English terminology). Happy crocheting!
03.03.2014 - 10:07
![]() Christine wrote:
Christine wrote:
Ravissant !
24.02.2014 - 20:28
|
||||||||||||||||||||||||||||
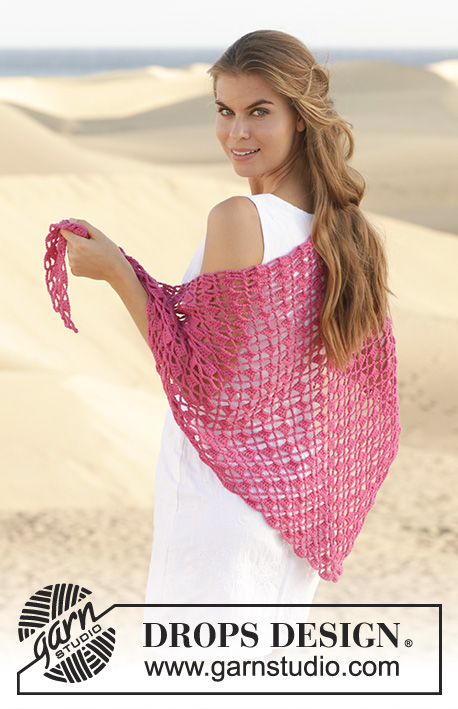
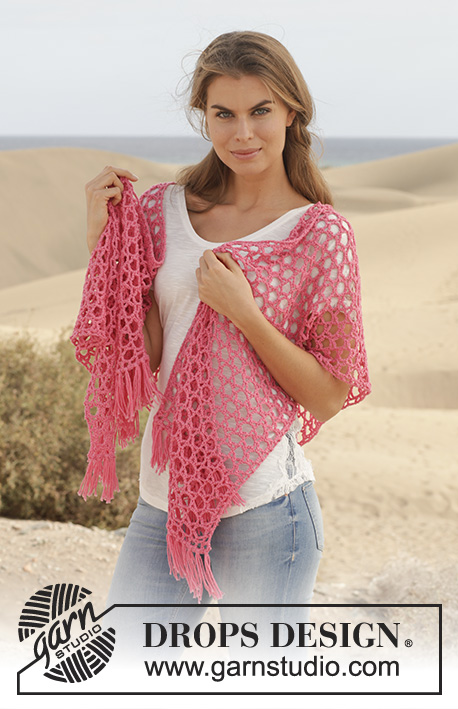
Summer Blush#summerblushcardigan |
||||||||||||||||||||||||||||
|
|
||||||||||||||||||||||||||||
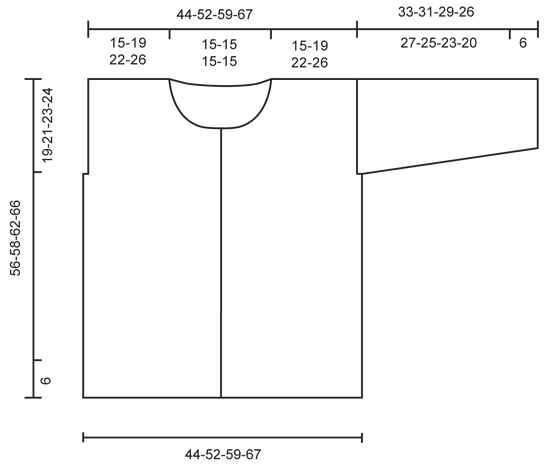
Crochet DROPS jacket with lace pattern in ”Cotton Merino”. Size S-XXXL.
DROPS 154-1 |
||||||||||||||||||||||||||||
|
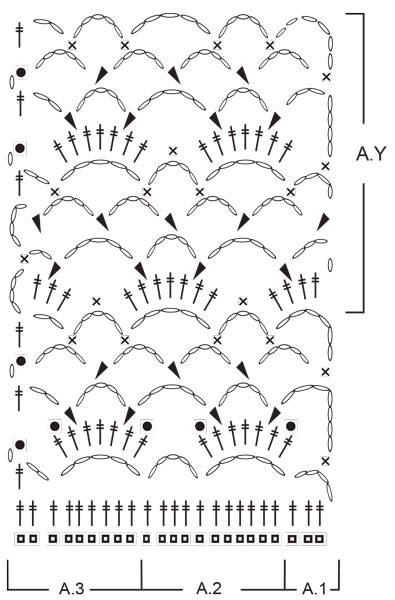
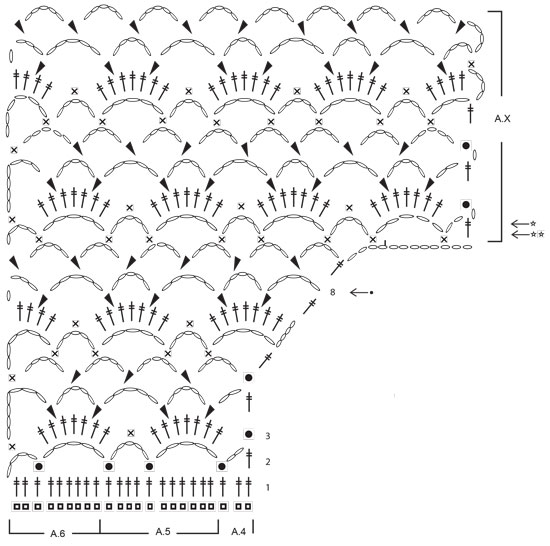
PATTERN: See diagrams A.1-A.8. CROCHET TIP: Ch-spaces will contract more than crochet pattern at the upper part of body. The jacket will thus be naturally rounded without dec in pattern. BUTTONHOLES: Measure from neck edge at the front and sew buttons on left band: SIZE S/M: 1, 7, 14, 21, 28, 35 and 41 cm / ⅜",2¾",5½",8¼",11",13¾",16⅛" SIZE L: 1, 7, 15, 22, 29, 36 and 43 cm / ⅜",2¾",6",8¾",11⅜",14¼",17" SIZE XL/XXL: 1, 8, 15, 21, 27, 33, 40 and 47 cm / ⅜",3⅛",6",8¼",10⅝",13",15¾",18½" SIZE XXXL: 1, 8, 15, 22, 29, 36, 43 and 50 cm / ⅜",3⅛",6",8¾",11⅜",14¼",17",19¾" --------------------------------------------------------- JACKET: Worked in parts, top down and worked tog when finished. LEFT FRONT PIECE: Work 54-66-79-92 ch with Cotton Merino on hook size 3 mm / C. Continue with 1 tr in 4th ch from hook = 2 tr. Continue to work as follows: 1 tr in each of the next 1-6-5-4 ch, * skip ch 1, 1 tr in each of the next 6 ch *, repeat from *-* 7-8-10-12 times in total = 45-56-67-78 tr. (= 1ST ROW in diagrams A.4, A.5 and A.6). Continue to work as follows: ROW 2 (= WS): Work A.6, then work A.5 3-4-5-6 times in total, and finish with A.4. Turn piece. ROW 3: Work A.6, then work A.5 3-4-5-6 times in total, and finish with A.4. Continue back and forth with this pattern, AT THE SAME TIME inc for neck in right side of piece (seen from RS) from 6th row in diagram. When 8th row in diagram has been worked from WS, cut the yarn. Then work 12 loose ch, before working as follows from RS (= 9th row): 1 tr in last tr on 8TH ROW. Continue with pattern according to diagram A.4, A.5 and A.6 as before. When piece measures 19-21-23-24 cm / 7½"-8¼"-9"-9½", insert a marker for armhole in the side, AT THE SAME TIME when A.4, A.5 and A.6 have been worked 1 time vertically, repeat A.x until piece measures approx. 27-29-31-33 cm / 10½"-11½"-12¼"-13". Adjust so that pattern is finished on a row with ch-spaces from WS. Then work ch-spaces with 5 ch in every space as follows from RS: Continue with 1ST ROW in A.Z. Repeat the 4 rows in A.Z until piece measures 51-55-57-61 cm / 10½"-11½"-12¼"-13" in total – Read CROCHET TIP! Work an edge as follows, beg from WS: Beg on 1st row in A.X. Work A.6, A.5 3-4-5-6 times in width, A.4. Continue back and forth until 2nd row in A.X with tr-groups has been worked (i.e. until 6th row in A.X has been worked). Piece measures approx. 56-58-62-66 cm / 22"-22¾"-24½"-26". Fasten off. Put piece aside and work right front piece. RIGHT FRONT PIECE: Beg and work as left front piece but reversed. Adjust according to left front piece. BACK PIECE: First work right shoulder as follows: Work 52-64-77-90 ch with Cotton Merino on hook size 3 mm / C. Cut the yarn and put piece aside. Then work left shoulder as follows: Work 54-66-79-92 ch with Cotton Merino on hook size 3 mm / C. Continue with 1 tr in 4th ch from hook = 2 tr. Continue to work as follows: 1 tr in each of the next 1-6-5-4 ch, * skip ch 1, 1 tr in each of the next 6 ch *, repeat from *-* 7-8-10-12 times in total = 45-56-67-78 tr for left shoulder. Then work 43 LOOSE ch before continuing over right shoulder (i.e. the ch-row): Continue with 1 tr in the first 2 ch on row = 2 tr. Continue to work as follows: 1 tr in each of the next 1-6-5-4 ch, * skip ch 1, 1 tr in each of the next 6 ch *, repeat from *-* 7-8-10-12 times in total = 45-56-67-78 tr for right shoulder. Turn piece (= WS), and work 1 tr in each of the 45-56-67-78 next tr, then work 1 tr in each of the next 43 ch, and finish with 1 tr in each of the next 45-56-67-78 tr = 133-155-177-199 tr. NOTE! This row is the 1st row in diagram A.1, A.2 and A.3. On next row work as follows (= RS): A.1, then work A.2 11-13-15-17 times in total, and finish with A.3. Continue as follows. When piece measures 19-21-23-24 cm / 7½"-8¼"-9"-9½", insert a marker each side to mark armholes, AT THE SAME TIME when A.1, A.2 and A.3 have been worked 1 time vertically, repeat A.Y until piece measures approx. 27-29-31-33 cm / 10½"-11½"-12¼"-13". Adjust pattern according to front pieces. Then work ch-spaces with 5 ch in every space as follows from RS: Continue with 1ST ROW in A.Z. Repeat the 4 rows in A.Z until piece measures 51-55-57-61 cm / 10½"-11½"-12¼"-13" in total – adjust according to front pieces. Work an edge at the bottom of body as on front pieces. Fasten off. Put piece aside. Piece measures approx. 56-58-62-66 cm / 22"-22¾"-24½"-26". Sew shoulder seams on front pieces and back piece tog. SLEEVE: Worked back and forth from body and outwards. ROW 1: Beg at one of the markers, and work ch-spaces along armhole as follows: * ch 5, skip approx. 1½ cm / ½", 1 sc *, repeat from *-* until there are 22-26-27-28 ch-spaces in total between the two markers. Continue with pattern from 2nd row in diagram A.Z, AT THE SAME TIME at beg of the next 2 rows dec 1 ch-space in the side – See diagram A.7 for left side of sleeve, and A.8 for right side of sleeve. 20-24-25-26 ch-spaces remain. Repeat the same dec at beg of the next 2-4-4-4 rows = 18-20-21-22 ch-spaces remain. Continue with ch-spaces as before, AT THE SAME TIME dec as follows: for S/M dec 1 ch-space in each side of sleeve when piece measures 15 cm / 6", and for sizes L - XL/XXL – XXXL dec 1 ch-space in each side of sleeve when piece measures 13-12-11 cm / 5"-4¾"-4½" and 1 ch-space in each side when piece measures 19-18-15 cm / 7½"-7"-6" = 16-16-17-18 ch-spaces remain. Continue until sleeve measures 27-25-23-20 cm / 10½"-9¾"-9"-8" (shorter measurements in the larger sizes because of wider shoulders), and adjust to finish on next to last row in A.Z (i.e. a row with whole ch-spaces in each side of piece). Then work an edge as follows: Beg on 1st row in A.X (= row with ch-spaces, and half ch-spaces in each side of piece) and work this pattern over all ch-spaces at the bottom of sleeve. Continue back and forth until 6th row in A.X has been worked (i.e. 2nd row in with tr-groups). Fasten off. ASSEMBLY: Work underarm seams and side seams in one as follows: 1 sc in front piece, ch 3, 1 sc in back piece, * ch 3, skip approx. 1 cm / ⅜", 1 sc in front piece, ch 3, skip 1 cm / ⅜", 1 sc in back piece *, repeat from *-* and continue the same way for sleeve. NECK EDGE AND BAND: Then work an edge along the band and neck. Beg at the bottom on right front piece, and work as follows: Fasten yarn with one sc, * ch 3, skip 1 cm / ⅜", 1 sc *, repeat from *-* along right band, neck and left band. Sew buttons on to the left band - see explanation above. Button through a hole in right front piece. |
||||||||||||||||||||||||||||
Diagram explanations |
||||||||||||||||||||||||||||
|
||||||||||||||||||||||||||||
 |
||||||||||||||||||||||||||||
 |
||||||||||||||||||||||||||||
 |
||||||||||||||||||||||||||||
 |
||||||||||||||||||||||||||||
Have you finished this pattern?Tag your pictures with #dropspattern #summerblushcardigan or submit them to the #dropsfan gallery. Do you need help with this pattern?You'll find 3 tutorial videos, a Comments/Questions area and more by visiting the pattern on garnstudio.com. © 1982-2026 DROPS Design A/S. We reserve all rights. This document, including all its sub-sections, has copyrights. Read more about what you can do with our patterns at the bottom of each pattern on our site. |
||||||||||||||||||||||||||||


With over 40 years in knitting and crochet design, DROPS Design offers one of the most extensive collections of free patterns on the internet - translated to 17 languages. As of today we count 324 catalogs and 12290 patterns - 12280 of which are translated into English (US/in).
We work hard to bring you the best knitting and crochet have to offer, inspiration and advice as well as great quality yarns at incredible prices! Would you like to use our patterns for other than personal use? You can read what you are allowed to do in the Copyright text at the bottom of all our patterns. Happy crafting!
Post a comment to pattern DROPS 154-1
We would love to hear what you have to say about this pattern!
If you want to leave a question, please make sure you select the correct category in the form below, to speed up the answering process. Required fields are marked *.