
Popular categories
Looking for a yarn?


|
||||||||||||||||||||||||||||
Summer Blush |
||||||||||||||||||||||||||||
|
|
||||||||||||||||||||||||||||
Crochet DROPS jacket with lace pattern in ”Cotton Merino”. Size S-XXXL.
DROPS 154-1 |
||||||||||||||||||||||||||||
|
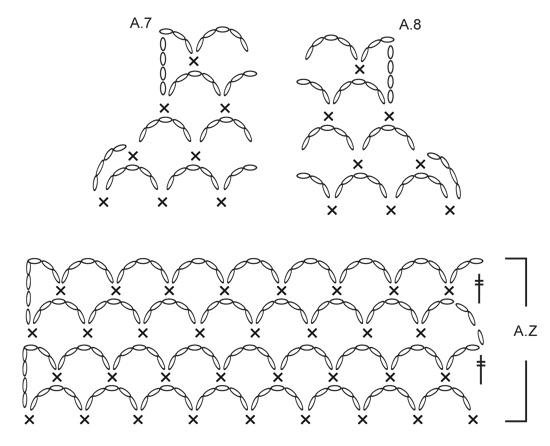
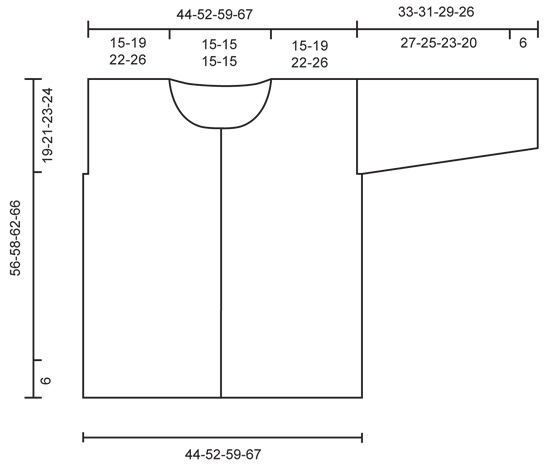
PATTERN: See diagrams A.1-A.8. CROCHET TIP: Ch-spaces will contract more than crochet pattern at the upper part of body. The jacket will thus be naturally rounded without dec in pattern. BUTTONHOLES: Measure from neck edge at the front and sew buttons on left band: SIZE S/M: 1, 7, 14, 21, 28, 35 and 41 cm / ⅜",2¾",5½",8¼",11",13¾",16⅛" SIZE L: 1, 7, 15, 22, 29, 36 and 43 cm / ⅜",2¾",6",8¾",11⅜",14¼",17" SIZE XL/XXL: 1, 8, 15, 21, 27, 33, 40 and 47 cm / ⅜",3⅛",6",8¼",10⅝",13",15¾",18½" SIZE XXXL: 1, 8, 15, 22, 29, 36, 43 and 50 cm / ⅜",3⅛",6",8¾",11⅜",14¼",17",19¾" --------------------------------------------------------- JACKET: Worked in parts, top down and worked tog when finished. LEFT FRONT PIECE: Work 54-66-79-92 ch with Cotton Merino on hook size 3 mm / C. Continue with 1 tr in 4th ch from hook = 2 tr. Continue to work as follows: 1 tr in each of the next 1-6-5-4 ch, * skip ch 1, 1 tr in each of the next 6 ch *, repeat from *-* 7-8-10-12 times in total = 45-56-67-78 tr. (= 1ST ROW in diagrams A.4, A.5 and A.6). Continue to work as follows: ROW 2 (= WS): Work A.6, then work A.5 3-4-5-6 times in total, and finish with A.4. Turn piece. ROW 3: Work A.6, then work A.5 3-4-5-6 times in total, and finish with A.4. Continue back and forth with this pattern, AT THE SAME TIME inc for neck in right side of piece (seen from RS) from 6th row in diagram. When 8th row in diagram has been worked from WS, cut the yarn. Then work 12 loose ch, before working as follows from RS (= 9th row): 1 tr in last tr on 8TH ROW. Continue with pattern according to diagram A.4, A.5 and A.6 as before. When piece measures 19-21-23-24 cm / 7½"-8¼"-9"-9½", insert a marker for armhole in the side, AT THE SAME TIME when A.4, A.5 and A.6 have been worked 1 time vertically, repeat A.x until piece measures approx. 27-29-31-33 cm / 10½"-11½"-12¼"-13". Adjust so that pattern is finished on a row with ch-spaces from WS. Then work ch-spaces with 5 ch in every space as follows from RS: Continue with 1ST ROW in A.Z. Repeat the 4 rows in A.Z until piece measures 51-55-57-61 cm / 10½"-11½"-12¼"-13" in total – Read CROCHET TIP! Work an edge as follows, beg from WS: Beg on 1st row in A.X. Work A.6, A.5 3-4-5-6 times in width, A.4. Continue back and forth until 2nd row in A.X with tr-groups has been worked (i.e. until 6th row in A.X has been worked). Piece measures approx. 56-58-62-66 cm / 22"-22¾"-24½"-26". Fasten off. Put piece aside and work right front piece. RIGHT FRONT PIECE: Beg and work as left front piece but reversed. Adjust according to left front piece. BACK PIECE: First work right shoulder as follows: Work 52-64-77-90 ch with Cotton Merino on hook size 3 mm / C. Cut the yarn and put piece aside. Then work left shoulder as follows: Work 54-66-79-92 ch with Cotton Merino on hook size 3 mm / C. Continue with 1 tr in 4th ch from hook = 2 tr. Continue to work as follows: 1 tr in each of the next 1-6-5-4 ch, * skip ch 1, 1 tr in each of the next 6 ch *, repeat from *-* 7-8-10-12 times in total = 45-56-67-78 tr for left shoulder. Then work 43 LOOSE ch before continuing over right shoulder (i.e. the ch-row): Continue with 1 tr in the first 2 ch on row = 2 tr. Continue to work as follows: 1 tr in each of the next 1-6-5-4 ch, * skip ch 1, 1 tr in each of the next 6 ch *, repeat from *-* 7-8-10-12 times in total = 45-56-67-78 tr for right shoulder. Turn piece (= WS), and work 1 tr in each of the 45-56-67-78 next tr, then work 1 tr in each of the next 43 ch, and finish with 1 tr in each of the next 45-56-67-78 tr = 133-155-177-199 tr. NOTE! This row is the 1st row in diagram A.1, A.2 and A.3. On next row work as follows (= RS): A.1, then work A.2 11-13-15-17 times in total, and finish with A.3. Continue as follows. When piece measures 19-21-23-24 cm / 7½"-8¼"-9"-9½", insert a marker each side to mark armholes, AT THE SAME TIME when A.1, A.2 and A.3 have been worked 1 time vertically, repeat A.Y until piece measures approx. 27-29-31-33 cm / 10½"-11½"-12¼"-13". Adjust pattern according to front pieces. Then work ch-spaces with 5 ch in every space as follows from RS: Continue with 1ST ROW in A.Z. Repeat the 4 rows in A.Z until piece measures 51-55-57-61 cm / 10½"-11½"-12¼"-13" in total – adjust according to front pieces. Work an edge at the bottom of body as on front pieces. Fasten off. Put piece aside. Piece measures approx. 56-58-62-66 cm / 22"-22¾"-24½"-26". Sew shoulder seams on front pieces and back piece tog. SLEEVE: Worked back and forth from body and outwards. ROW 1: Beg at one of the markers, and work ch-spaces along armhole as follows: * ch 5, skip approx. 1½ cm / ½", 1 sc *, repeat from *-* until there are 22-26-27-28 ch-spaces in total between the two markers. Continue with pattern from 2nd row in diagram A.Z, AT THE SAME TIME at beg of the next 2 rows dec 1 ch-space in the side – See diagram A.7 for left side of sleeve, and A.8 for right side of sleeve. 20-24-25-26 ch-spaces remain. Repeat the same dec at beg of the next 2-4-4-4 rows = 18-20-21-22 ch-spaces remain. Continue with ch-spaces as before, AT THE SAME TIME dec as follows: for S/M dec 1 ch-space in each side of sleeve when piece measures 15 cm / 6", and for sizes L - XL/XXL – XXXL dec 1 ch-space in each side of sleeve when piece measures 13-12-11 cm / 5"-4¾"-4½" and 1 ch-space in each side when piece measures 19-18-15 cm / 7½"-7"-6" = 16-16-17-18 ch-spaces remain. Continue until sleeve measures 27-25-23-20 cm / 10½"-9¾"-9"-8" (shorter measurements in the larger sizes because of wider shoulders), and adjust to finish on next to last row in A.Z (i.e. a row with whole ch-spaces in each side of piece). Then work an edge as follows: Beg on 1st row in A.X (= row with ch-spaces, and half ch-spaces in each side of piece) and work this pattern over all ch-spaces at the bottom of sleeve. Continue back and forth until 6th row in A.X has been worked (i.e. 2nd row in with tr-groups). Fasten off. ASSEMBLY: Work underarm seams and side seams in one as follows: 1 sc in front piece, ch 3, 1 sc in back piece, * ch 3, skip approx. 1 cm / ⅜", 1 sc in front piece, ch 3, skip 1 cm / ⅜", 1 sc in back piece *, repeat from *-* and continue the same way for sleeve. NECK EDGE AND BAND: Then work an edge along the band and neck. Beg at the bottom on right front piece, and work as follows: Fasten yarn with one sc, * ch 3, skip 1 cm / ⅜", 1 sc *, repeat from *-* along right band, neck and left band. Sew buttons on to the left band - see explanation above. Button through a hole in right front piece. |
||||||||||||||||||||||||||||
Diagram explanations |
||||||||||||||||||||||||||||
|
||||||||||||||||||||||||||||

|
||||||||||||||||||||||||||||

|
||||||||||||||||||||||||||||
|
||||||||||||||||||||||||||||
|
||||||||||||||||||||||||||||
|
Have you made this or any other of our designs? Tag your pictures in social media with #dropsdesign so we can see them! Do you need help with this pattern?You'll find tutorial videos, a Comments/Questions area and more by visiting the pattern on garnstudio.com. © 1982-2024 DROPS Design A/S. We reserve all rights. This document, including all its sub-sections, has copyrights. Read more about what you can do with our patterns at the bottom of each pattern on our site. |
||||||||||||||||||||||||||||


With over 40 years in knitting and crochet design, DROPS Design offers one of the most extensive collections of free patterns on the internet - translated to 17 languages. As of today we count 304 catalogs and 11422 patterns - 11417 of which are translated into English (US/in).
We work hard to bring you the best knitting and crochet have to offer, inspiration and advice as well as great quality yarns at incredible prices! Would you like to use our patterns for other than personal use? You can read what you are allowed to do in the Copyright text at the bottom of all our patterns. Happy crafting!
Comments / Questions (179)
Hallo Zusammen ich sitze schon so lange an der Anleitung und komme einfach nicht mehr weiter. Wer hat die Jacke schon einmal gehäkelt und kann mir weiterhelfen? Leibe Grüsse Nadine Bättig
04.04.2014 - 08:06DROPS Design answered:
Liebe Frau Bättig, bitte schildern Sie genauer, an welcher Stelle Sie festhängen, dann können wir Ihnen vielleicht weiterhelfen.
04.04.2014 - 09:51Pattern 154-1 Am I supposed to convert the symbols from UK to US? example symbol on pattern is dc. Does it mean double crochet or single crochet?
02.04.2014 - 01:14Linda answered:
Please disregard my question. I can see that I do need to convert the symbols:)
02.04.2014 - 01:28DASA wrote:
PLEASE CZECH TRANSLATE
26.03.2014 - 22:12Hei Dette spørsmålet gjelder diagram A3-A2-A1, den 3. raden mangler det tegn for fastmaske til å feste mellom buene, og på 4.raden er det tegn for fastmaske, hvor jeg tenker må være feil plassert, i tillegg på samme rad, mangler tegn for fastmaske mellom dobbelt stavene. Er dette riktig. Fikk spørsmålet fra en kunde. Mvh: Bentes Boutique
20.03.2014 - 15:21DROPS Design answered:
Hej, vi har lagt en rettelse ud på opskiften, så problemet skulle väre löst! :)
07.05.2014 - 14:01Et bien ça ne marche pas car même en inversant le sens du diagramme une fin de rang ne se crochète pas comme début de rang, un vrai casse tête pour faire correspondre le motif.Un diagramme pour le devant droit aurait été le bienvenu.
20.03.2014 - 09:12DROPS Design answered:
Chère Madame Mellado, pour vous aider, vous pouvez imprimer le diagramme en effet miroir ainsi vous pourrez le suivre tel quel. Bon crochet!
23.03.2014 - 17:51Bonjour, Je crochète ce modèle et il m'est impossible de faire le devant droit en inversant le diagramme du devant gauche. Que faire? ne pourriez vous fournir un diagramme pour le devant droit? Merci
17.03.2014 - 12:21DROPS Design answered:
Bonjour Mme Mellado, pour crocheter le devant droit, suivez les diagrammes dans l'autre sens, c'est-à-dire en commençant par sur l'endroit A.6 et en terminant par A.4. Bon crochet!
17.03.2014 - 18:57Hej, har ni inte märkt att mönstret på höger o vänster sida inte matchar......
13.03.2014 - 14:50Er staat dat je moet meerderen bij het voorpand maar niet hoeveel en hoe vaak??
12.03.2014 - 11:41DROPS Design answered:
Hoi Marian. Volg je de teltekening voor het voorpand dan meerder je automatisch middenvoor (= rechterkant van het werk op het linker voorpand) vanaf toer 6 - zie ook de teltekening A.4, 5 en 6.
14.03.2014 - 16:58Ik maak de kleinste maat
11.03.2014 - 21:17Ben begonnen met het vestje maar loop in toer 2 al vast ;-) je moet dan beginnen met A6, maar is dat van rechts naar links, zoals jullie zeggen in de uitleg, of van links naar rechts. Hoop dat jullie me kunnen helpen want wil hem erg graag maken. Superleuk! Groet Marian
11.03.2014 - 18:44DROPS Design answered:
Hoi Marian. Omdat je heen en weer haakt, dan haak je de eerste toer van rechts naar links, en de tweede toer van links naar rechts. Dus je begint dan met A.6, en haakt de 4 l, 1 v in het stk enzovoort.
19.03.2014 - 17:30