
Popular categories
Looking for a yarn?


Comments / Questions (91)
![]() Lia wrote:
Lia wrote:
Buongiorno premesso che sono una principiante,abbiamo scelto questo modello,ma già dall'inizio ho cancellato molte volte,non mi trovo con leggere ed eseguire.ho da fare delle domande:posso farlo con ferri diritti?non so usare quelli circolari.quando c e'scritto assicurarsi che il ferro sia2-2-2-3-3 cosa significa?posso usare le stesse coste inglesi x lana di un solo colore?in ultimo c e' verificare che sia la costa 2-2-3-3-2una cosa simile credo.grazie
27.12.2016 - 10:26DROPS Design answered:
Buongiorno Lia, questo modello è un cardigan, per cui può essere lavorato anche con i ferri dritti seguendo le stesse istruzioni. Per quanto riguarda l'altra domanda, ad esempio per la taglia S, quando arriva a 33 cm, il ferro successivo deve corrispondere al ferro 2 delle coste inglesi (seguendo la spiegazione delle coste inglesi in alto), quindi può procedere con le diminuzioni. Può anche lavorare con un colore solo se preferisce, l'effetto però sarà diverso dalla foto. Buon lavoro!
27.12.2016 - 12:13
![]() Nicole wrote:
Nicole wrote:
Bei der Alpaca Silk brushed wird angegeben sie wäre mit Nadeln 5 zu stricken und die Maschenprobe wären 17M x 24R. Diese Angaben passen jetzt auch. Was leider nicht klappt ist mit Nadeln 6 auf 11M x 26R zu kommen im Patentmuster. Was jedoch geht ist nicht zweifarbig, sondern zweifädig und mit Nadeln 8 zu stricken. Dann passen die Angaben. Jetzt habe ich aber das nächste Problem. Für das Rückenteil soll ich bei Größe M 99 Maschen anschlagen, das ergibt 90 cm. Ich fürchte hier stimmt etwas nicht.
05.05.2016 - 11:29DROPS Design answered:
Liebe Nicole, es ist wichtig, dass die Maschenprobe im Patentmuster stimmt. Nehmen Sie die Nadel, die bei Ihrer Strickart dafür nötig ist. Und bei der Maschenzahl beim Anschlag müssen Sie die Anleitung weiter lesen: schon in der zweiten Reihe wird die Maschenzahl stark reduziert (man macht dies, damit die Anschlagskante nicht zu fest wird).
07.05.2016 - 07:53
![]() Tullia wrote:
Tullia wrote:
Encore merci pour votre réponse rapide et vos conseils, c'est tellement agréable de les recevoir lorsque l'on est impatiente de commencer le travail !
20.02.2016 - 13:23
![]() Tullia wrote:
Tullia wrote:
Bonjour, c'est encore Tullia ! Bien reçu jolies laines pour modèle 152-12 mais hélas, mon échantillon (11mx26rgs avec Aig.6 ne mesure que 8x8cm. Pourtant il est très ajouré et travaillé très souplement. Mon magasin Drops me dit d'utiliser des aiguilles plus grosses... mais la laine est si fine, je crains un mauvais résultat. Comment faire ? Merci de vos conseils.
20.02.2016 - 11:56DROPS Design answered:
Bonjour Tullia, vous pouvez également laver (bloquer) votre échantillon et vérifier les mesures après séchage - mais s'il est toujours trop petit, il vous faudra recommencer avec des aiguilles plus grosses. Bon tricot!
20.02.2016 - 12:47
![]() Tullia wrote:
Tullia wrote:
Merci, merci ! Votre réponse rapide et claire vient de me permettre de terminer le "brouillon modèle réduit" de l'empiècement. Je vais commander les laines et me lancer dans "l'œuvre" avec plus de sérénité. A bientôt peut-être, pour d'autres modèles... Bien cordialement. tullia.
10.02.2016 - 13:25
![]() Tullia wrote:
Tullia wrote:
Aïe,aïe, besoin d'aide... Modèle 152-12 taille S. Bien arrivée à la fin des 11x 12 diminutions de l'empiècement (fin du rang 2). Mais sur le rang suivant (rang 3), me voilà perdue, je n'arrive pas à comprendre le passage des "côtes bicolores"... sur les 41 m entre les devants. Merci de m'aider !
09.02.2016 - 18:18DROPS Design answered:
Bonjour Tullia, pour le passage aux côtes bicolores, continuez les 2 couleurs comme avant, mais au lieu de glisser 1 m à l'env avec 1 jeté, tricotez cette maille à l'envers et tricotez à l'end le jeté et la m glissée du rang précédent dans l'autre couleur (conservez bien l'ordre des couleurs pour ne pas les décaler. Vous aurez ainsi des côtes 1/1 - n'oubliez pas de diminuer en même temps (les jetés ne comptent pas comme des mailles). Bon tricot!
10.02.2016 - 10:00
![]() Tullia wrote:
Tullia wrote:
Infiniment merci, c'était pourtant tellement simple à comprendre ! Je viens d'apprendre à bien tricoter les cotes anglaises bicolores (non sans mal...). A présent j'étudie les difficultés du modèle et ensuite je commanderai les laines. J'espère y arriver, il me plait tellement. Très cordialement. tullia.
25.01.2016 - 20:10
![]() Irene wrote:
Irene wrote:
Die Jacke gefällt mir sehr gut. Ich möchte sie aber nicht im Patent sondern evtl.. mit einem Ajour Muster stricken, da ich selber schon voluminös genug bin :). Leider konnte ich das selbe Modell (Schnitt) nicht mit einem anderen Muster finden. Gibt es eines? Danke
16.12.2015 - 12:49DROPS Design answered:
Da müssten Sie einfach einmal bei den Jacken stöbern, Sie können ja im Filter bei der Suche "Jacke" und "stricken" einstellen. Möglicherweise gefällt Ihnen 164-3?
20.12.2015 - 17:04
![]() Jola wrote:
Jola wrote:
Witam. Czy moglibyście wyjaśnić czy w opisie karczku gdy mamy "(...)Przer. 2-3-3-1-1-3 rz. ściegiem angielskim" jeden rząd rozumieć jako 1 raz przerobienie czy 4 razy (=1 rząd angielski)? Dla rozmiaru M 3*4=12 rzędów (3 rzędy angielskie).
14.12.2015 - 23:28DROPS Design answered:
Tutaj 1 rząd oznacza 1 rząd. W rozmiarze M: "Kolejny rząd = rząd 4 ściegu angielskiego (= na lewej stronie robótki). Przer. 3 rz. ściegiem angielskim (czyli rz. 5, 1 i 2 wg opisu na górze wzoru), przed rozpoczęciem zamykania o. na reglan rękawów i tyłu (UWAGA: nie zamykać o. ponad przodami) w nast. rzędzie (= będzie to rząd 3 ściegu angielskiego)". POWODZENIA
15.12.2015 - 18:02
![]() Jola wrote:
Jola wrote:
Mam pytanie odnośnie rękawów. "(...) nabrać 32-32-34-34-35-35 o. Przer. kolejny rząd : 1 o. brzeg. ściegiem francuskim, *1 o.p., przer. 2 razy na prawo nast. oczko*, brzeg. ściegiem francuskim........ = 47-47-49-49-51-51 o". Nie rozumiem skąd wzięło się po przerobieniu 47 oczek (dla rozmiaru M).Proszę o odpowiedz
08.12.2015 - 19:15DROPS Design answered:
Witam. Przerabiając zgodnie z instrukcją (1 o. brzeg. ściegiem francuskim, *1 o.p., przer. 2 razy na prawo nast. oczko*, powt. od *-* aż zostaje 1-1-3-3-2-2 o., zakończyć przerabiając 0-0-2-2-1-1 o.p. i 1 o. brzeg. ściegiem francuskim) dodamy w rozmiarze M 15 o., a więc w sumie będzie ich 47 (=32+15). Mam nadzieję, że pomogłam. POWODZENIA
09.12.2015 - 11:23
|
|
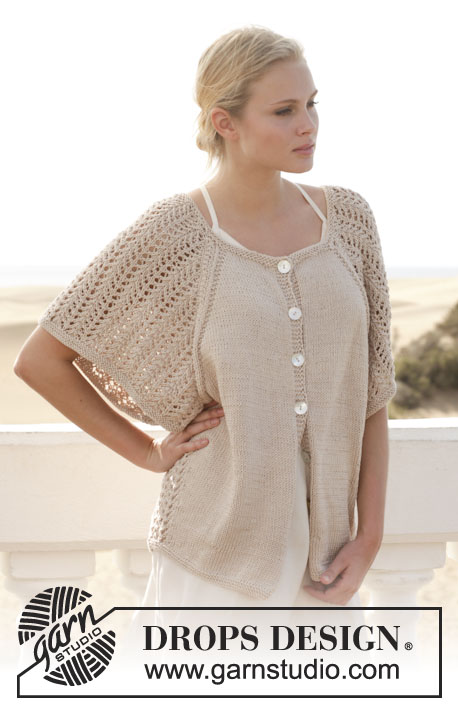
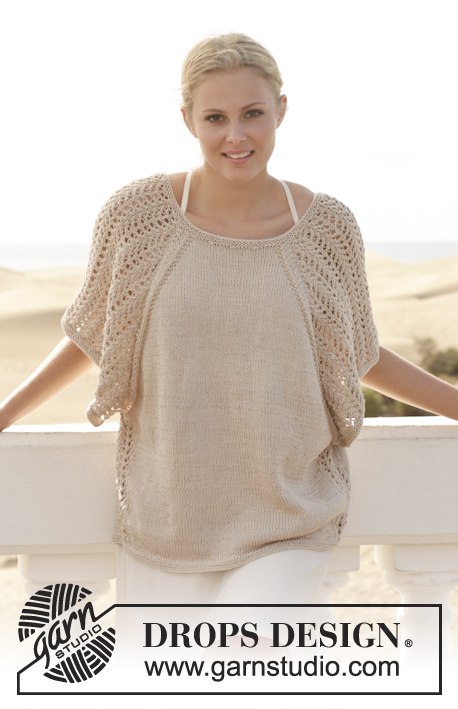
Brise d'Ete#brisedetecardigan |
|
|
|
|
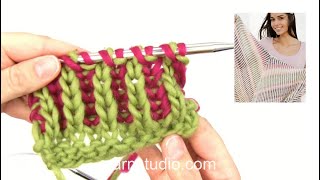
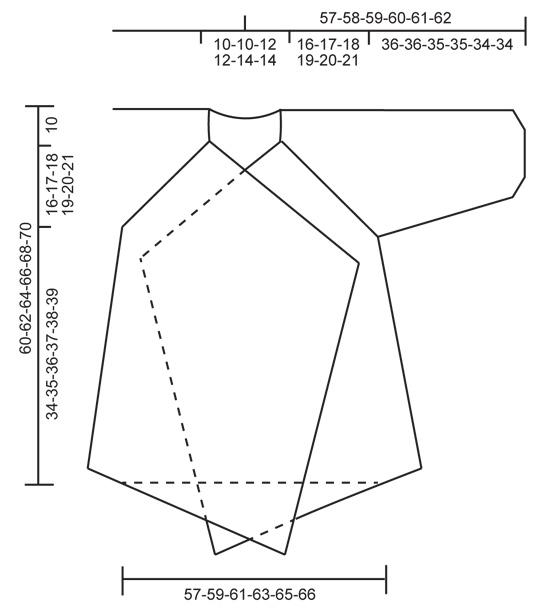
Knitted DROPS jacket in English rib with two colors in ”Brushed Alpaca Silk ” or ”Vivaldi”. Size: S - XXXL.
DROPS 152-12 |
|
|
GARTER ST (back and forth on needle): K all rows. 1 ridge = K2 rows. ENGLISH RIB ST: When counting the sts, the YOs are not counted as sts. KNITTING TIP 1: To make an English rib in two colors work back and forth on a circular needle as follows: Work 1st row as explained below, turn piece and then beg color change as follows: Work 2nd row as explained below with color 1 and then move all sts on circular needle to the other end so that next row can be worked with color 2 from the same side of piece - then turn piece and work the next 2 rows as the first 2 – i.e. work 1 row with each color and work 2 rows in total from the same side before turning piece and working back. KNITTING TIP 2: If you are in doubt, see what color the previous row was worked with on the color of edge st. ENGLISH RIB IN TWO COLORS: ROW 1 (= WS): Worked with color 01, off white * 1 YO, slip 1 st as if to P, K 1 *, repeat from *-* until 1 st remain, 1 YO, slip 1 st as if to P. Turn piece. ROW 2 (= RS): Worked with color 01, off white * K tog YO and slipped st, 1 YO, slip 1 st as if to P *, repeat from *-* until 2 sts remain, K tog YO and slipped st. Move sts back on circular needle to work from same side one more time and switch color (read KNITTING TIP 1 and 2). ROW 3 (= RS): Work with color 14, light grayish green * 1 YO, slip 1 st as if to P, P tog YO and slipped st *, repeat from *-* until 1 st remain, 1 YO, slip 1 st as if to P. Turn piece. ROW 4 (= WS): Worked with color 01, off white * P tog YO and slipped st, 1 YO, slip 1 st as if to P *, repeat from *-* until 2 sts remain, P tog YO and slipped st. Move sts back on circular needle to work from same side one more time and switch color. ROW 5 (= WS): Work with color 14, light grayish green * 1 YO, slip 1 st as if to P, K tog YO and slipped st *, repeat from *-* until 1 st remain, finish with 1 YO, slip 1 st as if to P. Turn piece. Repeat rows 2-5. INCREASE TIP (applies to sleeve): Inc 1 st at beg of row after 1 edge st and 1 st before 1 edge st at end of row. Inc 1 st by making a YO, on next row work YO twisted i.e. work in back loop of st instead front. NOTE: Work the inc sts in English rib. DECREASE TIP 1: Dec from RS in English rib as follows: Dec as follows before marker: Work in English rib until 3 sts remain before st with marker (Read ENGLISH RIB ST above), slip 1 st as if to K, K the next 2 sts tog and then pass 1 slipped st over. 2 sts dec. Dec as follows after marker: Work in English rib until marker, K 3 tog. 2 sts dec. DECREASE TIP 2: Dec 2 sts as follows: Slip 1 st as if to K, K 2 tog, psso ---------------------------------------------------------- JACKET: First worked back and forth in parts before slipping them on same needle and then work back and forth until finished measurements. BACK PIECE: Worked back and forth on circular needle - see KNITTING TIP 1. Loosely cast on 96-99-102-105-108-111 sts (includes 1 edge st in each side) on circular needle size 6 mm / US 10 with off white. Work next row as follows from RS: 1 edge st in GARTER ST - see explanation above -, * K 1, K 2 tog *, repeat from *-* until 2 sts remain, finish with K 1 and 1 edge st in garter st = 65-67-69-71-73-75 sts. Work ENGLISH RIB IN TWO COLORS – see explanation above – with 1 edge st in garter st in each side of piece until piece measures 33-34-35-36-37-38 cm / 13"-13⅜"-13¾"-14¼"-14½"-15" (adjust so that next row is 2nd-2nd-2nd-3rd-3rd-2nd row in English rib). REMEMBER THE GAUGE! Now dec 1 edge st in each side on next row as follows: Dec 1 edge st at beg of next row by working the first 2 sts K twisted tog, work as before until 2 sts remain, K the last 2 tog = 63-65-67-69-71-73 sts. Work 1 more row (= 3rd-3rd-3rd-4th-4th-3rd row in English rib). Put the piece aside and work both front pieces. RIGHT FRONT PIECE: Worked back and forth on circular needle. Loosely cast on 93-96-99-102-105-108 sts (includes 1 edge st in each side) on circular needle size 6 mm / US 10 with off white. Work next row as follows from RS: 1 edge st in garter st, * K 1, K 2 tog *, repeat from *-* until 2 sts remain, finish with K 1 and 1 edge st in garter st (work edge st in garter st until finished measurements) = 63-65-67-69-71-73 sts. Work ENGLISH RIB IN TWO COLORS with 1 edge st in garter st in each side of piece until piece measures 33-34-35-36-37-38 cm / 13"-13⅜"-13¾"-14¼"-14½"-15" (adjust so that next row is 2nd-2nd-2nd-3rd-3rd-2nd row in English rib). On next row dec edge st in garter st in right side of piece by working the last 2 sts K tog = 62-64-66-68-70-72 sts remain on row. Work 1 more row (= 3rd-3rd-3rd-4th-4th-3rd row in English rib). Put piece aside. LEFT FRONT PIECE: Work as right front piece but reversed, i.e. when 1 edge st is dec, work the first 2 sts twisted tog. SLEEVE: Worked back and forth on needle. Cast on 32-32-34-34-35-35 sts (includes 1 edge st in each side) on circular needle size 6 mm / US 10 with off white. Work next row as follows from RS: 1 edge st in garter st, * K 1, 2 sts in next st *, repeat from *-* until 1-1-3-3-2-2 sts remain, finish with K 0-0-2-2-1-1 and 1 edge st in garter st = 47-47-49-49-51-51 sts. Then work in ENGLISH RIB IN TWO COLORS with 1 edge st in garter st in each side of piece. When piece measures 8 cm / 3⅛", inc 1 st in each side inside 1 edge st - READ INCREASE TIP. Repeat inc in each side of piece every 5-4-4-3-2½-2½ cm / 2"-1½"-1½"-1⅛"-⅞"-⅞" 4-6-6-8-8-10 more times (= 5-7-7-9-9-11 times in total) = 57-61-63-67-69-73 sts. Work English rib with 1 edge st in garter st in each side of piece until piece measures 35-35-34-34-33-33 cm / 13¾"-13¾"-13⅜"-13⅜"-13"-13" (adjust so that next row is 2nd-2nd-2nd-3rd-3rd-2nd row in English rib). Dec 1 edge st in each side of piece as follows: Work the first 2 sts K twisted tog, work as before until 2 sts remain, K 2 tog = 55-59-61-65-67-71 sts. Then work 1 more row (= 3rd-3rd-3rd-4th-4th-3rd row in English rib) AT THE SAME TIME insert 1 marker in each side of piece inside 5 sts. Put piece aside and make another sleeve. YOKE: Slip sleeves between front and back piece in each side on same circular needle with off white outwards (= RS) = 297-311-321-335-345-359 sts on row. Now insert 1 marker in the transitions between back piece and sleeves in each side (= 6 markers in total incl markers on sleeves). Next row = 4th-4th-4th-5th-5th-4th row in English rib (= WS). Work 2-3-3-1-1-3 rows in English rib before dec for raglan on sleeves and back piece (NOTE: Do not dec on front piece) on next row (= 2nd-3rd-3rd-2nd-2nd-3rd row in English rib). Work as follows from RS: Work 1 edge st in garter st, 61-63-65-67-69-71 sts in English rib as before (YOs are not counted as sts – READ ENGLISH RIB ST), work the first 5 sts in English rib from sleeve as before, dec 2 sts after marker – see DECREASE TIP 1 above, continue with English rib until 3 sts remain before next marker on sleeve, dec 2 sts before marker – see DECREASE TIP 1 above, work the last 5 sts from sleeve as before, marker, then dec 2 sts on back piece after marker, work until 3 sts remain before marker in other side of back piece, dec 2 sts before marker, work the first 5 sts on sleeve as before, dec 2 sts after marker, continue in English rib until 3 sts remain before next marker on sleeve, dec 2 sts before marker, work the last 5 sts from sleeve as before, then work the last 61-63-65-67-69-71 sts in English rib and 1 edge st in garter st as before = 12 sts dec. Then dec differently on sleeves and back piece. Sleeve: Repeat dec every 4th row 10-10-11-12-13-13 more times (i.e. dec every 2nd-3rd-3rd-2nd-2nd-3rd row in English rib) = 11-15-13-13-11-15 sts remain on each sleeve. Back piece: Repeat dec on back piece every 8th row 0-0-0-1-2-2 times, then every 4th row 10-10-11-10-9-9 times (i.e. dec every 2nd-3rd-3rd-2nd-2nd-3rd row in English rib) = 19-21-19-21-23-25 sts remain on back piece. = 165-179-177-183-185-199 sts on needle. Then on next row (= RS in S-XL-XXL, WS in M-L-XXXL) work as follows: Work 1 edge st in garter st, English rib as before over the next 61-63-65-67-69-71 sts (= front piece), then work rib in two colors (i.e. work K over K sts in English rib in the same color as English rib sts and P over P sts in English rib in same color as English rib) over the next 41-51-45-47-45-55 sts (i.e. sleeves and back piece). NOTE: I.e. YO and slipped st K tog, and work P sts P, AT THE SAME TIME dec 4-14-4-6-2-12 sts evenly i.e. dec 2 sts 2-7-2-3-1-6 times – see DECREASE TIP 2, work English rib as before over the last 61-63-65-67-69-71 sts and 1 edge st in garter st (= front piece) = 161-165-173-177-183-187 sts. Work 1 edge st in garter st, English rib as before over the next 61-63-65-67-69-71 sts (= front piece), then work K over K and P over P over the next 37-37-41-41-43-43 sts, English rib as before over the last 61-63-65-67-69-71 sts and 1 edge st in garter st (= front piece). bind off with light grayish green with K over K and P over P - NOTE: bind off YOs as sts. ASSEMBLY: Sew side and underarm seams in one inside 1 edge st. |
|
 |
|
Have you finished this pattern?Tag your pictures with #dropspattern #brisedetecardigan or submit them to the #dropsfan gallery. Do you need help with this pattern?You'll find 25 tutorial videos, a Comments/Questions area and more by visiting the pattern on garnstudio.com. © 1982-2026 DROPS Design A/S. We reserve all rights. This document, including all its sub-sections, has copyrights. Read more about what you can do with our patterns at the bottom of each pattern on our site. |


With over 40 years in knitting and crochet design, DROPS Design offers one of the most extensive collections of free patterns on the internet - translated to 17 languages. As of today we count 324 catalogs and 12290 patterns - 12280 of which are translated into English (US/in).
We work hard to bring you the best knitting and crochet have to offer, inspiration and advice as well as great quality yarns at incredible prices! Would you like to use our patterns for other than personal use? You can read what you are allowed to do in the Copyright text at the bottom of all our patterns. Happy crafting!
Post a comment to pattern DROPS 152-12
We would love to hear what you have to say about this pattern!
If you want to leave a question, please make sure you select the correct category in the form below, to speed up the answering process. Required fields are marked *.