
Popular categories
Looking for a yarn?


Comments / Questions (101)
Lucie wrote:
Bude brzy přeloženo do čestiny?
17.07.2013 - 17:10DROPS Design answered:
Dobrý den, český návod je doplněn. Hodně zdaru! Hana
24.08.2014 - 00:02
![]() Martine wrote:
Martine wrote:
J'aime beaucoup
01.07.2013 - 10:46
![]() Nadiné wrote:
Nadiné wrote:
Würde gerne dieses schöne stück stricken
27.06.2013 - 18:07
![]() Bello wrote:
Bello wrote:
Magnifico y original
27.06.2013 - 17:10
![]() Truus wrote:
Truus wrote:
Het wachten word een beetje lang hoor wat een super mooi vest
27.06.2013 - 15:11
![]() Li wrote:
Li wrote:
Perfect vest!
27.06.2013 - 13:40
![]() Mona wrote:
Mona wrote:
Sind die 80er zurück? Gruselig...
27.06.2013 - 02:59
![]() Hanneke wrote:
Hanneke wrote:
Ik vind dit een geweldig mooi vest
26.06.2013 - 19:39
![]() Fulconis wrote:
Fulconis wrote:
Wahou!! ce gilet est MAGNIFIQUE!!!! En espérant que les explications ne tarderont pas. merci
22.06.2013 - 22:28
![]() Taina wrote:
Taina wrote:
Erittäin kaunis, upea, juhlava!
19.06.2013 - 17:08
|
||||||||||||||||
Dove#dovecardigan |
||||||||||||||||
 |
 |
|||||||||||||||
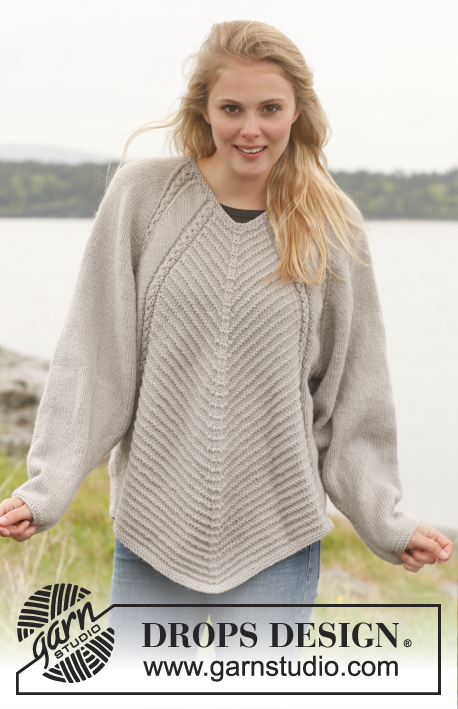
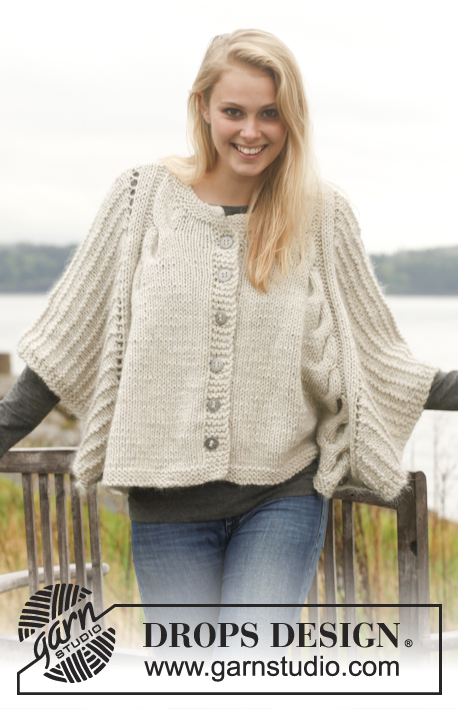
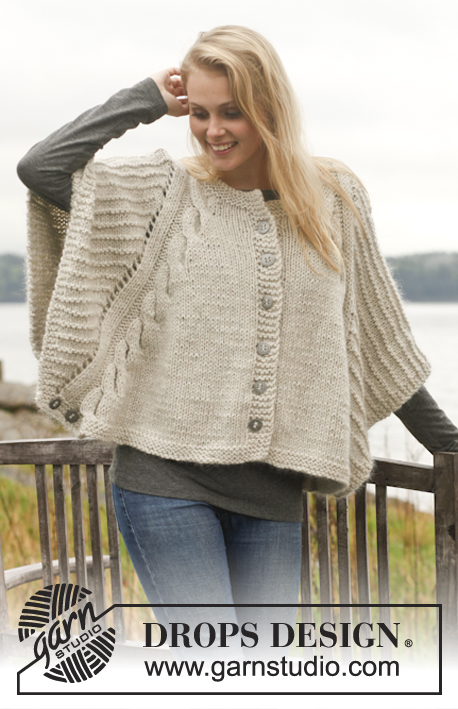
Knitted DROPS poncho with cables and textured pattern in "Nepal" and "Kid-Silk". Size: S - XXXL.
DROPS 150-12 |
||||||||||||||||
|
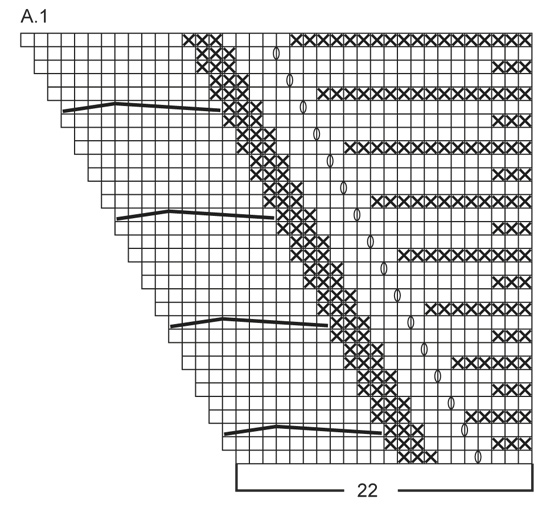
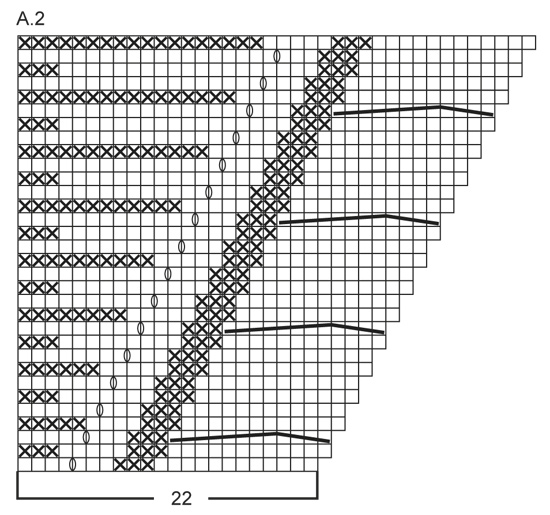
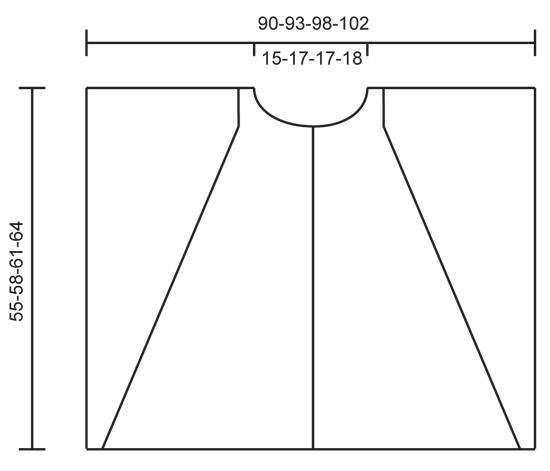
GARTER ST (back and forth on circular needle): K all rows. 1 ridge = K2 rows. PATTERN: See diagrams A.1 and A.2. The diagrams show all rows in pattern seen from RS. BUTTONHOLE: Dec for buttonholes on right band. 1 buttonhole = K tog third and fourth st from mid front and make 1 YO. Dec for buttonholes when piece measures: SIZE S/M: 7, 15, 23, 31, 39 and 47 cm / 2 ¾", 6", 9", 12¼", 15¼" and 18½" SIZE L: 8, 16, 25, 33, 42 and 50 cm / 3⅛", 6¼" 9¾", 13", 16½" and 19¾" SIZE XL/XXL: 7, 16, 25, 34, 43 and 52 cm / 2 ¾", 6¼", 9¾", 13⅜", 17" and 20½" SIZE XXXL: 8, 18, 27, 37, 46 and 55 cm / 3⅛", 7", 10⅝", 14½", 18" and 21⅝" ---------------------------------------------------------- BACK PIECE: Worked back and forth on circular needle. Cast on 108-112-118-122 sts on circular needle size 6 mm / US 10 with 1 strand of each yarn (= 2 strands). Work 3 ridges in GARTER ST - see explanation above. Switch to circular needle size 7 mm / US 10.75 and work next row from RS as follows: Work 4 sts in garter st, K 3, P 3, 88-92-98-102 sts in stockinette st, AT THE SAME TIME inc 12 sts by working 2 sts in each of the first 6 sts and 2 sts in each of the last 6 sts in stockinette st (= 12 sts inc), P 3, K 3, 4 sts in garter st = 120-124-130-134 sts in total on needle. Work 1 row as follows from WS: 4 sts in garter st, P 3, K 3, 100-104-110-114 sts in stockinette st, K 3, P 3, 4 sts in garter st. On next row from RS work as follows: Work A.1 (= 22 sts), work 76-80-86-90 sts in stockinette st and work A.2 (= 22 sts). Continue pattern like this, i.e. on every other row the section in stockinette st in the middle gets smaller while A.1 and A.2 get bigger – no of sts does not vary. When A.1 and A.2 have been worked 10-11-11-12 times in total vertically in each side, continue A.1 and A.2 without YOs and cable (work sts over cable in stockinette st). When piece measures 53-56-59-62 cm / 21"-22"-23¼"-24⅜", bind off the middle 16-18-18-20 sts for neck and finish each shoulder separately. Continue to bind off 1 st on the next row towards the neckline = 51-52-55-56 sts remain on each shoulder. Continue until piece measures 55-58-61-64 cm / 21⅝"-22¾"-24"-25¼" and bind off. Repeat on the other shoulder. RIGHT FRONT PIECE: Cast on 59-61-64-66 sts (includes 5 band sts towards mid front) on circular needle size 6 mm / US 10 with 1 strand of each yarn. Work 3 ridges in garter st. Switch to circular needle size 7 mm / US 10.75 and work as follows from RS: 5 band sts in garter st, work 44-46-49-51 sts in stockinette st, AT THE SAME TIME inc 6 sts by working 2 sts in each of the last 6 sts in stockinette st (= 6 sts inc), P 3, K 3, 4 sts in garter st = 65-67-70-72 sts in total on needle. Work 1 row as follows from WS: 4 sts in garter st, P 3, K 3, 50-52-55-57 sts in stockinette st, 5 band sts in garter st. On next row from RS work as follows: 5 band sts in garter st, 38-40-43-45 sts in stockinette st and then pattern according to diagram A.2 (= 22 sts). Continue pattern like this, i.e. section in stockinette st towards mid front gets smaller while A.2 gets bigger (no of sts does not vary). Remember BUTTONHOLES on band - see explanation above. NOTE: When A.2 have been worked 9-10-10-11 times in total vertically, continue A.2 without cable (work sts over cable in stockinette st) until A.2 has been worked for as many row as for back piece with increases, then continue without the increase, just as on back piece. AT THE SAME TIME when piece measures approx. 47-50-52-55 cm / 18½"-19¾"-20½"-21½" (make sure that 1 row has been worked after last buttonhole and plaiting in A.2 has been finished), slip the first 10-11-11-12 sts towards mid front on 1 stitch holder for neck (work sts before slipping them on stitch holder to avoid cutting the yarn in piece). Then bind off at beg of every row from neck: 2 sts 1 time and 1 st 2 times = 51-52-55-56 sts remain on shoulder. Continue until piece measures 55-58-61-64 cm / 21½"-22¾"-24"-25¼" - adjust according to back piece, bind off. LEFT FRONT PIECE: Cast on and work as right but reversed. Work pattern according to diagram A.1 instead of A.2. ASSEMBLY: Sew the shoulder seams. Sew 2 decorative buttons at the bottom of edge in garter st 3 and 9 cm / 1" and 3½" from edge in each side (sew through both layers so that front and back piece is tog at the edge in each side at the bottom of garment). NECK EDGE: Pick up approx. 60 to 70 sts from RS around the neck (includes sts on stitch holders mid front) with 1 strand of each yarn on circular needle size 6 mm / US 10. Work 3 ridges in garter st back and forth. Loosely bind off with K from WS. |
||||||||||||||||
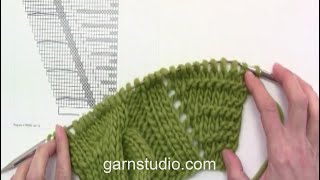
Diagram explanations |
||||||||||||||||
|
||||||||||||||||
 |
||||||||||||||||
 |
||||||||||||||||
 |
||||||||||||||||
Have you finished this pattern?Tag your pictures with #dropspattern #dovecardigan or submit them to the #dropsfan gallery. Do you need help with this pattern?You'll find 21 tutorial videos, a Comments/Questions area and more by visiting the pattern on garnstudio.com. © 1982-2026 DROPS Design A/S. We reserve all rights. This document, including all its sub-sections, has copyrights. Read more about what you can do with our patterns at the bottom of each pattern on our site. |
||||||||||||||||


With over 40 years in knitting and crochet design, DROPS Design offers one of the most extensive collections of free patterns on the internet - translated to 17 languages. As of today we count 324 catalogs and 12290 patterns - 12280 of which are translated into English (US/in).
We work hard to bring you the best knitting and crochet have to offer, inspiration and advice as well as great quality yarns at incredible prices! Would you like to use our patterns for other than personal use? You can read what you are allowed to do in the Copyright text at the bottom of all our patterns. Happy crafting!
Post a comment to pattern DROPS 150-12
We would love to hear what you have to say about this pattern!
If you want to leave a question, please make sure you select the correct category in the form below, to speed up the answering process. Required fields are marked *.