
Popular categories
Looking for a yarn?


Comments / Questions (101)
![]() Rosemarie wrote:
Rosemarie wrote:
Stricke ich nach den Verzopfungen am Rückenteil wirklich ohne Umschlag weiter? Leider sieht man auf dem Foto nur das Vorderteil . Und Da sieht es aus, ob das Lochmuster ( Umschlag) bis nach oben durchgeht.
26.04.2020 - 20:35DROPS Design answered:
Liebe Rosemarie, ja genau, es sind dann keine Umschläge mehr für nur ein paar Reihe. Viel Spaß beim stricken!
12.05.2020 - 10:26
![]() Monic wrote:
Monic wrote:
Könnte ich die Anleitung per PDF erhalten? Dankeschön
27.10.2019 - 00:07DROPS Design answered:
Liebe Monic, unsere Anleitungen können nur gedruckt werden, aber mit einem virtuellen Drucker können Sie die Anleitung als .PDF speichern. Viel Spaß beim stricken!
05.11.2019 - 09:53
![]() Laurendrine wrote:
Laurendrine wrote:
Bonjour J’ai terminé le dos et les devants. Du fait que l’on doit arrêter les croisements à 9 fois pour le devant à la place de 10 fois pour le dos (taille S).. Le coté extérieur (côtes en mousse) est plus large sur le dos que sur le devant (avant les jours : décalage de 4 mailles) et ils ne sont en face pour être cousu. Est ce normal ? Avec mes remerciements Laurendrine
29.09.2019 - 16:45DROPS Design answered:
Bonjour Laurendrine, on doit continuer avec A.2 comme on a fait pour le dos, cette phrase a été ajoutée dans le devant droit pour que ce soit plus simple à comprendre. Bon tricot!
01.10.2019 - 09:44
![]() Maria Helena wrote:
Maria Helena wrote:
São lindos os seus trabalhos !!!!! Só que tem que as receitas tem que ser em português do Brasil . Ficaria muito feliz em fazer seus trabalhos que são de extremo bom gosto . Beijos
27.07.2019 - 03:45
![]() Maria Helena wrote:
Maria Helena wrote:
Seus modelos de blusa chalés malha em geral são maravilhosos !!!!! Muito bom gosto !! Gostaria de fazer as receitas teriam que ser em português ! Vocês tem muito bom gosto !
31.05.2019 - 03:36
![]() Birgitte Borød wrote:
Birgitte Borød wrote:
Hej. Jeg har problemer med forstykkerne. Efter de 10 snoninger skal man stoppe med omslaget også, men hvorfor er der ikke lige mange snoninger på ryg og forstykke? Og på billedet ser det ud som om der er hulmønster hele vejen op.
19.01.2019 - 17:42DROPS Design answered:
Hei Birgitte. Du feller til hals tidligere på forstykket enn på bakstykket, derfor flettes det ikke like mange ganger på forstykket. Du fortsetter med mønster etter A.1 og A.2 oppover, det er kun fletten som strikkes videre i glattstrikk. hullmønsteret fortsette derfor selvom fletten er avlsuttet. God fornøyelse
28.01.2019 - 12:12
![]() Toñi wrote:
Toñi wrote:
Por donde se empieza por el cuello o por abajo y por q los tutoriales no tienen voz
30.11.2018 - 15:38DROPS Design answered:
Hola Toñi. La labor se trabaja de abajo arriba. Los vídeos son los mismos para los 16 idiomas, por eso no tienen voz. Cada vídeo tiene las explicaciones en el texto en cada idioma.
01.12.2018 - 16:54
![]() Deborah wrote:
Deborah wrote:
Buon pomeriggio mi interesserebbe sapere se questo modello posso farlo piu lungo quasi a voler coprire il bacino.grazie anticipatamente.buona domenica
17.09.2017 - 15:15DROPS Design answered:
Buongiorno Deborah, può sicuramente farlo più lungo, tenga presente che il lavoro parte dal basso, quindi tenga conto della lunghezza effettiva indicata nello schema delle misure per riproporzionare il modello. Buon lavoro!
17.09.2017 - 19:16
![]() Michela wrote:
Michela wrote:
Salve x esempio per essere a maniche a lunghezza normale quanto dovrei aumentare?sto facendo una l.e un altra cosa:il lavoro comunque rimane posizionato nello schema stabilito vero? Grazie mille e scusate.buon pomeriggio
17.09.2017 - 13:05DROPS Design answered:
Buongiorno Michela. Ci risulta difficile dare un aiuto così dettagliato. Può scegliere anche di aumentare gradualmente fino alla lunghezza necessaria. Le maglie in più delle maniche vanno lavorate seguendo la prima parte del diagramma A1 (prima del gettato) e l'ultima parte di A2 (dopo il gettato). Per un aiuto più specifico, può contattare il suo rivenditore Drops di fiducia. Buon lavoro!
17.09.2017 - 13:38
![]() Michela wrote:
Michela wrote:
Buon giorno vorrei sapere se è possibile farlo con maniche piu lunghe.grazie buona domenica
17.09.2017 - 11:10DROPS Design answered:
Buongiorno Michela. Per allungare le maniche, nelle istruzioni dove dice di lavorare 2 maglie in ognuna delle prime 6 e delle ultime 6 maglie, aumenta un numero maggiore di maglie. Buon lavoro!
17.09.2017 - 12:36
|
||||||||||||||||
Dove#dovecardigan |
||||||||||||||||
 |
 |
|||||||||||||||
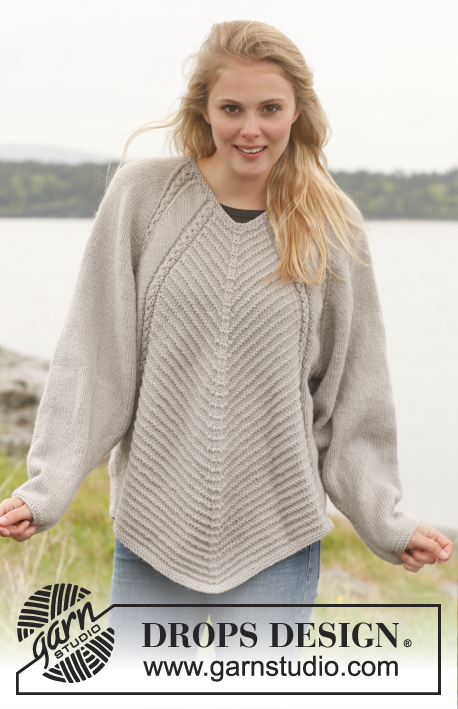
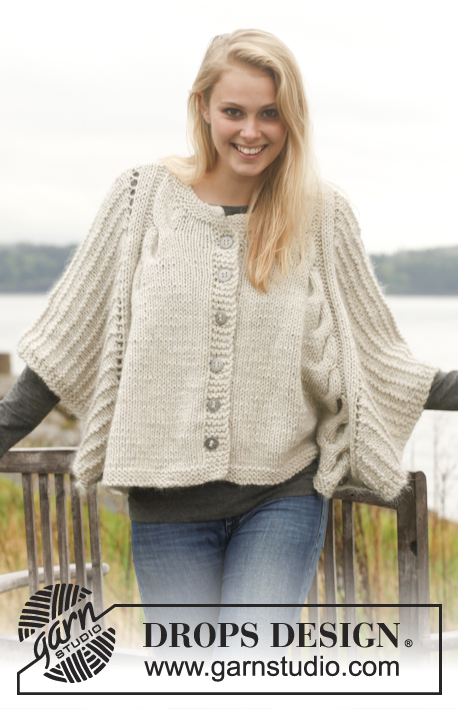
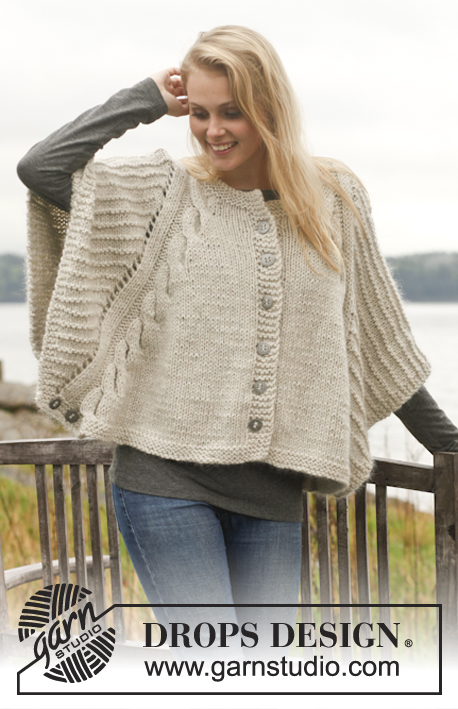
Knitted DROPS poncho with cables and textured pattern in "Nepal" and "Kid-Silk". Size: S - XXXL.
DROPS 150-12 |
||||||||||||||||
|
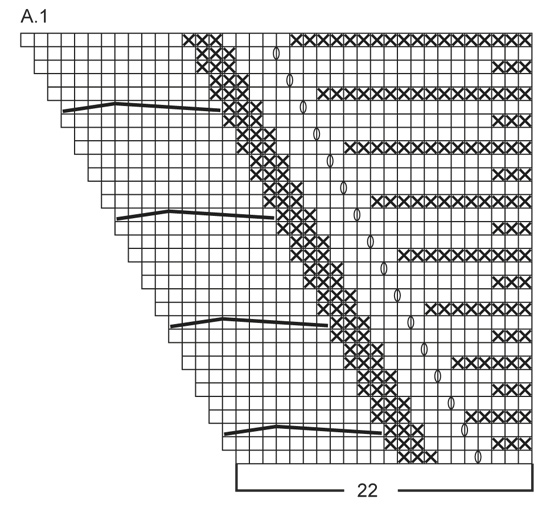
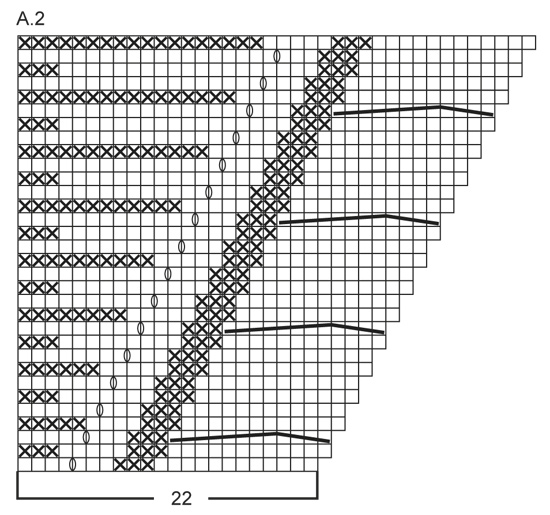
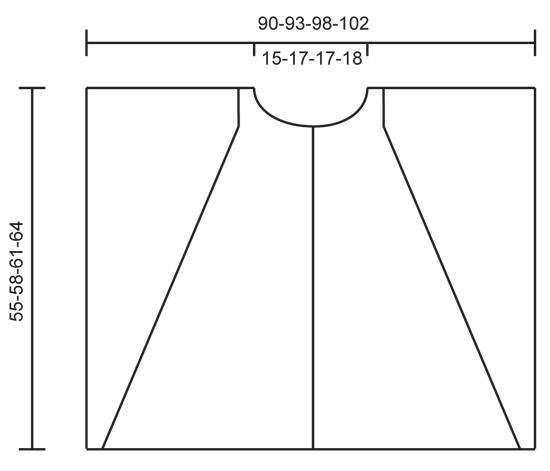
GARTER ST (back and forth on circular needle): K all rows. 1 ridge = K2 rows. PATTERN: See diagrams A.1 and A.2. The diagrams show all rows in pattern seen from RS. BUTTONHOLE: Dec for buttonholes on right band. 1 buttonhole = K tog third and fourth st from mid front and make 1 YO. Dec for buttonholes when piece measures: SIZE S/M: 7, 15, 23, 31, 39 and 47 cm / 2 ¾", 6", 9", 12¼", 15¼" and 18½" SIZE L: 8, 16, 25, 33, 42 and 50 cm / 3⅛", 6¼" 9¾", 13", 16½" and 19¾" SIZE XL/XXL: 7, 16, 25, 34, 43 and 52 cm / 2 ¾", 6¼", 9¾", 13⅜", 17" and 20½" SIZE XXXL: 8, 18, 27, 37, 46 and 55 cm / 3⅛", 7", 10⅝", 14½", 18" and 21⅝" ---------------------------------------------------------- BACK PIECE: Worked back and forth on circular needle. Cast on 108-112-118-122 sts on circular needle size 6 mm / US 10 with 1 strand of each yarn (= 2 strands). Work 3 ridges in GARTER ST - see explanation above. Switch to circular needle size 7 mm / US 10.75 and work next row from RS as follows: Work 4 sts in garter st, K 3, P 3, 88-92-98-102 sts in stockinette st, AT THE SAME TIME inc 12 sts by working 2 sts in each of the first 6 sts and 2 sts in each of the last 6 sts in stockinette st (= 12 sts inc), P 3, K 3, 4 sts in garter st = 120-124-130-134 sts in total on needle. Work 1 row as follows from WS: 4 sts in garter st, P 3, K 3, 100-104-110-114 sts in stockinette st, K 3, P 3, 4 sts in garter st. On next row from RS work as follows: Work A.1 (= 22 sts), work 76-80-86-90 sts in stockinette st and work A.2 (= 22 sts). Continue pattern like this, i.e. on every other row the section in stockinette st in the middle gets smaller while A.1 and A.2 get bigger – no of sts does not vary. When A.1 and A.2 have been worked 10-11-11-12 times in total vertically in each side, continue A.1 and A.2 without YOs and cable (work sts over cable in stockinette st). When piece measures 53-56-59-62 cm / 21"-22"-23¼"-24⅜", bind off the middle 16-18-18-20 sts for neck and finish each shoulder separately. Continue to bind off 1 st on the next row towards the neckline = 51-52-55-56 sts remain on each shoulder. Continue until piece measures 55-58-61-64 cm / 21⅝"-22¾"-24"-25¼" and bind off. Repeat on the other shoulder. RIGHT FRONT PIECE: Cast on 59-61-64-66 sts (includes 5 band sts towards mid front) on circular needle size 6 mm / US 10 with 1 strand of each yarn. Work 3 ridges in garter st. Switch to circular needle size 7 mm / US 10.75 and work as follows from RS: 5 band sts in garter st, work 44-46-49-51 sts in stockinette st, AT THE SAME TIME inc 6 sts by working 2 sts in each of the last 6 sts in stockinette st (= 6 sts inc), P 3, K 3, 4 sts in garter st = 65-67-70-72 sts in total on needle. Work 1 row as follows from WS: 4 sts in garter st, P 3, K 3, 50-52-55-57 sts in stockinette st, 5 band sts in garter st. On next row from RS work as follows: 5 band sts in garter st, 38-40-43-45 sts in stockinette st and then pattern according to diagram A.2 (= 22 sts). Continue pattern like this, i.e. section in stockinette st towards mid front gets smaller while A.2 gets bigger (no of sts does not vary). Remember BUTTONHOLES on band - see explanation above. NOTE: When A.2 have been worked 9-10-10-11 times in total vertically, continue A.2 without cable (work sts over cable in stockinette st) until A.2 has been worked for as many row as for back piece with increases, then continue without the increase, just as on back piece. AT THE SAME TIME when piece measures approx. 47-50-52-55 cm / 18½"-19¾"-20½"-21½" (make sure that 1 row has been worked after last buttonhole and plaiting in A.2 has been finished), slip the first 10-11-11-12 sts towards mid front on 1 stitch holder for neck (work sts before slipping them on stitch holder to avoid cutting the yarn in piece). Then bind off at beg of every row from neck: 2 sts 1 time and 1 st 2 times = 51-52-55-56 sts remain on shoulder. Continue until piece measures 55-58-61-64 cm / 21½"-22¾"-24"-25¼" - adjust according to back piece, bind off. LEFT FRONT PIECE: Cast on and work as right but reversed. Work pattern according to diagram A.1 instead of A.2. ASSEMBLY: Sew the shoulder seams. Sew 2 decorative buttons at the bottom of edge in garter st 3 and 9 cm / 1" and 3½" from edge in each side (sew through both layers so that front and back piece is tog at the edge in each side at the bottom of garment). NECK EDGE: Pick up approx. 60 to 70 sts from RS around the neck (includes sts on stitch holders mid front) with 1 strand of each yarn on circular needle size 6 mm / US 10. Work 3 ridges in garter st back and forth. Loosely bind off with K from WS. |
||||||||||||||||
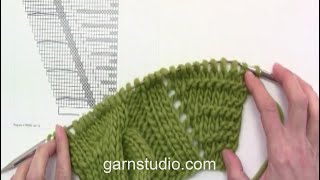
Diagram explanations |
||||||||||||||||
|
||||||||||||||||
 |
||||||||||||||||
 |
||||||||||||||||
 |
||||||||||||||||
Have you finished this pattern?Tag your pictures with #dropspattern #dovecardigan or submit them to the #dropsfan gallery. Do you need help with this pattern?You'll find 21 tutorial videos, a Comments/Questions area and more by visiting the pattern on garnstudio.com. © 1982-2026 DROPS Design A/S. We reserve all rights. This document, including all its sub-sections, has copyrights. Read more about what you can do with our patterns at the bottom of each pattern on our site. |
||||||||||||||||


With over 40 years in knitting and crochet design, DROPS Design offers one of the most extensive collections of free patterns on the internet - translated to 17 languages. As of today we count 324 catalogs and 12290 patterns - 12280 of which are translated into English (US/in).
We work hard to bring you the best knitting and crochet have to offer, inspiration and advice as well as great quality yarns at incredible prices! Would you like to use our patterns for other than personal use? You can read what you are allowed to do in the Copyright text at the bottom of all our patterns. Happy crafting!
Post a comment to pattern DROPS 150-12
We would love to hear what you have to say about this pattern!
If you want to leave a question, please make sure you select the correct category in the form below, to speed up the answering process. Required fields are marked *.