
Popular categories
Looking for a yarn?


Comments / Questions (28)
![]() Noëllie Aulas wrote:
Noëllie Aulas wrote:
Tant pis. Merci quand même pour la réponse. Je vais chercher un autre modèle.
27.09.2016 - 12:18
![]() Noëllie Aulas wrote:
Noëllie Aulas wrote:
Bonjour, J'aimerais avoir des emmanchures à manches montées plutôt que carrées comme c'est prévu ici. Quelqu'un pourrait-il m'aider à le faire ? Je précise que je vais tricoter sur des aiguilles classiques donc pièce par pièce. Je saurais choisir les diminutions à faire sur le dos et les devants mais je ne saurais pas ensuite adapter la tête de manche. Merci de m'avoir lu et j'espère à très vite pour lire vos réponses.
25.09.2016 - 19:51DROPS Design answered:
Bonjour Mme Aulas, nous ne pouvons malheureusement pas adapter chacun de nos modèles à chaque demande particulière, vous pouvez toutefois vous inspirer d'un modèle réalisé dans le même échantillon, avec les manches telles que vous les souhaitez, ou demander une assistance complémentaire à votre magasin DROPS. Bon tricot!
26.09.2016 - 10:54
![]() Paola wrote:
Paola wrote:
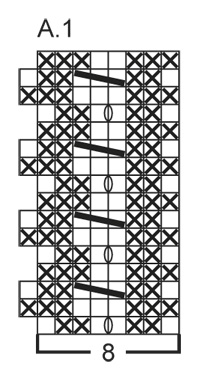
A1 telpateoon is voor mij onbegrijpelijk. Van 8 steken naar 9 en dan naar 7. Hoe kom ik er dan weer aan 8?. En 1e steek over de 2e en 3e steek halen is voor mij 2 steken minderen en niet 1! Kan iemand mij uitleg geven?
13.01.2015 - 21:25DROPS Design answered:
Hoi Paola. Je gaat in het telpatroon alleen van 8 naar 9 st en terug naar 8. Je breit 3 st recht en haalt dan de 1e st over de 2 andere (dus de 2 steken blijven staan - er wordt alleen 1 st geminderd).
14.01.2015 - 14:49Mónica wrote:
Hola! he realizado este patrón al pie de la letra en s y me ha quedado perfecto!, puedo poner una foto y donde? Saludos desde México
10.12.2014 - 02:20DROPS Design answered:
Hola Mónica! Me alegro muchísimo y te agradecemos que quieras compartirlo con las demás. Hay un grupo público de DROPS en facebook donde puedes hacerlo: DROPS sockalicious knit & crochet along. Espero verlo pronto.
13.12.2014 - 10:17
![]() A. Jansen wrote:
A. Jansen wrote:
Ben begonnen aan dit mooie vest en zit nu op ongeveer 20cm. Echter, de boord is (door die ribbels) erg aan het omkrullen. Weten jullie of dit is verholpen na het blocken? Kan een gehaakte rand ook het omkrullen verhelpen? Graag hoor ik van jullie.
18.12.2013 - 22:20DROPS Design answered:
Hoi A. Jansen. De rand zal minder gaan krullen na het wassen/blocken. Je kan dat uiteraard ook verhelpen door een gehaakte rand.
19.12.2013 - 09:24
![]() Anke Crielaard wrote:
Anke Crielaard wrote:
Ik vind het een prachtig vest, maar al breiende kom ik er niet uit. Het patroon A.1 bestaat uit 8 steken, maar op regel 2 zijn het er 9.. Is het uiteinde van de naald dan: 9 steken patroon, dan 3 tricotsteken en dan 5 ribbelsteken?
07.12.2013 - 21:11DROPS Design answered:
Hoi Anke. Ja, dat klopt. A.1 begint met 8 st, maar in nld 2, 6 en 10 enzovoort komt er 1 st bij (= 9 st), die weer in nld 3, 7 en 11 enzovoort worden vermindert. Je breit deze st volgens de teltekening en de overige st volgens de beschrijving.
10.12.2013 - 13:34
![]() Kerstin wrote:
Kerstin wrote:
Auch ein Favorit!!Wo soll ich nur anfangen,wenn die Anleitungen da sind??
28.06.2013 - 21:42
![]() Anna wrote:
Anna wrote:
Faccio esattamente come dite, ma quando sula seconda schermata clicco sulla scritta stampare modello non succede niente.... potete mandarmi le istruzioni sulla mia mail, per cortesia? Grazie
28.06.2013 - 19:05DROPS Design answered:
Buonasera Anna, provi a mandare una mail all'indirizzo italy@garnstudio.com, spiegando qual è il suo problema e cercheremo di aiutarla. Buon lavoro!!
28.06.2013 - 21:05
![]() Annie wrote:
Annie wrote:
Pretty!
26.06.2013 - 13:34
![]() Anna wrote:
Anna wrote:
Certo, clicco su stamparer: modello, poi si apre un'altra pagina con di nuovo la scritta stampare modello e non succede niente! Invece se clicco su stampare immagine si apre una pagina che mi permette di stampare, ma solo la fotografia senza istruzioni!
21.06.2013 - 17:08DROPS Design answered:
Buongiorno, se clicca su stampare immagine, si stampa solo la foto, non le istruzioni, deve cliccare su stampare modello, come dice esce un'altra schermata, clicchi sulla scritta stampare modello e si apre la finestra della stampa. Qui funziona perfettamente...ha provato con altri browser? Ci riscriva se ha problemi!
24.06.2013 - 10:49
|
|||||||||||||
La Belle#labellecardigan |
|||||||||||||
|
|
|||||||||||||
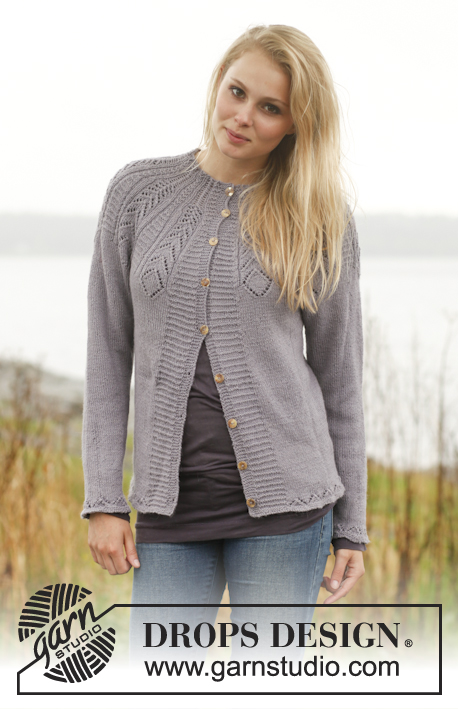
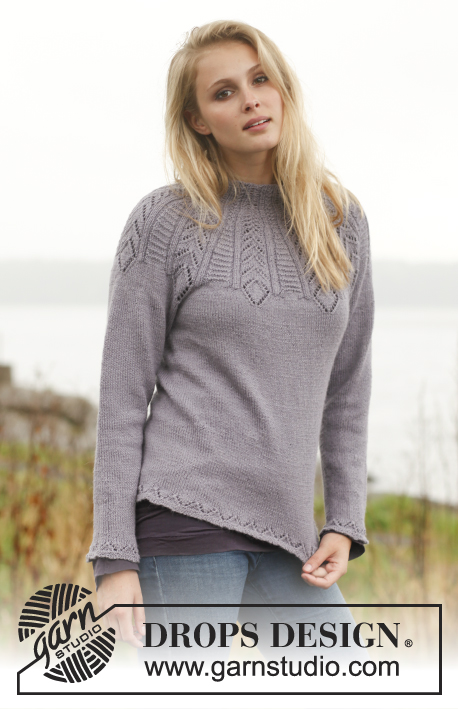
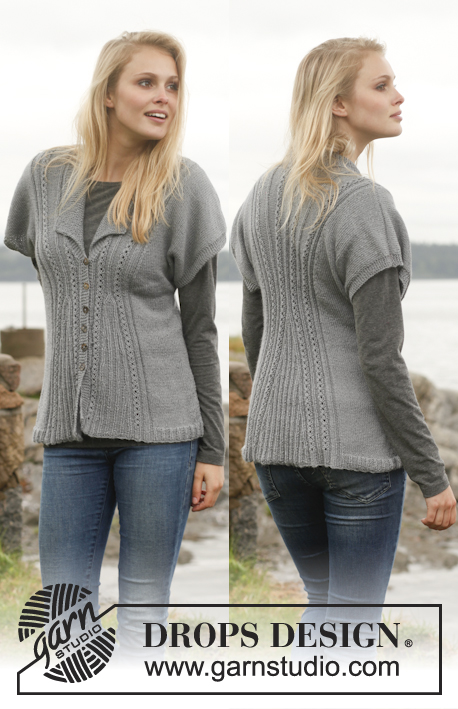
Knitted DROPS jacket with textured pattern at the front in "Karisma". Size: S - XXXL.
DROPS 149-28 |
|||||||||||||
|
GARTER ST (back and forth on circular needle): K all rows. 1 ridge = K2 rows. GARTER ST (in the round on double pointed needles): * K 1 round and P 1 round *, repeat from *-*. 1 ridge = 2 rounds. PATTERN: See diagram A.1. Diagram shows all rows in pattern seen from RS. DECREASE TIP: All dec are done from RS! Dec 1 on each side of marker in each side as follows: Work until 2 sts remain before marker, K 2 tog, (marker), slip 1 st as if to K, K 1, psso. INCREASE TIP: Inc 1 st by making 1 YO. On next row work YO twisted to avoid holes. BUTTONHOLES: Dec for buttonholes on right band. 1 buttonhole = K tog second and third st from edge and make 1 YO. Dec for buttonholes when piece measures: SIZE S: 8, 16, 24, 31, 38 and 45 cm / 3⅛",6¼",9½",12¼",15" and 17¾". SIZE M: 8, 16, 24, 32, 40 and 47 cm / 3⅛",6¼",9½",12½",15¾" and 18½". SIZE L: 8, 16, 24, 32, 40 and 49 cm / 3⅛",6¼",9½",12½",15¾" and 19¼". SIZE XL: 8, 17, 25, 34, 42 and 51 cm / 3⅛",6¾",9¾",13⅜",16½" and 20". SIZE XXL: 8, 17, 26, 35, 44 and 53 cm / 3⅛",6¾",10¼",13¾",17¼" and 21". SIZE XXXL: 8, 17, 27, 36, 46 and 55 cm / 3⅛",6¾",10⅝",14¼",18" and 21⅝". ---------------------------------------------------------- BODY: Worked back and forth on circular needle from mid front. READ ALL OF THE FOLLOWING SECTION BEFORE CONTINUING! Cast on 186-202-222-246-266-290 sts (includes 5 band sts in each side towards mid front) on circular needle size 3 mm / US 2.5 with Karisma. Work 5 RIDGES in garter st - see explanation above. Switch to circular needle size 4 mm / US 6 and work in stockinette st with 5 band sts in garter st in each side towards mid front. REMEMBER THE GAUGE! DEC IN THE SIDES: When piece measures 7 cm / 2¾", insert 1 marker 49-53-58-64-69-75 sts in from each side (= 88-96-106-118-128-140 sts between markers on back piece). On next row from RS, dec 1 st on each side of both markers - READ DECREASE TIP (= 4 sts dec). Repeat dec every 3 cm / 1⅛" 3 more times (= 4 dec in total) = 170-186-206-230-250-274 sts. Remember BUTTONHOLES on right band - see explanation above. PATTERN: AT THE SAME TIME when piece measures 9 cm / 3½", work pattern as follows (1st row = RS): 5 band sts in garter st, 4-4-5-5-6-6 sts in stockinette st, work in garter st (K from RS, K from WS) until 9-9-10-10-11-11 sts remain and finish with 4-4-5-5-6-6 sts in stockinette st and 5 band sts in garter st. Continue like this until 4 ridges have been worked in total. Work next row as follows from RS: 5 band sts in garter st, 4-4-5-5-6-6 sts in stockinette st, diagram A.1 (= 8 sts), work in stockinette st until 17-17-18-18-19-19 sts remain on row, work A.1 (= 8 sts), 4-4-5-5-6-6 sts in stockinette st and 5 band sts in garter st. Continue like this until 4 rows in stockinette st have been worked after ridges. Work next row as follows from RS: 5 band sts in garter st, 4-4-5-5-6-6 sts in stockinette st, A.1 (= 8 sts), 4-4-5-5-6-6 sts in stockinette st, work in garter st until 21-21-23-23-25-25 sts remain on row, 4-4-5-5-6-6 sts in stockinette st, A.1 (= 8 sts), 4-4-5-5-6-6 sts in stockinette st and 5 band sts in garter st. Continue like this until 4 ridges have been worked in total. Work next row as follows from RS: 5 band sts in garter st, 4-4-5-5-6-6 sts in stockinette st, A.1, 4-4-5-5-6-6 sts in stockinette st, A.1, work stockinette st until 29-29-31-31-33-33 sts remain on row, work A.1, 4-4-5-5-6-6 sts in stockinette st, A.1, 4-4-5-5-6-6 sts in stockinette st and 5 band sts in garter st. Continue pattern like this until finished measurements, i.e. work in stockinette st on body while AT THE SAME TIME continuing the two pattern borders up along both front pieces until finished measurements. INC IN THE SIDES: AT THE SAME TIME when piece measures 22 cm / 8¾"", inc 1 st on each side of both markers - READ INCREASE TIP (= 4 sts inc). Repeat inc every 4-4-4½-5-5-5½ cm / 1½"-1½"-1¾"-2"-2"-2¼" 3 more times (= 4 inc in total) = 186-202-222-246-266-290 sts. ARMHOLES: When piece measures 37-38-39-40-41-42 cm / 14½"-15"-15¼"-15¾"-16⅛"-16½", bind off 2-2-2-4-6-8 sts in each side for armholes (i.e. 1-1-1-2-3-4 sts on each side of both markers) = 86-94-104-114-122-132 sts on back piece and 48-52-57-62-66-71 sts on each front piece. Now finish each part separately. BACK PIECE: = 86-94-104-114-122-132 sts. Continue back and forth in stockinette st. When piece measures 54-56-58-60-62-64 cm / 21¼"-22"-22¾"-23⅝"-24⅜"-25¼", bind off the middle 28-28-32-32-36-36 sts for neck and finish each shoulder separately. Continue to bind off 1 st on next row from neck = 28-32-35-40-42-47 sts remain on the shoulder. Continue until piece measures 56-58-60-62-64-66 cm / 22"-22¾"-23⅝"-24⅜"-25¼"-26" and bind off. Repeat in the other side. RIGHT FRONT PIECE: = 48-52-57-62-66-71 sts. Continue pattern and in stockinette st as before with 5 band sts in garter st towards mid front. When piece measures approx. 46-48-50-52-54-56 cm / 18"-19"-19¾"-20½"-21¼"-22" – adjust so that 1-2 rows have been worked after last buttonhole on band, slip the outermost 10-10-12-12-14-14 sts from mid front on 1 stitch holder for neck (work sts before slipping them on holder to avoid cutting the thread). Then bind off for neck at beg of every row from mid front as follows: bind off 2 sts 4 times and 1 st 2 times = 28-32-35-40-42-47 sts remain on shoulder. Continue to work until piece measures 56-58-60-62-64-66 cm / 22"-22¾"-23⅝"-24⅜"-25¼"-26" and loosely bind off. LEFT FRONT PIECE: Work as right but reversed – NOTE: Do not dec for buttonholes on left band. SLEEVE: Worked in the round on double pointed needles. Cast on 46-48-50-52-54-56 sts on double pointed needles size 3 mm / US 2.5 with Karisma. Work 5 RIDGES in garter st - see explanation above. Switch to double pointed needles size 4 mm / US 6 and work in stockinette st. When piece measures 10-7-10-8-13-12 cm / 4"-2¾"-4"-3⅛"-5⅛"-4¾", inc 2 sts mid under sleeve. Repeat inc every 2½-2½-2-2-1½-1½ cm / ⅞"-⅞"-¾"-¾"-½"-½" 16-17-18-19-20-21 more times (17-18-19-20-21-22 inc in total) = 80-84-88-92-96-100 sts. When piece measures 53-52-50-49-47-46 cm / 21"-20½"-19¾"-19¼"-18½"-18", insert 1 marker mid under sleeve. Continue until piece measures 54-53-51-50-49-48 cm / 21¼"-21"-20"-19¾"-19¼"-19" and bind off. Make another sleeve. ASSEMBLY: Sew the shoulder seams. Sew in sleeves - marker mid under sleeve should fit against marker in the side on body. Sew on buttons. NECK EDGE: Pick up from RS approx. 96 to 116 sts around the neck (includes sts on stitch holders) on circular needle size 3 mm / US 2.5 with Karisma. K 6 rows and bind off with K from WS. |
|||||||||||||
Diagram explanations |
|||||||||||||
|
|||||||||||||
 |
|||||||||||||
 |
|||||||||||||
Have you finished this pattern?Tag your pictures with #dropspattern #labellecardigan or submit them to the #dropsfan gallery. Do you need help with this pattern?You'll find 23 tutorial videos, a Comments/Questions area and more by visiting the pattern on garnstudio.com. © 1982-2026 DROPS Design A/S. We reserve all rights. This document, including all its sub-sections, has copyrights. Read more about what you can do with our patterns at the bottom of each pattern on our site. |
|||||||||||||


With over 40 years in knitting and crochet design, DROPS Design offers one of the most extensive collections of free patterns on the internet - translated to 17 languages. As of today we count 324 catalogs and 12290 patterns - 12280 of which are translated into English (US/in).
We work hard to bring you the best knitting and crochet have to offer, inspiration and advice as well as great quality yarns at incredible prices! Would you like to use our patterns for other than personal use? You can read what you are allowed to do in the Copyright text at the bottom of all our patterns. Happy crafting!
Post a comment to pattern DROPS 149-28
We would love to hear what you have to say about this pattern!
If you want to leave a question, please make sure you select the correct category in the form below, to speed up the answering process. Required fields are marked *.