
Popular categories
Looking for a yarn?


Comments / Questions (195)
![]() SarahbuH wrote:
SarahbuH wrote:
Warm greetings! Hope you're doing well. I believe in the power of financial support to change lives. I provide grants for various projects and personal circumstances. WhatsApp +380938820856
24.01.2026 - 06:04
![]() Catherine wrote:
Catherine wrote:
Donc si je comprends bien, quand c’est mentionné pour le devant gauche "Continuer en jersey avec 1 m lis au point mousse sur le côté et 19-21 m de bordure devant milieu devant jusqu'à ce que l'ouvrage mesure 62-64-66-68-70-72 cm. ", la bordure devant milieu de cette partie, c’est le point fantaisie A.1. Et pour le devant droit, je lis le diagramme du point A.1 de la même façon? Je ne l’inverse pas? Le seul changement est au niveau du rabattage des mailles?
19.01.2026 - 12:00DROPS Design answered:
Bonjour Catherine, pour le devant gauche, les 19-21 m en fin de rang sur l'endroit sont pour la bordure devant = 18-20 m de A.1 + 1 m lisière au point mousse; pour le devant droit, les 19-21 premières mailles sur l'endroit sont pour la bordure devant soit 1 m lisière au point mousse et 18-20 m de A.1. Le diagramme se tricote de la même façon, on le lit de haut en bas et de droite à gauche sur l'endroit / de gauche à droite sur l'envers. Bon tricot!
20.01.2026 - 08:57
![]() Catherine wrote:
Catherine wrote:
Bonjour, ll me reste quelques petites interrogations surtout au niveau du devant gauche et du devant droit. Tout d’abord, quand on mentionne bordure devant milieu, quel point est utilisé? Je ne suis pas sûre si c’est du jersey ou le A1. De plus, je ne suis pas sûre de comprendre comment inverser le devant gauche pour obtenir le devant droit. Je ne sais pas à point je dois inverser les différents points ou rangs pour effectuer le devant droit.
17.01.2026 - 19:55DROPS Design answered:
Bonjour Catherine; les mailles de bordure des devants sont tricotées en suivant le diagramme A.1 (9 à 10 fois selon la taille), avec 1 maille lisière au point mousse de chaque côté. Lorsque vous aurez divisé pour les emmanchures, vous terminez le dos et les devants séparément. Après avoir tricoté le devant gauche, tricotez le devant droit de la même façon mais rabattez les mailles de l'épaule en début de rang sur l'envers. Vous rabattrez les 5 mailles du col au début des 3 rangs suivants sur l'envers (après les 9, 10, 11 cm à partir de l'épaule). Ainsi, le devant droit est "en miroir" du devant gauche. Bon tricot!
19.01.2026 - 09:21
![]() Giusy wrote:
Giusy wrote:
Per finire questo modello ho dovuto disfare tre volte il collo perdendo moltissimo tempo. Seguendo le indicazioni fornite, così come ho letto in altri commenti, 10 cm di motivo per lo scollo dopo aver chiuso la spalla sono veramente troppi. Lavorando una taglia L sono bastati 5cm di motivo per lo scollo per ognuna delle due parti, prima di iniziare le diminuzioni per chiudere lo scollo. Comunque una grandissima perdita di tempo!
02.11.2025 - 16:31DROPS Design answered:
Buonasera Giusy, grazie per il suggerimento. Buon lavoro!
02.11.2025 - 18:44
![]() Andrea wrote:
Andrea wrote:
Hallo:-) Müssen die Abnahmen für den Kragen auf der Seite zum Halsauschnitt gemacht werden oder auf der Außenseite?
08.09.2025 - 16:11DROPS Design answered:
Liebe Andrea, die Kragen-Maschen behalten Sie, die Schultermaschen ketten Sie ab. Am Ende des Kragens erfolgt das Abketten (3 x je 5 M) auch an der Schulterseite. Entschuldigen Sie bitte die späte Antwort. Gutes Gelingen und viel Spaß beim Tragen!
23.10.2025 - 20:51
![]() Anne-Christine wrote:
Anne-Christine wrote:
Non, excusez moi, c’est le modèle Free Flow, mais je pense avoir compris. Merci!
29.08.2025 - 18:56
![]() Anne-Christine wrote:
Anne-Christine wrote:
Bonjour! Je ne comprends pas « Au 15e rang de A3, tricoter une maille en moins après la dernière maille du diagramme ». Est-ce que je dois rabattre une maille ou au contraire ne pas tricoter les deux mailles ensemble après le jeté? Merci d’avance pour votre réponse
28.08.2025 - 22:05DROPS Design answered:
Bonjour Anne-Christine, votre question porte t'elle vraiment sur le modèle Nathalie? Je ne trouve pas cette mention dans le explications. Merci d'avance.
29.08.2025 - 16:38
![]() Angèle wrote:
Angèle wrote:
Bonsoir, J'arrive à ce niveau "Au début des 3 rangs suiv sur l'endroit, rabattre les 5 premières m = il reste 5-5-5-7-7-7 m. Rabattre souplement ces mailles au rang suivant sur l'endroit.". Dois je continuer en tricotant A1 ou en jersey. Merci pour votre retour. Bien cordialement.
27.07.2025 - 21:00DROPS Design answered:
Bonjour Angèle, continuez à bien tricoter les mailles restantes comme avant, autrement dit, en point ajouré. Bon tricot!
28.07.2025 - 08:06
![]() Elisabeth Steen wrote:
Elisabeth Steen wrote:
Jeg ser av diagrammet at man skal ta et kast mellom 2 masker (nr. 2 ovenfra), men hvor er de? Det står ingenting om det hverken i Diagram A1 eller A2. Jeg har ikke prøvd oppskriften, men siden det kastet mangler kan jeg ikke skjønne annet enn at man får færre og færre masker siden man (etter hva jeg forstår) bare skal ta inn, ikke øke noe sted.
08.03.2025 - 11:06DROPS Design answered:
Hei Elisabeth. Litt usikker på spørsmålet ditt. Diagram A.1 består av 2 masker som gjentas i bredden, diagrammet strikkes slik: 1 kast + ta 1 maske løst av pinnen som om den skulle strikkes rett, 1 rett, løft den løse maske over. Diagrammet består nå av 1 kast + 1 maske, altså fremdeles 2 masker. Det samme gjelder på 3. pinne (bortsett fra at man strikker 2 rett sammen + 1 kast). A.2 består av 3 masker og når man strikker 1. pinne felles det 2 masker og lages 2 kast = 3 masker. Les diagramteksten og evnt se på hjelpevideoene. mvh DROPS Design
10.03.2025 - 14:39
![]() Kathie wrote:
Kathie wrote:
And confirming - for the right and left band sections of A1, I should always count off 19 stitches, correct? Thx.
27.05.2024 - 16:32DROPS Design answered:
Dear Kathie, yes, since in the pattern for each decrease there is an accompaniying yarnover, the stitchnumber of the patterned band will not change. Happy Knitting!
27.05.2024 - 18:50
|
||||||||||||||||
Nathalie#nathaliecardigan |
||||||||||||||||
 |
 |
|||||||||||||||
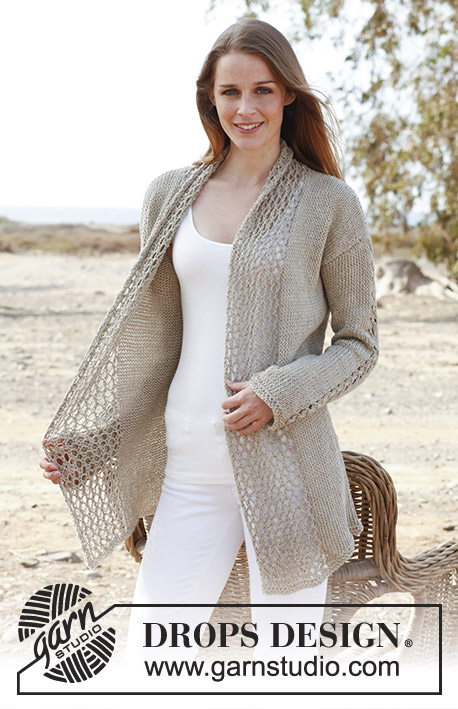
Knitted DROPS jacket in "Bomull Lin" or "Paris". Size: S - XXXL.
DROPS 146-1 |
||||||||||||||||
|
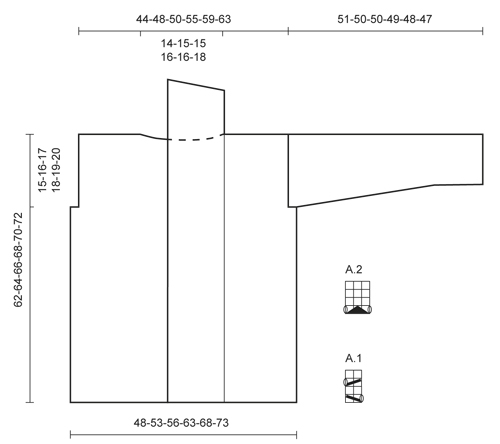
GARTER ST: K back and forth on all rows. 1 ridge = 2 rows K. PATTERN: See diagrams A.1 and A.2. Diagrams show all rows in 1 pattern repetition seen from RS. INCREASE TIP: Inc 1 st by making 1 YO, on next row work YO twisted (i.e. work in the back loop of st instead front) to avoid holes. -------------------------------------------------------- BODY: Worked back and forth on circular needle from mid front. Loosely cast on 170-184-196-218-234-248 sts on circular needle size 6 mm / US 10 with Bomull-Lin. Work 4 rows in garter st - read explanation above. Work next row (= RS) as follows: 1 edge st in garter st, work A.1 9-9-9-10-10-10 times in total (= 19-19-19-21-21-21 sts on right band), work in stockinette st until 19-19-19-21-21-21 sts remain, work A.1 9-9-9-10-10-10 times in total, finish with 1 edge st in garter st (= 19-19-19-21-21-21 sts on left band). Continue with A.1 on band in each side and in stockinette st over the middle sts. REMEMBER THE GAUGE! When piece measures 47-48-49-50-51-52 cm / 18½"-19"-19¼"-19¾"-20"-20½", insert 2 markers; 47-50-53-59-63-66 sts in from each side (= 76-84-90-100-108-116 sts between markers on back piece). On next row bind off 3-4-5-6-7-8 sts for armholes on each side of both markers (= 6-8-10-12-14-16 bind off sts in each side). Now divide the piece and finish each part separately. BACK PIECE: = 70-76-80-88-94-100 sts. Continue in stockinette st with 1 edge st in garter st in each side until piece measures 60-62-64-66-68-70 cm / 23⅝"-24⅜"-25¼"-26"-26¾"-27½". Then bind off the middle 20-22-22-24-24-26 sts for neck and finish each shoulder separately. Continue to bind off 1 st on next row from neck = 24-26-28-31-34-36 sts remain on the shoulder. Bind off when piece measures 62-64-66-68-70-72 cm / 24½"-25¼"-26"-26¾"-27½"-28½". LEFT FRONT PIECE: = 44-46-48-53-56-58 sts. Continue in stockinette st with 1 edge st in garter st in the side and 19-19-19-21-21-21 band sts mid front until piece measures 62-64-66-68-70-72 cm / 24½"-25¼"-26"-26¾"-27½"-28½". On beg of next row from RS bind off the first 24-26-28-31-34-36 sts for shoulder = 20-20-20-22-22-22 sts remain on band. Continue with A.1 with 1 edge st in garter st in each side until band measures 9-10-10-10-10-11 cm / 3½"-4"-4"-4"-4"-4½" from shoulder. At the beg of the next 3 rows from RS bind off the first 5 sts = 5-5-5-7-7-7 sts remain. Loosely bind off these sts on next row from RS. RIGHT FRONT PIECE: Work as left front piece but reversed. SLEEVE: Worked back and forth on needle. Loosely cast on 35-37-39-39-41-43 sts and work 4 rows in garter st. Work next row (= RS) as follows: 1 edge st in garter st, K 15-16-17-17-18-19, work A.2 over the next 3 sts, K 15-16-17-17-18-19, finish with 1 edge st in garter st. Continue in stockinette st with A.2 over the middle 3 sts until finished measurements. When piece measures 8 cm / 3⅛", inc 1 st inside 1 edge st in each side - Read INCREASE TIP above. Repeat inc every 6½-5½-4½-4-3½-3½ cm / 2½"-2¼"-1¾"-1½"-1¼"-1¼" 6-7-8-9-10-10 more times (7-8-9-10-11-11 times in total) = 49-53-57-59-63-65 sts. When piece measures 49-48-47-45-44-42 cm / 19¼"-19"-18½"-17 ¾"-17¼"-16½", insert a marker in each side of sleeve (for assembly). When piece measures 51-50-50-49-48-47 cm / 20"-19¾"-19¾"-19¼"-19"-18½" (shorter measurements in the larger sizes because of wider shoulders), loosely bind off all sts. ASSEMBLY: Sew shoulder seams inside bind off edges. Sew bind off edge on bands tog, WS against WS. Sew bands along neckline in the back of neck. Sew in sleeves, sew sleeve seams inside 1 edge st - NOTE: The section worked after the marker at the top of sleeve, should fit the bind off for armhole. |
||||||||||||||||
Diagram explanations |
||||||||||||||||
|
||||||||||||||||
 |
||||||||||||||||
Have you finished this pattern?Tag your pictures with #dropspattern #nathaliecardigan or submit them to the #dropsfan gallery. Do you need help with this pattern?You'll find 23 tutorial videos, a Comments/Questions area and more by visiting the pattern on garnstudio.com. © 1982-2026 DROPS Design A/S. We reserve all rights. This document, including all its sub-sections, has copyrights. Read more about what you can do with our patterns at the bottom of each pattern on our site. |
||||||||||||||||


With over 40 years in knitting and crochet design, DROPS Design offers one of the most extensive collections of free patterns on the internet - translated to 17 languages. As of today we count 324 catalogs and 12290 patterns - 12280 of which are translated into English (US/in).
We work hard to bring you the best knitting and crochet have to offer, inspiration and advice as well as great quality yarns at incredible prices! Would you like to use our patterns for other than personal use? You can read what you are allowed to do in the Copyright text at the bottom of all our patterns. Happy crafting!
Post a comment to pattern DROPS 146-1
We would love to hear what you have to say about this pattern!
If you want to leave a question, please make sure you select the correct category in the form below, to speed up the answering process. Required fields are marked *.