
Popular categories
Looking for a yarn?


Comments / Questions (47)
![]() Moni wrote:
Moni wrote:
Ein Must-have, gefällt mir super!
11.01.2013 - 21:42
![]() Kappert, Ursula wrote:
Kappert, Ursula wrote:
Dieses würde ich gerne in meiner Größe (44/46) nacharbeiten.
10.01.2013 - 19:36
![]() Jennifer wrote:
Jennifer wrote:
Calista
30.12.2012 - 01:11
![]() Mari-Louice Andersson wrote:
Mari-Louice Andersson wrote:
Elegant till sommarens fester!
29.12.2012 - 18:52
![]() Matilda wrote:
Matilda wrote:
Sievä naisellinen malli!
26.12.2012 - 17:37
![]() Karin wrote:
Karin wrote:
Das würde ich gern für mich nacharbeiten.
26.12.2012 - 14:28
![]() Vorsatz wrote:
Vorsatz wrote:
Sehr elegantes Modell.
25.12.2012 - 21:53
![]() Anja wrote:
Anja wrote:
Wow
22.12.2012 - 14:20
![]() Åsa Byström wrote:
Åsa Byström wrote:
Läcker sommarjacka i härlig färg!
20.12.2012 - 19:51
![]() Anita Tholen wrote:
Anita Tholen wrote:
Mooi vest, maar dan zonder dat koordje als sluiting.
19.12.2012 - 07:47
|
|||||||||||||||||||||||||
Calista#calistacardigan |
|||||||||||||||||||||||||
 |
 |
||||||||||||||||||||||||
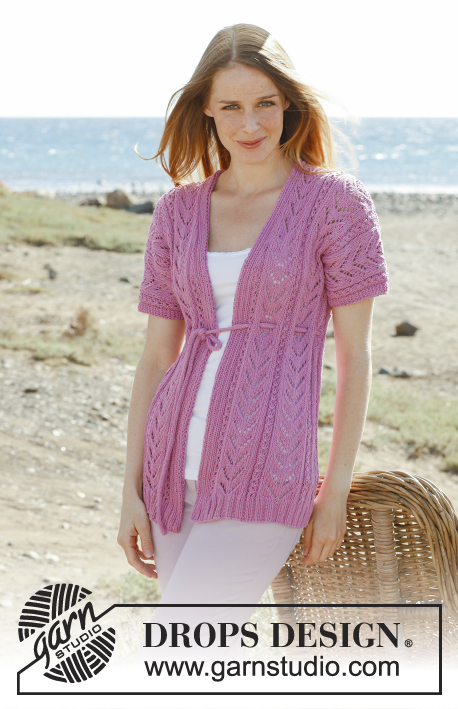
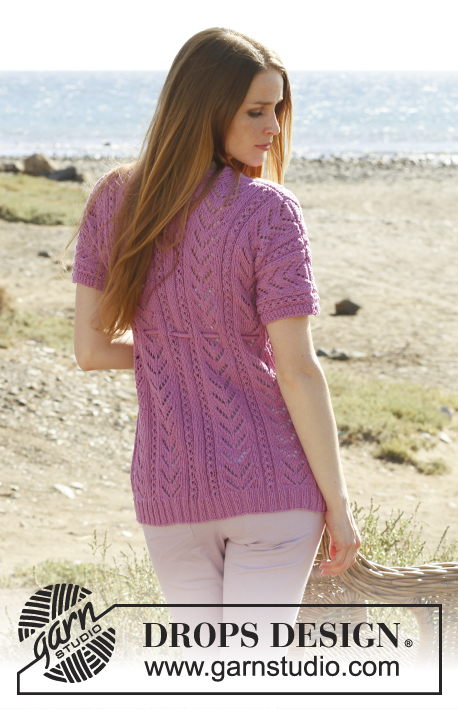
Knitted DROPS jacket with lace pattern in ”Cotton Light” or "Belle". Size: S - XXXL.
DROPS 148-14 |
|||||||||||||||||||||||||
|
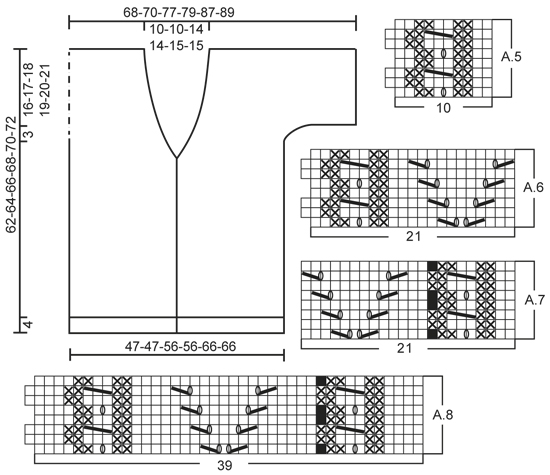
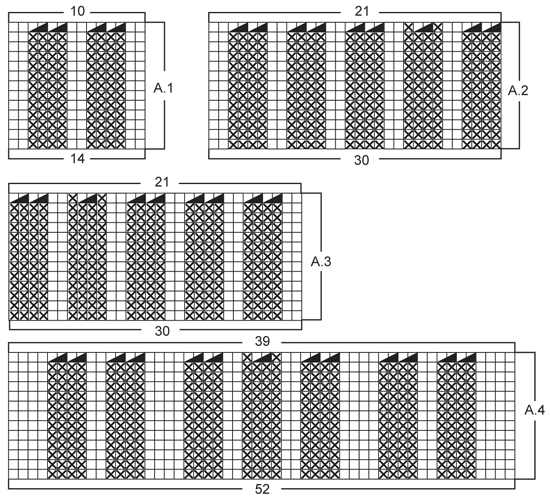
GARTER ST (back and forth on circular needle): K all rows. 1 ridge = 2 rows K. PATTERN: See diagrams A.1 to A.8. Diagrams show all rows in pattern seen from RS. DECREASE TIP (applies to neckline): Dec inside the outermost 11 sts in each side (= band + 1 st). All dec are done from RS! Dec after 11 sts as follows: Slip 1 st as if to K, K 1, psso. Dec before 11 sts as follows: K 2 tog. ---------------------------------------------------------- BODY: Worked back and forth on circular needle from mid front. Cast on 316-316-368-368-436-436 sts (incl 10 band sts in each side towards mid front) on circular needle size 3 mm / US 2.5 with Cotton Light or "Belle". P 1 row from WS. Work next row as follows from RS: SIZE S + M: 2 sts in GARTER ST – see explanation above, K 2, P 2, K 2, P 2 (= band), work A.1 (= 14 sts), work A.2 (= 30 sts) 2 times in total, insert 1 marker (= side), work A.3 (= 30 sts) 2 times in total, work A.1 2 times in total, A.2 2 times in total, insert 1 marker (= side), work A.3 2 times in total, A.1 one time and finish with P 2, K 2, P 2, K 2 and 2 sts in GARTER ST (= band). SIZE L + XL: 2 sts in GARTER ST – see explanation above, K 2, P 2, K 2, P 2 (= band), work A.1 (= 14 sts) 2 times in total, work A.2 (= 30 sts) 2 times in total, insert 1 marker (= side), work A.3 (= 30 sts) 2 times in total, work A.4 (= 52 sts), A.2 2 times in total, insert 1 marker (= side), work A.3 2 times in total, A.1 2 times in total and finish with P 2, K 2, P 2, K 2 and 2 sts in GARTER ST (= band). Size XXL + XXXL: 2 sts in GARTER ST – see explanation above, K 2, P 2, K 2, P 2 (= band), work A.1 (= 14 sts), work A.2 (= 30 sts) 3 times in total, insert 1 marker (= side), work A.3 (= 30 sts) 3 times in total, work A.1 2 times in total, A.2 3 times in total, insert 1 marker (= side), work A.3 3 times in total, A.1 (= 14 sts) and finish with P 2, K 2, P 2, K 2 and 2 sts in GARTER ST (= band). ALL SIZES: Continue rib like this until diagrams have been worked vertically (move the markers upwards when working), piece measures approx. 4 cm / 1½" and there are 228-228-267-267-312-312 sts on needle. Switch to circular needle size 3.5 mm / US 4, and work 1 row from WS with K over K and P over P. Work next row as follows from RS: SIZE S + M: 10 band sts as before, A.5 (= 10 sts), work A.6 (= 21 sts) 2 times in total, (marker), work A.7 (= 21 sts) 2 times in total, work A.5 2 times in total, work A.6 2 times in total, (marker), work A.7 2 times in total, work A.5 (= 10 sts) and finish with 10 band sts as before. SIZE L + XL: 10 band sts as before, work A.5 (= 10 sts) 2 times in total, work A.6 (= 21 sts) 2 times in total, (marker), work A.7 (= 21 sts) 2 times in total, work A.8 (= 39 sts), work A.6 2 times in total, (marker), work A.7 2 times in total, work A.5 2 times in total and finish with 10 band sts as before. Size XXL + XXXL: 10 band sts as before, work A.5 (= 10 sts), work A.6 (= 21 sts) 3 times in total, (marker), work A.7 (= 21 sts) 3 times in total, work A.5 2 times in total, work A.6 3 times in total, (marker), work A.7 3 times in total, work A.5 (= 10 sts) and finish with 10 band sts as before. ALL SIZES: Continue pattern like this upwards. REMEMBER THE GAUGE! When piece measures 40-41-42-43-44-45 cm / 15¾"-16⅛"-16½"-17"-17¼"-17¾", work 2 rows back and forth only over the outermost 10 sts in one side of piece (i.e. only over band, the other sts are not worked), turn piece, work 1 row pattern as before and then repeat over the outermost 10 sts in the other side (this is done to make the neckline fold nicely). On next row from RS, dec 1 st in each side towards mid front for neck line – READ DECREASE TIP. Repeat dec for neck in each side every 4th row (i.e. every other row from RS), 4-4-14-13-12-12 more times and then every 6th row a total of 6-6-1-2-3-3 times. AT THE SAME TIME when piece measures 43-44-45-46-47-48 cm / 17"-17¼"-17¾"-18"-18½"-19", divide the piece at the markers and finish front and back piece separately. BACK PIECE: = 104-104-123-123-146-146 sts. Work pattern back and forth on needle as before. AT THE SAME TIME cast on new sts for sleeves at the end of every row in each side as follows: Cast on 5 sts 3 times in total and then 8-10-8-10-8-10 sts 1 time = 150-154-169-173-192-196 sts – NOTE: Work the inc sts gradually in A.6/A.7. When all sts have been cast on, continue the pattern as before but work the outermost 4 sts in each side in garter st (in size S + L + XXL the pattern ends with 2 P inside 4 sts in garter st in each side and in size M + XL + XXXL the pattern ends with 2 K inside 4 sts in garter st in each side). When piece measures 60-62-64-66-68-70 cm / 23⅝"-24⅜"-25¼"-26"-26¾"-27½", bind off the middle 20-20-29-29-30-30 sts for neck and finish each shoulder separately. Then bind off 1 st on next row from neck = 64-66-69-71-80-82 sts remain on needle. Continue the pattern with 1 st in garter st towards the neck and 4 sts in garter st towards the sleeve (the sts that do not fit the pattern are worked in stockinette st). When piece measures 62-64-66-68-70-72 cm / 24½"-25¼"-26"-26¾"-27½"-28½", loosely bind off all sts. Repeat on the other shoulder. RIGHT FRONT PIECE: Continue pattern and dec for neck as before. AT THE SAME TIME cast on new sts for sleeve at the end of every row towards the side as on back piece. After all dec for neck, 74-76-79-81-90-92 sts remain on needle (the sts that do not fit the pattern towards the neck are worked in stockinette st). When piece measures 62-64-66-68-70-72 cm / 24½"-25¼"-26"-26¾"-27½"-28½", bind off the outermost 64-66-69-71-80-82 sts on shoulder = 10 sts remain on needle for neck edge. Continue rib as before but work the outermost sts towards the neck in garter st. When neck edge measures approx. 7-7-9-9-10-10 cm / 2¾"-2¾"-3½"-3½"-4"-4" from shoulder, slip sts on a stitch holder. LEFT FRONT PIECE: Work as right front piece but reversed. ASSEMBLY: Sew the shoulder seams. Sew neck edge tog mid back - sew st by st with grafting/kitchener sts and sew neck edge to neckline in the back of neck. BELT: Cast on 4 sts on double pointed needles size 3 mm / US 2.5 with Cotton Light or "Belle". K 1 row, * move the sts to the right side of needle without turning the piece, tighten thread on the back and K 1 row from the same side as previous row *. Repeat from *-* (working like this forms a round tie in stockinette st without working P). NOTE: It is important to tighten the thread on the back to make the tie look nice. When tie measures approx. 150 to 200 cm / 60"-80", cut the yarn and pull it through the 4 sts, tighten tog and fasten. Thread the belt up and down through the holes in the pattern - try the jacket on for correct placement. |
|||||||||||||||||||||||||
Diagram explanations |
|||||||||||||||||||||||||
|
|||||||||||||||||||||||||
 |
|||||||||||||||||||||||||
 |
|||||||||||||||||||||||||
Have you finished this pattern?Tag your pictures with #dropspattern #calistacardigan or submit them to the #dropsfan gallery. Do you need help with this pattern?You'll find 17 tutorial videos, a Comments/Questions area and more by visiting the pattern on garnstudio.com. © 1982-2026 DROPS Design A/S. We reserve all rights. This document, including all its sub-sections, has copyrights. Read more about what you can do with our patterns at the bottom of each pattern on our site. |
|||||||||||||||||||||||||


With over 40 years in knitting and crochet design, DROPS Design offers one of the most extensive collections of free patterns on the internet - translated to 17 languages. As of today we count 325 catalogs and 12298 patterns - 12288 of which are translated into English (US/in).
We work hard to bring you the best knitting and crochet have to offer, inspiration and advice as well as great quality yarns at incredible prices! Would you like to use our patterns for other than personal use? You can read what you are allowed to do in the Copyright text at the bottom of all our patterns. Happy crafting!
Post a comment to pattern DROPS 148-14
We would love to hear what you have to say about this pattern!
If you want to leave a question, please make sure you select the correct category in the form below, to speed up the answering process. Required fields are marked *.