
Popular categories
Looking for a yarn?


Comments / Questions (64)
![]() Jucka wrote:
Jucka wrote:
Problem an den Stellen, an denen ich für die Ärmelausschnitte je 8 Maschen abgekettet habe und nun die 60 Maschen der Ärmelränder auf die Rundnadel des Rumpfteils lege: ich kann die 60 Maschen des Ärmelrandes kaum abstricken, weil die darunterliegenden 8 abgeketteten Maschen viel "kürzer" sind und ich mit den Nadeln keinen Spielraum zum Stricken habe, ohne die abgeketteten Maschen zu überdehnen. Was mache ich falsch?
24.02.2014 - 10:33DROPS Design answered:
Liebe Jucka, Sie machen nichts falsch, es kann zu Beginn der Passe nach dem Zusammenlegen der M von Rumpf und Ärmeln vorkommen, dass sie sich an den Übergängen schwer abstricken lassen. Dies wird nach einigen Reihen beim Abnehmen besser. Sie können versuchen, 2 oder 3 Rundnadeln zu benutzen, damit das Stricken einfacher wird. Gutes Gelingen!
24.02.2014 - 10:55
![]() J V D Merwe wrote:
J V D Merwe wrote:
Zou het patroon ook met gewone naalden kunnen breien in plaats van een rond brei naald
11.09.2013 - 16:13DROPS Design answered:
Dit patroon wordt heen en weer gebreid op de rondbreinaald omdat er hier veel steken zijn (= u kunt veel meer steken kwijt op een rondbreinaald). Breit u de kleinste maten, dan denk ik dat het lukt met een rechte breinaald - voor de grootste maten weet ik het niet zeker. U kunt uitproberen of het lukt (grootste maat heeft max 412 st op de nld). Succes
12.09.2013 - 10:56Connie Thomsen wrote:
Kan jeg bruge jeres nye drops love for you med flame effekt til denne model?
18.08.2013 - 16:38DROPS Design answered:
Ja den kan du bruge og den bliver helt sikkert super flot. Læg gerne et billede ud på Facebook undervejs og når du er klar :)
19.08.2013 - 10:01
![]() Vivian Weiß wrote:
Vivian Weiß wrote:
Hallo Vera, klar das der Brustumfang rundum 84 cm bei Gr S, der ist ja auf der Szizze auch nur zur Hälfte angegeben! Wie kommst Du auf 176 M? Laut Anleitung ist man auf Brusthöhe bei 188 M. Ich frag mal bei meiner Drops-Händlerin nach, vielleicht weiß die Rat...
07.02.2013 - 20:03Vera wrote:
Hallo! Brustumfang ist doch 84 cm nicht 42. Zweitens: 21: 10 ist gleich X:84.Also sind schon 176 m genügend.
05.02.2013 - 10:04
![]() Vivian Weiß wrote:
Vivian Weiß wrote:
Liebe Frau Weidenwe, ich glaube Sie haben meinen Sachverhalt nicht richtig verstanden. In meinen Augen deckt sich die Angabe der Maschenprobe nicht mit den Angaben der cm bezüglich Brustumpfangs usw. Aber viele Dank trotzdem für den Versuch zu helfen.
04.02.2013 - 19:00
![]() Vivian Weiß wrote:
Vivian Weiß wrote:
Guten Tag mal wieder! Heute habe ich endlich das Jäckchen endlich fertig gestellt. Es sieht auch wunderschön aus, nur ist es leider zu klein geworden. Sehr schade! Meine Maschenprobe hat auf 10x10 cm 19 Maschen und 27 Reihen schon mit einer Nadelstärke kleiner als angegeben nämlich 3mm. Da mein Brustumfang etwas kleiner ist als beim Modell in Gr.S von 42cm (ich habe 41 cm) hätte es doch passen müssen, wenn ich in meiner Mascheprobe 2 Maschen weniger habe.Wo kann der fehler liegen?
03.02.2013 - 20:01WeidenweFrau Edith Catania answered:
Wenn mann das schon weiß dann nimmt mann die machenzahl einer nummeru größer und mann macht einen brobelappen. so mach ich es .
04.02.2013 - 13:00
![]() Vivian Weiß wrote:
Vivian Weiß wrote:
Ich befinde mich beim Stricken gerade bei der Rundpasse wo man mit dem Muster A.1 beginnt. Dies soll man mit einer Hin-R beginnen. Nach den 6 Blenden-M kraus re folgen 5 re M, 5 li M, 5 re M u.s.w. Laut dem Muster A.1 beginnt man damit 2 M li zusammen zu stricken u.s.w. Das bedeutet in der angegebenen Reihenfolge man strickt in der Hin-R auf glatt re nun linke Maschen und auf glatt linke Maschen rechte Maschen. Das ist doch nicht richtig, oder? Vielen Dank für Ihre Hilfe!
23.01.2013 - 21:02DROPS Design answered:
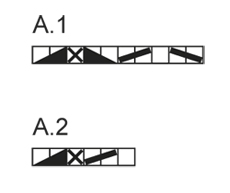
Liebe Vivian, Sie stricken immer rechte über rechte und linke über linke Maschen, Das Diagramm A.1 zeigt, wie 5 rechte M auf 3 rechte M reduziert werden und 5 linke auf 3 linke.
24.01.2013 - 11:56
![]() Sylvia Robson wrote:
Sylvia Robson wrote:
Please could you help me i am about to start and knit the above pattern and i would like to know if the main body is just worked in stocking stitch i think i must be reading the pattern wrong. love your site.
16.12.2012 - 11:34DROPS Design answered:
Dear Mrs Robson, you first work 6 rows garter st with smaller needle then continue in st st with front bands in garter sts with larger needle. Happy knitting !
16.12.2012 - 12:04
![]() Steffi wrote:
Steffi wrote:
Hallo, ich habe gerade während den ersten Abnahmen festgestellt, dass der untere Rand aus Krausrippen hochklappt bzw. sich regelrecht einrollt. Haben Sie viell. einen Tipp für mich? Herzlichen Dank!
26.11.2012 - 10:17
|
|||||||||||||||||||
Abbey#abbeycardigan |
|||||||||||||||||||
 |
 |
||||||||||||||||||
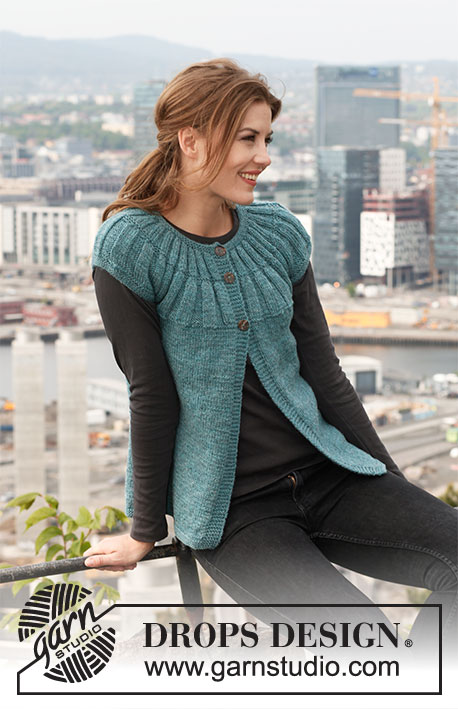
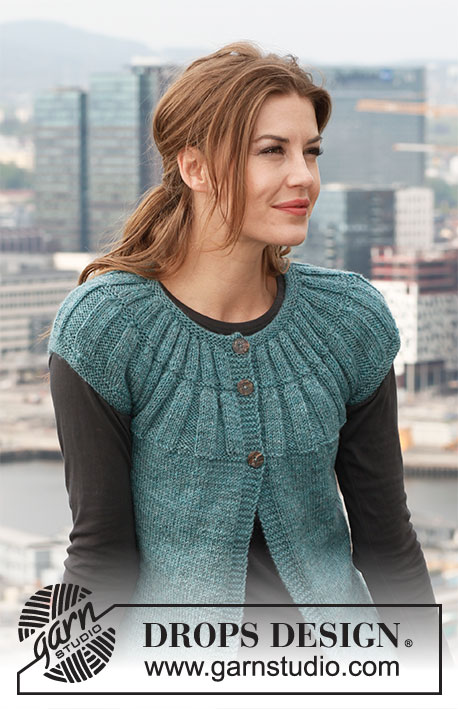
Knitted DROPS jacket with short sleeves and round yoke in ”Karisma”. Size: S - XXXL.
DROPS 142-14 |
|||||||||||||||||||
|
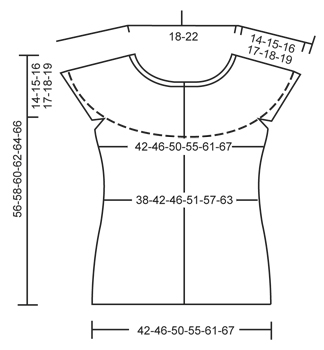
GARTER ST (back and forth on needle): K sts on all rows. DECREASE TIP: All dec are done from RS. Beg 2 sts before marker and work as follows: K 2 tog, slip 1 st as if to K, K 1, psso. DECREASE (applies to round yoke): See diagrams A.1 and A.2. Diagrams show pattern from RS. BUTTONHOLES: bind off for 3 buttonholes on right band as explained in pattern. 1 buttonhole = K tog third and fourth st from edge and make 1 YO. ---------------------------------------------------------- JACKET: Worked back and forth on circular needle from mid front. LOOSELY cast on 188-204-220-244-268-292 sts (includes 6 band sts in each side towards mid front) on circular needle size 3 mm / US 2.5 with Karisma. Work 6 rows in GARTER ST - see explanation above. Switch to circular needle size 4 mm / US 6 and work in St st - but continue the outermost 6 sts in each side in garter st (= bands). REMEMBER THE GAUGE! When piece measures 5 cm / 2", insert 2 markers in the piece; 50-54-58-64-70-76 sts in from each side (= 88-96-104-116-128-140 sts between markers on back piece). On next row from RS, dec 1 st on each side of both markers - Read DECREASE TIP (= 4 sts dec). Repeat dec every 3½ cm / 1¼" 3 more times = 172-188-204-228-252-276 sts. When piece measures 20 cm / 8", inc 1 st on each side of both markers (= 4 sts inc). Repeat inc every 6-6-6-7-7-7 cm / 2⅜"-2⅜"-2⅜"-2¾"-2¾"-2¾" 3 more times = 188-204-220-244-268-292 sts. When piece measures 42-43-44-45-46-47 cm / 16½"-17"-17¼"-17¾"-18"-18½" (make sure that next row is from WS), bind off 8-8-8-10-10-10 sts in each side for armholes (i.e. 4-4-4-5-5-5 sts on each side of both markers) = 46-50-54-59-65-71 sts on each front piece and 80-88-96-106-118-130 sts remain on back piece. Put piece aside and knit the sleeve edges. SLEEVE EDGE: Worked back and forth on circular needle. Cast on 62-64-66-70-72-74 sts on circular needle size 3 mm / US 2.5 with Karisma. Work 6 rows in garter st (1st row = RS). Work next row as follows from RS: bind off the first 4-4-4-5-5-5 sts, K the next 54-56-58-60-62-64 sts while AT THE SAME TIME inc 6 sts evenly over these (inc by working 2 sts in 1 st) and bind off the last 4-4-4-5-5-5 sts = 60-62-64-66-68-70 sts on needle. Put piece aside and knit another sleeve edge. YOKE: Slip sleeve edges on to same circular needle as body where armholes were bind off = 292-312-332-356-384-412 sts. Insert 1 marker – NOW MEASURE PIECE FROM HERE. K 1 row from RS AT THE SAME TIME bind off for 1 BUTTONHOLE on right band - see explanation above. K 1 row from WS, then K 1 row from RS while AT THE SAME TIME dec 5-5-5-9-7-5 sts evenly (do not dec over bands) = 287-307-327-347-377-407 sts. Work next row as follows from WS: 6 band sts in garter st, * P 5, K 5 *, repeat from *-* until 11 sts remain and finish with P 5 and 6 band sts in garter st. Continue rib like this. When piece measures approx. 6-7-7-8-9-10 cm / 2⅜"-2¾"-2¾"-3⅛"-3½"-4", work next row as follows from RS: 6 band sts as before, work diagram A.1 until 11 sts remain on needle, work the next 5 sts as the first 5 sts in A.1, and finish with 6 band sts as before. After A.1 there are 177-189-201-213-231-249 sts on needle. Work 1 row K over K and P over P (work bands in garter st as before). K 1 row from RS AT THE SAME TIME bind off for 1 buttonhole on right band. K 1 row from WS and K 1 row from RS. Then work next row as follows from WS: 6 band sts as before, * P 3, K 3 *, repeat from *-* until 9 sts remain and finish with P 3 and 6 band sts as before. Continue rib like this until piece measures approx. 13-14-15-16-17-18 cm / 5⅛"-5½"-6"-6¼"-6¾"-7". Work next row as follows from RS: 6 band sts as before, work diagram A.2 until 9 sts remain on needle, work the next 3 sts as the first 3 sts in A.2, and finish with 6 band sts as before. After A.2 there are 122-130-138-146-158-170 sts on needle. Work 1 row K over K and P over P (work bands in garter st as before). Switch to circular needle size 3 mm / US 2.5 and work 6 rows in garter st over all sts, AT THE SAME TIME on 1st row (i.e. RS) bind off for last buttonhole on right band and in addition dec 32-38-42-48-56-66 sts evenly (do not dec over bands) = 90-92-96-98-102-104 sts. After last row in garter st, loosely bind off with K from RS. Jacket measures approx. 56-58-60-62-64-66 cm / 22"-22¾"-23⅝"-24⅜"-25¼"-26" up to shoulder. ASSEMBLY: Sew sleeve edges tog mid under sleeve - sew edge to edge in outermost sts. Sew the openings under the sleeves. Sew on buttons. |
|||||||||||||||||||
Diagram explanations |
|||||||||||||||||||
|
|||||||||||||||||||
 |
|||||||||||||||||||
 |
|||||||||||||||||||
Have you finished this pattern?Tag your pictures with #dropspattern #abbeycardigan or submit them to the #dropsfan gallery. Do you need help with this pattern?You'll find 12 tutorial videos, a Comments/Questions area and more by visiting the pattern on garnstudio.com. © 1982-2026 DROPS Design A/S. We reserve all rights. This document, including all its sub-sections, has copyrights. Read more about what you can do with our patterns at the bottom of each pattern on our site. |
|||||||||||||||||||


With over 40 years in knitting and crochet design, DROPS Design offers one of the most extensive collections of free patterns on the internet - translated to 17 languages. As of today we count 324 catalogs and 12290 patterns - 12280 of which are translated into English (US/in).
We work hard to bring you the best knitting and crochet have to offer, inspiration and advice as well as great quality yarns at incredible prices! Would you like to use our patterns for other than personal use? You can read what you are allowed to do in the Copyright text at the bottom of all our patterns. Happy crafting!
Post a comment to pattern DROPS 142-14
We would love to hear what you have to say about this pattern!
If you want to leave a question, please make sure you select the correct category in the form below, to speed up the answering process. Required fields are marked *.