
Popular categories
Looking for a yarn?


|
|
Chantal |
|
 |
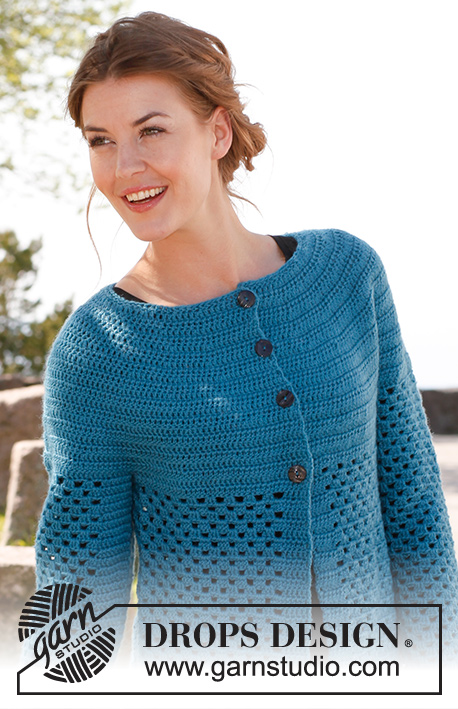 |
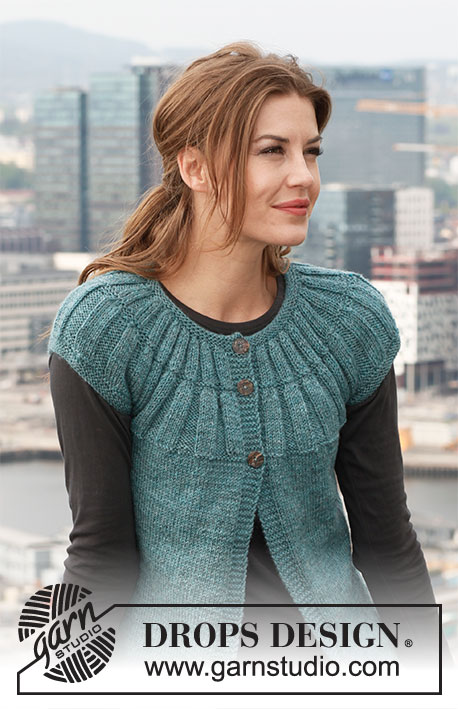
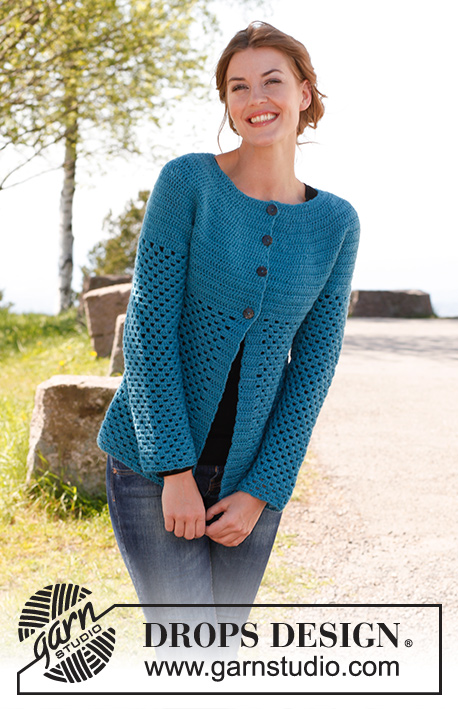
Crochet DROPS jacket in ”Karisma”. Size: S - XXXL.
DROPS 142-6 |
|
|
CROCHET INFO: Replace first dc on every round/row with 3 ch. Finish every round with 1 sl st in 3rd ch from beg of round. Finish every row with 1 dc in first dc from beg of previous row. INCREASE TIP: Inc by working 2 dc in 1 dc, first on one side of all markers on row, next time on the other side of all markers on row, continue inc like this. DECREASE TIP: Work 1 dc but wait with last pull through (= 2 sts on hook), then work next dc but on last pull through, pull thread through all sts on hook = 1 st dec. ---------------------------------------------------------- BODY: The piece is worked top down. Worked back and forth from mid front. Ch 111-116-121-131-136-146 (includes 3 ch to turn with) on hook size 4 mm / G/6 with Karisma. Work next row as follows: 1 dc in 4th ch (= 2 dc), 1 dc in each of the next ch 2, * skip ch 1, 1 dc in each of the next 4 ch *, repeat from *-* = 88-92-96-104-108-116 dc - read CROCHET INFO. Insert 19-20-21-23-24-26 markers in the piece as follows: Insert 1st marker after 8th dc, then insert 18-19-20-22-23-25 markers 4 dc apart, 8 dc remain after last marker. Work back and forth with dc while AT THE SAME TIME inc 1 dc at all markers as follows: On every other row 5-6-6-5-5-6 times and then on every 4th row 2-2-2-3-3-3 times – READ INCREASE TIP = 221-252-264-288-300-350 dc. Work 1 row while at the same time inc 14-7-7-7-19-5 dc evenly (do not inc over the first and last 6 dc = band) = 235-259-271-295-319-355 dc. Work next row as follows: 36-40-43-47-51-58 dc (front piece), ch 8 (= under sleeve), skip 52-56-56-60-64-68 dc from previous row (used for sleeve later), 59-67-73-81-89-103 dc (back piece), ch 8 (under sleeve), skip 52-56-56-60-64-68 dc from previous row (used for sleeve later) and 36-40-43-47-51-58 dc (front piece). Insert a marker and measure the piece from here. Work 1 dc in every dc/ch = 147-163-175-191-207-235 dc. Continue to work as follows: 1 dc in each of the first 6 dc (= band), * ch 1, skip 3 dc, work 3 dc in next dc *, repeat from *-* and finish with ch 1, skip 3 dc and work 1 dc in each of the last 6 dc (= 33-37-40-44-48-55 dc-groups with 6 dc in each side). Continue to work as follows: ROW 1: 1 dc in each of the first 6 dc, 3 dc in first ch, ch 1, * skip 3 dc, 3 dc in next ch, ch 1 *, repeat from *-* until 1 ch and 6 dc remain, finish with 3 dc in last ch and 1 dc in each of the last 6 dc. ROW 2: 1 dc in each of the first 6 dc, * ch 1, skip 3 dc, 3 dc in next ch *, repeat from *-* until 6 dc remain, finish with ch 1 and 1 dc in each of the last 6 dc. Repeat 1st and 2nd row upwards. When piece measures 10 cm / 4" from marker, inc 1 dc-group in the right side as follows: Work 3 dc + 1 ch in the first 8-9-10-11-12-13 ch, in next ch work as follows: 3 dc, ch 1, 3 dc, 1 ch. When piece measures 17 cm / 6¾", inc the same way in the left side – inc when 9-10-11-12-13-14 ch remain. When piece measures 24 cm / 9½", inc 1 dc-group in the right side, inc in the 10-11-12-13-14-15 ch the same way as before. When piece measures 31 cm / 12¼", inc in the left side – inc when 10-11-12-13-14-15 ch remain. After all inc are done there are 37-41-44-48-52-59 dc-groups on row. Cut and fasten the thread when piece measures 37-37-39-39-41-42 cm / 14½"-14½"-15¼"-15¼"-16⅛"-16½" from marker, piece measures 56-58-60-62-64-66 cm / 22"-22¾"-23⅝"-24⅜"-25¼"-26" in total. SLEEVE: Worked in the round, top down. Beg by working mid under sleeve as follows: Work 1 sc in the 5th ch of the 8 ch worked for armhole on body. Ch 3 (= 1 dc). Then work 1 dc in each of the next 3 ch. Then work 1 dc in every dc over sleeve, before working 1 dc in each of the remaining 4 ch under sleeve = 60-64-64-68-72-76 dc. Insert a marker mid under sleeve. Continue to work as follows: 1 dc in each of the first 10-10-10-12-12-14 dc, * ch 1, skip 3 dc, work 3 dc in next dc *, repeat from *-* and work 1 dc in each of the last 10-10-10-12-12-14 dc. Continue with 1 dc in each of the 20-20-20-24-24-28 dc mid under sleeve, in every ch work 3 dc + 1 ch. Continue this pattern AT THE SAME TIME when piece measures 4 cm / 1½", dec 1 dc on each side of marker - READ DECREASE TIP. Repeat dec every 3½-3½-3½-3-3-2½ cm / 1¼"-1¼"-1¼"-1⅛"-1⅛"-⅞" 9-9-9-11-11-13 more times = 40-44-44-44-48-48 dc. After all dec, work 3 dc + 1 ch in every ch. Cut and fasten the thread when sleeve measures 47-46-46-44-44-43 cm / 18½"-18½"-18"-17¼"-17¼"-17" from marker – NOTE – shorter measurements in the larger sizes because of larger neck and wider shoulders. ASSEMBLY: Sew buttons on to left front piece – the top button 1 cm / ⅜" from neck edge, the last in the transition between dc and dc-groups. Button the buttons between 2 dc on right front piece. |
|

|
|
|
Have you made this or any other of our designs? Tag your pictures in social media with #dropsdesign so we can see them! Do you need help with this pattern?You'll find tutorial videos, a Comments/Questions area and more by visiting the pattern on garnstudio.com. © 1982-2024 DROPS Design A/S. We reserve all rights. This document, including all its sub-sections, has copyrights. Read more about what you can do with our patterns at the bottom of each pattern on our site. |
|


With over 40 years in knitting and crochet design, DROPS Design offers one of the most extensive collections of free patterns on the internet - translated to 17 languages. As of today we count 304 catalogs and 11422 patterns - 11417 of which are translated into English (US/in).
We work hard to bring you the best knitting and crochet have to offer, inspiration and advice as well as great quality yarns at incredible prices! Would you like to use our patterns for other than personal use? You can read what you are allowed to do in the Copyright text at the bottom of all our patterns. Happy crafting!
Comments / Questions (128)
Warum nicht beide Seiten gleichzeitig zunehmen? Hat das einen besonderen Grund ( wegen muster??) Sieht dass hinterher nicht schief aus?
13.04.2023 - 13:09DROPS Design answered:
Wie früher gesagt werden so die Zunahmen weniger unauffällig und die Jacke wird dann nicht "plötzlich" breiter. Viel Spaß beim häkeln!
13.04.2023 - 14:37Hallo, nach Aufteilung für die einzelnen Teilen Markierung setzen. Dann die Zunahmen: nach 10 cm re/17 cm li/24cm re/31 cm li. Warum? Verstehe die unterschiedlichen Längen nicht.
12.04.2023 - 17:27DROPS Design answered:
Liebe Frau Radau, so werden die Zunahmen gehäkelt, dh nicht alle auf einmal sondern eine nach der anderen. Viel Spaß beim häkeln!
13.04.2023 - 09:35Goedemorgen, er staat als ik het goed lees in de eerste toer dat je steeds een losse haakt en dan 4 stokjes vanaf en tot * ik neem aan dat je dan ook een st overslaat, maar dan krijg je hokjes en dat zie ik op het plaatje niet terug. Het meerderen geeft bij mij ook problemen, ik haak bij elke markeerder 2 stokjes in 1 stokje. Nu in de 7e toer al op het stekenaantal! Sla wel de volgende toer over maar niet na de 4e toer. Is dat het probleem ?
14.02.2022 - 10:41DROPS Design answered:
Dag Marion,
Je haakt aan het begin van de toer steeds 3 lossen (boven het laatste stokje van de vorige toer) welke het eerste stokje vervangt. Het volgende stokje haak je dus in het tweede stokje van de vorige toer.
Je meerdert eerst om de toer (dus de ene toer wel en de andere toer niet) 5-6-6-5-5-6 keer. Afhankelijk van je maat zit je dan dus op 10 of 12 toeren. Daarna meerder je 2-2-2-3-3-3 keer op elke 4e naald.
17.02.2022 - 11:23Buonasera purtroppo non riesco a capire dove è come fare gli aumenti nel corpo...il segnapunti l'ho messo a fine riga dove ho creato scalfi con 8 catenelle. Dopodiché ho fatto una riga piena e poi ho iniziato il traforato. Adesso sono ferma a 10 cm per aumenti...non capisco perché si parla di catenelle e non spazi o maglie alte...ho provato a fare 3 m.a - 1 cat - 3 m.a. nello stesso spazio ma si nota tantissimo...scusatemi e grazie
21.01.2022 - 18:35DROPS Design answered:
Buonasera Giuseppina, le spiegazioni sono corrette: deve lavorare gli aumenti a 10 cm dal segnapunti come indicato. Deve lavorare 3 m.a. + 1 catenella nelle prime 8-9-10-11-12-13 catenelle, nella catenella successiva lavorare come segue: 3 m.a., 1 catenella, 3 m.a., 1 catenella; poi, a 17 cm farà l'aumento sul lato sinistro quando rimangono 9-10-11-12-13-14 catenelle. Buon lavoro!
22.01.2022 - 18:43Bonjour. En effet, je n'avais pas pris en compte celà. Merci beaucoup de votre réponse, et pour tous les modèles au crochet mis à notre disposition. Vivement que je réceptionne ma laine karisma. Bonne journée.
17.11.2021 - 10:01Bonjour. Pour le modèle en taille S. On débute avec 111 mailles moins les 3 ml pour tourner. On a 108 m, on ajoute 5 fois 19 augmentations tous les 2 rangs et 2 fois 19 augmentations tous les 4 rangs. Donc 108+133=241 et vous annoncez 221 m. Je ne comprends pas comment arriver à avoir 221 m. Merci pour la réponse. Cordialement.
15.11.2021 - 19:08DROPS Design answered:
Bonjour Evelyne, on commence par plus de mailles en l'air que de brides au 1er rang car bien souvent la chaînette de base est trop serrée, on va donc sauter des mailles au 1er rang pour terminer avec 88 brides au 1er rang + (5+2) x 19 augmentations pour l'empiècement = 221 brides. Bon crochet!
16.11.2021 - 08:46Ik ben begonnen met het vest 142-6. Ik begrijp het meerderen met de markers maar toch een vraag. Laat je de markers zitten als ze eenmaal aangebracht zijn of verplaats ik elke toer met meerderenden de markers mee? Het is mijn eerste keer vandaar mijn onervaren vraag. Alvast bedankt voor het antwoord.
27.09.2021 - 15:39DROPS Design answered:
Dag Sylvia,
De markeerders laat je op de positie in de breedte en schuif je mee in de hoogte tijdens het breien, zodat je steeds weet waar je moet meerderen.
30.09.2021 - 11:06Meerder bij een hoogte van 10 cm vanaf de markeerder 1 stk-groep aan de rechterkant als volgt: Haak 3 stk en 1 l in de eerste 8-9-10-11-12-13 l, haak in de volgende l als volgt: 3 stk, 1 l, 3 stk, 1 l. Meerder bij een hoogte van 17 cm op dezelfde manier aan de linkerkant – meerder als er 9-10-11-12-13-14 l over zijn. Ik zie even niet hoe dit nu precies zit. Want als je eerst aan de ene kant meerderd en dan aan de andere kant dan word het toch scheef?
08.09.2021 - 22:26DROPS Design answered:
Dag Patricia,
Je haakt de ene keer bij het meerderen aan de rechterkant van alle markeerdraden en de volgende keer steeds aan de linkerkant van alle markeerdraden. Het afwisselend rechts en links meerderen voorkomt juist dat het werk scheef wordt.
17.09.2021 - 10:57Ik begrijp niet wat er wordt bedoeld met: om de toer 5-6-6-5-5-6 keer en elke 4e toer 2-2-2-3-3-3 keer. Kunt u dat uitleggen?
22.08.2020 - 16:11DROPS Design answered:
Dag Robine,
Stel je haakt maat S, dan geldt het eerste getal van de reeks getallen. Je meerdert in dat geval 5 keer om de toer (dus de ene toer wel en de andere toer niet) en daarna meerder je op elke 4e toer en dit doe je in totaal 2 keer.
26.08.2020 - 14:41Hi Could you please tell me how many rows of dcs and how long would it measure? When I reached end of the part. "Work 1 row while at the same time inc 14-7-7-7-19-5 dc evenly (do not inc over the first and last 6 dc = band) = 235-259-271-295-319-355 dc." I am getting confused with increasing part. Thank you Sri
03.04.2020 - 03:01DROPS Design answered:
Dear Sri, these increases are worked on one row only, crochet this row in pattern as before (with the 6 front band sts on each side) and increase evenly 14-7-7-7-19-5 dc working 2 sts in the same sts a total of 14-7-7-7-19-5 times on this row - read more here about how to increase evenly. Happy crocheting!
03.04.2020 - 08:02