
Popular categories
Looking for a yarn?


Comments / Questions (28)
![]() Ostrowsky Waltraud wrote:
Ostrowsky Waltraud wrote:
Hallo können Sie mir bitte mitteilen wie oft und wieviel Maschen in der Endphase abgenommen werden da ich die Weste nur in einer Farbe stricke und somit keinen musterhaft mit den Abnahmen Vielen Dank
21.07.2022 - 09:14DROPS Design answered:
Liebe Ostrowsky, Die Abnahmen sind in den Diagrammen mit einem schwarzen Halbdreieck gekennzeichnet. Unabhängig davon, ob Sie in einer oder vielen Farben arbeiten, werden die Abnahmen auf die gleiche Weise gestrickt.
31.07.2022 - 23:29
![]() Katarina Johansson wrote:
Katarina Johansson wrote:
Rad 14 i mönster A 2 återkommer en vit ruta varannan gång i det mörka partiet. Det verkar inte stämma mot bilden på koftan?
29.01.2022 - 19:30DROPS Design answered:
Hej Katarina, det stemmer, der mangler en hvid prik i diagrammet. Tak for info :)
03.02.2022 - 14:31
![]() Ilovedogs wrote:
Ilovedogs wrote:
Non trovo lo schema jacquard per il fondo del corpo prima del bordo a coste: devo ripetere lo schema A1 ? Come mai per lo sprone non sono indicati con le frecce i ferri in cui fare glia aumenti? Mi rendo conto che lo schema è stato inserito parecchio tempo fa', ma sarebbe molto utile se venisse corretto...
05.01.2022 - 09:26DROPS Design answered:
Buongiorno Ilovedogs, il motivo da seguire all'inizio dopo il bordo a coste è il motivo A.1. Per quanto riguarda lo sprone, gli aumenti sono lavorati all'interno di A.2. Buon lavoro!
05.01.2022 - 10:45
![]() Christel Felgendreher wrote:
Christel Felgendreher wrote:
Ich würde das Model Augusta 142-18 gerne von oben nach unten stricken. gibt es dafür eine ANLEITUNG ??
09.03.2020 - 21:31DROPS Design answered:
Liebe Frau Felgendreher, siehe Antwort unten :)
10.03.2020 - 10:26
![]() Christel wrote:
Christel wrote:
Ich würde das Drops Model Augusta 142-18 gerne von oben nach unten stricken. Gibt es dafür auch eine Anleitung??
09.03.2020 - 21:25DROPS Design answered:
Liebe Christel, leider können wir nicht jede Anleitung nach jedem Wunsch umrechnen, aber hier finden Sie Jacken, die von oben nach unten gestrickt werden, davon können Sie sich sicher inspierieren. Viel Spaß beim stricken!
10.03.2020 - 10:17
![]() Pam wrote:
Pam wrote:
Hi. Thank you for your very quick response. I have done as you suggested and measured it against an existing cardigan. It is slightly smaller but it will be fine. Thanks for help. I love Drops yarn and use it for all my projects, especially colour work.
07.03.2019 - 14:44
![]() Pam Edmiston wrote:
Pam Edmiston wrote:
I love knitting with Baby Alpaca Silk, probably my favourite yarn ever. I also love Augusta, very pretty little cardigan.....but the size seems wrong. My tension is fine but it just looks so small. I started knitting size 14/16. Looked and measured too small. Switched to 18/20 and it still looks and measured too small. Does the knitted fabric have lots of stretch of us it meant to be a very close fit?
07.03.2019 - 13:23DROPS Design answered:
Dear Mrs Edmiston, measure a similar garment you have and like the shape and compare these measurements to the ones given in the chart, this is the best way to get the finished measurements as long as our tension is right. read more about sizing here. Happy knitting!
07.03.2019 - 14:04
![]() Mamieflo wrote:
Mamieflo wrote:
J'ai tricoté ce pull il y a 4 ans, me suis lancée dans du jacquard, malheureusement il m'était un peu juste au niveau du jacquard car cela resserre un peu , je l'ai offert à ma première petite fille, un peu à regret car il me plaisait beaucoup
20.05.2017 - 18:28
![]() Susanne Riisgaard Rasmussen wrote:
Susanne Riisgaard Rasmussen wrote:
Opskr. 142-18. Forstår ikke: strikketips: "når A2 strikkes vil der være 1 maske i slutningen..... denne maske strikkes ind i mønsteret som første maske i næste rapport - er det første maske i næste pind eller er det første maske på samme pind?????? kan ikke få det til at passe. ender med 4 m plus kantmaske i en ende og 5 m plus kantmaske i anden ende ): ): hjælp - hjælp.....
11.11.2015 - 13:38DROPS Design answered:
Hej Susanne, jo, når du har strikket A2 har du 1 m tilbage og den strikker du ifølge 1.m i A2 så mønsteret bliver ens i begge sider mod midt foran. God fornøjelse!
26.11.2015 - 09:18
![]() Ingunn Flaaterud wrote:
Ingunn Flaaterud wrote:
Nydelig jakke! Finnes denne som vest, dvs. uten knapper/stolper?
31.08.2014 - 07:54
|
||||||||||||||||
Augusta#augustacardigan |
||||||||||||||||
 |
 |
|||||||||||||||
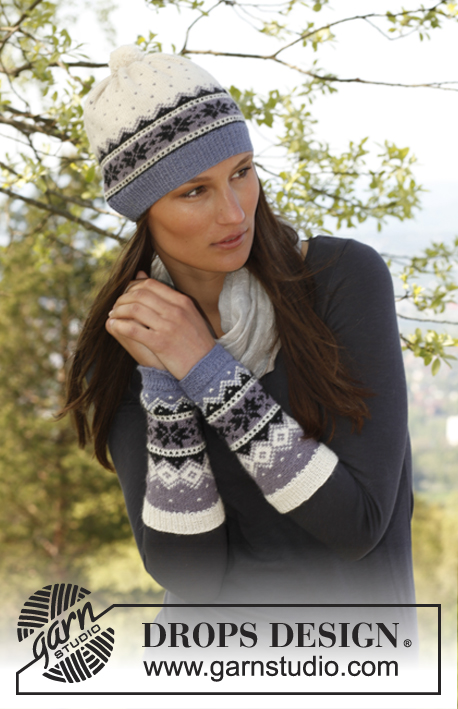
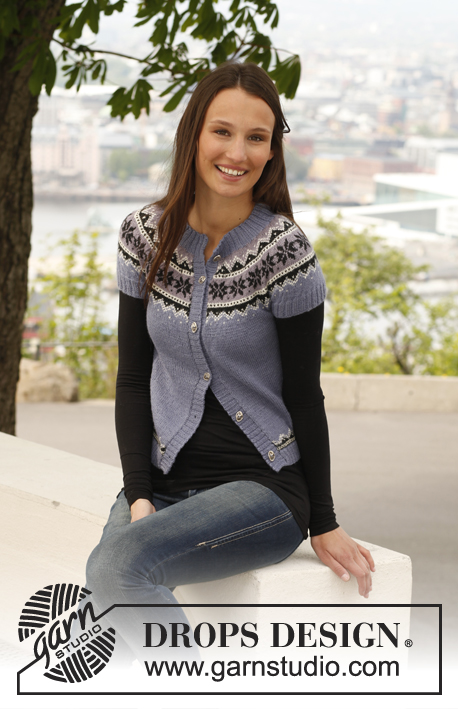
Knitted DROPS jacket with short sleeves and Norwegian pattern in BabyAlpaca Silk or Flora. Size: S - XXXL.
DROPS 142-18 |
||||||||||||||||
|
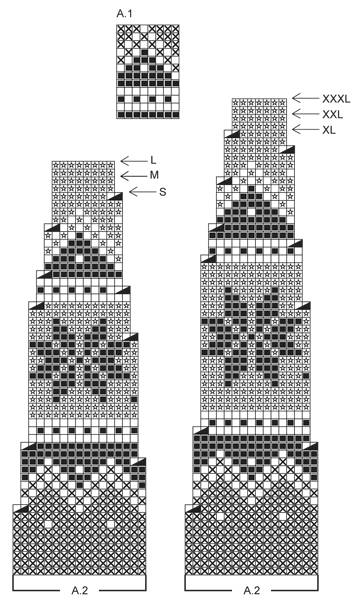
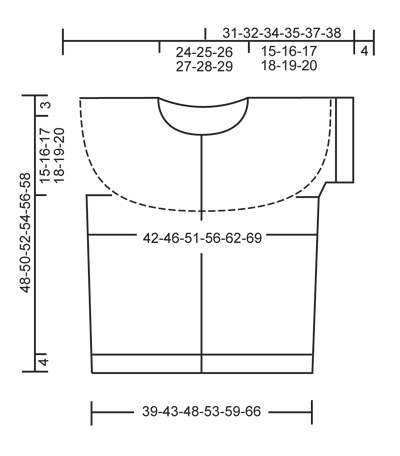
GARTER ST (back and forth on needle): K sts on all rows. PATTERN: See diagrams A.1 and A.2. Work entire pattern in stockinette st. KNITTING TIP 1: When A.2 is worked, there will be 1 st at the end of row that do not fit the pattern. This st is worked in the pattern as first st in next repetition so that the pattern beg and ends the same way in each side towards mid front. NOTE: Do not dec in this st. KNITTING TIP 2: To avoid the garment loosing its elasticity when working pattern it is important that the threads are not too tight on the back of piece. If needed go up in needle size when working pattern if the pattern looks somewhat tight. ---------------------------------------------------------- BODY: Worked back and forth on circular needle from mid front. Cast on 252-280-312-344-384-428 sts on circular needle size 2 mm/US 0 with blue purple. P 1 row from WS, work next row as follows from RS: 1 edge st in GARTER ST - see explanation above - * K 2, P 2 *, repeat from *-* until 3 sts remain and finish with K 2 and 1 edge st in GARTER ST. Continue rib like this for 4 cm / 1½" – adjust so that next row is worked from RS. Switch to circular needle size 2.5 mm / US 1.5 and K 1 row from RS while AT THE SAME TIME dec 49-53-61-69-77-81 sts evenly = 203-227-251-275-307-347 sts. Work next row as follows from WS: 1 edge st in garter st, work diagram A.1 until 2 sts remain, finish with 1st st in A.1 (so that pattern beg and ends the same way in each side towards mid front) and 1 edge st in garter st. Continue the pattern like this. When A.1 has been worked 1 time vertically, continue in stockinette st with blue purple. Insert 2 markers in the piece; 51-57-63-69-77-87 sts in from each side (= 101-113-125-137-153-173 sts between markers on back piece). REMEMBER THE GAUGE! When piece measures 8 cm / 3⅛", inc 1 st on each side of both markers (= 4 sts inc). Repeat inc every 6-6-6-7-7-7 cm / 2⅜"-2⅜"-2⅜"-2¾"-2¾"-2¾" 3 more times = 219-243-267-291-323-363 sts. When piece measures 30-31-32-33-34-35 cm / 11¾"-12¼"-12½"-13"-13⅜"-13¾", bind off 8 sts in each side for armholes (i.e. 4 sts on each side of both markers) = 51-57-63-69-77-87 sts on each front piece and 101-113-125-137-153-173 sts on back piece. Put piece aside and work the sleeve edges. SLEEVE EDGE: Worked in the round on double pointed needles. Cast on 84-88-96-100-104-112 sts on double pointed needles size 2 mm / US 0 with blue purple. K 1 round, then work rib (= K 2/P 2) for 4 cm / 1½". Work next round as follows: bind off 4 sts at beg of round, K until 4 sts remain and bind off these 4 sts = 76-80-88-92-96-104 sts. Put piece aside and knit another sleeve edge. YOKE: Slip sleeves on to same circular needle as body where armholes were bind off = 355-387-427-459-499-555 sts. Work 2-2-4-4-4-6 rows in stockinette st with blue purple (1st row = RS), AT THE SAME TIME dec 29-27-33-31-37-42 sts evenly on last row (= from WS) = 326-360-394-428-462-513 sts. READ KNITTING TIP 1 and 2 and work as follows: 1 edge st in garter st, work pattern according to diagram A.2 (choose diagram for correct size) until 2 sts remain, finish with 1st st in A.2 and 1 edge st in garter st. Continue with pattern and dec until A.2 has been worked vertically (work until arrow for correct size) = 155-171-187-178-192-213 sts. LEFT BAND: Pick up from RS approx. 120 to 150 sts along left front piece on circular needle size 2 mm / US 0 with blue purple. P 1 row from WS while AT THE SAME TIME inc evenly to 149-157-161-169-173-181 sts. Then work rib as follows (seen from RS): 1 edge st in garter st, * K 2, P 2 *, repeat from *-* until 4 sts remain, finish with K 2 and 2 edge sts in garter st at the bottom of body. When rib measures 3 cm / 1⅛", loosely bind off with K over K and P over P. RIGHT BAND: Work as left band but when band measures approx. 1 cm / ⅜", bind off for 5-5-5-6-6-6 button holes evenly. The top and bottom button hole should be approx. 4 cm / 1½" from edge. 1 button hole = work 2 sts tog and make 1 YO (binding off in 2 P sts will look more pretty seen from RS). NECK EDGE: Slip sts from yoke on circular needle size 2 mm / US 0 and in addition pick up 8 new sts over each band (pick up from RS inside 1 edge st) = 171-187-203-194-208-229 sts. P 1 row from WS while AT THE SAME TIME dec 23-31-43-26-32-49 sts evenly = 148-156-160-168-176-180 sts. Continue to work rib from RS as follows: 1 edge st in garter st, * K 2, P 2 *, repeat from *-* until 3 sts remain, finish with K 2 and 1 edge st in garter st. AT THE SAME TIME after 2 rows rib, work an elevation (in rib) at the back of neck as follows: Work until 17-19-21-23-25-27 sts remain on needle, turn, tighten thread and work until 17-19-21-23-25-27 sts remain in the other side, turn, tighten thread and work until 35-39-41-45-49-53 sts remain, turn, tighten thread and work until 35-39-41-45-49-53 sts remain in the other side, turn, tighten thread and work until 53-59-61-67-73-79 sts remain, turn, tighten thread and work until 53-59-61-67-73-79 sts remain in the other side, turn. Then continue with rib as before over all sts. AT THE SAME TIME when neck edge measures approx. 1½ cm / ½" at the front, bind off for 1 button hole over the others on right band. When neck edge measures 4 cm / 1½" at the front, loosely bind off with K over K and P over P. ASSEMBLY: Sew the openings under the sleeves. Sew on buttons. |
||||||||||||||||
Diagram explanations |
||||||||||||||||
|
||||||||||||||||
 |
||||||||||||||||
 |
||||||||||||||||
Have you finished this pattern?Tag your pictures with #dropspattern #augustacardigan or submit them to the #dropsfan gallery. Do you need help with this pattern?You'll find 14 tutorial videos, a Comments/Questions area and more by visiting the pattern on garnstudio.com. © 1982-2026 DROPS Design A/S. We reserve all rights. This document, including all its sub-sections, has copyrights. Read more about what you can do with our patterns at the bottom of each pattern on our site. |
||||||||||||||||


With over 40 years in knitting and crochet design, DROPS Design offers one of the most extensive collections of free patterns on the internet - translated to 17 languages. As of today we count 324 catalogs and 12290 patterns - 12280 of which are translated into English (US/in).
We work hard to bring you the best knitting and crochet have to offer, inspiration and advice as well as great quality yarns at incredible prices! Would you like to use our patterns for other than personal use? You can read what you are allowed to do in the Copyright text at the bottom of all our patterns. Happy crafting!
Post a comment to pattern DROPS 142-18
We would love to hear what you have to say about this pattern!
If you want to leave a question, please make sure you select the correct category in the form below, to speed up the answering process. Required fields are marked *.