
Popular categories
Looking for a yarn?


Comments / Questions (76)
![]() Annica Sannum wrote:
Annica Sannum wrote:
Hej Förstår inte hur man ska sticka kragen. När man stickat upp m runt kragen och ska sticka varven innan mossticknibgen ska man inte sticka dom första maskorna då
12.06.2017 - 10:35DROPS Design answered:
Jo, du stickar över alla maskorna på stickan på varje varv och kom ihåg att justera maskantalet.
12.06.2017 - 17:04
![]() Elli wrote:
Elli wrote:
Ich möchte gerne sagen ist super Modell, stricktsich ganz leicht und einfach.Danke ! LG Elli !
15.02.2017 - 07:40
![]() Sieta Stol wrote:
Sieta Stol wrote:
Hoeveel steken heb ik op de pen als ik de mouw tot het armsgat brei?
16.12.2016 - 23:50DROPS Design answered:
Hoi Sieta. Dat staat niet in het patroon, maar het is te berekenen als je weet welke maat je maakt
19.12.2016 - 14:46
![]() Steffi wrote:
Steffi wrote:
In der Anleitung nach dem Bübdchen steht: 1 R. re. über re. und li. über li. stricken. Zu Rundstricknadel Nr. 3 wechseln und 1 R. re. über alle M. stricken. GLEICHZEITIG gleichmässig verteilt 44-44-40 (40-36) M. abn. = 114-126-142 (154-170) M. Muss ich hier in der Hinreihe 1 Reihe rechts über rechts und links über Links stricken und in der Rückreihe nur rechte Maschen und die entsprechende Maschenzahl abnehmen? Wie werden die Abnahmen gestrickt? Zusammenstricken oder überzogen Stricken?
15.12.2016 - 22:24DROPS Design answered:
Liebe Steffi, Sie stricken eine Hinreihe mit Nadel Nr 3 re. über alle Maschen gleichzeitig verteilen Sie die Abnahme. dh die Abnahmen werden bei der 1. Hinreihe mit Ndl Nr3 gestrickt. Viel Spaß beim stricken!
16.12.2016 - 09:26
![]() Amalthea wrote:
Amalthea wrote:
In der Anleitung steht beim Ärmel: Danach auf beiden Seiten jeweils 2 M. abk. bis die Arbeit 21-23-25 (29-33) cm misst Nehme ich hier einmal beidseitig je 2 Maschen ab und stricke gerade hoch bis ich auf beiden Seiten je 3 M abkette, oder wiederholt sich die Abnahme der je 2M mehrmals? Wieviele Maschen sind in Größe 92 übrig, bevor ich alle abkette? Vielen Dank!
20.10.2016 - 13:02DROPS Design answered:
Liebe Amalthea, Sie sollen 2 M. am Anfang jeder Reihe (d.h. Hin- und Rückreihe) abketten bis die Ärmel 29 cm misst. Wieviele Reihe/Abnahmen hängt von Ihrer Maschenprobe an, einfach 2 M. beidseitig bis 29 cm abketten, dann 3 M. 1x beidseitig abketten.
20.10.2016 - 15:29
![]() Renata wrote:
Renata wrote:
Nach der Anleitung soll man be den Vorderteilen nach 25 cm due äusseren 7 Maschen gegen den Halsausschnitt auf einen Hilfsfaden legen.Warum?Und wo brauch ich due wieder oder nehm ich die wieder zu?
23.09.2016 - 11:09DROPS Design answered:
Liebe Renata, diese Maschen werden aufgenommen, wenn sie am Ende den Kragen stricken (siehe letzte Absatz "KRAGEN").
23.09.2016 - 13:20
![]() Zsuzsa wrote:
Zsuzsa wrote:
Elakadtam. Az ujjánál a szaporításnál mennyi az elérendő szemszám? Ha az előírtnak megfelelően minden 4.sorban szaporítok kétoldalon a szélszem mellett, akkor hamar elérem a 44 szemet és egyenesen folytassam a karöltőig ? Akkor nem lesz egyenletes a bővülés ? Azt írják: folytassuk a szaporítást, de nem írják, összesen hány szemig ? Nem írják le azt sem, hogy az ujja végén hány szem marad a leláncoláshoz-befejezéshez!? Előre is köszönöm válaszukat.
22.08.2016 - 23:07DROPS Design answered:
Kedves Zsuzsa! Az ujja szaporításánál a minta azt mondja: UGYANAKKOR, amikor a darabunk 5 cm-es mindkét oldalon szaporítsunk 1 szemet a szélszem mellett. Ismételjük meg a szaporítást 4-2½-2 (2-2) soronként összesen 3-5-7 (9-10) alkalommal =44-50-54 (60-64) szem. Az ujja felső ívénél a megmaradt szemeket kell az utolsó sorban leláncolni, a pontos szám az angolban sincs meghatározva, tehát ahány szem maradt, azt mindet. Bízom benne a fentiek segítenek. Javaslom továbbá, hogy keresse a Facebook-on a Magyar Drops csoportot, ott is választ kaphat a mintákkal kapcsolatos kérdéseire.
06.11.2016 - 14:06
![]() Tovethea Ruth wrote:
Tovethea Ruth wrote:
Smuk model.som både mødrene og småpigerne godt kan lide.
28.04.2015 - 17:25
![]() Sandy wrote:
Sandy wrote:
I would like to make baby drops 21-14 for a size 4/5. Can you tell me how you would convert the pattern? I made this in the 2 years size and my granddaughter loved it so much that she wants it made again and she is now 4. Thanks
23.04.2015 - 22:27DROPS Design answered:
Dear Sandy, we unfortunately are not able to answer each individual request. You can adapt the pattern to the desired size with the help of another similar pattern in the correct size. Remember you can get help from your DROPS Store. Happy knitting!
24.04.2015 - 10:30
![]() Marie-Gabrielle wrote:
Marie-Gabrielle wrote:
Le nombre de mailles à monter intitialement ne me semble pas cohérent avec les dimensions finales de cette veste... S'il faut environs 24 mailles (ou même quelques unes de plus si on travaille en 2,5) pour obtenir un échantillon de 10 cm, je ne comprends pas qu'il faille monter 336 mailles intiales (soit environs 140 cm) pour le bas d'une veste taille 3 mois... Pourriez-vous m'éclairer? Ce modèle est vraiment adorable, j'aimerais comprendre.
23.10.2014 - 07:56DROPS Design answered:
Bonjour Marie-Gabrielle, on monte bien 366 m en taille 1/3 mois et on tricote une petite bordure volantée en côtes en diminuant comme indiqué pour terminer avec 114 m pour le dos et les 2 devants. La bordure volantée explique le nombre de mailles important au début. Bon tricot!
23.10.2014 - 10:36
|
|||||||
Lea#leajacket |
|||||||
|
|
|||||||
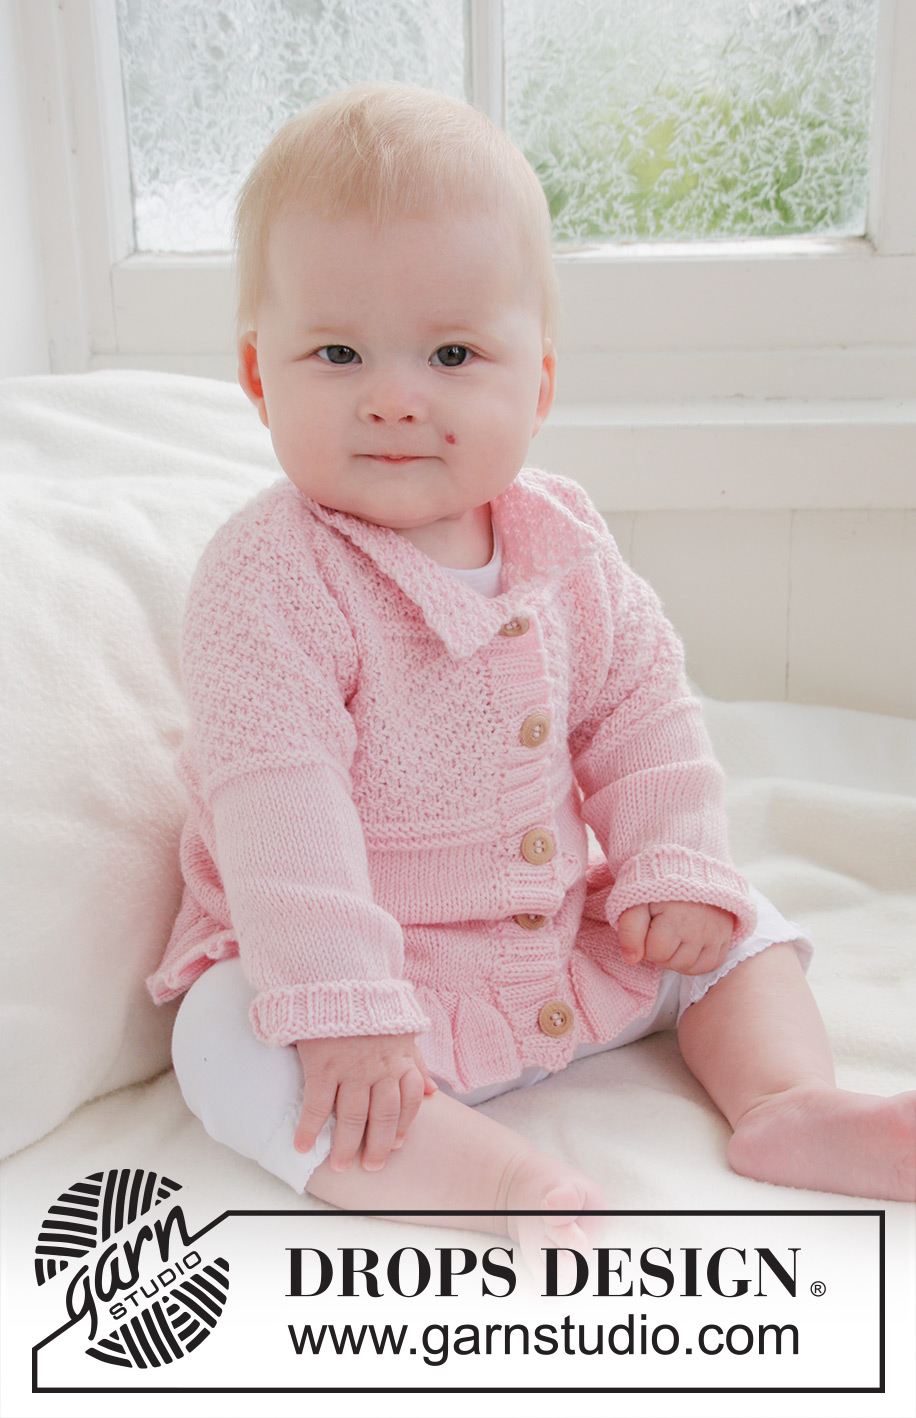
Knitted jacket with wavy edge and textured pattern for baby and children in DROPS BabyAlpaca Silk
DROPS Baby 21-14 |
|||||||
|
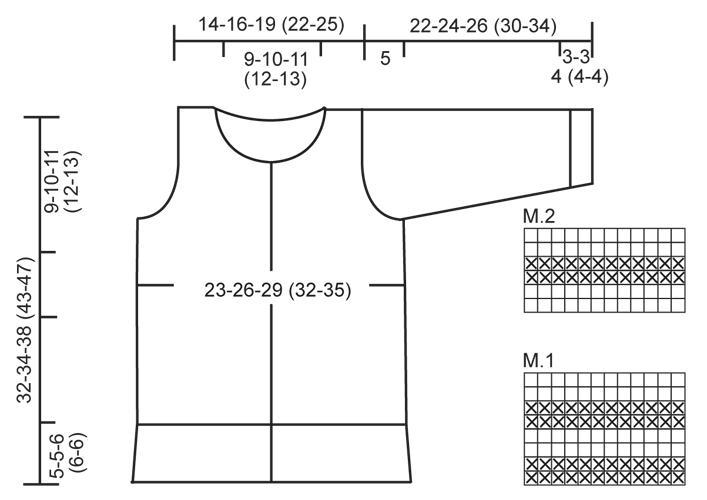
DOUBLE SEED ST: 1st row: * K 2, P 2 *, repeat from *-*. 2nd row: K over K and P over P. 3rd row: P over K and K over P. 4th row: As 2nd row. Repeat row 1 to 4. DECREASE TIP: Dec as follows before marker: Beg 2 sts before marker. Slip 1 st as if to K, K 1, psso. Dec as follows after marker: K 2 tog. GARTER ST (back and forth on needle): K all rows. PATTERN: See diagrams M.1 and M.2. The diagrams show the pattern from RS. -------------------------------------------------------- JACKET: Worked back and forth on circular needle. Cast on 366-394-422 (450-478) sts on circular needle size 2.5 mm / US 1or2 with Baby Alpaca Silk. Work rib as follows: 1 st in GARTER ST – see explanation above, P 2, * K 10, P 4 *, repeat from *-* until 13 sts remain and finish with K 10, P 2 and 1 st in GARTER ST. Continue like this until 8-8-12 (12-12) rows in rib have been worked. Now dec 1 st on each side of every K-section by working all K 10 sts as follows (P 4 as before): Slip 1 st as if to K, K 1, psso, K until 2 sts remain, K 2 tog. Repeat dec on every other row a total of 4 times = 158-170-182 (194-206) sts (= K 2/P 4). Work 1 row from WS with K over K and P over P. Switch to circular needle size 3 mm / US 2or3. Now K 1 row from RS while AT THE SAME TIME dec 44-44-40 (40-36) sts evenly = 114-126-142 (154-170) sts. Insert a marker after 29-32-36 (39-43) sts and a marker after 85-94-106 (115-127) sts (marks the mid of the sides). Back piece = 56-62-70 (76-84) sts. Now measure the piece from here. Continue in stockinette st and 1 st in Garter st in each side towards mid front until piece measures 10-11-12 (16-18) cm / 4"-4⅜"-4¾" (6¼"-7") from marker. Now work diagram M.1. When diagram M.1 has been worked 1 time vertically, continue in DOUBLE SEED ST - see explanation above. When piece measures 18-19-21 (25-28) cm / 7"-7½"-8¼" (9¾"-11") from marker, bind off 6 sts in each side (i.e. 3 sts on each side of every marker) for armholes. Then finish front and back piece separately. BACK PIECE: = 50-56-64 (70-78) sts. Continue back and forth in double seed st. AT THE SAME TIME bind off for armholes in beg of each row each side: 2 sts 1 time and 1 st 2 times = 42-48-56 (62-70) sts. When piece measures 21-22-24 (28-31) cm / 8 1"-8¾"-9½" (11"-12¼"), work diagram M.2 over all sts. When diagram M.2 has been worked 1 time vertically, continue in double seed st until piece measures 25-27-30 (35-39) cm / 9¾"-10⅝"-11¾" (13¾"-15¼"). Now bind off the middle 20-22-24 (26-28) sts for neck and finish each part separately. Continue to dec 1 st on the next row towards the neck = 10-12-15 (17-20) sts remain on each shoulder. Continue until piece measures 27-29-32 (37-41) cm / 10⅝"-11⅜"-12½" (14½"-16⅛") from marker. Loosely bind off. Piece measures 32-34-38 (43-47) cm / 12½"-13⅜"-15" (17"-18½") in total. LEFT FRONT PIECE: = 26-29-33 (36-40) sts. Continue back and forth in Double seed st. AT THE SAME TIME dec for armhole in the side as on back piece = 22-25-29 (32-36) sts. Then when piece measures 21-22-24 (28-31) cm / 8 1"-8¾"-9½" (11"-12¼"), work diagram M.2 over all sts. When diagram M.2 has been worked 1 time vertically, continue in double seed st. AT THE SAME TIME when piece measures 23-25-27 (31-34) cm / 9"-9¾"-10⅝" (12¼"-13⅜") from marker, slip the 6-7-7 (7-8) sts towards mid front on a stitch holder for neck. Continue to bind off for neck at beg of every row from neck: 2 sts 2 times and 1 st 2-2-3 (4-4) times = 10-12-15 (17-20) sts remain on shoulder. Continue until piece measures 27-29-32 (37-41) cm / 10⅝"-11⅜"-12½" (14½"-16⅛") from marker. Loosely bind off. Piece measures 32-34-38 (43-47) cm / 12½"-13⅜"-15" (17"-18½") in total. RIGHT FRONT PIECE: Work as left front piece but reversed. SLEEVE: Worked back and forth on needle. Cast on 44-44-44 (50-50) sts on needle size 2.5 mm / US 1or2 with Baby Alpaca Silk. P 1 row from WS. Then work rib (1st row = from RS) P 4/K 2 with 1 edge st in each side. When rib measures 3-3-4 (4-4) cm / 1⅛"-1⅛"-1½" (1½"-1½"), K 1 row from RS while AT THE SAME TIME dec 6-4-4 (8-6) sts evenly = 38-40-40 (42-44) sts. Switch to needle size 3 mm / US 2or3. Work back and forth in stockinette st with 1 edge st in garter st each side. AT THE SAME TIME when piece measures 5 cm / 2", inc 1 st in each side, repeat inc every 4-2½-2 (2-2) cm / 1½"-⅞"-¾" (3/4"-¾") a total of 3-5-7 (9-10) times = 44-50-54 (60-64) sts. AT THE SAME TIME when piece measures 11-13-14 (17-19) cm / 4⅜"-5⅛"-5½" (6¾"-7½"), work diagram M.2. When diagram M.2 has been worked 1 time vertically, continue in DOUBLE SEED ST. NOTE! Make sure that the double seed st is the same in each side when beg to work. Continue to inc in each side – work the inc sts in double seed st. Work until piece measures 17-19-21 (25-29) cm / 6¾"-7½"-8¼" (9¾"-11⅜"). Now bind off 3 sts in beg of next 2 rows for sleeve cap. Continue to bind off for sleeve cap at beg of every row in each side: 3 sts 0-0-0 (1-1) time, 2 sts 2-3-3 (3-3) times and 1 st 3-1-0 (0-0) times. Then bind off 2 sts in each side until piece measures 21-23-25 (29-33) cm / 8¼"-9"-9¾" (11⅜"-13"). Now bind off 3 sts 1 time in each side. Piece now measures approx. 22-24-26 (30-34) cm / 8¾"-9½"-10¼" (11¾"-13⅜"). Bind off the remaining sts. ASSEMBLY: Sew the shoulder seams. Sew sleeve seams inside 1 edge st and sew in sleeves. LEFT BAND: Beg at top of neck. Knit up 82-86-94 (106-118) sts on needle size 2.5 mm / US 1or2 from RS inside 1 edge st down along left front piece. K 1 row from WS. Then work rib as follows (from RS): * P 2, K 2 *, repeat from *-* and finish with 2 sts in GARTER ST. Continue to work like this until band measures approx. 2-2-2 (2½-2½) cm / ¾"-¾"-¾" (7/8"-⅞"). Loosely bind off sts with K over K and P over P. RIGHT BAND: Work as on left band but when rib measures approx. 1 cm / ⅜", bind off for 5-5-6 (6-7) button holes. Bind off for the upper button hole approx. 1 cm / ⅜" from neck, bind off for bottom button hole approx. 2 cm / ¾" from bottom edge. Bind off for the other button holes approx. 6-7-6 (7-6) cm / 2⅜"-2¾"-2⅜" (2¾"-2⅜") apart. All button holes are bind off in 2 P, by P 2 tog and making 1 YO. Then work rib as before until it measures approx. 2-2-2 (2½-2½) cm / ¾"-¾"-¾" (7/8"-⅞"). Loosely bind off sts with K over K and P over P. COLLAR: Knit up 68 to 96 sts from RS on needle size 3 mm / US 2or3 (including sts on stitch holders) and also knit up sts over front bands in each side (on bands knit up in front loop of outermost st). K 1 row from WS. K 1 row from RS while AT THE SAME TIME adjusting no of sts to 76-84-92 (100-108). K 1 row from WS. Continue in DOUBLE SEED ST over all sts until piece measures approx. 4 cm / 1½". Loosely bind off. |
|||||||
Diagram explanations |
|||||||
|
|||||||
 |
|||||||
Have you finished this pattern?Tag your pictures with #dropspattern #leajacket or submit them to the #dropsfan gallery. Do you need help with this pattern?You'll find 14 tutorial videos, a Comments/Questions area and more by visiting the pattern on garnstudio.com. © 1982-2026 DROPS Design A/S. We reserve all rights. This document, including all its sub-sections, has copyrights. Read more about what you can do with our patterns at the bottom of each pattern on our site. |
|||||||


With over 40 years in knitting and crochet design, DROPS Design offers one of the most extensive collections of free patterns on the internet - translated to 17 languages. As of today we count 325 catalogs and 12298 patterns - 12288 of which are translated into English (US/in).
We work hard to bring you the best knitting and crochet have to offer, inspiration and advice as well as great quality yarns at incredible prices! Would you like to use our patterns for other than personal use? You can read what you are allowed to do in the Copyright text at the bottom of all our patterns. Happy crafting!
Post a comment to pattern DROPS Baby 21-14
We would love to hear what you have to say about this pattern!
If you want to leave a question, please make sure you select the correct category in the form below, to speed up the answering process. Required fields are marked *.