
Popular categories
Looking for a yarn?


Comments / Questions (19)
![]() Juliet Wischmeyer wrote:
Juliet Wischmeyer wrote:
I am confused about the quantity of yarn needed for this pattern. If I am making it with two strands of sport weight yarn, I believe I would I need around 600 yards for a XS/S; is that correct? Since I am making it in a solid color, what weight yarn and how much yardage would I need for the same size? I assume around 300 yards; is that correct? But what weight would be appropriate? Thank you so much in advance, Juliet
20.09.2017 - 02:35DROPS Design answered:
Dear Mrs Wischmeyer, please click here to calulate how much yarn you would need if using 1 strand yarn group C instead of 2 strands yarn group A. Happy
20.09.2017 - 09:18
![]() Eva Joschky wrote:
Eva Joschky wrote:
Danke liebes garnstudio-Team für die rasche Antwort! Eine Frage hätte ich aber doch noch: die erste Reihe soll in folgender Weise gestrickt werden: 1M wie die 1.M von M.1 (=mittlere-M auf der Seite). Die erste Masche von M.1 ist aber ein Umschlag und Abheben. Wie fange ich eine Reihe mit Umschlag an? LG
01.09.2016 - 12:46DROPS Design answered:
Liebe Frau Joschky, nach dem Markierungfaden (= Anfang der Runden) machen Sie sofort den Umschlag, dann die nächste M (= die erste M) abheben, und weiter stricken. Am Anfang nächster Runde, nach dem Markierungsfaden sofort den Umschlag und die abgehobene M. zusammenstricken.
01.09.2016 - 13:41
![]() Eva Joschky wrote:
Eva Joschky wrote:
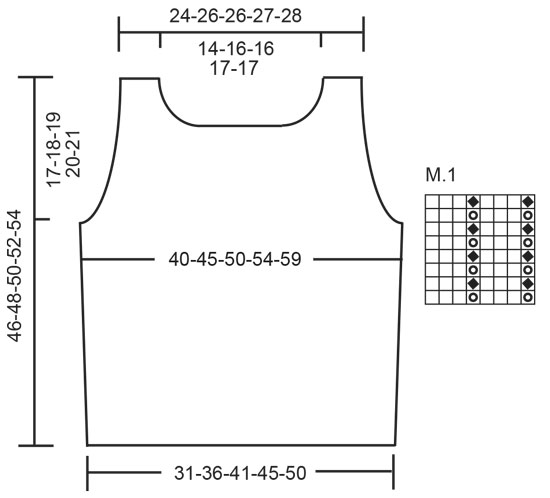
Was heißt: "auf alle 2.Ndl abketten"??? Oder:"Achten Sie darauf dass Sie die Ndl.mit dem Umschlag auf der linken Seite stricken"? Das M.1 geht über 8 Maschen. M.1 soll aber über 41 Maschen gestrickt werden. Wie geht das auf?
31.08.2016 - 16:26DROPS Design answered:
Liebe Frau Joschky, sie werden jede 2. R abketten, dh am Anfang jeder R von der Hin- und von der Rückreihe. Wenn mann jeden Teil separat strickt, musst der Reihe mit (1 Umschlag, 1 M abheben) von der Rückseite gestrickt sein, so dass der Umschlag und die abghobene M von der Vorderseite zusammengestrickt wird. Stricken Sie 8 Mal M.1 in der Breite (= 40 M), dann stricken Sie die 1. Masche in M.1 (= 41 M).
31.08.2016 - 16:36
![]() Maria wrote:
Maria wrote:
Grazie per la spiegazione, ma ho un altro problema. Dato che il lavoro è in tondo sui ferri circolari, non so come fare quando viene indicato (nella prima riga del diagramma) lavorare a rovescio sul diritto e a diritto sul rovescio. La maglia rasata sui ferri circolari non si lavora tutta a diritto? e quindi come devo fare? Grazie per il vostro aiuto. Maria
13.02.2016 - 20:02DROPS Design answered:
Buongiorno Maria. Il top viene lavorato in tondo fino agli scalfi. Quindi, guardando il diritto del lavoro, le m indicate dai quadrati bianchi vengono lavorate a rov ad ogni giro. Dopo aver intrecciato le m per gli scalfi, lavora avanti e indietro: quindi, sul diritto del lavoro, lavorerà queste m a rov, e sul rovescio, lavorerà queste m a dir. Buon lavoro!
16.02.2016 - 13:30
![]() Maria wrote:
Maria wrote:
Nella spiegazione del Davanti & Dietro scrivete: proseguire come segue:*1a m come la 1a m del diagramma, ecc. ecc. Che cosa significa? Altra domanda: I diagrammi vanno eseguiti da destra a sinistra o da sinistra a destra? Grazie mille. maria
11.02.2016 - 22:38DROPS Design answered:
Buonasera Maria Il capo viene lavorato in tondo, pertanto i diagrammi si leggono dall’alto verso il basso e da destra verso sinistra. La prima m del giro deve essere lavorata come indicato nel primo quadrato sulla destra del diagramma: quindi nel primo giro deve fare 1 gettata e poi passare la prima m senza lavorarla; al giro successivo lavora insieme a dir la m gettata e la m passata. Buon lavoro!
12.02.2016 - 22:15
![]() Drops Design wrote:
Drops Design wrote:
Hi Zahra, sts is short for stitches.
22.03.2010 - 18:46
![]() Zahra wrote:
Zahra wrote:
What is the meaning of sts?
22.03.2010 - 18:36
![]() Scandinavian Knitting Design wrote:
Scandinavian Knitting Design wrote:
The chart is translated in the pattern. The = symbols follow the order of the Scandinavian symbols, i.e. the first symbol means purl (as seen from the right side), etc. Karen Scandinavian Knitting Design
31.05.2006 - 23:30
![]() Lori wrote:
Lori wrote:
The graph is not in English!
29.05.2006 - 01:53
|
||||||||||
Oceana |
||||||||||
|
|
||||||||||
DROPS Top in Safran and Cotton Viscose
DROPS 77-22 |
||||||||||
|
Gauge: 16 sts x 22 rows = 10 x 10 cm on larger needles in pattern. Pattern: See chart. The pattern is seen from the right side. Knitting tips (for armhole): All decs are made from the right side. Dec 1 st inside 4 edge sts knit as follows from edge: K 1 (edge st knit in garter st), K 1, P 1, K 1. After 4 edge sts: P 2 tog, twisting sts. Before 4 edge sts: P 2 tog. Body: Cast on 100-116-132-144-160 sts on larger circular needles with 1 strand Safran + 1 strand Cotton Viscose; join and place a marker at the join. Establish Pattern as follows: * 1 st the same as the first st in Pattern (this st is the side st), P 4-4-4-5-5, Pattern over 41-49-57-61-69 sts, P 4-4-4-5-5 * (= front), repeat from * - * over remaining sts (= back). Continue with pattern as established over all sts. When the piece measures 12 cm inc 1 st on each side of each side st (4 sts increased each inc row). Inc every 2-2-2.5-2.5-2.5 cm a total of 7 times - P the increased sts = 128-144-160-172-188 sts. When the piece measures 28-29-30-31-32 cm knit rib (= K 1, P 1) over 17 sts at each side (the side st + 8 sts each side of the side st - knit the remaining sts the same as before). When the piece measures approx. 29-30-31-32-33 cm bind off 9 sts at each side (the side st + 4 sts each side of the side st) for armhole in pattern. Knit each piece separately - be sure that the rows with yo are wrong side rows. Front: = 55-63-71-77-85 sts. Read the entire section before knitting: Dec for armhole at each side - see knitting tips - every other row: 1 st 0-4-11-14-19 times and then every 4 rows: 1 st 8-7-4-3-1 times. At the same time when the piece measures 40-42-43-45-47 cm put the center 13-15-15-17-17 sts on a st holder for the neck. Then bind off at each neck edge every other row: 2 sts 1 time and 1 st 3 times. After all shaping for armhole and neck is complete 8-8-8-8-9 sts remain on each shoulder. Bind off when the piece measures 46-48-50-52-54 cm. Back: = 55-63-71-77-85 sts. Dec for armhole as on front. At the same time when the piece measures 44-46-48-50-52 cm put the center 21-23-23-25-25 sts on a st holder for the neck. On the next row dec 1 st at each neck edge. Bind off the remaining 8-8-8-8-9 sts when the piece measures 46-48-50-52-54 cm. Assembly: Sew shoulder seams. Neckband: Pick up approx. 68-76 sts around the neck (divisible by 4 - incl. sts on st holders) on smaller short circular needles and knit Pattern 1 - see that the pattern follows the pattern at center front and back. When neckband measures 3 cm bind off in pattern. |
||||||||||
Diagram explanations |
||||||||||
|
||||||||||
 |
||||||||||
Have you finished this pattern?Tag your pictures with #dropspattern or submit them to the #dropsfan gallery. Do you need help with this pattern?You'll find 18 tutorial videos, a Comments/Questions area and more by visiting the pattern on garnstudio.com. © 1982-2026 DROPS Design A/S. We reserve all rights. This document, including all its sub-sections, has copyrights. Read more about what you can do with our patterns at the bottom of each pattern on our site. |
||||||||||


With over 40 years in knitting and crochet design, DROPS Design offers one of the most extensive collections of free patterns on the internet - translated to 17 languages. As of today we count 324 catalogs and 12290 patterns - 12280 of which are translated into English (US/in).
We work hard to bring you the best knitting and crochet have to offer, inspiration and advice as well as great quality yarns at incredible prices! Would you like to use our patterns for other than personal use? You can read what you are allowed to do in the Copyright text at the bottom of all our patterns. Happy crafting!
Post a comment to pattern DROPS 77-22
We would love to hear what you have to say about this pattern!
If you want to leave a question, please make sure you select the correct category in the form below, to speed up the answering process. Required fields are marked *.