
Popular categories
Looking for a yarn?


Comments / Questions (61)
![]() Kay Campbell wrote:
Kay Campbell wrote:
I have just finished knitting this jumper but have found the sleeve cap too short when I tried to sew the sleeve in, should I just knit up extra rows without shaping to accommodate the length? Many thanks
15.10.2022 - 04:02DROPS Design answered:
Dear Kay, if you have been following the measurements while working the sleeve, the sleeve cap should fit the armhole. You should redo the sleeve cap and when you need to cast off stitches for shaping the sleeve cap, check the measurements of the sleeve cap and the armhole so that they fit. In the case that they still don't fit you can simply add a few extra rows to lengthen the sleeve cap. Happy knitting!
17.10.2022 - 00:06
![]() Saskia wrote:
Saskia wrote:
Hoi, ik heb nog nooit meegemaakt dat er na een boord steken geminderd worden. Gaat het boord dan niet lubberen? En wat is het effect hiervan? Waarom wordt hier niet `gewoon` gemeerderd? Heeft dit misschien te maken met het verder breien in gerstekorrel?
17.08.2022 - 15:16DROPS Design answered:
Dag Saskia,
In sommige patronen wordt er inderdaad gemeerderd na de boordsteek om ervoor te zorgen dat de boord wat wijder is dan de rest.
17.08.2022 - 16:41
![]() Sawnuy wrote:
Sawnuy wrote:
Hallo, 2 R. nur über die äussersten 20 M. stricken. Ist es die Richtung Ärmel ? Vielen Dank
14.12.2021 - 20:59DROPS Design answered:
Liebe Sawnuy, beim rechten Kragen fangen Sie die verkürtzten Reihen mit einer Hinreihe an, so daß diese 20 Maschen die ersten bei der Hin-Reihe sind. Beim linken Kragen sind diese 20 Maschen die ersten der Rückreihe. Viel Spaß beim stricken!
15.12.2021 - 08:04
![]() Anita wrote:
Anita wrote:
Op 8 december 2020 heb ik een vraag gesteld over de wijze waarop de kraag moet worden bevestigd aan voor en achterland. Graag zou ik een reactie krijgen, zodat ik de trui kan afwerken. Mvg Anita
15.02.2021 - 21:05DROPS Design answered:
Dag Anita,
Excuses voor de late reactie. De vraag is zojuist beantwoord. Hopelijk kun je nu verder.
16.02.2021 - 14:31
![]() Anita wrote:
Anita wrote:
Ik wil de kraag aan de trui zetten, maar weet niet goed hoe dit hoort te passen. In het patroon voor de kraag staat een overgang naar de ribbelsteek. Hoort deze overgang samen te vallen met de schoudernaad?
08.12.2020 - 23:05DROPS Design answered:
Dag Anita,
De overgang van gerstekorrel naar ribbelsteek valt inderdaad samen met de schoudernaad. Dus waar de kraag aan het achterpand genaaid wordt heb je ribbelsteek en aan de voorkant heb je gerstekorrel.
16.02.2021 - 14:30
![]() Snoopy wrote:
Snoopy wrote:
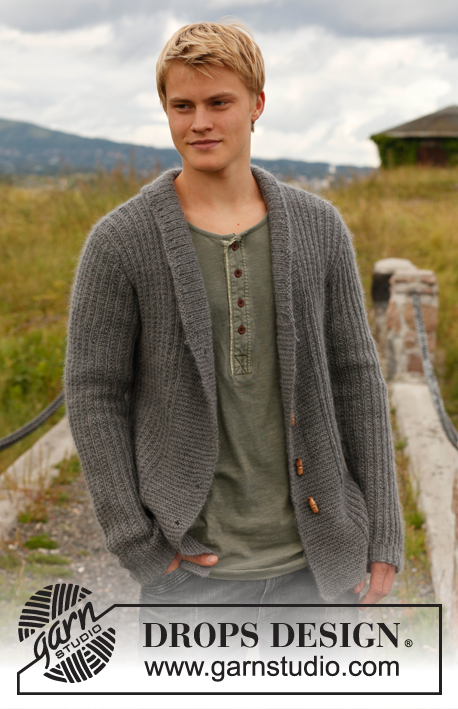
Bonsoir, Pourriez-vous m'indiquer quels types de boutons Drops je pourrais utiliser pour ce modèle? Mon choix de couleurs n'irait pas très bien avec les boutons "Bûchettes Drops en bois", et je me demande si les boutons nacre ronds rouge 20mm pourraient convenir. Je vous remercie pour botre réponse.
22.05.2020 - 18:31DROPS Design answered:
Bonjour Snoopy, pour toute assistance au choix des couleurs et des boutons, merci de bien vouloir contacter directement votre magasin DROPS. Bon tricot!
25.05.2020 - 07:52
![]() Monica wrote:
Monica wrote:
Forslag på ett annet garn?har strikket sokker med dobbel nord garn med mønster til karisma,dette passer veldi fint.
08.01.2020 - 18:42DROPS Design answered:
Hej Monica, om du testar vår garnkalkulator, får du flera andra förslag med samma stickrfasthet, som kan ersätta DROPS Karisma. Lycka till :)
15.01.2020 - 16:01
![]() Anita wrote:
Anita wrote:
Waarom wordt de mouw op losse pennen gebreid in plaats van op een rondbreinaald?
02.10.2019 - 20:34DROPS Design answered:
Dag Anita,
Je kan de mouwen zowel op breinaalden zonder knop als op een rondbreinaald breien, maar net wat je het handigst vindt.
03.10.2019 - 12:56
![]() Irene wrote:
Irene wrote:
Hola yo no tejo con agujas circulares solo dos agujas como puedo adaptar los patrones para tenerlos con ellas? Muchas gracias y felicitaciones por compartir tantos patrones hermosos
17.08.2019 - 16:29DROPS Design answered:
Hola Irene. En este link puedes encontrar la respuesta: https://www.garnstudio.com/lesson.php?id=13&cid=23
25.08.2019 - 14:33
![]() Marie wrote:
Marie wrote:
I would like to modify to make without sleeves for a longer vest - can you give me some pointers?
07.03.2019 - 23:00DROPS Design answered:
Dear Marie, we are unfortunately not able to adapt every pattern to every single request. For any further individual assistance, please contact the store where you bought the yarn, or any knitting forum. Happy knitting!
08.03.2019 - 08:09
|
|
Anna#annasweater |
|
|
|
|
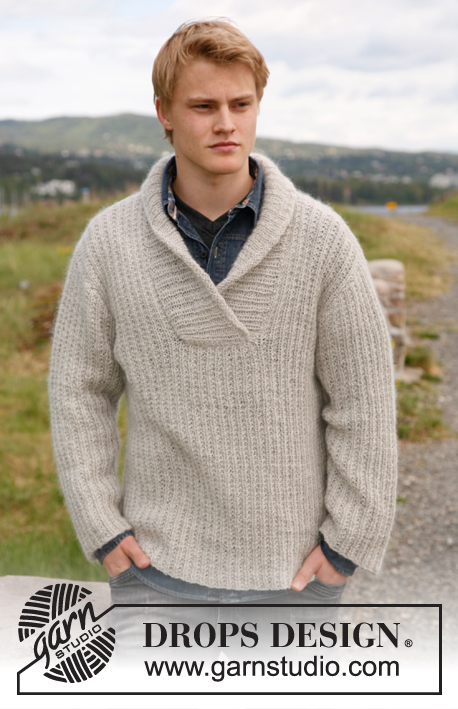
Knitted sweater with shawl collar, stripes and seed stitch in DROPS Karisma. Sizes S to XXXL.
DROPS 135-25 |
|
|
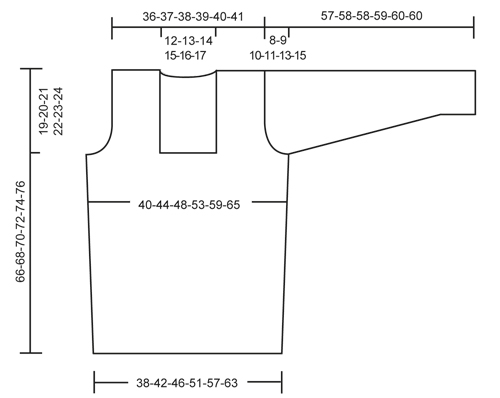
DOUBLE SEED ST: 1st round: * K 1, P 1 *, repeat from *-*. 2nd round: K over K and P over P. 3rd round: * P 1, K 1 *, repeat from *-*. 4th round: P over P and K over K. Repeat rounds 1-4. STRIPES 1 (applies to body): Work medium gray and light gray alternately every 11-11-11½-12-12-12½ cm / 4⅜"-4⅜"-4½"-4¾"-4¾"-4⅞". NOTE: Measure first stripe from cast on edge. Work medium gray in the last stripe until finished measurements. STRIPES 2 (applies to sleeve): Work medium gray and light gray alternately every 10 cm / 4". NOTE: Measure first stripe from cast on edge. Work medium gray in the last stripe until finished measurements. INCREASE TIP: Inc 1 st by making 1 YO, on next round K YO twisted (i.e. work in back loop of st instead front) to avoid holes. PATTERN 1: Row 1 (= from RS): K all sts. Row 2 (= from WS): * K 1, P 1 *, repeat from *-*. Repeat 1st and 2nd row. GARTER ST (back and forth on needle): K all rows. -------------------------------------------------------- BODY: Worked in the round on circular needle. Cast on 213-234-255-288-318-351 sts on circular needle size 3.5 mm / US 4 with light gray. Work rib as follows: * K 1, P 2 *, repeat from *-*. When piece measures 4 cm / 1½", K 1 round while AT THE SAME TIME dec 53-58-63-72-78-87 sts evenly (dec by K tog approx. every 3rd and 4th st) = 160-176-192-216-240-264 sts. Then switch to circular needle size 4 mm / US 6 and continue in the round with DOUBLE SEED ST and STRIPES 1 - See explanation above. REMEMBER THE GAUGE! When piece measures 15-15-16-16-17-17 cm / 6"-6"-6¼"-6¼"-6¾"-6¾", insert 2 markers in the piece; 1 at beg of round and 1 after 80-88-96-108-120-132 sts (marks the sides). On next round, inc 1 st on each side of every marker - Read INCREASE TIP above = 4 new sts on round. NOTE: Work the new sts in double seed st. Repeat inc one more time when piece measures 30-30-32-32-34-34 cm / 11¾"-11¾"-12½"-12½"-13½"-13½" = 168-184-200-224-248-272 sts. Continue until piece measures 47-48-49-50-51-52 cm / 18½"-19"-19¼"-19¾"-20"-20½" (adjust so that last round is 2nd or 4th round in seed st). Then divide the piece at the markers and finish each part separately. BACK PIECE: = 84-92-100-112-124-136 sts (1st row = WS). Continue with STRIPES 1 and DOUBLE SEED ST - while AT THE SAME TIME casting/binding off for armholes in each side on every other row as follows: bind off 3 sts 1 time, 2 sts 0-1-2-4-6-8 times and 1 st 1-2-3-4-5-6 times = 76-78-80-82-84-86 sts. When piece measures 64-66-68-70-72-74 cm / 25¼"-26"-26¾"-27½"-28⅜"-29⅛", bind off the middle 24-26-28-30-32-34 sts for neck and finish each shoulder separately. Then dec 1 st on next row from neck (dec by working the outermost 2 sts towards the neck tog) = 25 sts remain on shoulder in all sizes. Loosely bind off all sts when piece measures 66-68-70-72-74-76 cm / 26"-26¾"-27½"-28⅜"-29⅛"-30". FRONT PIECE: = 84-92-100-112-124-136 sts. Continue with STRIPES 1 and DOUBLE SEED ST. Start bind offs for armholes as on back piece on 1st row (= RS) - AT THE SAME TIME slip the middle 26-28-30-32-34-36 sts on a stitch holder for neck at the front, now finish each part separately. Bind off for armholes in each side as on back piece. When all bind offs are done, 25 sts remain on each shoulder. Continue with STRIPES 1 and DOUBLE SEED ST. When piece measures 66-68-70-72-74-76 cm / 26"-26¾"-27½"-28⅜"-29⅛"-30", loosely bind off all sts. SLEEVE: Worked in the round on double pointed needles. Cast on 63-66-69-72-75-78 sts on double pointed needles size 3.5 mm / US 4 with light gray. Work rib as follows: * K 1, P 2 *, repeat from *-*. When piece measures 4 cm / 1½", K 1 round while AT THE SAME TIME dec 15-16-17-18-19-20 sts evenly (dec by K tog approx. every 3rd and 4th st) = 48-50-52-54-56-58 sts. Switch to double pointed needles size 4 mm / US 6 and insert a marker at beg of round. Then continue in the round with DOUBLE SEED ST and STRIPES 2 - See explanation above. When piece measures 8-8-7-7-8-7 cm / 3⅛"-3⅛"-2¾"-2¾"-3⅛"-2¾", inc 1 st on each side of marker = 2 new sts. Repeat inc every 4-3½-3-2½-2-2 cm / 1½"-1¼"-1⅛"-⅞"-¾"-¾" a total of 10-11-13-15-17-18 times = 68-72-78-84-90-94 sts. When piece measures 49-49-48-48-47-45 cm / 19¼"-19¼"-19"-19"-18½"-17¾" (shorter measurements in the larger sizes because of longer sleeve cap and broader shoulder width) bind off 3 sts on each side of marker (= 6 sts mid under sleeve). Then work back and forth on circular needle. Continue to bind off for sleeve cap in each side on every other row as follows: bind off 2 sts 2-2-3-3-5-5 times, and then 1 st 3-4-4-5-5-6 times. Then bind off 2 sts in each side until piece measures 56-57-57-58-59-59 cm / 22"-22½"-22½"-22¾"-23¼"-23¼", then bind off 3 sts 1 time in each side. Loosely bind off all sts. Piece measures approx. 57-58-58-59-60-60 cm / 22½"-22¾"-22¾"-23¼"-23⅝"-23⅝". ASSEMBLY: Sew the shoulder seams tog. Sew in the sleeves. RIGHT COLLAR: Worked back and forth on circular needle size 4 mm / US 6 with medium gray. Knit up from WS sts from stitch holder mid front (leave sts on the stitch holder for left collar) = 26-28-30-32-34-36 sts. Then work PATTERN 1 - See explanation above, beg from next row (= RS). NOTE: Insert a marker at the end of 1st row from RS. When collar measures 19-20-21-22-23-24 cm / 7½"-8"-8¼"-8¾"-9"-9½", continue in GARTER ST - See explanation above - until finished measurements - while at the same time working short rows (beg from next row from RS) as follows: * Work 2 rows over all sts, work 2 rows over the outermost 20 sts towards mid front *, repeat from *-* until piece measures 8-9-9-10-10-11 cm / 3⅛"-3½"-3½"-4"-4"-4⅜" from marker (in the shorter side). Bind off. LEFT COLLAR: Pick up the sts from stitch holder from WS behind right collar = left collar is underneath right collar. Work the same way as on right collar but reversed (work short rows over the outermost 20 sts towards mid front). ASSEMBLY: Sew right collar to right front piece and left collar to left front piece in outermost sts. Sew collar tog mid back and sew the neck on back piece. STRAP: Make 1 strap as follows: Twine 2 strands of 40 cm / 16" medium gray and fold them double. Make another strap the same way. Fasten the straps approx. 4 and 11 cm / 1½" and 4½" up from bottom edge on right collar (approx. 1 cm / ½" from edge mid front). Pull the yarn ends through the collar and fasten the ends on the back. Sew button on left collar approx. 2 and 4 cm / ¾" and 1½" in from seam for left front piece. |
|
 |
|
Have you finished this pattern?Tag your pictures with #dropspattern #annasweater or submit them to the #dropsfan gallery. Do you need help with this pattern?You'll find 14 tutorial videos, a Comments/Questions area and more by visiting the pattern on garnstudio.com. © 1982-2026 DROPS Design A/S. We reserve all rights. This document, including all its sub-sections, has copyrights. Read more about what you can do with our patterns at the bottom of each pattern on our site. |


With over 40 years in knitting and crochet design, DROPS Design offers one of the most extensive collections of free patterns on the internet - translated to 17 languages. As of today we count 324 catalogs and 12290 patterns - 12280 of which are translated into English (US/in).
We work hard to bring you the best knitting and crochet have to offer, inspiration and advice as well as great quality yarns at incredible prices! Would you like to use our patterns for other than personal use? You can read what you are allowed to do in the Copyright text at the bottom of all our patterns. Happy crafting!
Post a comment to pattern DROPS 135-25
We would love to hear what you have to say about this pattern!
If you want to leave a question, please make sure you select the correct category in the form below, to speed up the answering process. Required fields are marked *.