DROPS Karisma
DROPS Karisma
100% Wool
from 3.00 $ /50g
Get the yarn to make this pattern from 42.00$.

The yarn cost is calculated from the pattern’s smallest size and the yarn’s cheapest product type. Looking for an even better price? You might find it on the DROPS Deals!

DROPS Super Sale

Limestone

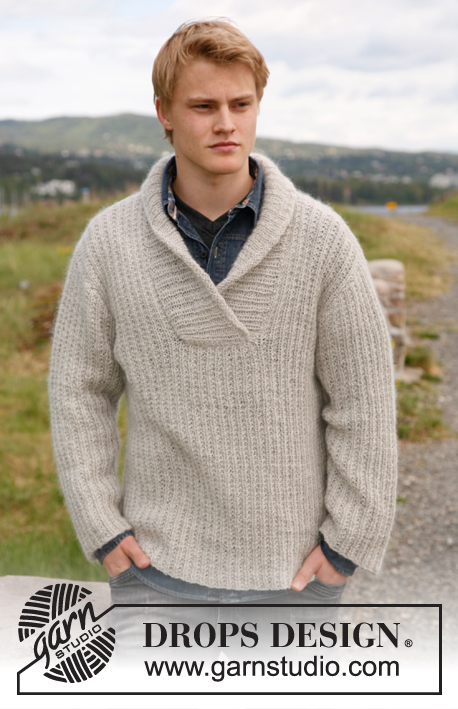
Men's knitted jumper with shawl collar, stripes and seed stitch in DROPS Karisma or DROPS Merino Extra Fine. Size S-XXXL.

DROPS 135-1
DROPS design: Pattern no U-639
Yarn group B
--------------------------------------------------------
Size: S - M - L - XL - XXL - XXXL
Finished measurements:
Bust: 80-88-96-106-118-130 cm /
31½’’-34 5/8’’-37¾’’-41¾’’-46½’’-51’’
Full length: 66-68-70-72-74-76 cm /
26’’-26¾’’-27½’’-28 3/8’’-29 1/8’’-30’’

Materials: DROPS KARISMA from Garnstudio
Color no 21, medium gray: 350-400-450-500-550-600 g
Color no 44, light gray: 300-300-300-350-350-400 g

DROPS DOUBLE POINTED NEEDLES and CIRCULAR NEEDLE (80 cm / 32’’) SIZE 4 mm / US 6 - or size needed to get 21 sts x 28 rows in stockinette st = 10 x 10 cm / 4’’ x 4’’.

DROPS DOUBLE POINTED NEEDLES and CIRCULAR NEEDLE (80 cm / 32’’) SIZE 3.5 mm / US 4 - for rib.

DROPS WOOD BUTTONS DUFFEL #520: 2 pieces for all sizes

-------------------------------------------------------

Alternative Yarn – See how to change yarns here
Yarn Groups A to F – Use the same pattern and change the yarn here
Yarn usage using an alternative yarn – Use our yarn converter here

-------------------------------------------------------

DROPS Karisma
DROPS Karisma
100% Wool
from 3.00 $ /50g
Get the yarn to make this pattern from 42.00$.

The yarn cost is calculated from the pattern’s smallest size and the yarn’s cheapest product type. Looking for an even better price? You might find it on the DROPS Deals!

DROPS Super Sale

SAVE 30% on 6 cotton favorites!
Valid until 04.12.2024

Pattern instructions

NOTE: This pattern is written in American English. All measurements in charts are in cm. For conversion from inches to cm - click here. There are different terms for crocheting in American and British English. If this pattern includes crochet, click for "crochet terms" here. For this pattern in British English, please click here.
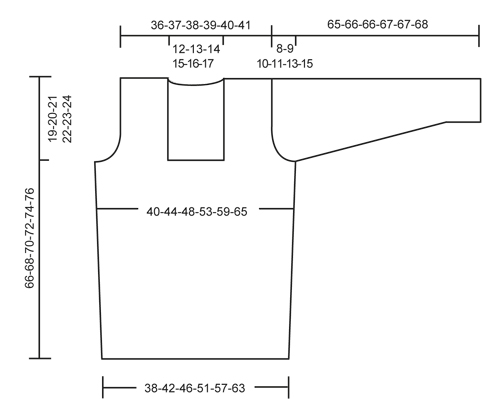
DOUBLE SEED ST:
1st round: * K 1, P 1 *, repeat from *-*.
2nd round: K over K and P over P.
3rd round: * P 1, K 1 *, repeat from *-*.
4th round: P over P and K over K.
Repeat rounds 1-4.

STRIPES:
Work medium gray and light gray alternately every 11-11-11½-12-12-12½ cm / 4 3/8”-4 3/8”-4½”-4¾”-4¾”-5”. NOTE: Measure first stripe from cast on edge. Work medium gray in the last stripe on the body and sleeve until finished measurements.

INCREASE TIP:
Inc 1 st by making 1 YO, on next round work YO twisted (i.e. work in back loop of st instead front) to avoid holes.

PATTERN 1:
Row 1 (= from RS): K all sts.
Row 2 (= from WS): * K 1, P 1 *, repeat from *-*.
Repeat 1st and 2nd row.

GARTER ST (back and forth on needle): K all rows.
--------------------------------------------------------

BODY:
Worked in the round on circular needle. Cast on 213-234-255-288-318-351 sts on circular needle size 3.5 mm / US 4 with light gray. Work rib as follows: * K 1, P 2 *, repeat from *-*. When piece measures 4 cm / 1½’’, K 1 round while AT THE SAME TIME dec 53-58-63-72-78-87 sts evenly (dec by K tog approx. every 3rd and 4th st) = 160-176-192-216-240-264 sts. Then switch to circular needle size 4 mm / US 6 and continue in the round with DOUBLE SEED ST and STRIPES - See explanation above. REMEMBER THE KNITTING GAUGE!
When piece measures 15-15-16-16-17-17 cm / 6”-6”-6¼”-6¼”-6¾-6¾”, insert 2 markers in the piece; 1 at beg of round and 1 after 80-88-96-108-120-132 sts (marks the sides). On next round, inc 1 st on each side of every marker - Read INCREASE TIP above = 4 new sts on round. NOTE: Work the new sts in double seed st. Repeat inc one more time when piece measures 30-30-32-32-34-34 cm / 11¾”-11¾”-12½”-12½”-13½”-13½” = 168-184-200-224-248-272 sts.
When piece measures 47-48-49-50-51-52 cm / 18½’’-19’’-19¼’’-19¾’’-20’’-20½’’, divide the piece at the markers and finish each part separately.

BACK PIECE:
= 84-92-100-112-124-136 sts (1st row = RS). Continue with stripes and double seed st - while AT THE SAME TIME casting/binding off for armholes in beg of every row in each side: 3 sts 1 time, 2 sts 0-1-2-4-6-8 times and 1 st 1-2-3-4-5-6 times = 76-78-80-82-84-86 sts. When piece measures 64-66-68-70-72-74 cm / 25¼’’-26’’-26¾’’-27½’’-28 3/8’’-29 1/8’’, bind off the middle 24-26-28-30-32-34 sts for neck and finish each shoulder separately. Then dec 1 st on next row from neck (dec by working the outermost 2 sts towards the neck tog) = 25 sts remain on shoulder in all sizes. Loosely bind off all sts when piece measures 66-68-70-72-74-76 cm / 26’’-26¾’’-27½’’-28 3/8’’-29 1/8’’-30’’.

FRONT PIECE:
= 84-92-100-112-124-136 sts. Continue with stripes and double seed st. Start bind offs for armholes as on back piece on 1st row (= RS) - AT THE SAME TIME slip the middle 26-28-30-32-34-36 sts on a stitch holder for neck at the front, now finish each part separately. Bind off for armholes in each side as on back piece. When all bind offs are done, 25 sts remain on each shoulder. Continue in double seed st and with stripes. When piece measures 66-68-70-72-74-76 cm / 26’’-26¾’’-27½’’-28 3/8’’-29 1/8’’-30’’, loosely bind off all sts.

SLEEVE:
Worked in the round on double pointed needles. Cast on 63-66-69-72-75-78 sts on double pointed needles size 3.5 mm / US 4 with light gray. Work rib as follows: * K 1, P 2 *, repeat from *-*. When piece measures 4 cm / 1½’’, K 1 round while AT THE SAME TIME dec 15-16-17-18-19-20 sts evenly (dec by K tog approx. every 3rd and 4th st) = 48-50-52-54-56-58 sts. Switch to double pointed needles size 4 mm / US 6 and insert a marker at beg of round. Continue in the round with DOUBLE SEED ST and STRIPES. When piece measures 8-8-7-7-7-6 cm / 3”-3”-2¾”-2¾”-2¾”-2½”, inc 1 st on each side of marker = 2 new sts. Repeat inc every 5-4½-3½-3-2½-2½ cm / 2”-1¾”-1¼”-1 1/8”-7/8” -7/8” a total of 10-11-13-15-17-18 times = 68-72-78-84-90-94 sts. When piece measures 57-57-56-56-54-53 cm / 22½”-22½”-22”-22”-21¼”-21” (shorter measurements in the larger sizes because of longer sleeve cap and wider shoulders) bind off 3 sts on each side of marker (= 6 sts mid under sleeve). Then work back and forth on circular needle. Continue to bind off for sleeve cap in beg of every row each side: 2 sts 2-2-3-3-5-5 times, and then 1 st 3-4-4-5-5-6 times. Then bind off 2 sts in each side until piece measures 64-65-65-66-66-67 cm / 25¼”-25½”-25½”-26”-26”-26 3/8”, then bind off 3 sts 1 time in each side. Loosely bind off all sts. Piece measures approx. 65-66-66-67-67-68 cm / 25½”-26”-26”-26 3/8”-26 3/8”-26¾”.

ASSEMBLY:
Sew the shoulder seam.. Sew in the sleeves.

RIGHT COLLAR:
Worked back and forth on circular needle size 4 mm / US 6 with medium gray as follows: Pick up sts from stitch holder mid front (leave the stitch holder) = 26-28-30-32-34-36 sts, P 1 row from WS. Then work PATTERN 1 from RS - See explanation above. When collar measures 19-20-21-22-23-24 cm / 7½’’-8’’-8¼’’-8¾’’-9’’-9½’’ (last row = 2nd row in PATTERN 1 = WS), insert a marker at the end of row seen from RS. Continue in GARTER ST - See explanation above - until finished measurements - At the same time work short rows as follows: * Work 2 rows over all sts, work 2 rows over the outermost 20 sts towards mid front *, repeat from *-* until piece measures 8-9-9-10-10-11 cm / 3 1/8”-3½”-3½”-4”-4”-4 3/8” from marker (in the shorter side). Bind off.

LEFT COLLAR:
Knit up the sts from stitch holder from RS behind right collar = left collar is underneath right collar. Work the same way as on right collar but reversed (work short rows over the outermost 20 sts towards mid front).

ASSEMBLY:
Sew right collar to right front piece and left collar to left front piece in outermost sts. Sew collar tog mid back and sew the neck on back piece.

STRAP:
Make 1 strap as follows: Twine 2 strands of 40 cm / 15¾” in medium gray and fold them double and let them twist. Make another strap the same way. Fasten the straps approx. 4 and 11 cm / 1½” and 4½” up from bottom edge on right collar (approx. 1 cm / ½’’ from edge mid front). Pull the strands through the collar and fasten the ends on the back. Sew button on left collar approx. 2 and 4 cm / ¾” and 1½’’ in from seam for left front piece.

Diagram

All measurements in charts are in cm.

diagram measurements
Do you have a question? See a list of frequently asked questions (FAQ)

Knitting tension is what determines the final measurements of your work, and is usually measured per 10 x 10 cm. It is provided like so: number of stitches in width x number of rows in height - eg: 19 stitches x 26 rows = 10 x 10 cm.

The knitting tension is very individual; some people knit/crochet loosely while others work tightly. You adjust the knitting tension with the needle size, which is why the suggested needle size only serve as a guide! You need to adjust this (up or down) to ensure that YOUR knitting tension matches the knitting tension provided in the pattern. If you work with a different knitting tension than provided you will have a different yarn consumption, and your work will have different measurements than what the pattern suggests.

The knitting tension also determines which yarns can replace each other. As long as you achieve the same knitting tension you can replace one yarn with another.

See DROPS lesson: How to measure your tension/gauge

See DROPS video: How to make a gauge tension swatch

The required amount of yarn is provided in grams, eg: 450 g. To calculate how many balls you’ll need you first need to know how many grams are in 1 ball (25g, 50g or 100g). This information is available if you click on the individual yarn quality on our pages. Divide the amount required with the amount of each ball. For example, if each ball is 50g (the most common amount), the calculation will be as follows: 450 / 50 = 9 balls.

The important thing when changing from one yarn to another is that the knitting/crochet tension remains the same. This is so that the measurements of the finished piece will be the same as on the sketch provided. It is easier to achieve the same knitting tension using yarns from the same yarn group. It is also possible to work with multiple strands of a thinner yarn to achieve the knitting tension of a thicker one. Please try our yarn converter. We recommend you to always work a test swatch.

Please NOTE: when changing yarn the garment might have a different look and feel to the garment in the photo, due to individual properties and qualities of each yarn.

See DROPS lesson: Can I use a different yarn than the one mentioned in the pattern?

All our yarns are categorised into yarn groups (from A to F) according to thickness and knitting tension – group A contains the thinnest yarns and group F the thickest. This makes it easier for you to find alternative yarns to our patterns, should you wish to switch yarn. All yarns within the same group have a similar knitting tension and can easily replace each other. However, different yarn qualities have different structures and properties which will give the finished work a unique look and feel.

Click here for an overview of the yarns in each yarn group

At the top of all our patterns you’ll find a link to our yarn converter, which is a helpful tool should you wish to use a different yarn than suggested. By filling in the yarn quality you wish to replace, the amount (in your size) and number of strands, the converter will present good alternative yarns with the same knitting tension. Additionally it will tell you how much you’ll require in the new qualities and whether you’ll need to work with multiple strands. Most skeins are 50g (some are 25g or 100g).

If the pattern is worked with multiple colours, every colour will have to be converted separately. Similarly, if the pattern is worked with several strands of different yarns (for example 1 strand Alpaca and 1 strand Kid-Silk) you will have to find alternatives for each, individually.

Click here to see our yarn converter

Since different yarns have different qualities and textures we have chosen to keep the original yarn in our patterns. However, you can easily find options among our available qualities by using our yarn converter, or simply pick a yarn from the same yarn group.

It is possible that some retailers still have discontinued yarns in stock, or that someone has a few skeins at home that they would like to find patterns for.

The yarn converter will provide both alternative yarn as well as required amount in the new quality.

If you think it's hard to decide what size to make, it can be a good idea to measure a garment you own already and like the size of. Then you can pick the size by comparing those measures with the ones available in the pattern's size chart.

You'll find the size chart at the bottom of the pattern.

See DROPS lesson: How to read size chart

The needle size provided in the pattern serves only as a guide, the important thing is to follow the knitting tension. And since knitting tension is very individual, you will have to adjust the needle size to ensure that YOUR tension is the same as in the pattern – maybe you’ll have to adjust 1, or even 2 needle sizes, up or down to achieve the correct tension. For this, we recommend that you work test swatches.

Should you work with a different knitting tension than the one provided, the measurements of the finished garment might deviate from the measurement sketch.

See DROPS lesson: How to measure your tension/gauge

See DROPS video: How to make a gauge tension swatch

Working a garment top-down provides more flexibility and room for personal adjustment. For example it is easier to try the garment on while working, as well as making adjustments to length of yoke and shoulder caps.

The instructions are carefully explaining every step, in the correct order. Diagrams are adjusted to the knitting direction and are worked as usual.

The diagram depicts all rows/rounds, and every stitch seen from the right side. It is read from bottom to top, from right to left. 1 square = 1 stitch.

When working back and forth, every other row is worked from the right side and every other row is worked from the wrong side. When working from the wrong side, the diagram will have to be worked reversed: from left to right, knit stitches are purled, purl stitches are knit etc.

When working in the round every round is worked from the right side and the diagram are worked from right to left on all rounds.

See DROPS lesson: How to read knitting diagrams

The diagram depicts all rows/rounds, and every stitch seen from the right side. It is worked from bottom to top, from right to left.

When working back and forth every other row is worked from the right side: from right to left and every other row is worked from the wrong side: from left to right.

When working in the round, every row in the diagram are worked from the right side, from right to left.

When working a circular diagram you start in the middle and work your way outwards, counter clockwise, row by row.

The rows usually start with a given number of chain stitches (equivalent to the height of the following stitch), this will either be depicted in the diagram or explained in the pattern.

See DROPS lesson: How to read crochet diagrams

Instructions for working several diagrams after each other on the same row/round, will often be written like so: “work A.1, A.2, A.3 a total of 0-0-2-3-4 times". This means you work A.1 once, then A.2 is worked once, and A.3 is repeated (in width) the number of times provided for your size – in this case like so: S = 0 times, M = 0 times, L=2 times, XL= 3 times and XXL = 4 times.

The diagrams are worked as usual: begin with the first row in A.1, then work the first row in A.2 etc.

See DROPS lesson: How to read knitting diagrams

See DROPS lesson: How to read crochet diagrams

The total width of the garment (from wrist-to-wrist) will be larger in the larger sizes, despite the actual sleeves being shorter. The larger sizes have longer sleeve caps and wider shoulders, so there will be a good fit in all sizes.

The measurement sketch/schematic drawing provides information regarding the full length of the garment. If it’s a jumper or a jacket the length is measured from the highest point on the shoulder (usually closest to the neckline), and straight down to the bottom of the garment. It is NOT measured from the tip of shoulder. Similarly, the length of yoke is measured from the highest point on the shoulder and down to where yoke is split into body and sleeves.

See DROPS lesson: How to read a schematic drawing

Diagrams are often repeated on the round or in height. 1 repeat is the diagram the way it appears in the pattern. If it says to work 5 repeats of A.1 in the round, then you work A.1 a total of 5 times after/next to each other in the round. If it says to work 2 repeats of A.1 vertically/in height you work the entire diagram once, then begin again at the start and work the entire diagram one more time.

Chain stitches are slightly narrower than other stitches and to avoid working the cast-on edge too tight, we simply chain more stitches to begin with. The stitch count will be adjusted on the following row to fit the pattern and measurement sketch.

The rib edge is more elastic and will contract slightly compared to, for example, stocking stitch. By increasing before the rib edge, you avoid a visible difference in width between the rib edge and the rest of the body.

It’s very easy to cast off too tightly, and by making yarn overs while casting off (and simultaneously casting these off) you avoid a too tight cast off edge.

See DROPS video: How to bind off with yarn overs (yo)

To achieve an even increase (or decrease) you can increase on, for example: every 3rd and 4th row alternately, like so: work 2 rows and increase on the 3rd row, work 3 rows and increase on the 4th. Repeat this until the increase is complete.

See DROPS lesson: Increase or decrease 1 st on every 3rd and 4th row alternately

Should you prefer to work in the round instead of back and forth, you may of course adjust the pattern. You’ll need to add steeks mid-front (usually 5 stitches), and follow the instructions. When you would normally turn and work from the wrong side, simply work across the steek and continue in the round. At the end you’ll cut the piece open, pick up stitches to work bands, and cover the cut edges.

See DROPS video: How to knit steeks and cut open

Should you prefer to work back and forth instead of in the round, you may of course adjust the pattern so you work the pieces separately and then assemble them at the end. Divide the stitches for the body in 2, add 1 edge stitch in each side (for sewing) and work the front and back pieces separately.

See DROPS lesson: Can I adapt a pattern for circular needles into straight needles?

Pattern repeats can vary slightly in the different sizes, in order to get the correct proportions. If you’re not working the exact same size as the garment in the photo, yours might deviate slightly. This has been carefully developed and adjusted so that the complete impression of the garment is the same in all sizes.

Make sure to follow instructions and diagrams for your size!

If you have found a pattern you like which is available in women’s size it’s not very difficult to convert it to men’s size. The biggest difference will be the length of sleeves and body. Start working on the women size that you think would fit across the chest. The additional length will be worked right before you cast off for the armhole/sleeve cap. If the pattern is worked top-down you can add the length right after the armhole or before the first decrease on sleeve.

Regarding additional yarn amount, this will depend on how much length you add, but it is better with a skein too many than too few.

All yarns will have excess fibres (from production) that might come off as lint or shedding. Brushed yarns (ie hairier yarns) have more of these loose, excess fibres, causing more shedding.

Shedding also depends on what is worn under or over the garment, and whether this pulls at the yarn fibres. It’s therefore not possible to guarantee that there will be no shedding

Below are some tips on how to get the best result when working with hairier yarns:

1. When the garment is finished (before you wash it) shake it vigorously so the looser hairs come off. NOTE: do NOT use a lint roller, brush or any method that pulls at the yarn.

2. Place the garment in a plastic bag and put it in your freezer - the temperature will cause the fibres to become less attached to each other, and excess fibres will come off easier.

3. Leave in the freezer for a few hours before taking it out and shaking it again.

4. Wash the garment according to the instructions on the yarn label.

Pilling is a natural process that happens to even the most exclusive of fibers. It's a natural sign of wear and tear that is hard to avoid, and that is most visible in high friction areas of your garment like a sweater's arms and cuffs.

You can make your garment look as new by removing the pilling, using a fabric comb or a pill/lint remover.

Still can't find the answer you need? Then scroll down and leave your question so one of our experts can try to help you. This will be done normally within 5 to 10 working days.
In the meantime, you can read the questions and answers that others have left to this pattern or join the DROPS Workshop on Facebook to get help from fellow knitters/crocheters!

You might also like...

Limestone

Joe5, France

Jumper with shawl collar

Lineke, Netherlands

Christmas present

Martina, Czech Republic

Limestone

Woll Elli, Germany

Post a comment to pattern DROPS 135-1

We would love to hear what you have to say about this pattern!

If you want to leave a question, please make sure you select the correct category in the form below, to speed up the answering process. Required fields are marked *.

Comments / Questions (111)

country flag Julie wrote:

Når man skal felle av på ermet står det: Det fortsettes å felles til ermtopp i hver side på hver 2.p slik: 2 m 2 ganger og deretter 1 m 4 (strikker M). Skal man felle av på hver side eller kun 2 m på starten av hver andre pinne?

08.11.2023 - 06:46

DROPS Design answered:

Hei Julie. Du feller av på hver side, slik at sidenen blir like. mvh DROPS Design

13.11.2023 - 11:34

country flag Jenni wrote:

Hallo! Ich bin total verwirrt mit den Angaben. Ich habe exakt nach Angaben gestrickt und meine Maschenprobe, glatt rechts gestrickt, passte auch. Solange ich den Bund gestrickt habe passte das mit den 53 cm. Jetzt habe ich die 74 Maschen abgenommen und das Perlmuster begonnen und jetzt „explodiert“ mir die Breite auf 65cm. Reguliert dich das wieder? Oder habe ich etwas falsch gemacht? Danke schonmal für eure Mühen!

16.01.2023 - 08:28

DROPS Design answered:

Liebe Jenni, welche Größe stricken Sie? unten bei dem Bündchen sind es 38-42-46-51-57-63 cm dann, nach den 2 Zunahmen an beiden Seiten und vor Armlöcher sollen Sie 40-44-48-53-59-65 cm haben. Viel Spaß beim stricken!

16.01.2023 - 10:40

country flag Bärbel wrote:

Eine Frage zu den Ärmeln: irgendwann sollen für die Armkugeln zu Beginn der Reihe Maschen abgekettet werden. Tatsächlich nur am Anfang der Reihe, oder beidseitig?

26.12.2022 - 16:34

DROPS Design answered:

Liebe Bärbel, die Maschen für die Armkugel werden am Anfang jeder Reihe (= Hin- sowie Rücktreihe) abgekettet,dh so wird es abgekettet: 2 Maschen am Anfang der nächsten 4-4-6-6-10-10 Reihen (= 2-2-3-3-5-5 Mal beidseitig) und 1 Masche am Anfang der nächsten 6-8-8-10-10-12 Reihen (= 3-4-4-5-5-6 Mal beidseitig). Viel Spaß beim stricken!

02.01.2023 - 09:21

country flag Katherine wrote:

Hola de nuevo, para hacer la vuelta corta los puntos externos serían los 20 puntos finales del lado derecho o izquierdo? Cuando la labor está del LD. Saludos

13.10.2022 - 10:06

DROPS Design answered:

Hola Katherine, los 20 pts son desde el centro del delantero hacia el borde de costura. Si trabajas por el lado derecho, los 20 pts son los del inicio de la vuelta/ fila.

17.10.2022 - 00:17

country flag Kathy wrote:

Hola, no entiendo la parte del cuello que dice: tejer vueltas cortas (tejer 2 vueltas pto musgo todos los pts ,tejer 2 vetas sobre los 20 pts externos, ¿son 20 pts del centro?). Y no se como tejer las vueltas cortas. Gracias por su ayuda.

11.10.2022 - 16:10

DROPS Design answered:

Hola Kathy, para tejer las vueltas cortas, que ayudan a dar forma redonda al cuello, puedes consultar el siguiente vídeo: https://www.garnstudio.com/video.php?id=438&lang=es. En cuanto a los 20 pts: para la talla S (por ejemplo), trabajas sobre 26 pts de ida y vuelta y luego se trabajan 2 filas sobre los 20 pts más cercanos al centro del delantero. Por lo tanto, comienzas trabajando 20 pts desde el centro del delantero, giras y trabajas de nuevo sobre estos 20 pts de vuelta. Después trabajar otra vez sobre los 26 pts de ida y vuelta.

17.10.2022 - 00:15

country flag Susan wrote:

I am a little confused about the YO increase on either side of the marker - this makes for a double YO which results in a large hole regardless of whether the YOs are worked through the back. Am I missing something? Thanks!

05.06.2022 - 02:56

DROPS Design answered:

Dear Susan, you can work the yarn overs on each side of 2 stitches on the sides, ie work until 1 stitch remains before marker, make 1 yarn over, work the next 2 sts (marker is between these both stitches), make 1 yarn over; and repeat at next marker. Happy knitting!

07.06.2022 - 08:31

country flag Nicky wrote:

Hi all, I am confused, and wonder if you can explain the below in plain terms please? When piece measures 4 cm / 1½’’, K 1 round while AT THE SAME TIME dec 53-58-63-72-78-87 sts evenly (dec by K tog approx. every 3rd and 4th st) = 160-176-192-216-240-264 sts. Then switch to circular needle size 4 mm / US 6 and continue in the round with DOUBLE SEED ST and STRIPES - See explanation above. REMEMBER THE KNITTING GAUGE!

13.09.2021 - 09:13

DROPS Design answered:

Dear Nicky, when piece measures 4 cm you will knit 1 round decreasing evenly (see this lesson, then switch to larger needle and work in double seed stitch following the stripes (see at the beg of the pattern description of both). Can this help?

14.09.2021 - 07:22

country flag Deni wrote:

My question was how to work work increases and maintain double moss stitch

06.01.2021 - 09:07

DROPS Design answered:

Hi Deni, you will add 2 stitches in one side, so just adjust them accordingly, to maintain double moss stitch. Happy knitting!

06.01.2021 - 09:19

country flag Deni wrote:

I'm knitting size xl and is at 16 cm.can you tell me how to proceed with increasing.how to work yarn over through back loop in the next round (when to make purl when to make knit twisted)

06.01.2021 - 08:24

DROPS Design answered:

Hi Deni, please see the video HERE. Happy knitting!

06.01.2021 - 08:56

country flag Stephanie wrote:

I am not sure if I am working the side of the collar that I think I am...when being assembled, does the long side or the short side of the collar get sewn to the body of the sweater?

12.11.2020 - 00:17

DROPS Design answered:

Hi Stephanie, You will sew the shorter side of the collar to the yoke. Happy knitting!

12.11.2020 - 08:23