
Popular categories
Looking for a yarn?


Comments / Questions (93)
![]() JB wrote:
JB wrote:
Langs hele sjalet strikkes de yderste 3 m i retstrik iflg. X1 og X4, men når der skal strikkes bort skal de yderste 4 m være i retstrik. Er det korrekt ?
29.06.2012 - 17:50DROPS Design answered:
Ja, det stemmer, bare følg opskriften. God fornøjelse!
02.07.2012 - 14:18
![]() Gea wrote:
Gea wrote:
Ik loop vast in het breien van de rand. M2.Er staat averecht samen breien, ik zie het niet op de foto. klopt dat wel? Ik krijg de gaatjes ook niet boven elkaar het verspringt. Wie is het wel gelukt?
02.06.2012 - 23:20DROPS Design answered:
Het klopt. Het moet av samen breien, maar dat ziet u inderdaad niet zo goed terug op de foto. U gaat door met de meerderingen aan de zijkanten en in het midden tijdens het breien van de rand. De nieuwe st moeten in tricotst worden gebreid, maar de st voor het ajourpatroon moet steeds boven elkaar blijven. Na de 3. en 7. nld heeft u per herhaling ook 2 st meer, maar maak nog steeds de omsl/r st boven de eerdere.
05.06.2012 - 20:32
![]() Sylvie wrote:
Sylvie wrote:
Bonjour,je ne parviens pas à retrouver la bordure du chale comme sur la photo...il me semble que j'arrive directement aux motifs en suivant les diagrammes ! Où ai je pu commetre une erreur ? Le chale se tricote bien du bas vers le haut ? Merci pour votre aide.
18.05.2012 - 09:18DROPS Design answered:
Bonjour Sylvie, le diagramme de la bordure c'est M2, le châle se tricote bien de haut en bas. Bon tricot !
18.05.2012 - 11:13
![]() Anne H wrote:
Anne H wrote:
Merci de votre réponse , je me suis rendue compte plus tard que je connaissais la réponse. Cependant une autre question se pose , concernant les jetés dans le diagramme. Il n'est pas précisé si ceux ci sont également tricoté court ( jeté torse)ou long .
09.05.2012 - 17:21DROPS Design answered:
Bonsoir Anne, les jetés se tricotent comme indiqué dans le diagramme : à l'env sur l'env, donc "normalement". Bon tricot !
09.05.2012 - 20:47
![]() Anne H wrote:
Anne H wrote:
Bonjour, les explications précises "tricoter tous les rangs à l'endroit" . Cependant j'ai l'impression que les explications du diagramme sont contradictoires " m end sur end et m. env sur env " ... Est ce que j'ai mal compris ?
08.05.2012 - 19:38DROPS Design answered:
Bonjour Anne, c'est le point mousse qui se tricote tous les rangs à l'endroit, comme indiqué au début des explications. Le point fantaisie, lui, se tricote en suivant les diagrammes et la légende. Bon tricot !
09.05.2012 - 09:47
![]() Tina wrote:
Tina wrote:
Jeg er altså fortsat meget i tvivl. Når jeg har strikket M2 i højden skal jeg så bagefter samle masker op på de skrå sider og strikke M2?
26.04.2012 - 12:49DROPS Design answered:
Mener du når du strikket M.1 i höjden? Etter M.1 er det 349 m på p, 174 m på hver side av midtm, og disse m er de skrå sider, så du strikker bara videre över disse 349 m först 4 p glatt strik og videre med M.2.
26.04.2012 - 18:24
![]() Annika wrote:
Annika wrote:
Det är bara beskrivning på ovankanten i M2, det blir ju ingen kant på sidorna
10.04.2012 - 19:31DROPS Design answered:
M.2 visar kanten som stickas allra sist, det är kanten som går längs de båda sneda sidorna.
13.04.2012 - 00:48
![]() Johanne wrote:
Johanne wrote:
Jeg kan ikke se at det er noe oppskrift på kanten rundt. Kan noen sende meg den?
05.04.2012 - 09:03DROPS Design answered:
Hej Johanne. Kanten faar du ved at strikke mönster M.2.
05.04.2012 - 15:30
![]() Else wrote:
Else wrote:
Så er garnet købt. Nu skal jeg have startet. Glæder mig til at se hvordan det forløber. Garnet er rigtig lækkert - og tyndt :))
03.04.2012 - 13:06
![]() DROPS Design wrote:
DROPS Design wrote:
1 kast, 2 rett strikkes i sidene og i midten, mellom disse strikkes M.2. Økningene i diagrammet kommer i tillegg.
23.01.2012 - 11:18
|
||||||||||||||||||||||
Garden of Diamonds#gardenofdiamondsshawl |
||||||||||||||||||||||
 |
 |
|||||||||||||||||||||
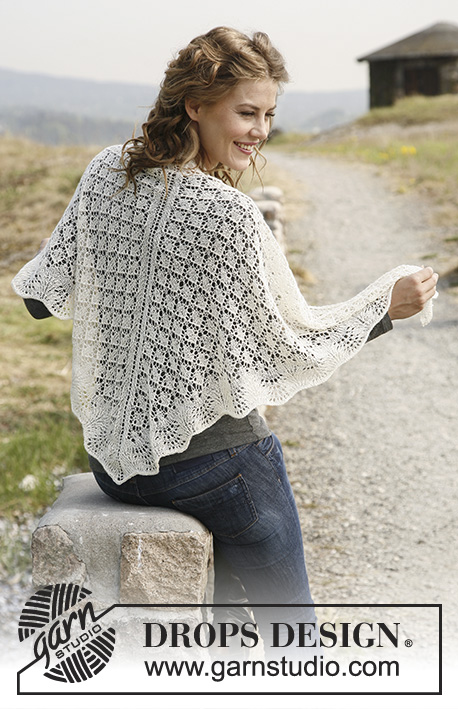
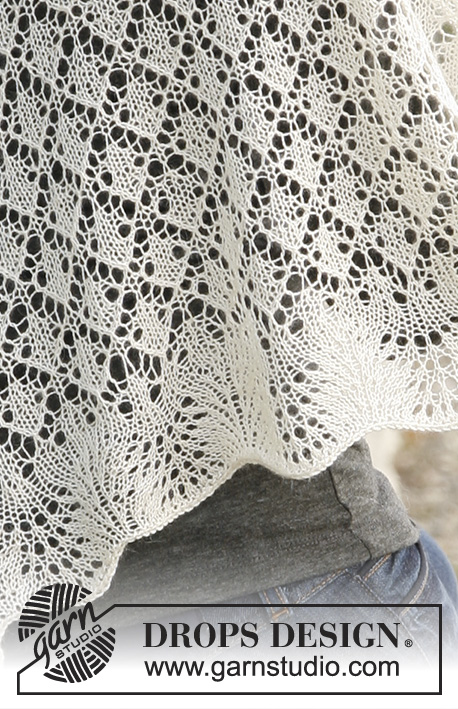
Knitted DROPS shawl with wave pattern in "Lace".
DROPS 131-2 |
||||||||||||||||||||||
|
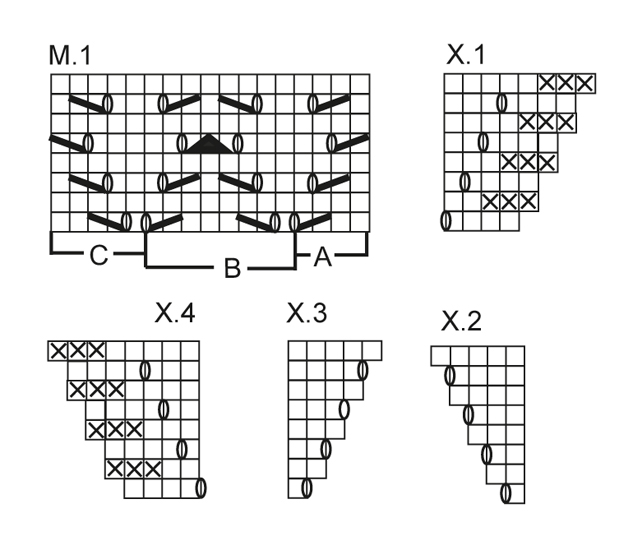
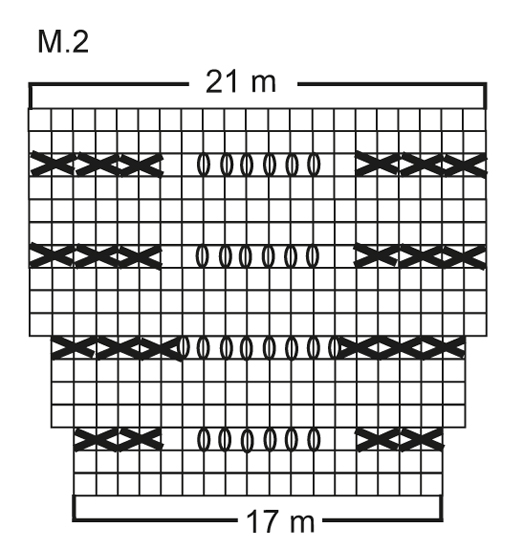
PATTERN: See diagrams X.1, X.2, X.3, X.4, M.1 and M.2. GARTER ST (back and forth on needle): K all rows. --------------------------------------------------------- SHAWL: Worked back and forth on circular needle to make room for all the sts. Cast on 3 sts on circular needle size 3.5 mm / US 4 with Lace. Insert a marker in the 2nd st (mid st - marks mid back of shawl). Work 1 row as follows (= RS): K 1, 1 YO, K 1, 1 YO, K 1 = 5 sts. NOTE! On next row K YOs twisted, i.e. work in back loop of YOs instead of front, to avoid holes. Then K every row while at the same time inc 4 sts on every row from RS as follows: Work 2 sts in the second st and in the next to last st in each side and make 1 YO on each side of st with marker (still work YOs twisted). Continue like this until there are 29 sts on the needle. Then work as follows from RS: Diagram X.1, diagram M.1A (= 4 sts), diagram M.1C (= 5 sts) and diagram X.2, 1 st in stockinette st (= mid st), diagram X.3, diagram M.1A (= 4 sts), diagram M.1C (= 5 sts) and diagram X.4. When the repetition has been worked 1 time vertically, there are 45 sts on needle. Continue to work as follows: Diagrams X.1, M.1A, then repeat M.1B (= 8 sts) until 6 sts remain before mid st (no of sts varies depending on which row in diagrams X.1-X.4 is being worked), over these last 6 sts work diagram M.1C and X.2, 1 st in stockinette st (= mid st), work diagrams X.3, M.1A, repeat M.1B until 9 sts remain on row (no of sts varies depending on which row in diagrams X.1-X.4 is being worked), and work these in diagram M.1C and X.4. Continue like this until M.1 has been worked a total of 20 times vertically - the inc sts are worked gradually into diagram M.1. There are now 349 sts on needle, 174 sts on each side of mid st. Work 4 rows in stockinette st while AT THE SAME TIME continuing with edge sts each side in garter st and inc on every row from RS as before = 357 sts, 178 sts on each side of mid st. Now work as follows from RS: 4 edge sts in GARTER ST - see explanation above - 1 YO, K 2, 10 times diagram M.2, K 2 before mid st, 1 YO, 1 st in stockinette st (= mid st), 1 YO, K 2, 10 times diagram M.2, K 2, 1 YO, 4 edge sts in garter st. NOTE! The inc sts in the sides and mid back are worked in stockinette st until diagram M.2 has been worked. When diagram M.2 has been worked 1 time vertically, K 1 row from WS. Loosely bind off with K sts with 2 strands. BLOCKING: Place the shawl in lukewarm water until it is soaking wet. Carefully squeeze the water out of the shawl - do not twist the shawl - then roll the shawl in a towel and squeeze to remove more water - the shawl will now only be moist. Place the shawl on a carpet or mattress - carefully stretch it out to size and fasten it with pins. Leave to dry. Repeat the process when the garment has been washed. |
||||||||||||||||||||||
Diagram explanations |
||||||||||||||||||||||
|
||||||||||||||||||||||
 |
||||||||||||||||||||||
 |
||||||||||||||||||||||
Have you finished this pattern?Tag your pictures with #dropspattern #gardenofdiamondsshawl or submit them to the #dropsfan gallery. Do you need help with this pattern?You'll find 11 tutorial videos, a Comments/Questions area and more by visiting the pattern on garnstudio.com. © 1982-2026 DROPS Design A/S. We reserve all rights. This document, including all its sub-sections, has copyrights. Read more about what you can do with our patterns at the bottom of each pattern on our site. |
||||||||||||||||||||||


With over 40 years in knitting and crochet design, DROPS Design offers one of the most extensive collections of free patterns on the internet - translated to 17 languages. As of today we count 324 catalogs and 12285 patterns - 12275 of which are translated into English (US/in).
We work hard to bring you the best knitting and crochet have to offer, inspiration and advice as well as great quality yarns at incredible prices! Would you like to use our patterns for other than personal use? You can read what you are allowed to do in the Copyright text at the bottom of all our patterns. Happy crafting!
Post a comment to pattern DROPS 131-2
We would love to hear what you have to say about this pattern!
If you want to leave a question, please make sure you select the correct category in the form below, to speed up the answering process. Required fields are marked *.