
Popular categories
Looking for a yarn?


Comments / Questions (102)
![]() Yara wrote:
Yara wrote:
Hallo, Ik heb deze muts vorig jaar gemaakt, alleen is hij gewoon veel te groot. Zodra ik mijn hoofd draai schuift hij voor mijn ogen. Hebben jullie een tip hoe ik de muts opnieuw kan breien en nu in een kleiner formaat? In het patroon lijkt het aantal steken verminderen lastig. Of zou dit ergens toch kunnen? Beter een garen nemen uit C of D ipc E? En kleinere naalden? Alvast bedankt!
20.10.2014 - 21:59DROPS Design answered:
Jammer dat de muts zo groot is. We raden u aan de stekenverhouding goed te controleren en eventueel met een dunnere naald te breien (of zelfs twee naalden dunner als dat nodig is) met hetzelfde garen.
21.10.2014 - 12:47
![]() Marie wrote:
Marie wrote:
Hur ska man sticka vantarna när man kommer till M.2? Det är ju mycket färre maskor i mönstret än på stickorna. Fick tipset att man skulle sticka mönstret nedifrån och upp men då blir det inget flätmönster utan bara konstigt. Har frågat alla jag känner som stickar och i butik men är tyvärr ingen som begriper sig på hur man ska göra så vore supertacksam för en förklaring för setet är ju så fint.
18.11.2013 - 15:57DROPS Design answered:
Det står i beskrivningen: Sticka varv 1 (= rätsidan) så här: 12 rm, sticka M.2 (= 12 rm och 12 m från M.2). Jo du börjar M.2 nedifrån såhär: 1:a varv: 3 am, sät 1 m på hj.st bakom arb, 1 rm, 1 rm från hj.st, 2 am, sätt 1 m på hj.st framför arb, 1 rm, 1 rm från hj.st, 3 am Lycka till!
20.11.2013 - 08:07Angel wrote:
On the hat earflaps, there is no information on how many times the increases should be made, please help, thank you
23.10.2013 - 23:32DROPS Design answered:
Dear Angel, there is only 1 inc each side (with a yo) after 3 vertical repeats of M.2. Happy knitting!
24.10.2013 - 10:28
![]() DROPS Design wrote:
DROPS Design wrote:
2-gie pyt: jest ok., zamykamy oczka (zakańczamy), ale dodatkowo zamykamy jeszcze 2 oczka ze schematu M.2 (i potem zakańczamy) oznaczone w legendzie do schematu na 3 i 4-tym miejscu.
22.01.2013 - 17:39
![]() DROPS Design wrote:
DROPS Design wrote:
1-sze pyt: ‘dc’ to ‘oś’ (tr to słupek) – w terminologii UK. W terminologii USA jest tak jak Pani mówi
22.01.2013 - 17:36Wanda Bareja wrote:
Witam, wydaje mi się, że polskie oś to nie dc w oryginale (dot. obszycia).Mam problem ze zrozumieniem polecenia dot. nauszników: "zamknać wszystkie o. W TYM SAMYM CZASIE, PRZER.1-SZY RZ. m-2". Jak na mily Bog sie jednoczesnie przerabia i zamyka. The hat is absolutely beautiful
22.01.2013 - 17:00
![]() Toe wrote:
Toe wrote:
Wird die Ohrenklappe nach 4xM2 nur auf einer Seite abgekettet oder beidseitig? und in Hin-und Rückreihe oder nur in den Hinreihen?
27.11.2012 - 21:41DROPS Design answered:
Hallo Toe, es wird in Hin-und Rückreihen abgekettet, insgesamt 6 x. Viel Spass mit der Mütze!
28.11.2012 - 11:14
![]() Ana Machado wrote:
Ana Machado wrote:
Eu gostava de fazer este gorro mas só consigo fazer bem se estiver a ver em video a fazer .sera que é possivel porem em video alguem a fazer o gorro para eu aprender .?? agradecia resposta ~sem mais ana machado
22.11.2012 - 11:08DROPS Design answered:
Na página do modelo (em baixo) estão links para alguns vídeos que ajudam a fazer este modelo. Pode também consultar os mais de 200 vídeos que ensinam muitas técnicas de tricô e croché na nossa videoteca. Esperamos que termine este bonito modelo!
06.12.2012 - 09:25
![]() Törcsvary wrote:
Törcsvary wrote:
Wie muss ich das Diagramm lesen? Sind nur die Hinreihen eingezeichnet oder áuch die Rückreihen?
20.11.2012 - 13:18DROPS Design answered:
Guten Tag, es sind immer Hin-und Rückreihen eingezeichnet.
21.11.2012 - 08:32
![]() Majsan wrote:
Majsan wrote:
Hur maskar man av alla maskor samtidigt som det står i beskrivningen av mössan? Har letat bland instruktionsvideon men hittar inget.
19.11.2012 - 08:26DROPS Design answered:
Du maskar av som vanligt, men maskorna du maskar av stickar du enligt varv 1 i M.2.
19.11.2012 - 12:01
|
|||||||||||||||||||
Rocky Mountain#rockymountainset |
|||||||||||||||||||
 |
 |
||||||||||||||||||
Set consists of: Knitted DROPS hat and mittens in ”Snow” or “Andes” with fur edge in “Puddel”.
DROPS 134-10 |
|||||||||||||||||||
|
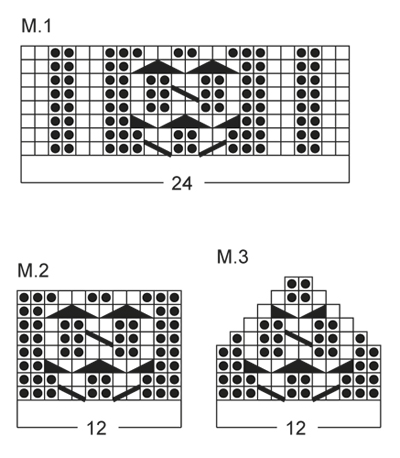
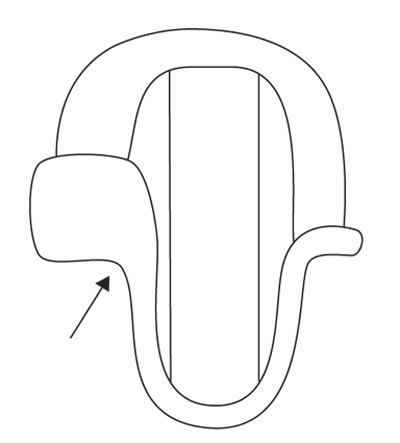
HAT: GARTER ST (back and forth on needle): K all rows. PATTERN: See diagram M.1. The diagram shows all rows in pattern seen from RS. -------------------------------------------------------- HAT: Worked back and forth on needle. Beg with middle part of the head and finish with the ear flaps in each side. Cast on 26 sts with Snow on needle size 7mm / US 10½ (includes 2 edge sts in garter st). Work 1st row (= RS) as follows: 1 st in garter st - See explanation above, work diagram M.1, finish with 1 st in garter st. Continue like this. When diagram M.1 has been worked 3 times vertically, insert a marker at the beg and end of next row (= 1st row in diagram M.1). When diagram M.1 has been worked 5 times vertically, insert another marker at the beg and end of next row (= 1st row in diagram M.1). Continue until diagram M.1 has been worked a total of 8 times vertically, piece should now measure 40 cm/15¾", loosely bind off all sts. EAR FLAP: Worked with Snow on needle size 5 mm / US 8 (to get a nicer row at the beg) as follows: Knit up 14 sts evenly from RS along the edge between the 2 markers in one side of piece. Work next row (= WS) as follows: 1 st in garter st, K 3, P 2, K 2, P 2, K 3, 1 st in garter st. On next row, switch to needle size 7mm / US 10½ and work: 1 st in garter st, work diagram M.2, finish with 1 st in garter st. Continue to work diagram M.2 (with 1 st in garter st in each side). When diagram M.2 has been worked 3 times vertically, inc 1 st in each side on next row from RS (1st row in diagram M.2) as follows: 1 st in garter st, make a YO, work diagram M.2, make a YO, finish with 1 st in garter st. On next row from WS, P the YOs twisted (i.e. in back loop of st instead of front to avoid holes). K the new sts from RS and P the new sts from WS in each side. Continue until diagram M.2 has been worked 4 times vertically. Then work 1st and 2nd row in diagram M.2, then bind off 1 st at beg of next row from RS (3rd row in diagram M.2) as follows: * work 2 sts, pass the first st over, work the rest of row *. Repeat from *-* 5 more rows, diagram M.2 has now been worked a total of 5 times. Then bind off all sts while AT THE SAME TIME working 1st row in diagram M.2. Work another ear flap the same way in the other side of piece. ASSEMBLY: Sew tog ear flaps and middle part in each side inside 1 edge st. FUR EDGE: Crochet along the bottom edge in outer loops of edge sts from RS. NOTE: Do not crochet too tight. Crochet with 2 strands Puddel with hook size 8 mm / L/11 as follows: ROW 1 (= RS): Beg in the corner where left ear flap beg (marked with arrow in diagram), work sc around left ear flap, around the back part and around the entire right ear flap, turn piece. ROW 2 (= WS): ch 1, then work 1 sc in every sc back to the beg. Then work 16 sc over the bottom edge mid front, finish row with 1 sl st in 1st sc on 2nd row (at right ear flap), turn piece. ROW 3-5: ch 1, sc in every sc mid front = 16 sc on row, turn piece. ROW 6: ch 1, skip 1st sc, 1 sc in next sc, 1 sc in every sc until 2 sc remain on row, skip next sc, 1 sc in last sc = 14 sc, turn piece. ROW 7: ch 1, skip 1st sc, 1 sc in next sc, 1 sc in every sc until 2 dc remain on row, skip next sc, 1 sc in last sc = 12 sc, turn piece. ROW 8: ch 1, skip 1st sc, 1 sc in next sc, 1 sc in every sc until 2 sc remain on row, skip next sc, 1 sc in last sc = 10 sc, finish with 1 sl st in the last sc. Fasten off. Fold the fur brim upwards over the hat and sew it tightly. Make 1 pompom of approx. 7 cm / 2¾" in diameter with Puddel. With Snow join at the bottom of the ear flap, make 1 tie by working ch for approx. 20 cm / 8". Place the end of the tie inside the pompom before cutting and tying around the pompom. Make another pompom and tie the same way in the other side. -------------------------------------------------------- MITTENS: INCREASE TIP: Inc 1 st by picking up the strand between 2 sts from previous round - K this st twisted, i.e. work in back loop of st instead of front to avoid hole. DECREASE TIP: Dec 1 st on each side of marker as follows: Work until 1 st remains before marker, slip next st on a cable needle behind the piece, slip next st (with marker) over to right needle, slip st from cable needle back on left needle, K 2 tog, psso = 2 sts dec. PATTERN: See diagram M.2 and M.3. The diagram shows the pattern from RS. -------------------------------------------------------- LEFT MITTEN: Worked in the round on double pointed needles. Cast on 24 sts on double pointed needles size 7mm / US 10½ with Snow. Work 1st round (= RS) as follows: K 12, work diagram M.2 (= 12 K sts and 12 sts from diagram M.2). REMEMBER THE GAUGE! Continue like this until piece measures 6 cm / 2⅜", then insert a marker in the 9th st. On next round, inc 1 st on each side of st with marker for thumb gusset - Read increase tip above. Repeat inc on each side of the inc sts on next round = 5 sts in thumb gusset. Work 2 rounds without inc. On next round slip the 5 thumb sts on a stitch holder - At the same time cast on 1 new st behind sts on stitch holder = 24 sts on round (12 K sts and 12 sts from diagram M.2). Insert 2 markers in the piece as follows (round beg with 1 K st): 1 marker in the 1st K st and 1 marker in the 12th K st. When diagram M.2 has been worked 3 times vertically, work next round as follows: K 12, work diagram M.3. After 4 rounds, dec 2 sts in each side of mitten - Read decrease tip above = 4 sts dec on round. Repeat dec on every round a total of 5 times = 4 sts remain. Cut the yarn and pull it through the remaining sts and tighten tog. THUMB: Slip the 5 thumb sts back on double pointed needles. Knit up 5 sts behind the thumb = 10 sts. Work in stockinette st in the round until thumb measures 5 cm / 2". Insert 2 markers in the thumb; one in the 1st st and one in the 6th st (= in each side). On next round, dec 2 sts in each side of thumb - Read decrease tip above = 4 sts dec on round. Repeat dec on next round = 2 sts remain. Cut the yarn and pull it through the remaining sts and tighten tog. RIGHT MITTEN: Cast on and work as left mitten but reversed. Insert marker in the 4th st for inc for thumb gusset. FUR EDGE: Crochet with 2 strands Puddel on crochet hook size 8mm / L/11. Work 1 sl st in cast on edge of mitten, ch 1, then work 18 sc around the edge, finish with 1 sl st in first sc. Then work 1 sc in every sc in the round until fur edge measures approx. 6 cm / 2½", fasten off. Work the same way on the other mitten. |
|||||||||||||||||||
Diagram explanations |
|||||||||||||||||||
|
|||||||||||||||||||
 |
|||||||||||||||||||
 |
|||||||||||||||||||
Have you finished this pattern?Tag your pictures with #dropspattern #rockymountainset or submit them to the #dropsfan gallery. Do you need help with this pattern?You'll find 16 tutorial videos, a Comments/Questions area and more by visiting the pattern on garnstudio.com. © 1982-2026 DROPS Design A/S. We reserve all rights. This document, including all its sub-sections, has copyrights. Read more about what you can do with our patterns at the bottom of each pattern on our site. |
|||||||||||||||||||


With over 40 years in knitting and crochet design, DROPS Design offers one of the most extensive collections of free patterns on the internet - translated to 17 languages. As of today we count 325 catalogs and 12298 patterns - 12288 of which are translated into English (US/in).
We work hard to bring you the best knitting and crochet have to offer, inspiration and advice as well as great quality yarns at incredible prices! Would you like to use our patterns for other than personal use? You can read what you are allowed to do in the Copyright text at the bottom of all our patterns. Happy crafting!
Post a comment to pattern DROPS 134-10
We would love to hear what you have to say about this pattern!
If you want to leave a question, please make sure you select the correct category in the form below, to speed up the answering process. Required fields are marked *.