
Popular categories
Looking for a yarn?


Comments / Questions (56)
![]() Liisa Vlahovic wrote:
Liisa Vlahovic wrote:
I'm starting the M.1. and I am very confused. It says to continue in it once you have done the garter stitch, which I have, but the diagram for the pattern as well as the description of the diagram is confusing as to where or how to start. Help would be very appreciated right now. Thanks.
17.12.2012 - 04:37DROPS Design answered:
Dear Mrs Vlahovic, start to read the diagram at the bottom corner on the right side towards the left (from RS) then from the left towards the right (from WS). First row, first 2 sts are from RS : Yo, slip 1 as if to K, K 1 and from WS : K1, P tog YO and the slipped st. Happy Knitting !
17.12.2012 - 09:14
![]() Esther wrote:
Esther wrote:
Ik heb een vraagje. Ik ben nu bezig met patroon M.1. in de trui. In de beschrijving staat, kant bij een hoogte van 43 cm af voor de armsgaten aan iedere kant om de nld. Wordt hiermee bedoelt dat je bij de ene nld afkant en bij de volgende niet of is het een typefout en wordt er bedoelt aan iedere kant van de nld. Dit is mij even niet helemaal duidelijk.
10.12.2012 - 20:25DROPS Design answered:
Om de nld is in elke 2e nld. Dus je moet afkanten aan beide kanten van het pand in elke 2e nld. Dus je begint op de goede kant. Kant het vermelde aantal af (dus eerste keer 3 st), brei de nld uit. De volgende nld is op de verkeerde nld en aan de andere kant. Kant de 3 st af en brei de nld uit. En zo voort. Op deze manier kant je af aan beide kanten in elke 2e nld (om de nld).
11.12.2012 - 14:16
![]() Liv Henny Aas wrote:
Liv Henny Aas wrote:
Når mønsteret strikkes i str. S blir det over 105 masker ( 2 masker er kantmasker) og det er ikke delelig med 6 som mønsteret går over. Hva gjør man? Kan starte med en vrangmaske kanskje?
20.11.2012 - 14:04DROPS Design answered:
Du behöver ikke at slutte efter en hel gentagelse af mönstret. Du har med 105 m 17 gentagelser af M.1 (102 m), strik da de sidste 3 m: 1 kast + ta 1 m løst av p som om den skulle strikkes rett,vrang fra retten og endnu engang 1 kast + ta 1 m løst av p som om den skulle strikkes rett (= 3 m)
21.11.2012 - 13:35
![]() Daniela wrote:
Daniela wrote:
Bei der Erklärung von M1 steht nur "den Umschlag und die Masche zusammenstricken" - aber nicht, ob rechts oder links - wie ist es richtig?
11.10.2012 - 11:52DROPS Design answered:
Liebe Daniela, Danke für den Hinweis. Die deutsche Übersetzung war ungenau, es wird links zusammengestrickt, ich habe es nun ergänzt. Gutes Gelingen!
12.10.2012 - 08:44
![]() Drops Design NL wrote:
Drops Design NL wrote:
U begint het patroon aan de goede kant, dit staat er ook: PATROON: Zie telpatroon M.1. Nld 1 in het telpatroon = aan de goede kant. Voor meer vragen verwijzen we u toch naar uw Drops verkooppunt, via internet of in uw woonplaats.
13.02.2012 - 09:19
![]() Es wrote:
Es wrote:
Bedankt,ik ben al uit de omslag,helaas in mijn woonplaats is geen breiwinkel.Maar nog een vraagje als je aan de goede kant met het patroon begint krijg ik de grote v aan de achterkant, vroeg me af is dit correct? Op de foto lijken ze juist aan de voorkant te liggen? misschien doe ik het niet goed?
10.02.2012 - 16:24
![]() DROPS Design NL wrote:
DROPS Design NL wrote:
De omslag is sowieso altijd hetzelfde: van voor naar achteren. En dan neemt u volgens mij gewoon weer de draad naar voren om de omslag te maken als u net een r st heeft gebreid. Ik kan niet uw werk zien, dus het lijkt me een goed idee om dit mee te nemen naar de winkel. Het is vaak makkelijker uit te leggen als je persoonlijke hulp krijgt dan via een mail.
09.02.2012 - 10:40
![]() Es wrote:
Es wrote:
Ik heb de video gezien maar dat is niet de engelse manier,zoals wij in Nederland breien. Bovendien wat u beschrijft kan bij de av-steek maar niet bij mijn kantsteek die is recht, want dan ligt de draad al achter.
08.02.2012 - 17:45
![]() DROPS Design NL wrote:
DROPS Design NL wrote:
Je breit altijd een omslag op dezelfde manier, van voor naar achter. Zie ook de video over een omslag maken, dan kan het niet mis gaan.
08.02.2012 - 13:01
![]() Es wrote:
Es wrote:
Vraagje over de omslagen.Je moet een omslag maken tussen de steken volgens het patroon, nu heb je een rechte kantsteek, hoe gaat deze omslag(van achter naar voor?) Vervolgens heb je de omslag tussen de averechte steek en krijg je de omslag maar hoe gaat deze dan? krijg je dan eerst de draad naar achter? kom hier niet echt uit.Graag uw uitleg voor tussen de rechte steek en dan de averechte steek.
08.02.2012 - 02:53
|
||||||||||
Edward#edwardsweater |
||||||||||
|
|
||||||||||
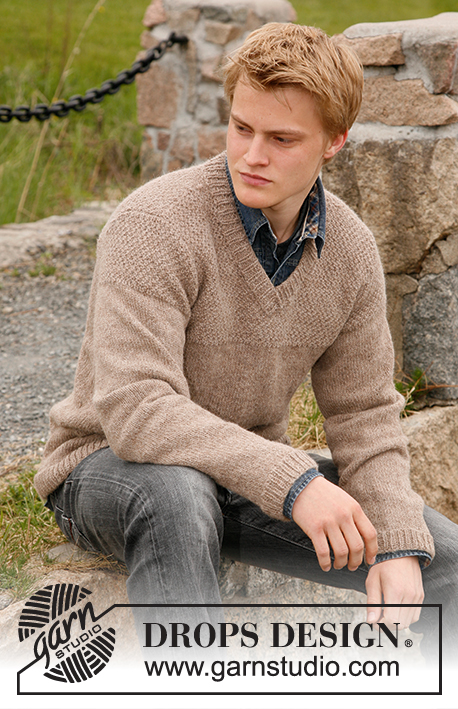
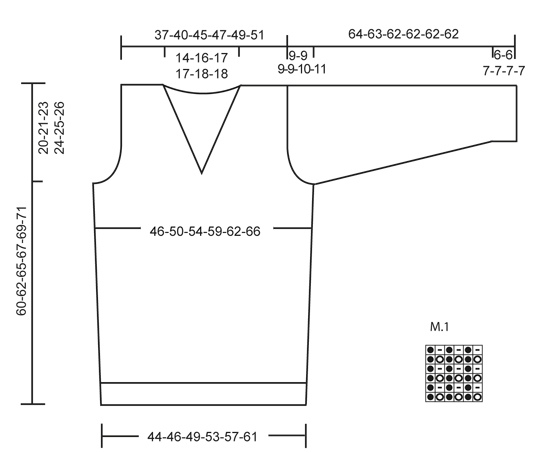
Knitted sweater for men with v-neck in DROPS Alpaca. Sizes S - XXL
DROPS 135-26 |
||||||||||
|
RIB: * K1, P2 *, repeat from * - *. GARTER ST (back and forth on needle): K all rows. PATTERN: See diagram M.1. Row 1 in diagram = work from RS. -------------------------------------------------------- FRONT PIECE: Cast on 104-107-116-125-134-143 sts (includes 1 edge st each side) on needle size 2.5 mm / US 1 or 2 with Alpaca and work RIB - see above - with 1 edge st each side for 5-5-6-6-6-6 cm / 2"-2"-2½"-2½"-2½"-2½". Change to size 3.5 mm/US 4 and work 2 rows GARTER ST - see above - AT THE SAME TIME dec 1-0-1-0-1-0 sts on row 1 = 103-107-115-125-133-143 sts. Continue in stockinette st. REMEMBER THE GAUGE! When piece measures 10 cm / 4" inc 1 st each side on every 12-5-5-5-5-7 cm / 4¾"-2"-2"-2"-2"-2¾" a total of 2-5-6-6-6-5 times = 107-117-127-137-145-153 sts. At the same time when piece measures 31-32-33-34-35-36 cm / 12¼"-12½"-13"-13⅜"-13¾"-14¼" work 2 rows garter st, and then continue in M.1. When piece measures 40-41-42-43-44-45 cm / 15¾"-16⅛"-16½"-17"-17¼"-17¾" bind off for armhole each side on every other row: 3 sts 1 time, 2 sts 3-3-3-4-5-5 times and 1 st 2-3-3-3-3-5 times = 85-93-103-109-113-117 sts. When piece measures 45-48-49-50-52-53 cm / 17¾"-19"-19¼"-19¾"-20½"-21" finish M.1 with 1 row stockinette st and 1 P row (as seen from RS), and continue in stockinette st. When piece measures 50-51-53-54-55-57 cm / 19¾"-20"-21"-21¼"-21⅝" bind off the middle 5 sts for V-neck and complete each side separately. Bind off 1 st on neckline on every other row: 1 st 14-16-17-17-18-18 times = 26-28-32-35-36-38 sts left on shoulder. Bind off when piece measures 60-62-65-67-69-71 cm / 23⅝"-24⅜"-25½"-26⅜"-27⅛"-28". BACK PIECE: Cast on and work like front piece. bind off for armhole as described for front piece and continue until piece measures 58-60-63-65-67-69 cm / 22¾"-23⅝"-24¾"-25½"-26⅜"-27⅛". Now bind off the middle 29-33-35-35-37-37 sts for neck. Bind off on neckline on every other row: 1 st 2 times = 26-28-32-35-36-38 sts left on shoulder. Bind off when piece measures 60-62-65-67-69-71 cm / 23⅝"-24⅜"-25½"-26⅜"-27⅛"-28". SLEEVE: Cast on 53-53-56-59-62-62 sts (includes 1 edge st each side) on needle size 2.5 mm / US 1 or 2 with Alpaca and work RIB for 6-6-7-7-7-7 cm / 2½"-2½"-2¾"-2¾"-2¾"-2¾". Change to needle size 3.5 mm / US 4 and work 2 rows garter st and continue in stockinette st. When piece measures 12-12-15-12-12-10 cm / 4¾"-4¾"-6"-4¾"-4¾"-4" inc 1 st each side on every 2.5-2-1.5-1.5-1.5-1.5 cm / ⅞"-¾"-½"-½"-½"-½" a total of 16-19-22-24-24-26 times = 85-91-100-107-110-114 sts. When sleeve measures 55-54-53-53-52-51 cm / 21⅝"-21¼"-21"-21"-20½"-20" (less for the larger sizes because of longer sleeve cap and wider shoulder) bind off for sleeve cap each side on every other row: 3 sts 4 times, the 2 sts each side until piece measures 63-62-61-61-61-61 cm / 24¾"-24⅜"-24"-24"-24"-24", now bind off 3 sts 1 time each side. Bind off remaining sts, piece measures approx 64-63-62-62-62-62 cm / 25¼"-24¾"-24⅜"-24⅜"-24⅜"-24⅜". ASSEMBLY: Sew shoulder seams. Set in sleeves. Sew sleeve and side seam inside 1 edge st. NECK: Beg to the left of the 5 sts mid front, pick up approx 92 to 125 (divisible by 3+2) round neck on circular needle size 2.5 mm / US 1 or 2 with Alpaca and finish to the right of the 5 sts mid front. Work back and forth from mid front. K 1 row from WS and K 1 row from RS, then work rib as follows (row 1 = WS) : 1 garter st, * P1, K2 *, repeat from * - *, finish with 1 garter st. The rib will be K1 / P2 as seen from RS. When neckline measures 4 cm / 1½" bind off in rib. Place the right side of neckline over the left mid front and fasten through both layers. |
||||||||||
Diagram explanations |
||||||||||
|
||||||||||
 |
||||||||||
Have you finished this pattern?Tag your pictures with #dropspattern #edwardsweater or submit them to the #dropsfan gallery. Do you need help with this pattern?You'll find 6 tutorial videos, a Comments/Questions area and more by visiting the pattern on garnstudio.com. © 1982-2026 DROPS Design A/S. We reserve all rights. This document, including all its sub-sections, has copyrights. Read more about what you can do with our patterns at the bottom of each pattern on our site. |
||||||||||


With over 40 years in knitting and crochet design, DROPS Design offers one of the most extensive collections of free patterns on the internet - translated to 17 languages. As of today we count 324 catalogs and 12290 patterns - 12280 of which are translated into English (US/in).
We work hard to bring you the best knitting and crochet have to offer, inspiration and advice as well as great quality yarns at incredible prices! Would you like to use our patterns for other than personal use? You can read what you are allowed to do in the Copyright text at the bottom of all our patterns. Happy crafting!
Post a comment to pattern DROPS 135-26
We would love to hear what you have to say about this pattern!
If you want to leave a question, please make sure you select the correct category in the form below, to speed up the answering process. Required fields are marked *.