
Popular categories
Looking for a yarn?


Comments / Questions (56)
Claudia Alarcon wrote:
Hola me pueden indicar si el diagrama se teje también en la espalda? o sólo es en el delantero? gracias
28.03.2016 - 05:23DROPS Design answered:
Hola Claudia. Si, el diagrama se trabaja en el delantero y en la espalda.
28.03.2016 - 10:35
![]() Ellen Haring-Peltenburg wrote:
Ellen Haring-Peltenburg wrote:
In de patroonbeschrijving staat, na het breien van het boord en de twee nld ribbelsteek, dat ercna 10 cm gemeerderd gaat worden. Is dit 10 cm vanaf de boord, of 10 cm vanaf begin van het werk? Met vriendelijke groet, Ellen Haring
26.11.2015 - 10:36DROPS Design answered:
Beste Ellen. Je meet vanaf het begin van het werk.
26.11.2015 - 14:18
![]() Christine Morin wrote:
Christine Morin wrote:
Référence: diagramme M1; suite au 2 rangs de point mousse, on débute le diagramme. Cependant doit-on débuter avec la 2ième ligne du diagramme car à la première ligne à la deuxième maille il est mentionné de tricotter ens à l'envers la jetée et la maille glissée mais elle n'a pas encore été fait à ce moment là (car on débute le diagramme). Merci de m'aider à comprendre.
11.11.2015 - 04:30DROPS Design answered:
Bonjour Mme Morin, après les 2 rangs point mousse, on tricote M.1 sur l'endroit ainsi: *1 jeté, glissez 1 m à l'end, 1 m env*, répétez de *-* sur les mailles concernées. Cliquez ici pour en savoir plus sur les diagrammes. Bon tricot!
11.11.2015 - 09:42
![]() Margaret wrote:
Margaret wrote:
Can anyone tell me where to find quantities of wool necessary for this garment.
23.09.2015 - 15:41DROPS Design answered:
Hi Margaret. It's stated at the top of the pattern: Size: S - M - L - XL - XXL - XXXL Materials: DROPS ALPACA from Garnstudio 350-400-450-500-550-600 g, colour no 0618, beige
23.09.2015 - 16:23
![]() Eric wrote:
Eric wrote:
Comment faire M1? Les points noir dans le rang 1 ? c'est 1 m env et rang 2 1 m end = Lignes verticale et l'horizontale moins prononcés. Ma mère fait différent : rang 1 des 1 m end et rang 2 des 1 m env = Lignes verticale avec des boucles. Vous donner deux réponses contradictoires; dans le rang 1 les m env le 02.01.2014 et les m end le 17.12.2012. De plus, doit-on faire une m end au début et a la fin (m lis)? Merci!
26.03.2015 - 02:02DROPS Design answered:
Bonjour Éric, les points noirs se tricotent en jersey env, soit à l'env sur l'end et à l'end sur l'env. Au rang 1, vous les tricotez à l'envers (= sur l'endroit), au rang 2, vous les tricotez à l'end (= sur l'envers). Répétez le diagramme en largeur, c'est-à-dire qu'à la fin du rang, terminez (sur l'endroit) par la 1ère m à droite du diagramme (1 jeté, glissez 1 m à l'end). Bon tricot!
26.03.2015 - 09:00Sibylle Schmid wrote:
Das Schnittmuster scheint falsch beschriftet. Armloch 9cm, das kann nicht sein. Muss wohl auf jeder Seite die Hälfte sein. Dann passt es mit den anderen Maßen zusammen. Bei Größe XXXL wären das dann 5,5cm. Abgenommen werden aber 18 Maschen, das wären ungefähr 8cm. Hier stimmt leider garnichts.
22.02.2015 - 14:28DROPS Design answered:
Die Angabe müssen Sie im Zusammenhang mit dem Ärmel sehen, sie zeigt die Länge der Armkugel an. Größe XXXL: Der Ärmel wird bis zu einer Länge von 55 cm gestrickt, dann folgt die Armkugel mit 11 cm = 62 cm Gesamtlänge wie in der Skizze. Durch die Rundung hat die Armkugel ein etwas anderes Maß als die Armausschnittbreite, passt aber trotzdem hinein.
06.03.2015 - 10:08Rachel wrote:
It seems that the point at which you cast off for the neckline might not be right. In the smallest size it says to bind off the middle 5 stitches when the work is 50 cm long, and then to continue with the decreases for the V neck until the work is 60 cm long. This results in a neckline that is too small for an adult's head, especially after adding the ribbed neckline. I ended up ripping back and starting the neck closer to 43cm which has made a reasonable sized V-neck.
02.02.2015 - 10:49
![]() Cinzia wrote:
Cinzia wrote:
Non capisco bene le diminuzioni per la pala manica ogni due ferri 3maglie 4 volte e 2 maglie..? Grazie
29.01.2015 - 21:22DROPS Design answered:
Buonasera Cinzia. Abbiamo integrato il testo: deve intrecciare ogni 2 ferri: 3 m per 4 volte, poi intreccia 2 m da ogni lato fino a quando il lavoro misura 63-62-61-61-61-61 cm; infine intreccia 3 m. 1 volta da ogni lato. Buon lavoro!
29.01.2015 - 22:26
![]() Kerstin wrote:
Kerstin wrote:
Beim Ärmel: Bedeutet am Anfang der Reihe für die Armkugel abketten: 3 M. 4 Mal, dass nur auf der Hinreihe am Anfang abgekettet wird, aber nicht auf der Rückseite?
19.12.2014 - 21:17DROPS Design answered:
Liebe Kerstin, Sie müssen an beiden Seiten abnehmen, damit die Armkugel eine symmetrische Rundung erhält. Das machen Sie, indem Sie in JEDER R abketten, also am Anfang der Hin-R und am Anfang der Rück-R. Und zwar je 3 M 4x (also 4x am Anfang der Hin-R und 4x am Anfang der Rück-R), dann je 2 M bis zur angegebenen Länge, dann je 3 M 1x.
21.12.2014 - 23:40
![]() Ale wrote:
Ale wrote:
Ho una lana che si lavora con un ferro da 6, e il mio ragazzo porta una L. Dato che ho già disfatto interamente il maglione, avete qualche consiglio maggiore da darmi? grazie!!
24.03.2014 - 10:10DROPS Design answered:
Buongiorno Ale, l'importante è che il suo campione corrisponda esattamente a quello indicato, non ha importanza la misura dei ferri. Inoltre, scorrendo la pagina può trovare lo schema con le misure per individuare la taglia adatta. Se ha già lavorato il modello ed era troppo grande, provi ad avviare una taglia più piccola. Buon lavoro!!
24.03.2014 - 14:04
|
||||||||||
Edward#edwardsweater |
||||||||||
|
|
||||||||||
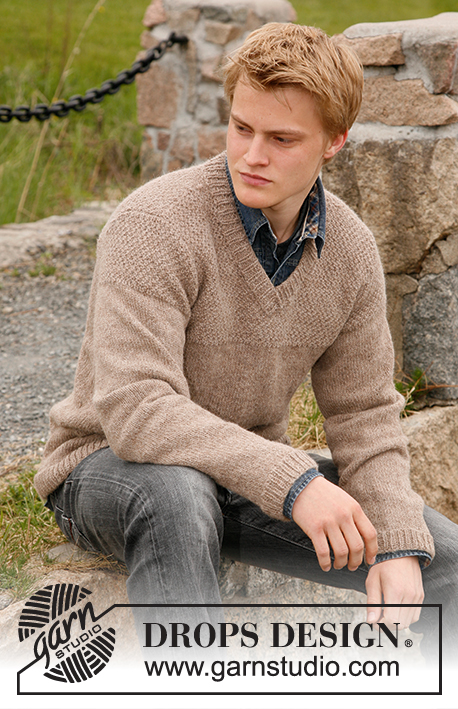
Knitted sweater for men with v-neck in DROPS Alpaca. Sizes S - XXL
DROPS 135-26 |
||||||||||
|
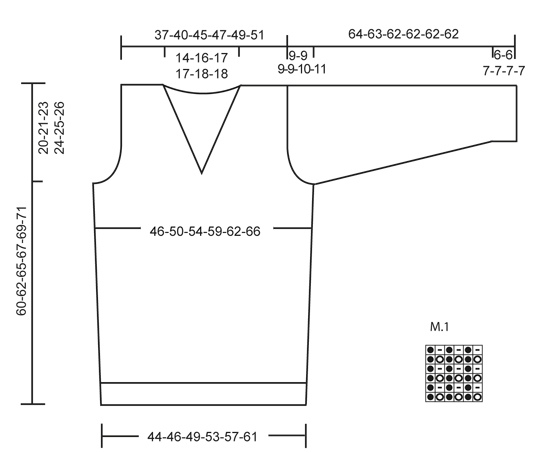
RIB: * K1, P2 *, repeat from * - *. GARTER ST (back and forth on needle): K all rows. PATTERN: See diagram M.1. Row 1 in diagram = work from RS. -------------------------------------------------------- FRONT PIECE: Cast on 104-107-116-125-134-143 sts (includes 1 edge st each side) on needle size 2.5 mm / US 1 or 2 with Alpaca and work RIB - see above - with 1 edge st each side for 5-5-6-6-6-6 cm / 2"-2"-2½"-2½"-2½"-2½". Change to size 3.5 mm/US 4 and work 2 rows GARTER ST - see above - AT THE SAME TIME dec 1-0-1-0-1-0 sts on row 1 = 103-107-115-125-133-143 sts. Continue in stockinette st. REMEMBER THE GAUGE! When piece measures 10 cm / 4" inc 1 st each side on every 12-5-5-5-5-7 cm / 4¾"-2"-2"-2"-2"-2¾" a total of 2-5-6-6-6-5 times = 107-117-127-137-145-153 sts. At the same time when piece measures 31-32-33-34-35-36 cm / 12¼"-12½"-13"-13⅜"-13¾"-14¼" work 2 rows garter st, and then continue in M.1. When piece measures 40-41-42-43-44-45 cm / 15¾"-16⅛"-16½"-17"-17¼"-17¾" bind off for armhole each side on every other row: 3 sts 1 time, 2 sts 3-3-3-4-5-5 times and 1 st 2-3-3-3-3-5 times = 85-93-103-109-113-117 sts. When piece measures 45-48-49-50-52-53 cm / 17¾"-19"-19¼"-19¾"-20½"-21" finish M.1 with 1 row stockinette st and 1 P row (as seen from RS), and continue in stockinette st. When piece measures 50-51-53-54-55-57 cm / 19¾"-20"-21"-21¼"-21⅝" bind off the middle 5 sts for V-neck and complete each side separately. Bind off 1 st on neckline on every other row: 1 st 14-16-17-17-18-18 times = 26-28-32-35-36-38 sts left on shoulder. Bind off when piece measures 60-62-65-67-69-71 cm / 23⅝"-24⅜"-25½"-26⅜"-27⅛"-28". BACK PIECE: Cast on and work like front piece. bind off for armhole as described for front piece and continue until piece measures 58-60-63-65-67-69 cm / 22¾"-23⅝"-24¾"-25½"-26⅜"-27⅛". Now bind off the middle 29-33-35-35-37-37 sts for neck. Bind off on neckline on every other row: 1 st 2 times = 26-28-32-35-36-38 sts left on shoulder. Bind off when piece measures 60-62-65-67-69-71 cm / 23⅝"-24⅜"-25½"-26⅜"-27⅛"-28". SLEEVE: Cast on 53-53-56-59-62-62 sts (includes 1 edge st each side) on needle size 2.5 mm / US 1 or 2 with Alpaca and work RIB for 6-6-7-7-7-7 cm / 2½"-2½"-2¾"-2¾"-2¾"-2¾". Change to needle size 3.5 mm / US 4 and work 2 rows garter st and continue in stockinette st. When piece measures 12-12-15-12-12-10 cm / 4¾"-4¾"-6"-4¾"-4¾"-4" inc 1 st each side on every 2.5-2-1.5-1.5-1.5-1.5 cm / ⅞"-¾"-½"-½"-½"-½" a total of 16-19-22-24-24-26 times = 85-91-100-107-110-114 sts. When sleeve measures 55-54-53-53-52-51 cm / 21⅝"-21¼"-21"-21"-20½"-20" (less for the larger sizes because of longer sleeve cap and wider shoulder) bind off for sleeve cap each side on every other row: 3 sts 4 times, the 2 sts each side until piece measures 63-62-61-61-61-61 cm / 24¾"-24⅜"-24"-24"-24"-24", now bind off 3 sts 1 time each side. Bind off remaining sts, piece measures approx 64-63-62-62-62-62 cm / 25¼"-24¾"-24⅜"-24⅜"-24⅜"-24⅜". ASSEMBLY: Sew shoulder seams. Set in sleeves. Sew sleeve and side seam inside 1 edge st. NECK: Beg to the left of the 5 sts mid front, pick up approx 92 to 125 (divisible by 3+2) round neck on circular needle size 2.5 mm / US 1 or 2 with Alpaca and finish to the right of the 5 sts mid front. Work back and forth from mid front. K 1 row from WS and K 1 row from RS, then work rib as follows (row 1 = WS) : 1 garter st, * P1, K2 *, repeat from * - *, finish with 1 garter st. The rib will be K1 / P2 as seen from RS. When neckline measures 4 cm / 1½" bind off in rib. Place the right side of neckline over the left mid front and fasten through both layers. |
||||||||||
Diagram explanations |
||||||||||
|
||||||||||
 |
||||||||||
Have you finished this pattern?Tag your pictures with #dropspattern #edwardsweater or submit them to the #dropsfan gallery. Do you need help with this pattern?You'll find 6 tutorial videos, a Comments/Questions area and more by visiting the pattern on garnstudio.com. © 1982-2026 DROPS Design A/S. We reserve all rights. This document, including all its sub-sections, has copyrights. Read more about what you can do with our patterns at the bottom of each pattern on our site. |
||||||||||


With over 40 years in knitting and crochet design, DROPS Design offers one of the most extensive collections of free patterns on the internet - translated to 17 languages. As of today we count 324 catalogs and 12290 patterns - 12280 of which are translated into English (US/in).
We work hard to bring you the best knitting and crochet have to offer, inspiration and advice as well as great quality yarns at incredible prices! Would you like to use our patterns for other than personal use? You can read what you are allowed to do in the Copyright text at the bottom of all our patterns. Happy crafting!
Post a comment to pattern DROPS 135-26
We would love to hear what you have to say about this pattern!
If you want to leave a question, please make sure you select the correct category in the form below, to speed up the answering process. Required fields are marked *.