
Popular categories
Looking for a yarn?


Comments / Questions (31)
![]() Ellis Verhoeven wrote:
Ellis Verhoeven wrote:
Ik begrijp niet waarom de steken van het apart gebreide voorpand en achterpand op een hulpdraad moeten worden gezet. In het patroon staat nergens hoe en waar ik het weer moet verbinden met de pas.
30.06.2022 - 15:20DROPS Design answered:
Dag Ellis,
Nadat afgekant is onder de arm wordt er nog een paar centimeter door gebreid, waarbij het achterpand en het voorpand apart van elkaar heen en weer gebreid wordt. Als je klaar bent met deze centimeters op het voorpand, dan laat je die stekenrusten en brei je het achterpand heen en weer. Je zou inderdaad ook de steken van het voorpand op de rondbreinaald kunnen laten staan, maar let er wel op dat je, voordat je met het achterpand begint, de draad afknipt.
03.07.2022 - 13:12
![]() Annamaria wrote:
Annamaria wrote:
Finalmente ho terminato la tunica grazie a voi ho ricevuto dei complimenti,sono molto soddisfatta del risultato grazie a tutti voi siete molto gentili e disponibili
19.10.2013 - 20:16
![]() Annamariacalanna wrote:
Annamariacalanna wrote:
Buongiorno,sto completando le diminuzione -1 però mi è venuto un dubbio.Ogni 10 giri sono compresi anche i giri delle diminuzioni? o oltre? grazie per la pazienza
13.10.2013 - 08:58DROPS Design answered:
Buongiorno Annamaria, deve diminuire ogni 10 giri, cioè lavora un giro con diminuzioni, 9 giri a m rasata, e sul decimo giro diminuisce, e così via. Ci riscriva se non le è chiaro. Buon lavoro!
13.10.2013 - 17:00
![]() Annamaria Calanna wrote:
Annamaria Calanna wrote:
Grazie molto per avermi risposto,le diminuzione li devo fare ogni 10 giri? x sette volte grazie mille
11.10.2013 - 20:38DROPS Design answered:
Buonasera AnnaMaria. Sì, le diminuzioni si ripetono ogni 10 giri, in tutto 7 volte. Terminate le diminuzioni, sui ferri avrà (a seconda della taglia) 128-144-160-176-192-208 maglie. Buon lavoro!
11.10.2013 - 20:56
![]() Annamaria wrote:
Annamaria wrote:
Buon pomeriggio sto realizzando questa tunica,sono arrivata nei segna punti per diminuire ai lati non capisco come è il procedimento
11.10.2013 - 14:55DROPS Design answered:
Buonasera Anna Maria. Dopo aver inserito i 6 segnapunti, diminuisce 1 m sia prima che dopo i segni 3 e 6 (i lati); diminuisce 1 m dopo i segni 1 e 4 e 1 m prima dei segni 2 e 5. Per diminuire prima dei segni, lavora 2 m insieme a dir; per diminuire dopo i segni, passa 1 m dir senza lavorarla, lavora 1 m dir, accavalla la m passata sulla m lavorata. Ad ogni giro vengono così diminuite 8 m. Ci riscriva se trova ancora difficoltà. Buon lavoro!
11.10.2013 - 16:19
![]() Hikari wrote:
Hikari wrote:
Bonjour, j'ai une question concernant les diminutions n1 (après 16cm de HT).Dans les explications c'est marqué qu'il faut les répéter ''7 fois tous les 10 tours = je tricote 10 tours sans diminution puis 1 avec'', mais dans les explications au haut de la page c'est marqué ''8 tours par tour = je tricote 8 tours sans puis 1 avec''. Donc quelle explication dois-je suivre? Merci d'avance ..
16.04.2013 - 17:41DROPS Design answered:
Bonjour Madame Hikari, il y avait une faute de frappe désormais corrigée : on diminue 8 m par tour, et donc vous répétez *1 tour avec diminution, 9 tours sans diminution*. Bon tricot !
16.04.2013 - 19:18Camila wrote:
Lindo!!
10.06.2010 - 04:18
![]() Anja wrote:
Anja wrote:
Denne var kjempefin
03.02.2010 - 16:20
![]() Laila wrote:
Laila wrote:
Super fin kjole, som jeg bare er nødt til at lave ;-)
29.01.2010 - 17:59
![]() Mariëlle wrote:
Mariëlle wrote:
Dit wordt mijn volgend project. Lekker voor het voorjaar!
18.01.2010 - 21:10
|
|
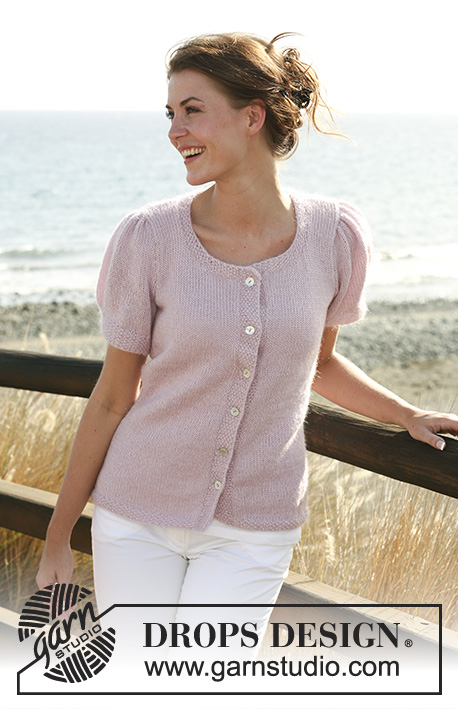
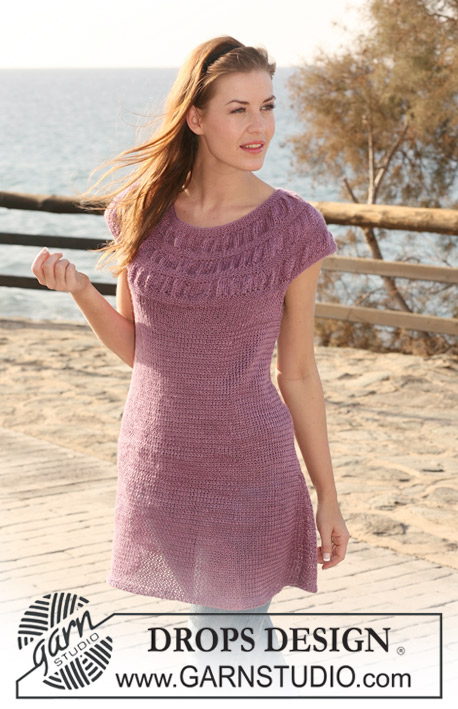
Purple Haze#purplehazetunic |
|
 |
 |
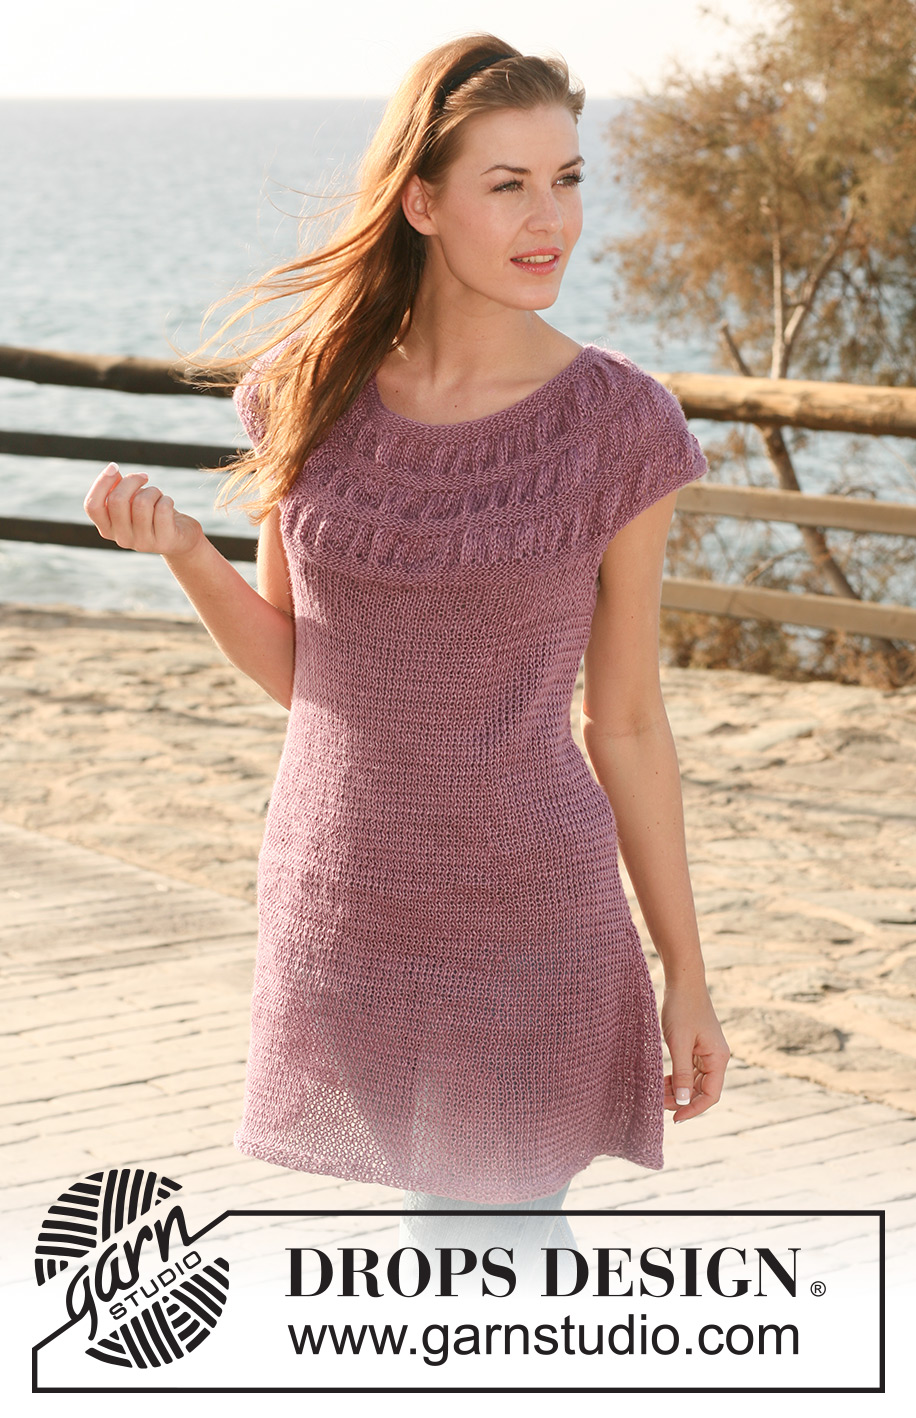
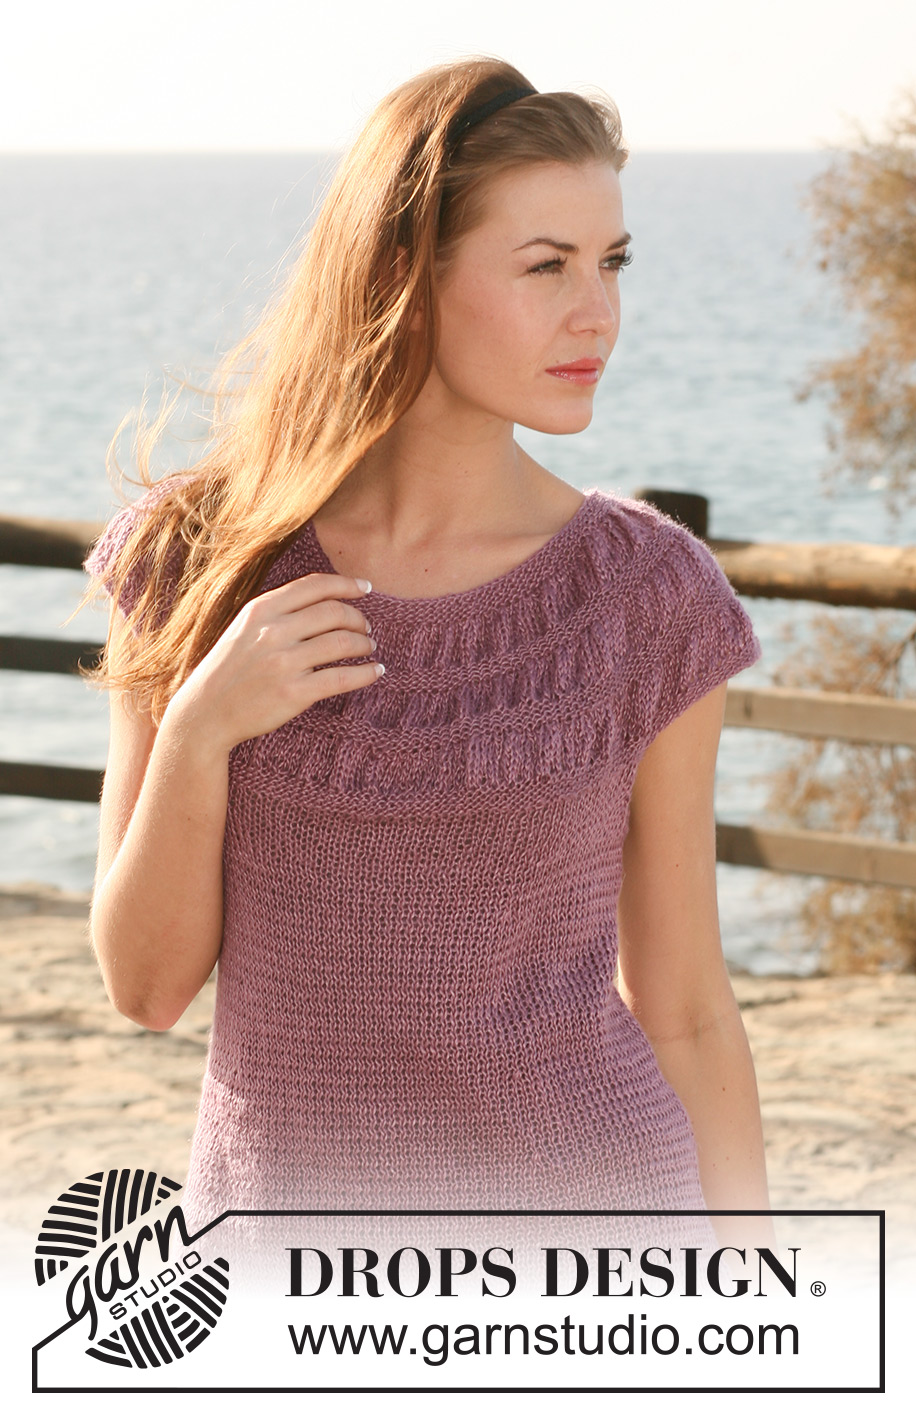
DROPS tunic in ”Lin” with “balloon” pattern on yoke. Size S to XXXL
DROPS 118-5 |
|
|
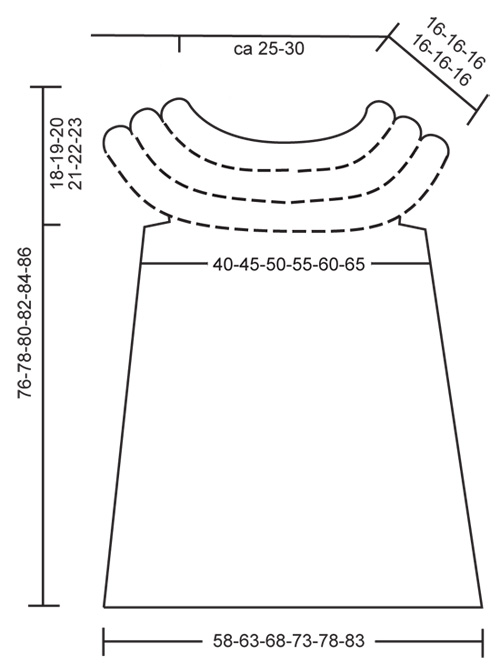
GARTER ST (back and forth on needle): K all rows. GARTER ST (in the round): K 1 round, P 1 round. DECREASING TIP-1 (applies to body piece): Dec 8 sts per round as follows: dec1 st on each side of marker-3 and 6 (= at the side), dec 1 st AFTER marker-1 and 4 and dec 1 st BEFORE marker-2 and 5. Dec AFTER markers as follows: slip 1 st as if to K, K1, psso. Dec BEFORE markers as follows: K2 tog. DECREASING TIP-2 (applies to armholes): Make all dec from RS! Dec as follows AFTER 3 garter sts: slip 1 st as if to K, K1, psso. Dec as follows BEFORE 3 garter sts: K2 tog. -------------------------------------------------------- -------------------------------------------------------- BODY PIECE: Worked in the round on circular needle. Cast on 184-200-216-232-248-264 sts on circular needle size 5.5 mm / US 9 with Lin. Work 6 rounds GARTER ST – see above – and continue in stockinette st until piece measures 16-17-18-19-20-21 cm / 6¼"-6¾"-7"-7½"-8"-8¼". REMEMBER THE GAUGE! Now insert 6 markers in piece as follows: Work 28-31-33-36-39-41 sts – insert marker-1, work 36-38-42-44-46-50 sts – insert marker-2, work 28-31-33-36-39-41 sts – insert marker-3 (= the side), work 28-31-33-36-39-41 sts – insert marker-4, work 36-38-42-44-46-50 sts – insert marker-5, work 28-31-33-36-39-41 sts – insert marker-6 (= the side). On next round dec 8 sts – SEE DECREASING TIP-1, and repeat the dec on every 10th round a total of 7 times = 128-144-160-176-192-208 sts. When piece measures 57-58-59-60-61-62 cm / 22½"-22¾"-23¼"-23⅝"-24"-24⅜" work 4 rounds garter st on 10-10-12-12-14-14 sts each side (i.e. 5-5-6-6-7-7 sts on each side of marker at the side) with remaining sts in stockinette st as before. On next round bind off the middle 4-4-6-6-8-8 garter sts each side for armhole. Now complete each piece separately. FRONT PIECE: = 60-68-74-82-88-96 sts. Continue in stockinette st back and forth on needle with 3 garter sts each side. At the same time on next row from RS dec 1 st each side – SEE DECREASING TIP-2 – and repeat the dec on every other row another 0-1-2-3-4-5 times = 58-64-68-74-78-84 sts. When piece measures 60-62-64-66-68-70 cm / 23⅝"-24⅜"-25¼"-26"-26¾"-27½" slip sts on a stitch holder. BACK PIECE: Like front piece. YOKE: Use circular needle size 3 mm / US 2or3. Loosely cast on 40-42-44-44-46-48 sts (= sleeve), work in sts from front piece as follows: K 4-4-6-5-7-6, 1 YO, * K 7-8-8-7-7-8, 1 YO *, repeat from *-* until 5-4-6-6-8-6 sts remain, K these, loosely cast on 40-42-44-44-46-48 sts (= sleeve) and work in sts from back piece in the same way as front piece = a total of 212-228-240-256-268-284 sts on needle. P 1 round (P YO into back of loop to avoid a hole), K 1 round, P 1 round, K 1 round, P 1 round, K 1 round and P 1 round. Change to circular needle size 5.5 mm / US 9 and work next round as follows: * K2, 1 YO *, repeat from *-* = 318-342-360-384-402-426 sts. K 1 round (K YO into back of loop to avoid a hole). Work 6 rounds stockinette st. Change to circular needle size 3 mm / US 2or3, K2 tog across the round = 159-171-180-192-201-213 sts. P 1 round, K 1 round, P 1 round, K 1 round, P 1 round, K 1 round and P 1 round. Change to circular needle size 5.5 mm / US 9 and work next round as follows: * K2, 1 YO *, repeat from *-* (in sizes where no of sts doesn’t fit K the last st) = 238-256-270-288-301-319 sts. K 1 round (K YO into back of loop to avoid a hole). Work 6 rounds stockinette st. Change to circular needle size 3 mm / US 2or3, K2 tog across the round (in sizes where no of sts doesn’t fit K the last 3 sts tog) = 119-128-135-144-150-159 sts. P 1 round, K 1 round, P 1 round, K 1 round, P 1 round, K 1 round and P 1 round. Change to circular needle size 5.5 mm / US 9 and work next round as follows: * K2, 1 YO, K1, 1 YO *, repeat from *-* until 2-2-0-0-0-0 sts remain, K these = 197-212-225-240-250-265 sts. K 1 round (K YO into back of loop to avoid a hole). Work 6 rounds stockinette st. Change to circular needle size 3 mm / US 2or3, K2 tog across the round (in sizes where no of sts doesn’t fit K the last 3 sts tog) = 98-106-112-120-125-132 sts. P 1 round, K 1 round, P 1 round, K 1 round, P 1 round, K 1 round and P 1 round and bind off in K sts. |
|
 |
|
Have you finished this pattern?Tag your pictures with #dropspattern #purplehazetunic or submit them to the #dropsfan gallery. Do you need help with this pattern?You'll find 20 tutorial videos, a Comments/Questions area and more by visiting the pattern on garnstudio.com. © 1982-2026 DROPS Design A/S. We reserve all rights. This document, including all its sub-sections, has copyrights. Read more about what you can do with our patterns at the bottom of each pattern on our site. |
|


With over 40 years in knitting and crochet design, DROPS Design offers one of the most extensive collections of free patterns on the internet - translated to 17 languages. As of today we count 325 catalogs and 12298 patterns - 12288 of which are translated into English (US/in).
We work hard to bring you the best knitting and crochet have to offer, inspiration and advice as well as great quality yarns at incredible prices! Would you like to use our patterns for other than personal use? You can read what you are allowed to do in the Copyright text at the bottom of all our patterns. Happy crafting!
Post a comment to pattern DROPS 118-5
We would love to hear what you have to say about this pattern!
If you want to leave a question, please make sure you select the correct category in the form below, to speed up the answering process. Required fields are marked *.