
Popular categories
Looking for a yarn?


Comments / Questions (63)
![]() Mink wrote:
Mink wrote:
Maybe it's me,I'm finding this difficult. how often do you work the shortened rows on the hat, I'm unclear about that, love the hat though.
15.10.2013 - 18:59DROPS Design answered:
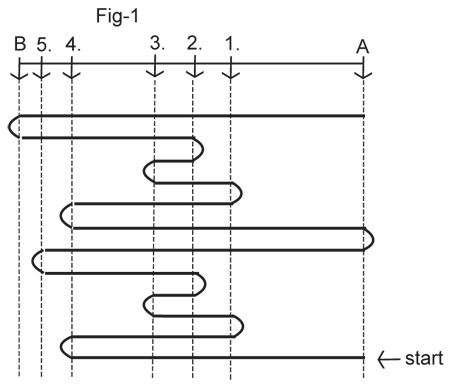
Dear Mrs Mink, shortened rows will be repeated until work measures 48 cm (in 1st size) or 54 cm (in 2nd size) along bottom edge (by A on the chart at the bottom of the page). Happy knitting!
16.10.2013 - 08:44
![]() Segalen wrote:
Segalen wrote:
Ce modèle se coud-il ou reste -t-il ouvert à l'arrière?
23.06.2013 - 14:43DROPS Design answered:
Bonjour Mme Segalen, on l'assemble bord à bord au milieu dos (info manquante rajoutée). Merci, bon tricot!
24.06.2013 - 09:17
![]() PANCALDY wrote:
PANCALDY wrote:
Bonjour, j'ai un peu de mal avec les explications du modèle 115-32. il faut tricoter le bonnet et le beret à part ? avez-vous s'il vous plait un diagramme complet ? merci par avance. ps : vos modèles sont magnifiques !
14.06.2012 - 10:11DROPS Design answered:
Bonjour Pancaldy, il s'agit bien d'une seule pièce, le béret se tricote dans le sens de la longueur, avec des rangs raccourcis pour créer la forme spécifique. Suivez pas à pas les indications et les différents schémas et diagrammes disponibles. Pour toute aide personnalisée, nous vous demandons de bien vouloir vous adresser au magasin où vous avez acheté votre laine, ou sur le forum DROPS. Bon tricot !
14.06.2012 - 14:25
![]() Brunet wrote:
Brunet wrote:
Pourriez-vous me donner les explications pour les rangs raccourcis ? c'est la première fois que j'en fait et j'avoue ne pas comprendre. d'avance, merci mjo
23.02.2012 - 15:12DROPS Design answered:
Bonjour mjo, je vous recommande de consulter notre vidéothèque, vous y trouverez des vidéos qui expliquent comment s'y prendre pour réussir les rangs raccourcis. Bon tricot !
23.02.2012 - 15:21
![]() DROPS Design wrote:
DROPS Design wrote:
Ja.
04.10.2010 - 12:13
![]() Margit Tiefel wrote:
Margit Tiefel wrote:
Diese Bakenmütze entspricht genau meinen Geschmack. Ich werde sie mir auf alle Fälle nachstricken. Übrigens, aus dem Kragen könnte ein toller Pulli in Naturweiß mit Rundpasse von mir entstehen. Darf ich das Muster so umändern wie mir es am allerbesten gefällt?
02.10.2010 - 15:07Faby wrote:
Thank you a lot for ALL your beautiful patterns, there are great designs! Thank you, thank you, I like lot of them, specially the ones that have celtic braids. Very pretty!!!
11.09.2009 - 03:23Paula wrote:
Hola me encanta esta pagina, lo que si lamento es que los que mas me gustan estan en portugues muchas gracias
30.07.2009 - 00:55
![]() Ute wrote:
Ute wrote:
Lach - mir viel das gleiche ein wie Elisabeth: richtig flott!
12.07.2009 - 00:14
![]() Elisabeth wrote:
Elisabeth wrote:
Rigtig flot
02.07.2009 - 20:50
|
|||||||||||||||||||
Twine Love |
|||||||||||||||||||
|
|
|||||||||||||||||||
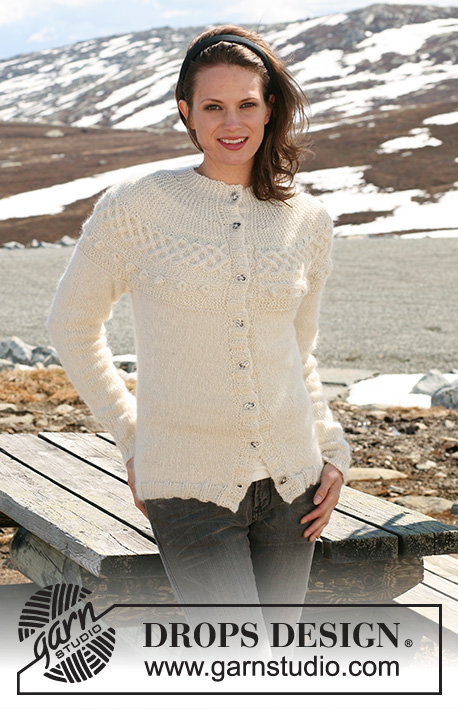
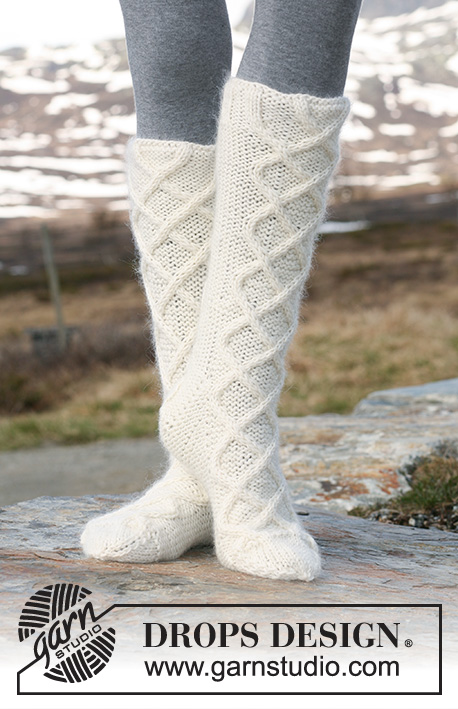
DROPS Basque hat and shoulder wrap with cables knitted from side to side in ”Alpaca” and ”Kid-Silk”.
DROPS 115-32 |
|||||||||||||||||||
|
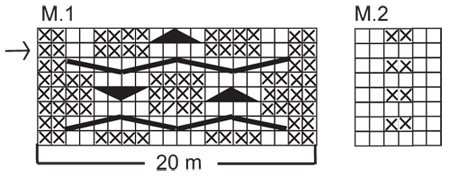
GARTER ST (back and forth on needle): K all rows. PATTERN: See diagram M.1 and M.2 – pattern in diagram is seen from RS and shows 1 pattern repeat (first row = WS). ---------------------------------------------------------- ---------------------------------------------------------- BASQUE HAT: SHORTENED ROWS: To make the hat wider in the middle to create the Basque shape. When turning mid piece, tighten thread before working return row to avoid holes in transitions. Work shortened rows as follows – see Fig-1 (beg by A): * work row to marker-4, turn, work row to marker-1, turn, work row to marker-3, turn, work row to marker-2, turn, work row to marker-5, turn, work all sts on row (= to A), turn, work row to marker-4, turn, work row to marker-1, turn, work row to marker-3, turn, work row to marker-2, turn, work all sts on row (= to B), turn, work all sts on row (= to A) *, repeat from *-*. I.e. 1 repeat = 12 rows in the middle of piece, 4 rows on right side of piece and 2 rows on left side of piece. HAT: Worked back and forth on needle from side to side. Loosely cast on 58-62 sts with 1 thread of each quality on needle size 3.5 mm / US 4. Insert 5 markers in piece as follows from bottom edge: MARKER-1 after 32-32 sts, MARKER-2 after a total of 40-40 sts, MARKER-3 after a total of 46-48 sts, MARKER-4 after a total of 52-56 sts and MARKER- 5 after a total of 56-60 sts, = 2 sts left after the last marker. Work first row as follows (from RS): K12, P2, K2, P4, K4, P4, K2, P2 and K26-30. Work next row as follows (from WS): 26-30 garter sts, M.1 (= 20 sts), M.2 (= 6 sts), 5 stockinette sts and 1 garter st (the bottom 6 sts = folding edge). Continue in pattern like this, AT THE SAME TIME work SHORTENED ROWS – see above. Continue until hat measures approx 48-54 cm / 19"-21¼" along bottom edge (by A) – adjust so that last row is the row marked by an arrow in diagram. Bind off loosely with K over K and P over P. ASSEMBLY: Sew hat tog mid back, edge to edge. Run a thread through sts at the top of hat, tighten thread and fasten. Fold bottom edge towards WS along folding edge and fasten – make sure to have an even seam. ---------------------------------------------------------- SHOULDER WRAP: SHORTENED ROWS: To make the piece wider along bottom edge work shortened rows as follows (beg from RS - when turning mid piece, tighten thread to avoid holes in transitions): * Work 2 rows on all sts, work row to marker-2, turn, work return row, work row to marker-1, turn, work return row *, repeat from *-*. I.e. 1 repeat = 6 rows along bottom edge and 2 rows at the top. SHOULDER WRAP: Worked back and forth on needle from side to side. Loosely cast on 52-56 sts on needle size 3.5 mm / US 4 with 1 thread of each quality. Insert 2 markers in piece as follows (from RS): MARKER-1 after 27-27 sts, MARKER-2 after a total of 37-39 sts = 15-17 sts left at the top after last marker. Let markers follow the piece as you go along. Work SHORTENED ROWS - see above (NOTE: work the bottom 4 sts in 2 threads Alpaca + 1 thread Kid-Silk, i.e. 3 threads, throughout), AT THE SAME TIME work pattern as follows - first row = RS: K4, P2, K2, P4, K4, P4, K2, P2 and K28-32. Work next row as follows from WS: 28-32 garter sts, M.1 (= 20 sts) and 4 garter sts. Continue in pattern like this until piece measures 35-40 cm / 13¾"-15¾" at the top (= approx 105-120 cm / 41⅜"-47¼" along bottom edge, the opposite side) – adjust so that last row is the row marked with an arrow in diagram. NOTE: Make all measurements when piece is lying flat. Bind off loosely with K over K and P over P. Sew shoulder wrap tog mid back, edge to edge. |
|||||||||||||||||||
Diagram explanations |
|||||||||||||||||||
|
|||||||||||||||||||
 |
|||||||||||||||||||
 |
|||||||||||||||||||
Have you finished this pattern?Tag your pictures with #dropspattern or submit them to the #dropsfan gallery. Do you need help with this pattern?You'll find 14 tutorial videos, a Comments/Questions area and more by visiting the pattern on garnstudio.com. © 1982-2026 DROPS Design A/S. We reserve all rights. This document, including all its sub-sections, has copyrights. Read more about what you can do with our patterns at the bottom of each pattern on our site. |
|||||||||||||||||||


With over 40 years in knitting and crochet design, DROPS Design offers one of the most extensive collections of free patterns on the internet - translated to 17 languages. As of today we count 324 catalogs and 12290 patterns - 12280 of which are translated into English (US/in).
We work hard to bring you the best knitting and crochet have to offer, inspiration and advice as well as great quality yarns at incredible prices! Would you like to use our patterns for other than personal use? You can read what you are allowed to do in the Copyright text at the bottom of all our patterns. Happy crafting!
Post a comment to pattern DROPS 115-32
We would love to hear what you have to say about this pattern!
If you want to leave a question, please make sure you select the correct category in the form below, to speed up the answering process. Required fields are marked *.