
Popular categories
Looking for a yarn?


Comments / Questions (31)
![]() Jan wrote:
Jan wrote:
Is there a written pattern for this cushion cover as I can't work to diagrams. Thank you.
28.04.2026 - 16:13DROPS Design answered:
Dear Jan, sorry we only have diagrams for this pattern, but you will find help on how to read diagrams here this might help. Happy knitting!
28.04.2026 - 16:37
![]() Debra wrote:
Debra wrote:
Where can I get this pattern (Cabled Hide Away) in English? Thank you.
18.12.2021 - 15:15DROPS Design answered:
Dear Debra, click on the scroll down menu below the photo to edit language and choose either UK-English (in cm only) or US-English (inches). Happy knitting!
20.12.2021 - 08:38
![]() Lourdes Flores wrote:
Lourdes Flores wrote:
Porque no hacen vídeos ? No todos entendemos los puntos y es mejor en algo súper visual. Las puntadas son hermosas Ojalá lo tomen en cuenta
26.09.2021 - 16:08DROPS Design answered:
Hola Lourdes, hacemos tutoriales en formato vídeo para aquellas partes que consideramos más complicadas de entender en el patrón. Como entiendes, con el número de patrones que tenemos disponibles no es posible realizar un vídeo tutorial paso a paso de cada uno de ellos. También tenemos en nuestra sección de vídeos muchos tutoriales para principiantes para aprender a trabajar los diferentes puntos.
26.09.2021 - 19:49
![]() Hanne Jensen wrote:
Hanne Jensen wrote:
Er det muligt at få et billede af bagsiden af puden.
18.01.2020 - 16:19DROPS Design answered:
Hei Hanne. Det har vi dessverre ikke. Men om du leser oppskrifte og ser på siden av puten der det er strikket M.2, vil du få et godt inntrykk av hvordan baksiden blir. God Fornøyelse!
27.01.2020 - 13:16
![]() Margret Bermes wrote:
Margret Bermes wrote:
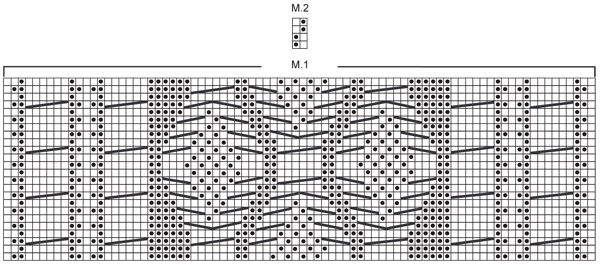
Hallo und guten Abend, Ich denke bei der Anleitung ist bezüglich der Reihenfolge ein Fehler unterlaufen. Sie sagen in dem Diagramm zeigen sich hin- und Rückreihe.. das ergibt aber keinen Sinn. Es sind nur die Hinreihen gezeigt - wie allgemein üblich. Und dieRückreihe muss dann so wie die Maschen liegen. Freundlichen Gruß Margret Bermes Otto Stange Str. 15, 51377 Leverkusen 5
01.04.2018 - 00:50
![]() Vaidehi wrote:
Vaidehi wrote:
The pattern says to Knit two rows (garter st) and on same time the last row add 24 sts. Can you confirm If I understand this correct: RW1: Knit RW2: knit 16sts, k58 and add 24sts, K16 How to add 24 sts? is it every 2nd st and do I do YO or KFB since its on the WS? The Charts M.1 and M.2 are both to be read bottom right side to top in a zigzag flow right? I am doing cables for the 1st time I dont want to mess with it. Thanks Regards
13.01.2018 - 18:31DROPS Design answered:
Dear Vaidehi, the 24 stitches "added" in the second row of the garter stitch, increasing the stitches, by making evenly distributed yarnovers. In teh next row, the yarnovers are knitted or purled (according to the pattern) twisted (so there is no holes left in their places. Yesm the patterns are read in zig zag fashion. Happy Knitting!
13.01.2018 - 21:48
![]() Catrin wrote:
Catrin wrote:
Är det OK att ta inspiration av flätmönstret, komponera ihop ett eget mönster på en tröja och dela online?
01.05.2017 - 10:31DROPS Design answered:
Hej Catrin, ja det må du gerne for privat-brug, så skriver du bare i hvilken DROPS opskrift du har fundet inspiration :)
03.05.2017 - 13:32Christine wrote:
Doesn't one need to increase 24 after the fold so as to have back & front the same size? Thanks.
26.06.2016 - 16:55DROPS Design answered:
Dear Christine, after the fold you are working in M.2, ie different pattern the front side of cushion, and there is then no need to inc sts evenly (cables tighten pieces in width, that's why you inc before working M.1 and dec before fold). Happy knitting!
27.06.2016 - 10:00Marta Baranowska wrote:
I'm not sure, but I think there is small mistake in the pattern and in place where is: slip 1 st on cable needle behind piece, K3, K1 from cable needle should be instead slip 1 st on cable needle behind piece, K3, P1 from cable needle. Am I correct?
14.12.2015 - 13:08DROPS Design answered:
Wykonałam schemat i jest w porządku, czyli mamy: 'slip 1 st on cable needle behind piece, K3, K1'. POWODZENIA
14.12.2015 - 14:54Marta Baranowska wrote:
What is the best was to increase in that pattern? YO of other technique? Where the new stitches should be included?
13.12.2015 - 09:58DROPS Design answered:
Dear Mrs Baranowska, you can choose your favorite technique to inc (YO worked into back of loop on next row, Knit 2 sts in 1 st (Kfbl)...). You first K 2 rows, inc are done evenly on 2nd row = from WS. Read more about inc evenly here. Happy knitting!
14.12.2015 - 10:10
|
||||||||||||||||
Cabled Hide Away#cabledhideawaypillow |
||||||||||||||||
 |
 |
|||||||||||||||
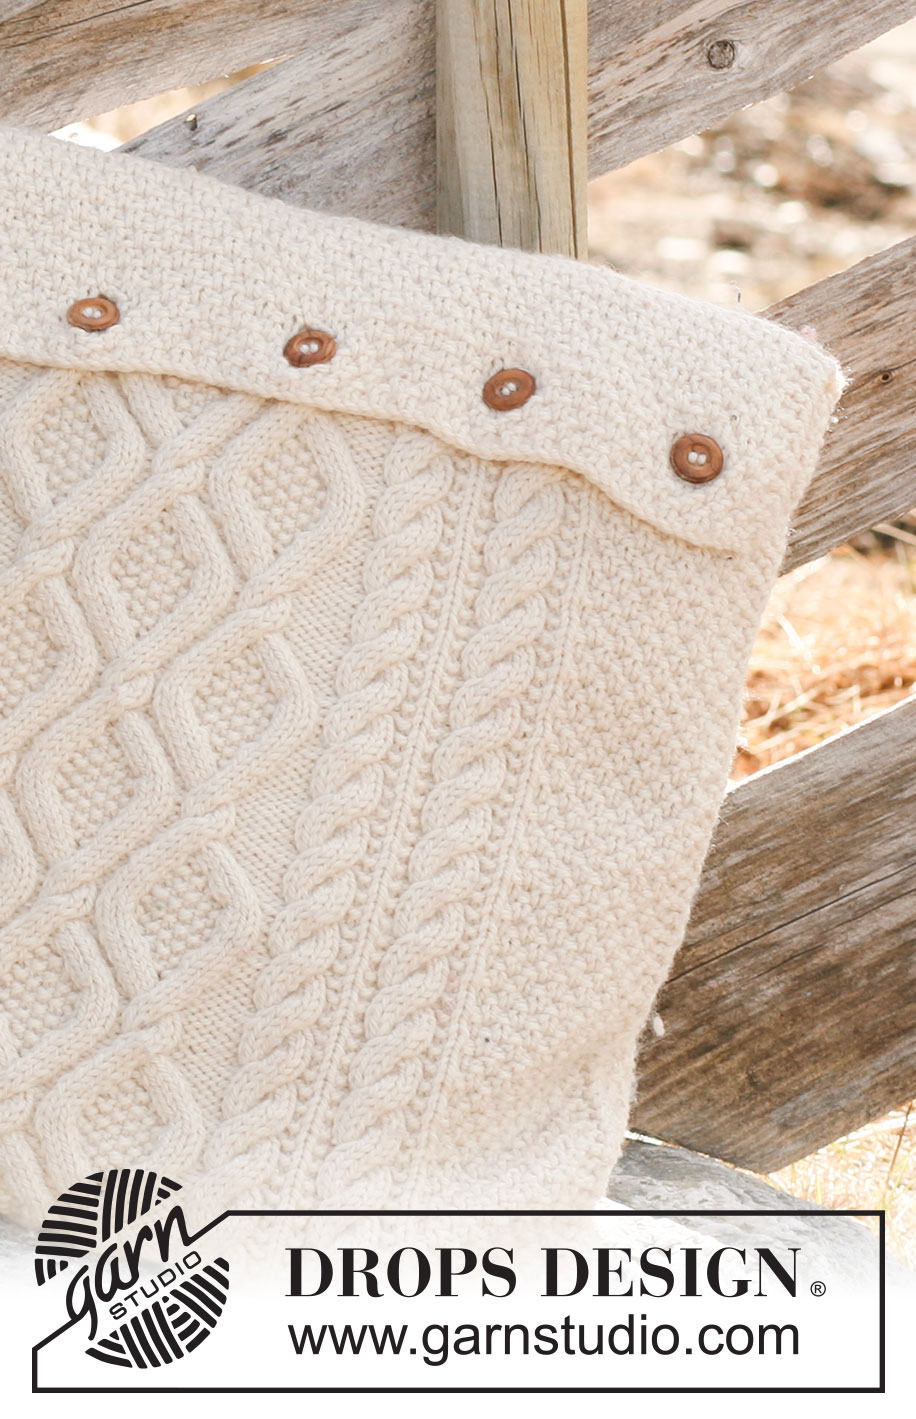
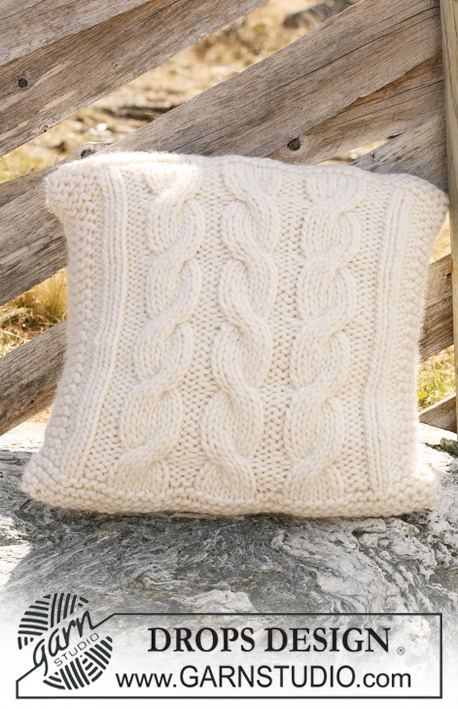
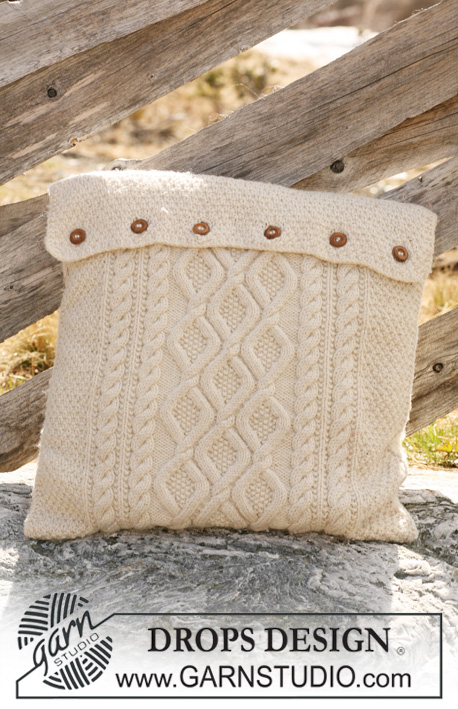
Knitted DROPS cushion cover with cables in ”Alaska”.
DROPS 117-50 |
||||||||||||||||
|
GARTER ST (back and forth on needle): K all rows. PATTERN: See diagrams M.1 and M.2. Diagrams show the pattern from RS. -------------------------------------------------------- CUSHION COVER: Worked back and forth on needle. Cast on 86 sts on needle size 5 mm / US 8 with Alaska and work 2 rows garter st, AT THE SAME TIME on last row inc 24 sts evenly on the middle 58 sts = 110 sts. Work next row as follows: 2 edge sts in garter st, M.2 on the next 12 sts, M.1 (= 82 sts), M.2 on the next 12 sts and finish with 2 edge sts in garter st. Continue in pattern like this. REMEMBER THE GAUGE! When piece measures 48 cm / 19" work 2 rows garter st on all sts (= folding edge), AT THE SAME TIME on first row dec 24 sts evenly on the middle 82 sts = 86 sts. Now continue in M.2 with 2 edge sts in garter st each side. When piece measures 96 cm / 37¾" insert a marker in piece, and when piece measures 102 cm / 40" make 6 buttonholes as follows: 2 garter sts, M.2 on the next 5 sts, bind off 2 sts for buttonhole, * work M.2 on the next 12 sts, bind off 2 sts for buttonhole *, repeat from *-* a total of 5 times, and finish with M.2 on the next 5 sts and 2 garter sts. Cast on 2 new sts over bind off sts on next row. Continue in M.2 with 2 garter sts each side until piece measures 104 cm / 41". Work 2 rows garter st on all sts and bind off. Piece measures approx 105 cm / 41⅜". ASSEMBLY: Fold piece by the garter st rows at 48 cm / 19" and by marker so that buttonholes are on the outside of cover. Sew side seams from RS through all layers. Sew on buttons. |
||||||||||||||||
Diagram explanations |
||||||||||||||||
|
||||||||||||||||
 |
||||||||||||||||
Have you finished this pattern?Tag your pictures with #dropspattern #cabledhideawaypillow or submit them to the #dropsfan gallery. Do you need help with this pattern?You'll find 9 tutorial videos, a Comments/Questions area and more by visiting the pattern on garnstudio.com. © 1982-2026 DROPS Design A/S. We reserve all rights. This document, including all its sub-sections, has copyrights. Read more about what you can do with our patterns at the bottom of each pattern on our site. |
||||||||||||||||


With over 40 years in knitting and crochet design, DROPS Design offers one of the most extensive collections of free patterns on the internet - translated to 17 languages. As of today we count 324 catalogs and 12290 patterns - 12280 of which are translated into English (US/in).
We work hard to bring you the best knitting and crochet have to offer, inspiration and advice as well as great quality yarns at incredible prices! Would you like to use our patterns for other than personal use? You can read what you are allowed to do in the Copyright text at the bottom of all our patterns. Happy crafting!
Post a comment to pattern DROPS 117-50
We would love to hear what you have to say about this pattern!
If you want to leave a question, please make sure you select the correct category in the form below, to speed up the answering process. Required fields are marked *.