
Populaarsed kategooriad
Otsid lõnga?


Kommentaarid / Küsimused (30)
![]() Debra kirjutas:
Debra kirjutas:
Where can I get this pattern (Cabled Hide Away) in English? Thank you.
18.12.2021 - 15:15DROPS Design vastas:
Dear Debra, click on the scroll down menu below the photo to edit language and choose either UK-English (in cm only) or US-English (inches). Happy knitting!
20.12.2021 - 08:38
![]() Lourdes Flores kirjutas:
Lourdes Flores kirjutas:
Porque no hacen vídeos ? No todos entendemos los puntos y es mejor en algo súper visual. Las puntadas son hermosas Ojalá lo tomen en cuenta
26.09.2021 - 16:08DROPS Design vastas:
Hola Lourdes, hacemos tutoriales en formato vídeo para aquellas partes que consideramos más complicadas de entender en el patrón. Como entiendes, con el número de patrones que tenemos disponibles no es posible realizar un vídeo tutorial paso a paso de cada uno de ellos. También tenemos en nuestra sección de vídeos muchos tutoriales para principiantes para aprender a trabajar los diferentes puntos.
26.09.2021 - 19:49
![]() Hanne Jensen kirjutas:
Hanne Jensen kirjutas:
Er det muligt at få et billede af bagsiden af puden.
18.01.2020 - 16:19DROPS Design vastas:
Hei Hanne. Det har vi dessverre ikke. Men om du leser oppskrifte og ser på siden av puten der det er strikket M.2, vil du få et godt inntrykk av hvordan baksiden blir. God Fornøyelse!
27.01.2020 - 13:16
![]() Margret Bermes kirjutas:
Margret Bermes kirjutas:
Hallo und guten Abend, Ich denke bei der Anleitung ist bezüglich der Reihenfolge ein Fehler unterlaufen. Sie sagen in dem Diagramm zeigen sich hin- und Rückreihe.. das ergibt aber keinen Sinn. Es sind nur die Hinreihen gezeigt - wie allgemein üblich. Und dieRückreihe muss dann so wie die Maschen liegen. Freundlichen Gruß Margret Bermes Otto Stange Str. 15, 51377 Leverkusen 5
01.04.2018 - 00:50
![]() Vaidehi kirjutas:
Vaidehi kirjutas:
The pattern says to Knit two rows (garter st) and on same time the last row add 24 sts. Can you confirm If I understand this correct: RW1: Knit RW2: knit 16sts, k58 and add 24sts, K16 How to add 24 sts? is it every 2nd st and do I do YO or KFB since its on the WS? The Charts M.1 and M.2 are both to be read bottom right side to top in a zigzag flow right? I am doing cables for the 1st time I dont want to mess with it. Thanks Regards
13.01.2018 - 18:31DROPS Design vastas:
Dear Vaidehi, the 24 stitches "added" in the second row of the garter stitch, increasing the stitches, by making evenly distributed yarnovers. In teh next row, the yarnovers are knitted or purled (according to the pattern) twisted (so there is no holes left in their places. Yesm the patterns are read in zig zag fashion. Happy Knitting!
13.01.2018 - 21:48
![]() Catrin kirjutas:
Catrin kirjutas:
Är det OK att ta inspiration av flätmönstret, komponera ihop ett eget mönster på en tröja och dela online?
01.05.2017 - 10:31DROPS Design vastas:
Hej Catrin, ja det må du gerne for privat-brug, så skriver du bare i hvilken DROPS opskrift du har fundet inspiration :)
03.05.2017 - 13:32Christine kirjutas:
Doesn't one need to increase 24 after the fold so as to have back & front the same size? Thanks.
26.06.2016 - 16:55DROPS Design vastas:
Dear Christine, after the fold you are working in M.2, ie different pattern the front side of cushion, and there is then no need to inc sts evenly (cables tighten pieces in width, that's why you inc before working M.1 and dec before fold). Happy knitting!
27.06.2016 - 10:00Marta Baranowska kirjutas:
I'm not sure, but I think there is small mistake in the pattern and in place where is: slip 1 st on cable needle behind piece, K3, K1 from cable needle should be instead slip 1 st on cable needle behind piece, K3, P1 from cable needle. Am I correct?
14.12.2015 - 13:08DROPS Design vastas:
Wykonałam schemat i jest w porządku, czyli mamy: 'slip 1 st on cable needle behind piece, K3, K1'. POWODZENIA
14.12.2015 - 14:54Marta Baranowska kirjutas:
What is the best was to increase in that pattern? YO of other technique? Where the new stitches should be included?
13.12.2015 - 09:58DROPS Design vastas:
Dear Mrs Baranowska, you can choose your favorite technique to inc (YO worked into back of loop on next row, Knit 2 sts in 1 st (Kfbl)...). You first K 2 rows, inc are done evenly on 2nd row = from WS. Read more about inc evenly here. Happy knitting!
14.12.2015 - 10:10
![]() Roelanda Bonder kirjutas:
Roelanda Bonder kirjutas:
Ik snap de afmeting niet zo goed, want moet ik na de 1e 48 cm al minderen? dan krijg ik toch een kleiner achterpand en komt het patroon toch niet uit?
14.02.2015 - 12:09DROPS Design vastas:
Hoi Roelanda. Bij 48 cm brei je verder volgens een ander patroon (M.2). De st van dit patroon trekken zich minder samen dan de st van het kabelpatroon. Dus het komt goed. Veel breiplezier verder.
17.02.2015 - 15:54
|
||||||||||||||||
Cabled Hide Away#cabledhideawaypillow |
||||||||||||||||
|
|
||||||||||||||||
Kootud DROPSi palmikutega padjakate lõngast ”Alaska”.
DROPS 117-50 |
||||||||||||||||
|
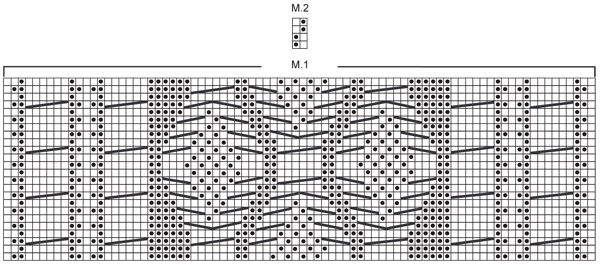
RIPSKUDE (edasi-tagasi kududes): koo kõik read parempidi. MUSTER Vaata skeeme M1 ja M2. Muster on vaadatuna töö paremalt poolt (PP) ja näitab iga rida. ---------------------------- PADJAKATE Kootakse edasi-tagasi. Loo 86 silmust ja koo 2 rida ripskoes, teisel real kasvata keskmise 58 silmuse jooksul võrdsete vahedega 24 s = 110 s. Järgmine rida: koo 2 ääresilmust ripskoes, muster M2 (= 12 silmust), M1 (= 82 s), M2 (= 12 silmust), 2 ääresilmust ripskoes. Jälgi kudumistihedust! Koo sedasi mustrit, kuni kate on 48 cm kõrgune. Koo 2 rida ripskoes (= murdejoon), esimesel neist kahanda keskmise 82 silmuse jooksul võrdsete vahedega 24 silmust = 86 s. Edasi koo skeemi M2, kahe ripskoes ääresilmusega kummaski servas, kuni töö on kokku 96 cm pikkune. Märgista viimane rida ja jätka kudumist niimoodi, kuni töö on 102 cm pikkune. Nüüd tee 6 nööpauku: 2 s ripskoes, koo skeemi M2 järgmisel viiel silmusel, koo maha 2 s, * koo skeemi M2 järgmisel 12 silmusel, koo maha 2 silmust*, korda alates * kuni * kokku 5 korda; lõpeta M2-ga järgmisel viiel silmusel ja kahe ripskoes silmusega rea lõpus. Tagasirida koo nagu ikka pahempidi luues mahakootud silmuste asemele 2 uut silmust. Jätka skeemi M2 kudumist kahe ripskoes ääresilmusega kummaski servas, kuni töö on kokku 104 cm pikkune. Koo 2 rida ripskoes ja koo siis silmused maha. Töö on nüüd kokku umbes 105 cm pikkune. ÜHENDAMINE Murra töö 48 cm juures olevaid ripsiridu pidi ja märgistatud ridade juurest kokku nii, et nööpaugud jäävad väljapoole. Õmble servad töö paremalt poolt välimisi aasasid kasutades läbi kõikide kihtide kokku. Õmble nööbid õigetesse kohtadesse. |
||||||||||||||||
Skeemi seletused |
||||||||||||||||
|
||||||||||||||||
|
||||||||||||||||
Kas oled teinud seda mustrit?Lisa oma piltidele viide #dropspattern #cabledhideawaypillow või saada link projektile meie #dropsfan galeriisse. Vajad abi selle mustriga?Garnstudio.com kodulehel on 10 õppevideot, küsimuste/vastuste osa ja muudki. © 1982-2025 DROPS Design A/S. Kõik õigused kaitstud. See dokument, ning selle alajaotused on kaitsud autoriõigustega. Loe rohkem, mida meie mustritega võib teha, iga mustrilehe alt meie kodulehel. |
||||||||||||||||


Tegeledes üle 40 aasta kudumise ja heegeldamise disainidega, pakub DROPS Design ühte suurimat tasuta mustrite kollektsiooni internetis - tõlgituna 17 keelde. Tänaseks on meil 314 kataloogi ja 11822 mustrit - millest 8972 on tõlgitud Eesti keelde.
Me anname endast parima, et tuua teieni kõike mida kudumine ja heegeldamine võib pakkuda - inspiratsiooni, nõuandeid ning ka kvaliteetseid lõngu parima hinnaga! Soovid kasutada mustreid muukski, kui ainult oma tarbeks? Loe infot meie Copyright osas iga lehekülje all. Rõõmsat loomist!
Jäta kommentaar mustrile DROPS 117-50
Ootame kommentaare selle mustri kohta!
Kui soovid midagi küsida, siis kiiremaks vastuse saamiseks veendu, et valid õige kategooria alloleval formil. Vajaliku väljad *.