
Popular categories
Looking for a yarn?


Comments / Questions (36)
![]() Emma wrote:
Emma wrote:
Jag är nybörjare men vill så gärna göra den här! Jag ser att ärmarna ska stickas med strumpstickor. Finns det något sätt att sticka ärmarna på vanliga stickor eller rundstickor istället?
16.07.2009 - 11:23
![]() Martina Herold wrote:
Martina Herold wrote:
Für diese Jacke brauche ich unbedingt die Anleitung. Sie ist super schön!!!!
12.07.2009 - 22:33
![]() Iris wrote:
Iris wrote:
Die ist wunderschön!!!!
25.06.2009 - 22:47
![]() Gloria wrote:
Gloria wrote:
Sehr schön!!
25.06.2009 - 15:34
![]() Lena wrote:
Lena wrote:
Jeg syns denne ser superdeilig ut å ha på seg på sure høstdager som ytterjakke. Deilig med en knall farge som kan lyse opp i høstmørket! Denne skal jeg strikke meg :)
23.06.2009 - 17:13
![]() Sara wrote:
Sara wrote:
Nei, nei, nei. Vi er vel kvinner, trenger ikke kle oss i sekker
21.06.2009 - 21:52
![]() Zala wrote:
Zala wrote:
För stark färg, ser ut att vara för stor.
20.06.2009 - 11:38
![]() Helena wrote:
Helena wrote:
Aivan ihana villatakki, joka pitää toteuttaa.
16.06.2009 - 19:45
![]() Eva Sundby wrote:
Eva Sundby wrote:
En usedvanlig lekker og stilfull jakke, som strikket i Eskimo blir deilig å varm
15.06.2009 - 23:32
![]() Margit wrote:
Margit wrote:
Lidt for stor, man ser ikke pigen, kun trøjen
12.06.2009 - 15:06
|
|||||||
Welcome to the North#welcometothenorthjacket |
|||||||
 |
 |
||||||
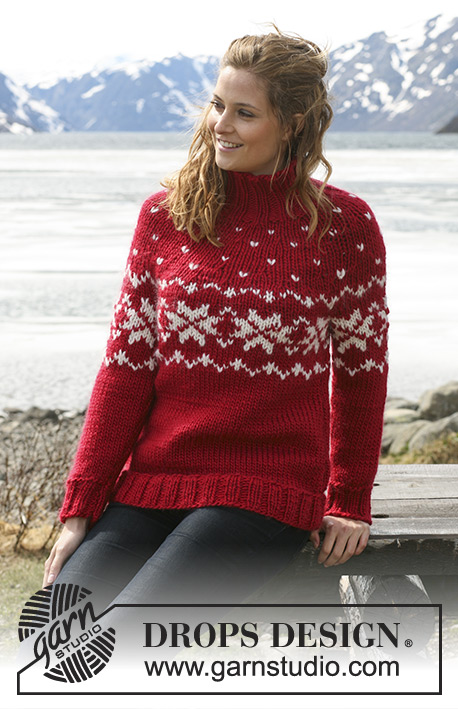
Long DROPS jacket in ”Snow” with Norwegian pattern and hood. Size S to XXXL.
DROPS 114-29 |
|||||||
|
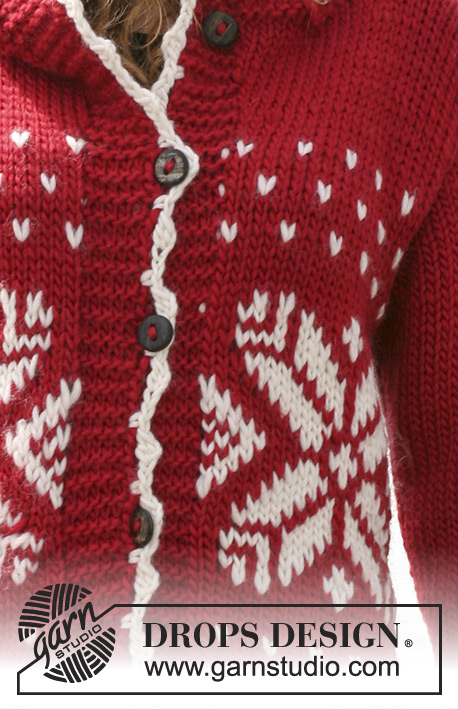
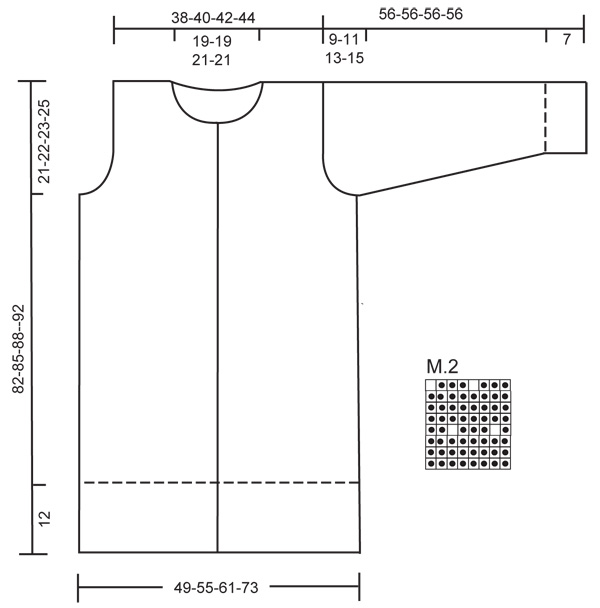
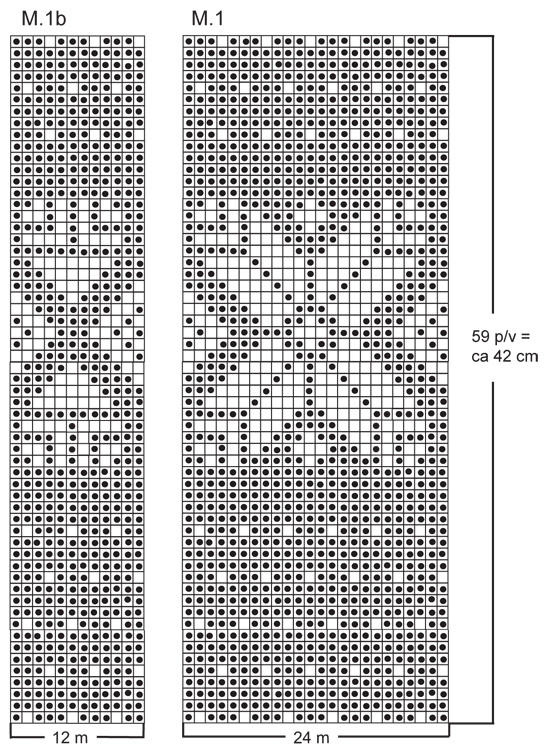
GARTER ST (back and forth on needle): K all rows. PATTERN: See diagram M.1 and M.2 – diagram shows 1 pattern repeat (M.1b is only for mid back in size L). The entire pattern is worked in stockinette st. ---------------------------------------------------------- ---------------------------------------------------------- BODY PIECE: Worked back and forth on circular needle from mid front. Cast on 134-150-166-198 sts (includes 6 front band sts each side) on needle size 7 mm / US 10½ with red. Continue as follows (first row = RS): 6 front band sts in GARTER ST – see above, * K2, P2 * repeat from *-* and finish with K2, and 6 front band sts in garter st. When rib measures approx 12 cm / 4¾" K 1 row from RS with 6 garter sts each side, AT THE SAME TIME dec 25-29-33-41 sts evenly = 109-121-133-157 sts. Change to circular needle size 8 mm / US 11 and continue in stockinette st with 6 garter sts each side. REMEMBER THE GAUGE! When piece measures 23-25-27-29 cm / 9"-9¾"-10⅝"-11⅜" work next row from RS as follows: SIZE S/M, XL and XXL/XXXL: 6 garter sts (worked in red throughout), 4-5-6 repeats of M.1, work first st in M.1 to make pattern identical each side mid front, and finish with 6 red garter sts. SIZE L: 6 garter sts (worked in red throughout), 2 repeats of M.1, 1 repeat of M.1b (= mid back), 2 repeats of M.1, work first st in M.1 to make pattern identical each side mid front, and finish with 6 red garter sts. ALL SIZES: When piece measures 61-63-65-67 cm / 24"-24¾"-25½"-26⅜" (approx 5-6 rows remain of M.1) work next rows as follows from RS: 25-28-31-37 sts (= right front piece), bind off 8 sts for armhole, 43-49-55-67 sts (= back piece), bind off 8 sts for armhole, 25-28-31-37 sts (= left front piece). Complete each piece separately. LEFT FRONT PIECE: = 25-28-31-37 sts. Continue and complete M.1, then complete piece in red. AT THE SAME TIME bind off for armhole at the beg of every row from the side: 2 sts 0-1-2-4 times and 1 st 2-2-2-3 times = 23-24-25-26 sts. When piece measures 76-79-82-86 cm / 30"-31"-32¼"-33⅞" slip the 8-8-9-9 sts towards mid front on a stitch holder for neck. Bind off to shape the neckline at the beg of every row from mid front: 2 sts 1 time and 1 st 3 times = 10-11-11-12 sts left on shoulder. Bind off when piece measures 82-85-88-92 cm / 32¼"-33½"-34⅝"-36¼". RIGHT FRONT PIECE: Like left front piece, but mirrored. BACK PIECE: = 43-49-55-67 sts. Continue and complete M.1, then complete piece in red. AT THE SAME TIME bind off for armhole each side as described for front piece = 39-41-43-45 sts left on needle. When piece measures 80-83-86-90 cm / 31½"-32¾"-33⅞"-35½" bind off the middle 19-19-21-21 sts for neck = 10-11-11-12 sts left on each shoulder. Complete each shoulder separately and bind off when piece measures 82-85-88-92 cm / 32¼"-33½"-34⅝"-36¼". SLEEVE: Worked in the round on double pointed needles. Cast on 32-32-36-36 sts on double pointed needles size 7 mm / US 10½ with red. Work rib K2/P2 for 7 cm / 2¾". Change to double pointed needles size 8 mm / US 11. K 1 round, AT THE SAME TIME dec 8-4-8-4 sts evenly = 24-28-28-32 sts. Insert a marker at beg of round and continue in M.2. After M.2 complete piece in red stockinette st. AT THE SAME TIME when piece measures 14 cm / 5½" inc 1 st each side of marker, and repeat the inc on every 4-4.5-3.5-3.5 cm / 1½"-1¾"-1¼"-1¼" a total of 8-7-8-8 times = 40-42-44-48 sts. When piece measures 47-45-43-41 cm / 18½"-17¾"-17"-16⅛" (less for the larger sizes because of longer sleeve cap and wider shoulder) bind off 6 sts mid under sleeve and complete piece back and forth on needle. Bind off for sleeve cap each side at the beg of every row: 2 sts 1 time, 1 st 2-3-4-6 times, then 2 sts 1 time and 3 sts 1 time. Bind off remaining sts, piece measures approx 55 cm / 21⅝" for all sizes. ASSEMBLY: Sew shoulder seams. HOOD: Pick up 50 to 60 sts round the neck (includes sts on stitch holders at front) on circular needle size 8 mm / US 11 with red. K 1 row from WS, K 1 rows from RS, AT THE SAME TIME inc evenly to 60-64-68-72 sts. Work stockinette st with 6 garter sts each side until hood measures approx 32 cm / 12½", bind off. Sew hood tog at the top. FURTHER ASSEMBLY: Set in sleeves. CROCHET BORDER: Crochet a border with crochet hook size 8 mm / L/11 and off-white up along right front band, round the hood and down along left front band as follows: 1 sc in first st, * 4 ch, 1 dc in first ch (= 1 picot), skip 2-2.5 cm / ¾"-⅞", 1 sc in next st *, repeat from *-*. BUTTONS: Sew buttons to left front band – place the top button at beg of neckline and place the remaining buttons with approx 10-12 cm / 4"-4¾" between each. Use the picots on right front band as buttonholes. |
|||||||
Diagram explanations |
|||||||
|
|||||||
 |
|||||||
 |
|||||||
Have you finished this pattern?Tag your pictures with #dropspattern #welcometothenorthjacket or submit them to the #dropsfan gallery. Do you need help with this pattern?You'll find 21 tutorial videos, a Comments/Questions area and more by visiting the pattern on garnstudio.com. © 1982-2026 DROPS Design A/S. We reserve all rights. This document, including all its sub-sections, has copyrights. Read more about what you can do with our patterns at the bottom of each pattern on our site. |
|||||||


With over 40 years in knitting and crochet design, DROPS Design offers one of the most extensive collections of free patterns on the internet - translated to 17 languages. As of today we count 324 catalogs and 12290 patterns - 12280 of which are translated into English (US/in).
We work hard to bring you the best knitting and crochet have to offer, inspiration and advice as well as great quality yarns at incredible prices! Would you like to use our patterns for other than personal use? You can read what you are allowed to do in the Copyright text at the bottom of all our patterns. Happy crafting!
Post a comment to pattern DROPS 114-29
We would love to hear what you have to say about this pattern!
If you want to leave a question, please make sure you select the correct category in the form below, to speed up the answering process. Required fields are marked *.