
Popular categories
Looking for a yarn?


Comments / Questions (238)
![]() D. Rasmussen wrote:
D. Rasmussen wrote:
Flot og utraditionelt design. Ville gerne lave denne jakke
07.07.2007 - 20:44
![]() Tove wrote:
Tove wrote:
Håber I snart kommer med det mønster. Lige noget jeg kunne tænke mig at strikke
05.07.2007 - 09:49Gitte wrote:
Prachtig vest.
04.07.2007 - 10:38
![]() Torhild wrote:
Torhild wrote:
Jakken er flott, men den blir upraktisk å ha på seg,den glir bare ned. har strikket og heklet liknenede men det fungerer dårlig i bruk,
03.07.2007 - 12:08
![]() Marieke wrote:
Marieke wrote:
Een prachtig patroon. Ik kan niet wachten tot het beschikbaar komt. Moet ook erg leuk zijn om te breien.
02.07.2007 - 12:38
![]() Marlemio wrote:
Marlemio wrote:
Absolut genial! Ich liebe die "etwas andere" Strickerei. Mehr davon!!!
27.06.2007 - 07:04
![]() Sanna wrote:
Sanna wrote:
Love it, I put it on my "to-do-list".
20.06.2007 - 20:02
![]() Annie wrote:
Annie wrote:
Dafür würde ich mir glatt das Originalgarn leisten!!
20.06.2007 - 08:31
![]() Ulrika wrote:
Ulrika wrote:
Annorlunda, ett blickfång från alla håll
19.06.2007 - 10:59
![]() Steffi wrote:
Steffi wrote:
Ein Traum, das Muster muss ich haben.
18.06.2007 - 16:30
|
||||||||||||||||
Blue Moon |
||||||||||||||||
 |
 |
|||||||||||||||
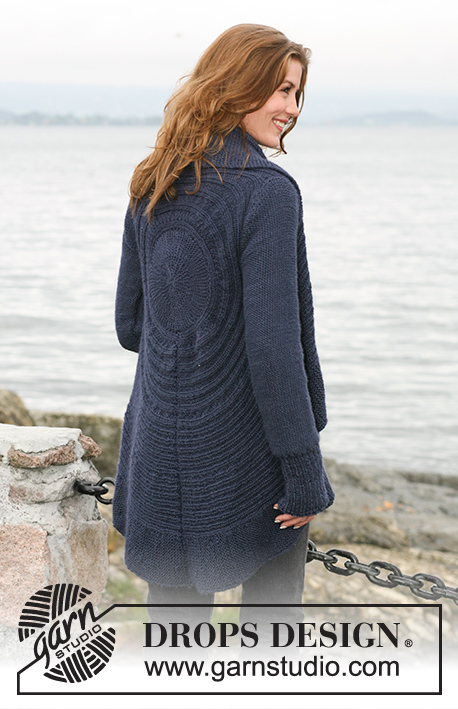
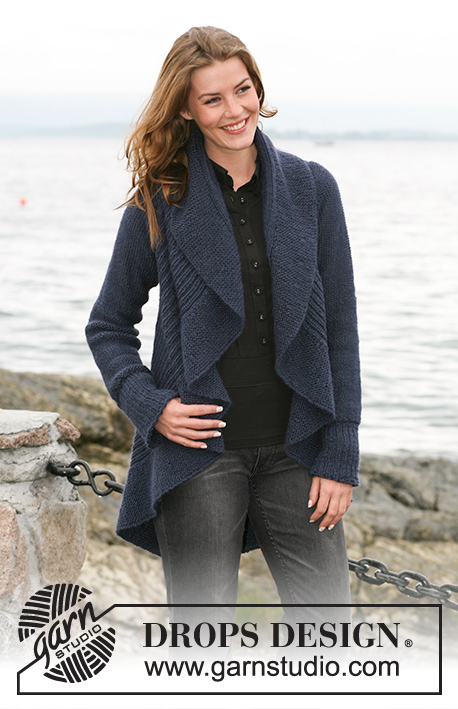
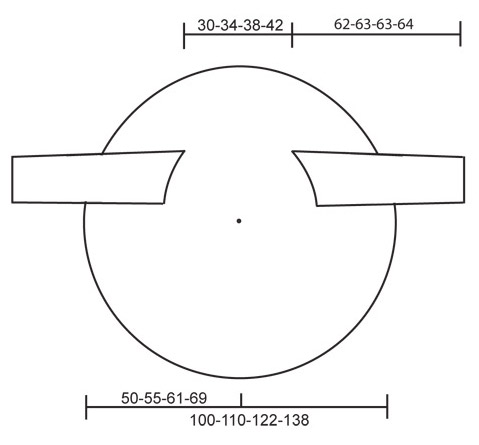
DROPS circular jacket in "SIlke-Alpaca" or ”Air” with texture pattern. Size: S to XXXL
DROPS 102-6 |
||||||||||||||||
|
Knitting gauge: 17 sts x 22 rows stockinette sts = 10 x 10 cm [4" x 4"] Pattern: See diagram M.1. Diagrams are seen from RS. NOTE: Each size has own diagram. Short rows: Work short rows to ensure circular shape of piece, as follows: 1st / 2nd row: Knit 102-112-124-140 sts, turn piece and knit back. 3rd / 4th row: Knit back and forth over 18-16-20-20 first sts on row (these sts = outermost on circle) – read knitting tip 1 below. Repeat 1st to 4th rows, but reduce stitch number by 2 sts on every 1st/2nd row before turning piece – repeat this 10-10-12-12 times in total, then reduce sts number knitted by 4 sts before piece is turned – repeat this 6-9-8-12 times in total and from this point reduce sts number by 8 sts before piece is turned – repeat 5-5-6-6 times in total. Remaining are 18-16-20-20 outermost sts of circle. Start again from beginning over all sts. – read Knitting tip 2 below. Knitting tip 1: When turning piece slip the first st as if to knit and tighten yarn before continuing knitting. This is done to avoid holes when turning. This does not applies to innermost 20-20-24-24 sts of circle – when piece is turned knit all sts as normal. Knitting tip 2: On row where all sts are knit, P 20-20-24-24 innermost sts in circle (seen from RS). Then continue as before with chart M.1. Measuring tip: All measurements on circle are done with piece lying flat. Do not measure across! Measurements follow curve to 63rd - 69th -73rd - 81st sts. CIRCLE Knit piece back and forth on needle to make room for all sts. Cast on 102-112-124-140 sts on circular needle size 4.5 mm [US 7] with Air. Insert 1 marking thread or stitch marker after 63-69-73-81 sts, make all measurements from this point. Knit chart M.1 (see diagram for your size) from right to left (i.e. from outside towards inside on circle)1st row = RS. At the same time as chart M.1 knit Short rows – see explanation above – to make circular shape. When piece measures 37-40-49-57 cm [14½"-15¾"-19¼"-22½"] from marking thread or stitch marker – read measuring tip – knit armholes. Armhole: Slip outermost 63-69-73-81 sts onto an extra needle size 4.5 mm [US 7] (circular needle to make room for all sts). Continuing, bind off next 2 sts (= armhole). Insert 1 marking thread or stitch marker between 2 bound off sts. Leave remaining sts on needle. Continuing, knit 2 parts (sts before and after armhole) separately, but knit them at the same time on separate needles with separate balls of yarn. This is done so the short rows are correct on both sides of armhole. Continue with pattern and short rows as earlier. When armhole measures 18-21-23-25 cm [7"-8¼"-9"-9¾"] cast on 2 new sts over armhole(i.e. between the 2 parts). Continuing, slip all sts onto one needle again = 102-112-124-140 sts. Insert 1 marking thread or stitch marker after 63-69-73-81 sts. Continuing, measure piece from this point. Now knit chart M.1 and short rows on all sts. Continue like this until piece measures approx 15-17-19-21 cm [6"-6 ¾"-7½"-8 ¼"], this should be a ½ circle. Continue until piece measures approx 30-34-38-42 cm [11 ¾"-13⅜"-15"-16½"] from marking thread – read measuring tip. Now make armholes in same way. When all sts are back on one needle again insert 1 marking thread or stitch marker after 63-69-73-81 sts. Continue measuring from here. Continue with chart M.1 and short rows until piece measures approx 37-40-49-57 cm [14½"-15 ¾"-19 ¼"-22½"] from marking thread or stitch markers (adjust to 1 whole pattern repeat with short rows). Bind off loosely. Sleeve: Knit piece back and forth on circular needles. Cast on 56-59-65-68 sts (incl 1 front edge sts on each side) on needles size 4.5 mm [US 7] with Air. P1 row from WS. Continue with Rib K2/P1 and 1 edge sts on each side. When Rib measures 13-13-14-14 cm [5⅛"-5⅛"-5½"-5½"] K 1 row from WS at the same time dec 10-11-13-14 sts evenly = 46-48-52-54 sts. Continue in stockinette sts with WS out until complete measurement. When piece measures 16 cm [6¼"] inc 1 sts on each side on every 9 -4.5 -3.5 -3 cm [3½"-1 ¾"-1 ¼"-1⅛"] 5-9-11-13 times in total = 56-66-74-80 sts. When piece measures 56 cm [22"] bind off top shape sleeve top on each side on every other row: 4 sts 1-2-2-2 times. Continuing, bind off 2 sts on each side until piece measures approx 61-62-62-63 cm [24"-24⅜"-24⅜"-24 ¾"]. Then bind off 4 sts 1 time on each side. Piece measures approx 62-63-63-64 cm [24⅜"-24 ¾"-24 ¾"-25 ¼"]. Bind off remaining sts. Assembly: Sew circle tog in outermost edge of cast on sts and bind off edge. Sew in sleeves so seams under sleeve meet at middle of marking thread or stitch marker placed at bottom of armhole and middle of sleeve top meet marking thread or stitch marker placed on top of armhole. Sew sleeve seams. |
||||||||||||||||
Diagram explanations |
||||||||||||||||
|
||||||||||||||||
 |
||||||||||||||||
 |
||||||||||||||||
Have you finished this pattern?Tag your pictures with #dropspattern or submit them to the #dropsfan gallery. Do you need help with this pattern?You'll find 14 tutorial videos, a Comments/Questions area and more by visiting the pattern on garnstudio.com. © 1982-2026 DROPS Design A/S. We reserve all rights. This document, including all its sub-sections, has copyrights. Read more about what you can do with our patterns at the bottom of each pattern on our site. |
||||||||||||||||


With over 40 years in knitting and crochet design, DROPS Design offers one of the most extensive collections of free patterns on the internet - translated to 17 languages. As of today we count 324 catalogs and 12278 patterns - 12268 of which are translated into English (US/in).
We work hard to bring you the best knitting and crochet have to offer, inspiration and advice as well as great quality yarns at incredible prices! Would you like to use our patterns for other than personal use? You can read what you are allowed to do in the Copyright text at the bottom of all our patterns. Happy crafting!
Post a comment to pattern DROPS 102-6
We would love to hear what you have to say about this pattern!
If you want to leave a question, please make sure you select the correct category in the form below, to speed up the answering process. Required fields are marked *.