
Popular categories
Looking for a yarn?


Comments / Questions (70)
![]() Kat42 wrote:
Kat42 wrote:
Bonjour, Je souhaite tricoter ce modèle, mais le fils Drops Silke Alpaca n'étant plus disponible. je ne trouve pas les information sur concernant le poids et le métrage d'une pelote. Vous remerciant par avance. Cordialement, Katia
26.09.2022 - 12:25DROPS Design answered:
Bonjour Kat42, retrouvez ici toutes les informations utiles sur les fils épuisées; pensez à utiliser notre convertisseur pour voir les alternatives possibles et les nouvelles quantités correspondantes. Bon tricot!
26.09.2022 - 16:55
![]() Anne O wrote:
Anne O wrote:
Hoi, Vraagje voor de start van het linkervoorpand. Bij de eerste te breien naalden staat dat de eerste naald de verkeerde kant is. Kan het zijn dat dat eigenlijk de goede kant moet zijn? Want anders kan de derde naald toch niet plots de goede kant zijn? Groetjes, Anne
14.04.2021 - 22:11
![]() Agnete wrote:
Agnete wrote:
Hvis jeg ikke vil have sjalskrave på, kan jeg så bare fortsætte lige op uden at tage ud
26.05.2020 - 09:34DROPS Design answered:
Hej Agnete, ja det kan du gøre, du ser i måleskitsen nederst i opskriften hvordan stykkerne så kommer til at se ud. God fornøjelse!
26.05.2020 - 14:54
![]() Carina wrote:
Carina wrote:
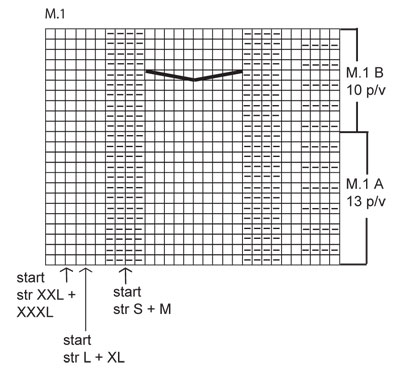
Hallo zusammen, ich stricke seit Jahren aber hier tue ich mich wirklich sehr schwer. Ich stricke in M und habe den Anfang bis zum Ende M1A geschafft. Es sind noch weitere Zunahmen an der rechten Seite (A) nötig, aber M1B steht nun an. Fange ich jetzt nicht vorne - als rechts in der Zeichnung - an? Wie soll denn sonst der Zopf da rein kommen? Es fällt mir wirklich sehr schwer, die Beschreibung und Zeichnung dazu zu verstehen. Vielen Dank fjür die Unterstützung!
20.10.2019 - 10:50DROPS Design answered:
Liebe Carina, die 4 letzten Maschen werden am Ende der 1. Reihe in M.1B angeschlagen/gestrickt. hier lesen Sie mehr über Diagramme. Viel Spaß beim stricken!
21.10.2019 - 12:42
![]() Claudia wrote:
Claudia wrote:
Vielen Dank! Das war sehr hilfreich. Ich habe das Stricken verkehrt herum gelernt (warum auch immer), d.h. von links nach rechts mit dem Faden in der rechten Hand und lese Diagramme dementsprechend auch von links nach rechts. Das wird mir in solchen Anleitungen manchmal zum Verhängnis ;-).
20.09.2016 - 10:51
![]() Claudia wrote:
Claudia wrote:
Ich habe große Schwierigkeiten beim Verständnis der Anleitung für das rechte Vorderteil (Größe M). Nachdem ich 34 Maschen habe soll ich M1A stricken, das sind 22 Maschen, danach 22 Maschen glatt und 4 kraus, macht insgesamt 48. Wenn ich die ersten 8 Maschen M1 stricke und nach und nach die neuen Maschen in M1 integriere, habe ich das Problem, dass ich nach allen Zunahmen 56 Maschen habe, also 8 mehr als 48 (22 M1, 22 glatt, 4 kraus). Gruß, Claudia
18.08.2016 - 09:24DROPS Design answered:
Liebe Claudia, haben Sie vielleicht folgenden Satz übersehen: (- siehe Pfeil für die jeweilige Grösse. Beim Pfeil anfangen und gegen links stricken). So hat man 8 M in M1A + 22 M + 4 M = 34 M.
27.08.2016 - 15:42
![]() PennyPiste wrote:
PennyPiste wrote:
Hei! Aivan ihana malli tämä, mutta ongelmaksi muodostuu etukappaleen rullaus. Kappale lähtee rullaamaan ainaoikeinneuleesta huolimatta (lisäsin jopa kerrokset 4:ään, että kappale pysyisi suorassa). Mitä voin tehdä?
23.09.2015 - 15:50DROPS Design answered:
Mikäli reunukset rullautuvat myös pingotuksen jälkeen, voit virkata reunuksiin yhden kerroksen kiinteitä silmukoita.
12.10.2015 - 16:07Laura Tittensor wrote:
I am undertaking drops 103-8 but I am struggling with the front pattern, part M1. A. I am about the undertake the section from 'continue to knit as follows (from the RS). I have 32 stitches (smallest size) and the pattern says knit from arrow to the end of the row, but this would only use up 22 of the 32 stitches, the pattern also says to stockinette over the next 20 stitches but I would only have 10 of the 32 left. Please advise, thanks Laura
15.03.2015 - 17:07DROPS Design answered:
Dear Mrs Tittensor, on next row from RS, start at the arrow for size S and work the last 8 sts in diagram (from the right towards the left), turn and work the first 8 sts (from left towards the right from WS) and increase at the end of every row from WS (towards A), so that you will work more sts in M1A on next row from RS, until all sts have been cast on and whole diagram M1A can be worked. Happy knitting!
16.03.2015 - 09:39
![]() Marja wrote:
Marja wrote:
Hei! olen aloittanut työn jo moneen otteeseen mutta ei vain onnistu! Oikea etukpl. Ensimmäiset rivit saan tehtyä. kun aloitan kuvion alkaa vaikeus. M1A eka rivi ok ja nurjapuoli tehdään 2o, 6n, 22n,4 ainaoik, ja lisätään lopussa 2 silmukkaa? seuraava oikean puolen rivi jatkaa kuviota? eli 2n,6o,2n,22o ja 4 ainaoikeaa? M1A kuvio on oikealta puolelta katsottuna eikö? Kiitos jo etukäteen!
03.02.2015 - 16:09DROPS Design answered:
Kyllä, piirros näyttää mallineuletta oikealta puolelta katsottuna. Mallineuleen ensimmäinen krs neulotaan työn oikealta puolelta, eli 2 n, 6 o. Seuraavalla nurjan puolen krs:lla lisätään 2 s, jolloin seuraavalla oikean puolen krs:lla neulotaan: 4 n, 6 o. Nurjan puolen krs:lla lisätään sitten taas 2 s, jolloin oikealta puolelta neulotaan: 2 o, 4 n, 6 o piirroksen mukaisesti.
12.03.2015 - 16:32
![]() Liisa Silen wrote:
Liisa Silen wrote:
Hi! M1. pattern starts from where the size is indicated with an arrow. But does the pattern start from the arrow everytime? or just the first time? And what should I do with the loops that remain after doing the pattern once? should i just continue? Thank you already!
04.01.2015 - 13:00DROPS Design answered:
Dear Mrs Silen, start M.1 at the arrow for your size and work as in diagram over the first sts (seen from RS), and work the inc sts as in diagram - when all sts have been inc, you will have all the sts shown in diagram. Happy knitting!
05.01.2015 - 09:13
|
||||||||||
DROPS 103-8 |
||||||||||
|
|
||||||||||
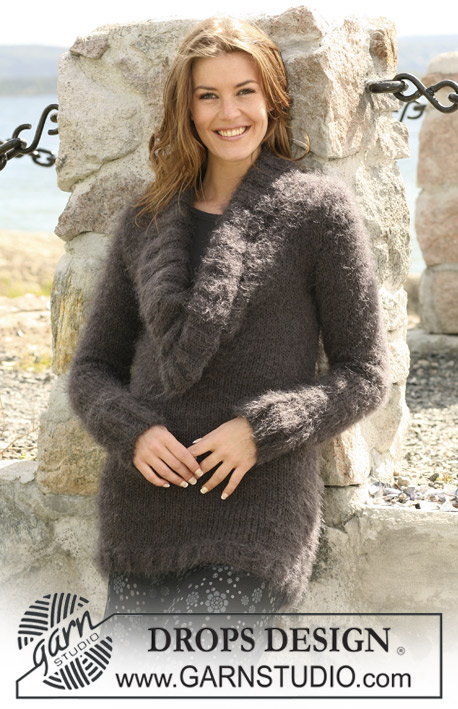
DROPS Slipover in ”Silke-Alpaca” with a front piece crossing over. Size S to XXXL.
DROPS 103-8 |
||||||||||
|
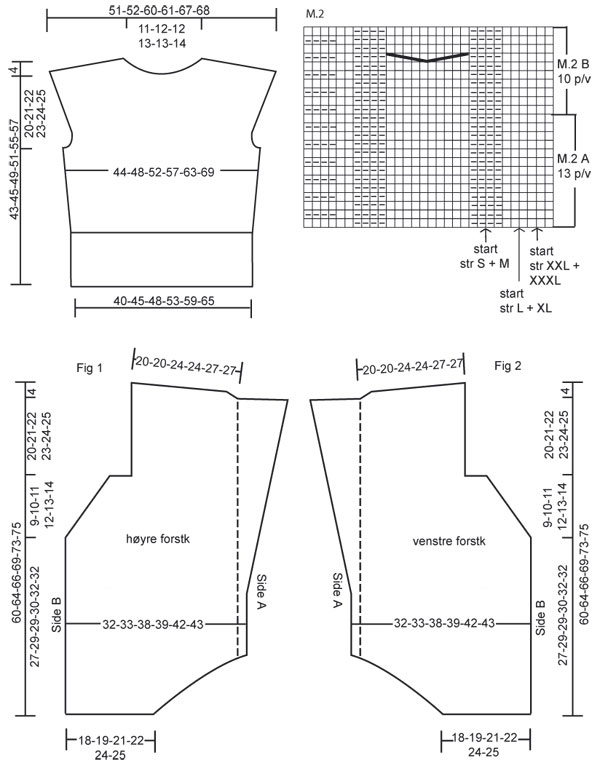
Knitting Gauge: 17 sts x 22 rows in stockinette sts = 10 x 10 cm [4"]. Pattern: See diagram M.1 and M.2. The diagrams are shown from the RS. Measurement tip: Put the work flat on a table when measuring it. All measures are done from the casting on edge. Garter sts: Knit back and forth on all rows. Increasing tip: Inc. inside 4 garter sts as follows: make a yo, on the returning row twist and knit the yo to avoid a hole. (i.e knit into the back of st instead of the front). Right front piece (knitted from the left side towards the right shoulder: The front piece are knitted on the slant – see Fig. 1. please read all the explanation + measurement tip before knitting it! Cast on 30-32-36-38-41-43 sts on needle size 4.5 mm [US 7] with Silke-Alpaca. Knit 2 rows of garter sts (1st row = WS). Knit the next row as follows: (from the WS): 4 garter sts – see explanation above - 26-28-32-34-37-39 stockinette sts (i.e. P from the WS, K from the RS). inc. 2 sts at the end of row (= Side A) = 32-34-38-40-43-45 sts in total. Continue to knit as follows (from the RS): M.1 A (- see the start arrow for size. Note! Knit from the start arrow towards the left until finish row), stockinette sts over the next 20-22-30-32-37-39 sts, 4 garter sts. Remember the knitting gauge! At the same time inc. at the end of each row from the WS (= Side A): 2 sts 3-3-5-5-6-6 times, 3 sts 4 times and 4 sts 1 time = 54-56-64-66-71-73 sts. Incorporate new sts into M.1 as going along. After 1 repeat of M.1A is completed continue with M.1B until finish. After all inc. knit all sts on row according to M.1B. When the piece measures approx. 20-20-22-22-23-23 cm [8"-8"-8¾"-8¾"-9"-9"] – Read increasing tip – inc. 1 st at Side A on every 6 rows a total of 14-15-15-16-17-18 times = neck line (knit new sts in garter sts). At the same time when the piece measures 27-29-29-30-32-32 cm [10⅝"-11⅜"-11⅜"-11¾"-12½"-12½"] bind off 1 st at the beg. of each row from the WS (= Side B) a total of 10-11-12-13-14-15 times (bind off from the edge = outermost st). Insert 1 MT (marking thread) at the same side as binding off (It marks the side seam). After the last dec. Knit 1 row from the WS and 1 row from the RS as before but knit 10-11-12-13-12-13 sts at the beg. of row from the WS (= Side B) in garter sts. On the next row from the WS bind off 6-7-8-9-8-9 sts at side B for the armhole. Continue with 4 garter sts at the armhole side until finish – knit other sts as before. When the piece measures 56-60-62-65-69-71 cm [22"-23⅝"-24⅜"-25½"-27⅛"-28"] put 18-19-19-20-21-22 garter sts at side A on a thread or a stitch holder = 34-34-40-40-45-45 sts left on row. Bind off for shoulder at the beg. of each row from the RS at side A as follows: Size S + M + L + XL: 2 st 3 times and 14-14-17-17 sts 2 times. Size XXL + XXXL: 2 sts 3 times, 19 sts 1 time and 20 sts 1 time. When all sts are bind off the piece measures approx. 60-64-66-69-73-75 cm [23⅝"-25¼"-26"-27⅛"-28¾"-29½"]. Left front piece (Knit from the right side towards the left shoulder): The front piece are knitted on the slant – see Fig. 2. Cast on 30-32-36-38-41-43 sts on pointed needles size 4.5 mm [US 7] with Silke-Alpaca. Knit 2 rows of garter sts (1st row = RS). Knit the next row as follows (from the RS): 4 garter sts – see explanation - 26-28-32-34-37-39 stockinette sts and inc. 2 sts at the end of row = 32-34-38-40-43-45 sts in total. Continue to knit as follows (from the WS): M.2 A (- see start arrow for size. Note! Knit from the start arrow towards the right in the diagram until finish row), stockinette sts over the next 20-22-30-32-37-39 sts, 4 garter sts. Continue to inc. as done for the right front piece but at the end of each row from the RS (= Side A) = 54-56-64-66-71-73 sts. Incorporate new sts into M.2A as going along. When 1 repeat of M.2 A is completed continue with M.2 B until finish. When the piece measures approx. 20-20-22-22-23-23 cm [8"-8"-8¾"-8¾"-9"-9"] inc. 1 st at side A – read Increasing tips –on every 6 row a total of 14-15-15-16-17-18 times = neck line, knit new sts in garter sts. At the same time when the piece measures 27-29-29-30-32-32 cm [10⅝"-11⅜"-11⅜"-11¾"-12½"-12½"] bind off 1 st at the beg of each row from the RS (= Side B) a total of 10-11-12-13-14-15 times. Insert 1 MT at the same side as bind off (marks the side seam). After the last dec. knit 1 row from the RS and 1 row from the WS as before but knit 10-11-12-13-12-13 sts at beg of row from the RS (= Side B) in garter sts. On the next row from the RS bind off for the armhole as done for the right front piece. Continue with 4 garter sts towards the armhole until finish - knit other sts as before. When the piece measures 56-60-62-65-69-71 cm [22"-23⅝"-24⅜"-25½"-27⅛"-28"] put 18-19-19-20-21-22 garter sts at side A on a thread or a stitch holder. Then bind off for the shoulder as done for the right front piece (from side A). Back piece: Cast on 88-100-106-124-136-148 sts (incl. 1 edge st each side) on pointed needles size 4 mm [US 6]. P the first row from the WS. Continue in Rib as follows: 1 edge st, * K2, P4 *, repeat from *-* and finish with K2 and 1 edge st. Continue until the piece measures 7-7-8-8-9-9 cm [2¾"-2¾"-3⅛"-3⅛"-3½"-3½"]. Now dec. 1 st in each P section = 74-84-89-104-114-124 sts. Continue with K2/P3 until the piece measures 14-14-16-16-18-18 cm [5½"-5½"-6¼"-6¼"-7"-7"]. Change to needle size 4.5 mm [US 7]. K 1 row from the RS at the same time dec. 4-6-5-12-12-12 sts evenly distributed = 70-78-84-92-102-112 sts. K 1 row from the WS. Continue in stockinette sts until finish. When the piece measures 16-16-18-18-20-20 cm [6¼"-6¼"-7"-7"-8"-8"] inc. 1 st each side on every 2 cm [¾"] a total of 3-3-3-3-4-4 times = 76-84-90-98-110-120 sts. When the piece measures 22-23-26-27-30-31 cm [8¾"-9"-10¼"-10⅝"-11¾"-12¼"] knit 2 rows of garter sts over 7-10-10-13-16-20 sts each side (knit the remaining sts in stockinette sts as before). Bind off for armholes each side on every other row as follows: 3 sts 1-1-1-2-3-3 times, 2 sts 0-1-1-1-1-3 times and 1 sts 0-1-1-1-1-1 time = 70-72-78-80-86-88 sts. Continue with 4 garter sts each side until finish. When the bind off for the armholes are completed inc. for wide shoulder – read Increasing tip – each side: on every 2-2-1.5-1.5-1-1 cm [¾"-¾"-½"-½"-⅜"-⅜"] a total of 8-8-11-11-14-14 times = 86-88-100-102-114-116 sts. When the piece measures 43-45-49-51-55-57 cm [17"-17¾"-19¼"-20"-21⅝"-22½"] bind off for shoulder each side on every other row: 8-8-10-10-11-11 sts 2 times and 9-9-10-10-12-12 sts 2 times. At the same time when the piece measures 45-47-51-53-57-59 cm [17¾"-18½"-20"-21"-22½"-23¼"] bind off the mid 18-20-20-22-22-24 sts for the neck. When all dec. are completed the piece then measures approx. 47-49-53-55-59-61 cm [18½"-19¼"-21"-21⅝"-23¼"-24"]. Collar: Put the 18-19-19-20-21-22 sts from the thread or stitch holder from the right front piece back on needle size 4.5 mm [US 7]. Insert 1 MT. Continue in garter sts over the collar sts as follows: * 2 rows of garter sts over all sts, 2 rows of garter sts over the outer most 10 sts *, repeat from *-* until the collar measures approx. 5.5-6-6-6.5-6.5-7 cm [2¼"-2⅜"-2⅜"-2½"-2½"-2¾"] from the MT at the shortest side. Bind off loosely. Knit the same way for the left front piece. Assembly: Sew the shoulder seams. Sew the collar tog. at the mid back and sew it to the neck line. Sew the side seams inside the 1 edge st as follows: The MT which marks the side seam at the right front piece should be sewn to the right side of the back piece where the armholes begins and down to the Rib. The MT which marks the side seam for the left front piece should be sewn to the left side of the back piece from where the armholes begins and down to the Rib. Put the left front piece underneath the right front piece. Sew the inc sts at the bottom of the left front piece to the rib at the right side of the back piece. Sew the inc sts at the bottom of the right front piece at the Rib to the left side of the back piece. The front pieces are now crossed over at the front so the right front piece is on top of the left front piece. |
||||||||||
Diagram explanations |
||||||||||
|
||||||||||
 |
||||||||||
 |
||||||||||
Have you finished this pattern?Tag your pictures with #dropspattern or submit them to the #dropsfan gallery. Do you need help with this pattern?You'll find 19 tutorial videos, a Comments/Questions area and more by visiting the pattern on garnstudio.com. © 1982-2026 DROPS Design A/S. We reserve all rights. This document, including all its sub-sections, has copyrights. Read more about what you can do with our patterns at the bottom of each pattern on our site. |
||||||||||


With over 40 years in knitting and crochet design, DROPS Design offers one of the most extensive collections of free patterns on the internet - translated to 17 languages. As of today we count 324 catalogs and 12290 patterns - 12280 of which are translated into English (US/in).
We work hard to bring you the best knitting and crochet have to offer, inspiration and advice as well as great quality yarns at incredible prices! Would you like to use our patterns for other than personal use? You can read what you are allowed to do in the Copyright text at the bottom of all our patterns. Happy crafting!
Post a comment to pattern DROPS 103-8
We would love to hear what you have to say about this pattern!
If you want to leave a question, please make sure you select the correct category in the form below, to speed up the answering process. Required fields are marked *.