
Popular categories
Looking for a yarn?


Comments / Questions (68)
![]() Rebecka wrote:
Rebecka wrote:
Hej! Jag lyckades lösa gåtan med hur man stickar M1, efter att ha tänkt några rundor (ser många kommentarer om att den var svår att förstå( och är nu färdig med själva stickningen och håller på med monteringen. Men jag ser att slagkragen är för kort. Det stod i mönstret att jag skulle sticka på kragen (i slutet) till 6 cm i storlekt M, men det blir i kortaste laget för min del. Ska försöka sticka längre och se vad som sker.
28.11.2024 - 21:12
![]() Inga-Karin Takacs wrote:
Inga-Karin Takacs wrote:
Nu har jag repat upp fyra gånger…kommer inte vidare på raden ” M1A…” och ” efter alla ökningar stickas alla på raden i M1B”. Hur går det till? Ska man vända vid startpilen varje gång? Det blir ju konstigt?
26.09.2024 - 07:47DROPS Design answered:
Heri Inga-Karin. Vi skal hjelpe deg så godt vi kan, men fint om du kan opplyse hvilken str. du strikker etter. mvh DROPS Design
07.10.2024 - 09:40
![]() Christel wrote:
Christel wrote:
Snap het patroon niet rechter voorpand van links te breien met 38 st en in de eerste naald 2 meerderen ?,, het patroon telt maar 30 steken . Kan je mij de eerste 2 naalden even steek per steek uitleggen zo ik een patroon kan volgen
22.02.2024 - 16:59
![]() Karin wrote:
Karin wrote:
Ik ben een ervaren breister en heb nog nooit problemen gehad met een patroon behalve dit. Bij M1a staat 30 steken tricotsteek. Maar het patroon laat toch rechtse en averechtse steken in die teltekening zien? Of is dat maar 1keer. Ik zie op de foto van het voorpand ook nergens het patroon van M1a . En is de averechtse kant de steken breien zoals ze zich voordoen? Ben ik nu zo stom geworden maar ik snap er niks van. Mijn excuses
07.02.2024 - 12:52DROPS Design answered:
Dag Karin,
In het telpatroon zijn alle naalden weergegeven, dus zowel de heengaande als de teruggaande naalden. Bij de symboolverklaring staat aangegeven hoe je de steken op de goede dan wel de verkeerde kant breit. M.1.A wordt voor het rechter voorpand gebruikt.
07.02.2024 - 18:59
![]() Christine Wilson wrote:
Christine Wilson wrote:
Drops 103-8 Refer to earlier comment: Can anyone please explain instructions for the front M1.A. The number of stitches in the instructions do not tally with what I have on the needles (size L). Am I supposed to be turning back and knitting ‘short rows’? I’d really appreciate clearer English instructions as I love this design and don’t want to abandon it.
08.07.2023 - 08:26DROPS Design answered:
Dear Christine, when working the first row of M1.A, start at the arrow as indicated for your size and work from right to left. For size L, there will only be 4 stitches in the first row, which matches the instructions in the text (4 from the charts, 30 in stocking stitch, 4 in garter stitch). On the next row, you will work over M1.A over the same 4 stitches, stocking stitch as before and 4 stitches in garter stitch and increase as indicated in the pattern instructions. Since you have increased 2 stitches, on the next row you will work 2 more stitches of M.1A, always starting to read from the arrow for size L. Happy knitting!
10.07.2023 - 16:50
![]() Christine Wilson wrote:
Christine Wilson wrote:
Re correction to earlier comment - I HAVE NOT managed to get past 2nd row of main pattern. The number of stitches make no sense.
03.07.2023 - 18:52
![]() Christine Wilson wrote:
Christine Wilson wrote:
Pattern 103-8 Oh dear! I am a very experienced knitter and have had great success with your patterns up until now. However, the instructions for the crossover vest 103-8 have left me completely flummoxed. I have got beyond the second row and am at the point of giving up. If I spoke other languages I suspect I am not the first knitter to make this comment! Christine Wilson
03.07.2023 - 18:26
![]() Sylvia wrote:
Sylvia wrote:
Hallo habe gerade Wolle gekauft für das Model 103-8 und komme bereits am Anfang nicht klar. Was bedeutet "Beim Pfeil anfangen und gegen links stricken"? Für das rechte Vorderteil muss ich eine Hin- und Rückreihe machen und dann beim Pfeil anfangen. Wenn ich eine Hin- und Rückreihe habe, wie kann ich beim Pfeil anfangen? Was mache ich mit dem bereits gestrickten davor? Nach Maschenbild stricken und dann mit M1A beginnen? Danke.
26.05.2023 - 10:27DROPS Design answered:
Liebe Sylvia, stricken Sie die 1. Masche nach dem Pfeil und stricken Sie die letzten Maschen vom Diagram (rechts nach links bei den Hinreihen lesen); dh die letzten Maschen vom Diagram, dann werden neuen Maschen angeschlagen, und immer mehr Maschen in M.1 gestrickt. Hinreihen lesen Sie rechts nach links, Rückreihen links nach rechts. Viel Spaß beim stricken!
26.05.2023 - 11:50
![]() Kat42 wrote:
Kat42 wrote:
Bonjour, Je souhaite tricoter ce modèle, mais le fils Drops Silke Alpaca n'étant plus disponible. je ne trouve pas les information sur concernant le poids et le métrage d'une pelote. Vous remerciant par avance. Cordialement, Katia
26.09.2022 - 12:25DROPS Design answered:
Bonjour Kat42, retrouvez ici toutes les informations utiles sur les fils épuisées; pensez à utiliser notre convertisseur pour voir les alternatives possibles et les nouvelles quantités correspondantes. Bon tricot!
26.09.2022 - 16:55
![]() Anne O wrote:
Anne O wrote:
Hoi, Vraagje voor de start van het linkervoorpand. Bij de eerste te breien naalden staat dat de eerste naald de verkeerde kant is. Kan het zijn dat dat eigenlijk de goede kant moet zijn? Want anders kan de derde naald toch niet plots de goede kant zijn? Groetjes, Anne
14.04.2021 - 22:11
|
||||||||||
DROPS 103-8 |
||||||||||
|
|
||||||||||
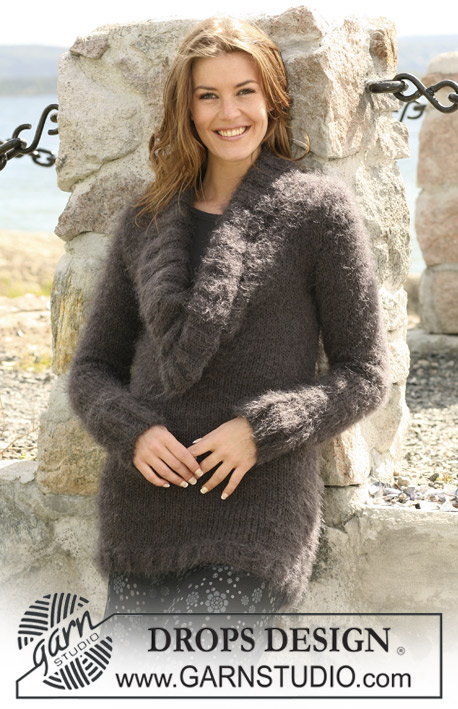
DROPS vest / slipover in ”Silke-Alpaca” with a front piece crossing over. Size S to XXXL.
DROPS 103-8 |
||||||||||
|
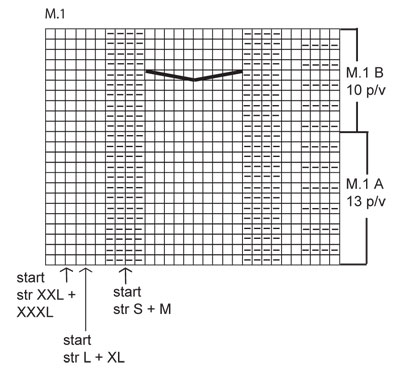
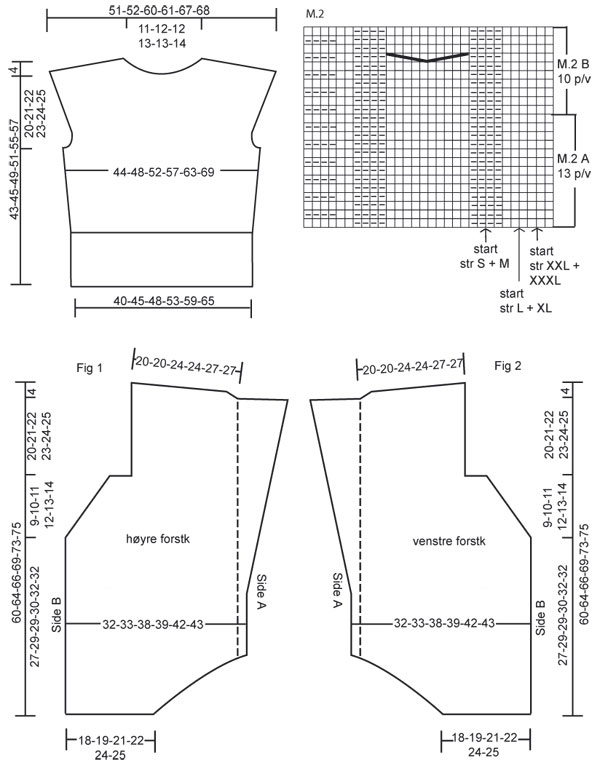
Knitting Tension: 17 sts x 22 rows in stocking sts = 10 x 10 cm. Pattern: See diagrams M.1 and M.2. The diagrams are shown from the RS. Measurement tip: Put the work flat on a table when measuring it. All measures are done from the casting on edge. Garter sts: Knit back and forth on all rows. Increasing tip: Inc. inside 4 garter sts as follows: make a yo, on the returning row twist and knit the yo to avoid a hole. (i.e knit into the back of st instead of the front). ---------------------------------------------------------------- Right front piece (knitted from the left side towards the right shoulder): The front piece are knitted on the slant – see Fig. 1. please read all the explanation + measurement tips before knitting it! Cast on 30-32-36-38-41-43 sts on needle size 4.5 mm with Silke-Alpaca. Knit 2 rows of garter sts (1st row = WS). Knit the next row as follows: (from the WS): 4 garter sts – see explanation above - 26-28-32-34-37-39 stocking sts (i.e. P from the WS, K from the RS). inc. 2 sts at the end of row (= Side A) = 32-34-38-40-43-45 sts in total. Continue to knit as follows (from the RS): M.1 A (- see the start arrow for size. NB! Knit from the start arrow in diag towards the left until finish row), stocking sts over the next 20-22-30-32-37-39 sts, 4 garter sts. Remember the knitting tension! At the same time inc. at the end of each row from the WS (= Side A): 2 sts 3-3-5-5-6-6 times, 3 sts 4 times and 4 sts 1 time = 54-56-64-66-71-73 sts. Incorporate new sts into M.1 as going along. After 1 repeat of M.1A is completed continue with M.1B until finish. After all inc. knit all sts on row according to M.1B. When the piece measures approx. 20-20-22-22-23-23 cm – Read increasing tips – inc. 1 st at Side A on every 6 rows a total of 14-15-15-16-17-18 times = neck line (knit new sts in garter sts). At the same time when the piece measures 27-29-29-30-32-32 cm cast off 1 st at the beg. of each row from the WS (= Side B) a total of 10-11-12-13-14-15 times (cast off from the edge =outermost st). Insert 1 MT (marking thread) at the same side as casting off (It marks the side seam). After the last dec. Knit 1 row from the WS and 1 row from the RS as before but knit 10-11-12-13-12-13 sts at the beg. of row from the WS (= Side B) in garter sts. On the next row from the WS cast off 6-7-8-9-8-9 sts at side B for the armhole. Continue with 4 garter sts at the armhole side until finish – knit other sts as before. When the piece measures 56-60-62-65-69-71 cm put 18-19-19-20-21-22 garter sts at side A on a thread or a stitch holder = 34-34-40-40-45-45 sts left on row. Cast off for shoulder at the beg. of each row from the RS at side A as follows: Size S + M + L + XL: 2 st 3 times and 14-14-17-17 sts 2 times. Size XXL + XXXL: 2 sts 3 times, 19 sts 1 time and 20 sts 1 time. When all sts are cast off the piece measures approx. 60-64-66-69-73-75 cm. Left front piece (Knit from the right side towards the left shoulder): The front piece are knitted on the slant – see Fig. 2. Cast on 30-32-36-38-41-43 sts on pointed needles size 4.5 mm with Silke-Alpaca. Knit 2 rows of garter sts (1st row = RS). Knit the next row as follows (from the RS): 4 garter sts – see explanation - 26-28-32-34-37-39 stocking sts and inc. 2 sts at the end of row = 32-34-38-40-43-45 sts in total. Continue to knit as follows (from the WS): M.2 A (- see start arrow for size. NB! Knit from the start arrow towards the right in the diagram until finish row), stocking sts over the next 20-22-30-32-37-39 sts, 4 garter sts. Continue to inc. as done for the right front piece but at the end of each row from the RS (= Side A) = 54-56-64-66-71-73 sts. Incorporate new sts into M.2A as going along. When 1 repeat of M.2 A is completed continue with M.2 B until finish. When the piece measures approx. 20-20-22-22-23-23 cm inc. 1 st at side A – read Increasing tips –on every 6 row a total of 14-15-15-16-17-18 times = neck line, knit new sts in garter sts. At the same time when the piece measures 27-29-29-30-32-32 cm cast off 1 st at the beg of each row from the RS (= Side B) a total of 10-11-12-13-14-15 times. Insert 1 MT at the same side as cast off (marks the side seam). After the last dec. knit 1 row from the RS and 1 row from the WS as before but knit 10-11-12-13-12-13 sts at beg of row from the RS (= Side B) in garter sts. On the next row from the RS cast off for the armhole as done for the right front piece. Contunie with 4 garter sts towards the armhole until finish - knit other sts as before. When the piece measures 56-60-62-65-69-71 cm put 18-19-19-20-21-22 garter sts at side A on a thread or a stitch holder. Then cast off for the shoulder as done for the right front piece (from side A). Back piece: Cast on 88-100-106-124-136-148 sts (incl. 1 edge st each side) on pointed needles size 4mm. P the first row from the WS. Continue in Rib as follows: 1 edge st, * K2, P4 *, repeat from *-* and finish with K2 and 1 edge st. Continue until the piece measures 7-7-8-8-9-9 cm. Now dec. 1 st in each P section = 74-84-89-104-114-124 sts. Continue with K2/P3 until the piece measures 14-14-16-16-18-18 cm. Change to needle size 4.5 mm. K 1 row from the RS at the same time dec. 4-6-5-12-12-12 sts evenly distributed = 70-78-84-92-102-112 sts. K 1 row from the WS. Continue in stocking sts until finish. When the piece measures 16-16-18-18-20-20 cm inc. 1 st each side on every 2 cm a total of 3-3-3-3-4-4 times = 76-84-90-98-110-120 sts. When the piece measures 22-23-26-27-30-31 cm knit 2 rows of garter sts over 7-10-10-13-16-20 sts each side (knit the remaining sts in stocking sts as before). Cast off for armholes each side on every other row as follows: 3 sts 1-1-1-2-3-3 times, 2 sts 0-1-1-1-1-3 times and 1 sts 0-1-1-1-1-1 time = 70-72-78-80-86-88 sts. Continue with 4 garter sts each side until finish. When the cast off for the armholes are completed inc. for wide shoulder – read Increasing tips – each side: on every 2-2-1.5-1.5-1-1 cm a total of 8-8-11-11-14-14 times = 86-88-100-102-114-116 sts. When the piece measures 43-45-49-51-55-57 cm cast off for shoulder each side on every other row: 8-8-10-10-11-11 sts 2 times and 9-9-10-10-12-12 sts 2 times. At the same time when the piece measures 45-47-51-53-57-59 cm cast off the mid 18-20-20-22-22-24 sts for the neck. When all dec. are completed the piece then measures approx. 47-49-53-55-59-61 cm. Collar: Put the 18-19-19-20-21-22 sts from the thread or stitch holder from the right front piece back on needle size 4.5 mm. Insert 1 MT. Continue in garter sts over the collar sts as follows: * 2 rows of garter sts over all sts, 2 rows of garter sts over the outer most 10 sts *, repeat from *-* until the collar measures approx. 5.5-6-6-6.5-6.5-7 cm from the MT at the shortest side. Cast off loosely. Knit the same way for the left front piece. Assembly: Sew the shoulder seams. Sew the collar tog. at the mid back and sew it to the neck line. Sew the side seams inside the 1 edge st as follows: The MT which marks the side seam at the right front piece should be sewn to the right side of the back piece where the armholes begins and down to the Rib. The MT which marks the side seam for the left front piece should be sewn to the left side of the back piece from where the armholes begins and down to the Rib. Put the left front piece underneath the right front piece. Sew the inc. Sts at the bottom of the left front piece to the rib at the right side of the back piece. Sew the inc sts at the bottom of the right front piece at the Rib to the left side of the back piece. The front pieces are now crossed over at the front so the right front piece is on top of the left front piece. |
||||||||||
Diagram explanations |
||||||||||
|
||||||||||
|
||||||||||
|
||||||||||
Have you finished this pattern?Tag your pictures with #dropspattern or submit them to the #dropsfan gallery. Do you need help with this pattern?You'll find 19 tutorial videos, a Comments/Questions area and more by visiting the pattern on garnstudio.com. © 1982-2025 DROPS Design A/S. We reserve all rights. This document, including all its sub-sections, has copyrights. Read more about what you can do with our patterns at the bottom of each pattern on our site. |
||||||||||


With over 40 years in knitting and crochet design, DROPS Design offers one of the most extensive collections of free patterns on the internet - translated to 17 languages. As of today we count 314 catalogues and 11822 patterns translated into English (UK/cm).
We work hard to bring you the best knitting and crochet have to offer, inspiration and advice as well as great quality yarns at incredible prices! Would you like to use our patterns for other than personal use? You can read what you are allowed to do in the Copyright text at the bottom of all our patterns. Happy crafting!
Post a comment to pattern DROPS 103-8
We would love to hear what you have to say about this pattern!
If you want to leave a question, please make sure you select the correct category in the form below, to speed up the answering process. Required fields are marked *.