
Popular categories
Looking for a yarn?































Comments / Questions (33)
 Lizette wrote:
Hi I love the pattern but would like a shorter version (lengthwise) for my daughter as she is very short. Is there any possibility that you can give directions for xxl size but total length of garment should be 54 cm in stead of your smallest size that is 60 cm. Will appreciate any help or directions where to obtain help to adapt pattern to fit her shorter length. thank you lizette
22.07.2026 - 19:04DROPS Design answered:
Dear Lizette, we are unfortunately not able to adjust every pattern to every single request, sorry. Maybe you can find another pattern matching your wishes. Happy knitting!
11.08.2026 - 11:48
 Nekane González Rodríguez wrote:
Entiendo que se trabajan las dos hebras de los diferentes colores juntas.Gracias
07.04.2021 - 00:16DROPS Design answered:
Hola Nekane. Exactamente, este modelo se trabaja con 1 hilo de cada color (= 2 hilos)
07.04.2021 - 20:14
Nekane González Rodríguez wrote:
Se tejen las dos lanas a la vez?
06.04.2021 - 00:48DROPS Design answered:
Hola Nekane, si, 2 colores insieme. Buen trabajo!
06.04.2021 - 17:30
 Cazas Marie France wrote:
Bonjour je voudrais savoir si il n y a pas d,erreur sur les rang pour 10cm je trouve que cela fait beaucoup merci
09.09.2019 - 15:19DROPS Design answered:
Bonjour Mme Cazas, l'échantillon est juste, on doit avoir 18 mailles x 35 rangs au point mousse (= soit 17,5 côtes mousse) = 10 x 10 cm. Il faut plus de rangs au point mousse qu'en jersey pour avoir les 10 cm. Bon tricot!
09.09.2019 - 15:49
 Sandra wrote:
I am knitting this jacket, and a little confused as to how it is assembled. Is there a tutorial video available? I would be grateful for any advice. Thank you
18.02.2019 - 11:54DROPS Design answered:
Dear Sandra, follow the different assembly steps under each piece. you first crochet an edge with dc (UK-English) then sew the dc row(edges) together so that there is a ridge. See also chart. Happy assembly!
18.02.2019 - 13:05Vickii Wilson wrote:
Pattern 101-20 please send correct instruction for right front peice A pertaining to increasing for small size. thank you
15.05.2013 - 12:26Vickii Wilson wrote:
In pattern 101-20 ladies cardigan, there is an error on section Right pce A with the increasing for S/M and it say to increase in every other row in first section the every 3rd row in second section, could you please send me a correction urgently thanks
14.05.2013 - 09:36DROPS Design answered:
Dear Mrs Wilson, increases will work that way : *1 row with inc, 1 row without inc (= 1 inc every other row), 1 ridge (= K2 rows) on all sts*. Happy knitting!
14.05.2013 - 10:17
THEOBALD wrote:
Je viens de terminer cette magnifique veste. Je signale juste une remarque sur l'explication "devant gauche D" : il faut augmenter 1 m uniquement vers milieu devant et non "de chaque côté"...mais une non débutante s'y retrouve. ALPACA en double fil est un bonheur ! Merci. Il est temps de passer à MUSKAT pour les filles...
12.02.2013 - 09:17DROPS Design answered:
Merci Madame Theobald, la correction a été faite. Bon tricot !
12.02.2013 - 10:34bettina wrote:
meget elegant jakke!!!!!
26.01.2007 - 18:27
 vanja wrote:
DEN var råstilig. Et absolutt must i katalogen!
21.01.2007 - 16:17
|
|||||||||||||
Ready for Paris#readyforparisjacket |
|||||||||||||
|
|
|||||||||||||
DROPS large jacket knitted in several parts with 2 strands of "Alpaca”
DROPS 101-20 |
|||||||||||||
|
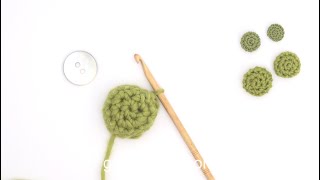
Knitting gauge: 18 sts x 35 rows on needle size 4.5 mm / US 7 with 2 strands Alpaca in garter st = 10 x 10 cm / 4" x 4" Garter st back and forth: Knit all rows. Crochet edge: Crochet with 2 strands black on crochet hook size 4.5 mm/US 7 as follows: 1 row sc, then 1 row sl st. Knitting info: It is important that knitting gauge is adhered so measures in piece are correct both in width and height. Knit a sample and change to thicker or thinner needles to ensure correct knitting gauge. Increasing tip for right front piece: Inc 1 sts by K2 in same st Inc 2 sts by K 2 sts in second last st and K2 sts in last st. ____________________________________________________________________ Back piece: Back piece is worked in 3 parts – see figure 1. Mid back piece: Work piece from bottom up. Cast on 36-38-40-42-44 sts with 1 strand of each color on needle size 4.5 mm / US 7. Knit garter sts – see explanation above – until piece measures 58-60-62-64-66 cm / 22¾"-23⅝"-24⅜"-25¼"-26". Now bind off middle 28-30-32-34-36 sts for neck and work each side separately. Then bind off at neckline on every other row: 2 sts 1 time and 1 st 2 times, all sts are now bound off and piece measures approx 60-62-64-66-68 cm / 23⅝"-24⅜"-25¼"-26"-26¾" on longest part. Right side piece: Piece is worked side ways from the side towards mid back. Cast on 91-91-94-96-99 sts with 1 strand of each color on needle size 4.5 mm / US 7. Read entire section before knitting commences! Knit garter sts at the same time cast on new sts on one side towards bottom edge as follows: On every 4th row: 1 st 12-15-16-18-19 times. At the same time cast on other side (= shoulder): On every 12th row: 1 sts 5 times. On completion of all increases there are 108-111-115-119-123 sts on needle. When piece measures 15-17-19-22-25 cm / 6"-6¾"-7½"-8¾"-9¾"-, bind off loosely. Left back side piece: Cast on and knit like right but reversed. Assembly back piece: Crochet around all pieces but not along bottom edges – see explanation above. Sew side pieces onto middle piece – sew in sc so sl st is lying on outside of seam. Right front piece: Work in 2 parts = A (top, large piece) and B (bottom, small slanted piece) – see figure 2. Right front piece A (top, large part): Knit piece from bottom up. Cast on 3 sts with 1 strand of each color on needle size 4.5 mm / US 7. Knit garter sts – at the same time inc on left side on every other row = inc towards side at end of row - see Increasing tip in explanation above, inc as follows: Size S/M: *1 st 15 times and knit 2 rows garter sts without inc *, repeat *-* until there are 63 sts on needle. Size M/L: *1 st 30 times and knit 2 rows garter sts without inc *, repeat *-* until there are 68 sts on needle. Size XL: *1 st 22 times and 2 sts 1 time *, repeat *-* until there are 74 sts on needle. Size XXL: *1 st 7 times and 2 sts 1 time *, repeat *-* until there are 81 sts on needle. Size XXXL: *1 st 5 times and 2 sts 1 time *, repeat *-* until there are 88 sts on needle. After last inc piece measures approx 37-38-39-40-41 cm / 14½"-15"-15¼"-15¾"-16⅛". Continue knitting over all sts until piece measures 53-55-57-59-61 cm / 21"-21⅝"-22½"-23¼"-24" from cast on edge. Now bind off 13-15-17-19-21 sts mid front for neck. Then bind off at neckline on every other row: 3 sts 1 time, 2 sts 2 times and 1 st 8 times. At the same time when piece measures 57-59-61-63-65 cm / 22½"-23¼"-24"-24¾"-25½" from cast on edge (= approx 20-21-22-23-24 cm / 8"-8¼"-8¾"-9"-9½" on short side) bind off for slanting shoulder as follows: bind off from shoulder and towards neckline on every other row: 7-8-9-10-11 sts 4 times, then bind off remaining 7-6-6-7-8 sts. Piece measures approx 60-62-64-66-68 cm / 23⅝"-24⅜"-25¼"-26"-26¾" at longest part when all sts are bound off. Right front piece B (bottom small slanting piece): Knit this part sideways from the side towards mid front. Read entire section before knitting commences! Cast on 54-54-54-54-54 sts with 1 strand of each color on needle size 4.5 mm / US 7. Knit garter sts at the same time as inc on right side and bind off on left side as follows: Right side (towards bottom edge): Inc 1 st on every 4th rows 12-15-16-18-19 times. Left side: Bind off 1 sts 63-66-67-69-70 times in total: for size S/M + M/L: On every other row for size XL: On every other row – but after every 13th bind off, knit 2 rows garter st without binding off. for size XXL: On every other row – but after every 7th bind off, knit 2 rows garter st without binding off. for size XXXL: On every other row – but after every 5th bind off, knit 2 rows garter st without binding off. When there are 5-3-3-3-3 sts left, bind these off. Piece measures approx 35-38-41-45-49 cm / 13¾"-15"-16⅛"-17¾"-19¼" in knitting direction. Assembly right front piece: Crochet along the long slanted side on both pieces – see explanation above. Sew two pieces A+B tog with slanted sides towards each other – sew like back piece was sewn tog. Continuing crochet along the entire side, up along armhole and over shoulder – see explanation above. Left front piece: Work in 2 parts = C (side piece) and D (front piece) – see figure 3. C (side piece): Knit like right side back piece. D (front piece): Knit piece from bottom up. Cast on 16-18-20-22-24 sts with 1 strand of each color on needle size 4.5 mm / US 7. Knit garter sts – at the same time inc 1 st on one side (= towards mid front) on every 4-4.5-4.5-5-5 cm / 1½"-1¾"-1¾"-2"-2" a total of 12 times = 28-30-32-34-36 sts. When piece measures 53-55-57-59-61 cm / 21"-21⅝"-22½"-23¼"-24" bind off 13-15-17-19-21 sts towards mid front (= the side where inc was made) for neck. Continuing bind off at neckline on every other row: 3 sts 1 time, 2 sts 2 times and 1 st 8 times. Piece measures approx 60-62-64-66-68 cm / 23⅝"-24⅜"-25¼"-26"-26¾" at longest part when all sts are bound off. Assembly left front piece: Crochet along side of front piece to be sewn onto side piece – see explanation above. Crochet in same way on side piece: Along bind off edge, shoulder and cast on edge (do not crochet along bottom edge). Sew on front piece to side piece like back piece was sewn tog. Sleeve: Knit piece back and forth. Cast on 46-48-51-53-56 sts with 2 strands black on needle size 4.5 mm / US 7. Knit 5 cm / 2" garter sts, change to 1 strand white + 1 strand black. Continue in garter sts – at the same time inc 1 st on each side on every 2.5-2.5-2-2-2 cm / ⅞"-⅞"-¾"-¾"-¾" a total of 13-14-14-15-15 times = 72-76-79-83-86 sts. Bind off when piece measures 41-40-38-36-34 cm / 16⅛"-15¾"-15"-14¼"-13⅜". Crochet around top of sleeve – see explanation above. Sew sleeve tog in outermost part of outermost sts. Assembly of collar: Sew shoulder seams and side seams – sew in sc so sl st is lying on outside of seam. Pick up approx 120 to 140 sts (from WS) round neckline on needle size 4.5 mm / US 7 with 2 strands. Knit 11 cm / 4½" garter sts, bind off loosely. Assembly: Sew sleeves onto back and front pieces – sew in sc so sl st is lying on outside of seam. Crochet with 2 strands black on crochet hook size 4.5 mm/US 7 around entire jacket, i.e. collar, front edge, bottom edge as follows: 2 rounds sc and then 1 round sl st. Assembly Buttons: Crochet cover for 4 buttons on crochet hook size 3 mm / C with 1 strand black as follows: Button cover: ch 2, then crochet 6 sc in the first of the ch 2, finish off with 1 sl st in first sc of round (= 1st round). 2nd round: Crochet 2 sc in each sc = 12 sc. 3rd round: * crochet 1 sc in 1st sc, crochet 1 sc in 2nd sc, crochet 2 sc in 3rd sc *, repeat from *-* and finish off with 1 sl st in 1st of round = 16 sc. 4 th, 5 th and 6th round: Crochet 1 sc in each sc. 7th round: Crochet 1 sc in every 2nd sc = 8 sc. Finish off with 1 sl st in 1st sc of round. Slip button inside cover, sew around edge and pull tog. Sew in buttons at a slant along left front piece as follows: Top button: 1 cm / ⅜" from seams between the 2 front piece parts, second top button: 3 cm / 1⅛" from seam, next 5 cm / 2" from seam and last 7 cm / 2¾" from seam – see also black marking for buttons on figure 3. Button hole loop: Crochet 4 button hole loops on front edge along right front piece – place the top button just under the neck opening, hereafter there has to be approx 5 cm / 2" between the loops. Crochet with 2 strands black on crochet hook size 4.5 mm/US 7 as follows: 1 sc on front edge, ch 8, skip 2 cm / ¾", fasten with 1 sl st, turn and crochet 10 sc in ch loop, turn and crochet 1 sl st in each sc going back. |
|||||||||||||
Diagram explanations |
|||||||||||||
|
|||||||||||||
 |
|||||||||||||
Have you finished this pattern?Tag your pictures with #dropspattern #readyforparisjacket or submit them to the #dropsfan gallery. Do you need help with this pattern?You'll find 11 tutorial videos, a Comments/Questions area and more by visiting the pattern on garnstudio.com. © 1982-2026 DROPS Design A/S. We reserve all rights. This document, including all its sub-sections, has copyrights. Read more about what you can do with our patterns at the bottom of each pattern on our site. |
|||||||||||||






With over 40 years in knitting and crochet design, DROPS Design offers one of the most extensive collections of free patterns on the internet - translated to 17 languages. As of today we count 333 catalogs and 12525 patterns - 12515 of which are translated into English (US/in).
We work hard to bring you the best knitting and crochet have to offer, inspiration and advice as well as great quality yarns at incredible prices! Would you like to use our patterns for other than personal use? You can read what you are allowed to do in the Copyright text at the bottom of all our patterns. Happy crafting!
Post a comment to pattern DROPS 101-20
We would love to hear what you have to say about this pattern!
If you want to leave a question, please make sure you select the correct category in the form below, to speed up the answering process. Required fields are marked *.