
Popular categories
Looking for a yarn?


Comments / Questions (37)
![]() Anita Gors wrote:
Anita Gors wrote:
Hier wordt geschreven dat ik een Spammer Ben dit is de eerste keer dat ik een opmerking plaats
07.06.2023 - 18:27
![]() Anita Gors wrote:
Anita Gors wrote:
Het patroon met de steken klopt van geen kanten veel meer steken over op het laatst
07.06.2023 - 18:25
![]() Hennie wrote:
Hennie wrote:
Hoeveel cm. moet de boord lang zijn?
23.04.2022 - 12:05
![]() Lin Van Den Bremt wrote:
Lin Van Den Bremt wrote:
Ik heb voor het voorpand 111 st opgezet. Ik moet dus voor het armsgat 28 steken verminderen, voor de halsuitsnijding volgens de uitleg 1 x 23 en verder 22, dan houd ik 38 st over. Ik zou er maar 19 mogen overhouden voor de schouder?
05.06.2021 - 13:28DROPS Design answered:
Dag Lin,
Als je 38 steken overhoudt heb je toch 19 steken voor elk schouder over?
13.06.2021 - 10:45Karina wrote:
Ik snap dit echt niet Herhaal Nld 1 en 2 nog een keer en meerder in de laatste nld de 4 r tussen de 4 av en 7 av naar 6 r = 83-95-107-119-131 Dus meerderen in de 2de naald? 4 rechtse tussen de 4 av en 7 av naar 6 r ? De laatste is toch dan minderen en per slot van rekening zijn er 2 steken meer?! Hoe lees ik dit correct ?
27.04.2018 - 00:22
![]() Talentetta wrote:
Talentetta wrote:
Is the diagram correct? My armscye is slanted more like a raglan, not straight up and down, as in the diagram. Also, all the Drops patterns would benefit from a diagram of the sleeve shown flat, with more measurements than just how long it is from the shoulder down.
05.08.2017 - 01:14DROPS Design answered:
Dear Talentetta, diagram is correct, start reading diagram on the bottom corner on the right side from RS and read from the right towards the left from RS and from the left towards the right from WS. Happy knitting!
07.08.2017 - 11:40
![]() Talentetta wrote:
Talentetta wrote:
I think there is a mistake on the armhole decreases. The decreasing tips seem to be switched for the front and back (last tip only.) The left side says to do decrease within last 5 sts for the front. I think it should be last 4, to match RS. The tip references the rib pattern that is part of the back only, so I think they were swapped in the pattern.
04.08.2017 - 15:33
![]() Marjolein Van Dijke wrote:
Marjolein Van Dijke wrote:
Als ik de kleinste mt wil aanhouden dus 81 st opzetten kom ik bij nld 1 al niet uit , dus als ik de eerste nld brei volgens beschrijving blijf ik uitkomen op 93 steken
15.01.2015 - 19:24
![]() Simone wrote:
Simone wrote:
Stuck again!.. on the cable pattern the 2 tram lines that run up either side of the cable are ending up next to each other on one side of the top! with pattern chart, I take it I start, with RS facing me, from right side of chart, then left side on next row? then 34 stitches stockinette stitch with RS facing, so I assume carry on with my Purl row as WS is still facing? p.s can you confirm that main side panels of front of top show as reversed stockinette stitch? Thanks
06.05.2013 - 09:32DROPS Design answered:
Dear Simone, seen from RS, right side of cable (before M1) is worked in reverse stockinette (P side = RS) and after M1 you work regular stockinette (= K side = RS), so that from WS, you first P before M1 and K after M1. Happy knitting!
06.05.2013 - 13:11
![]() Simone wrote:
Simone wrote:
I have knitted rows 1 & 2.... pattern now says repeat Rows 1 & 2 one more time increasing on the last row the K4 between the P4 and P7 to K6. This last row would be row 2 and the stitches mentioned are actually in Row 1. Please advise me.. Thanks
02.05.2013 - 23:14DROPS Design answered:
Dear Simone, the sections K4 and P4 are meant seen from RS. Happy knitting!
03.05.2013 - 08:04
|
|||||||||||||||||||
Chilling Seaside |
|||||||||||||||||||
|
|
|||||||||||||||||||
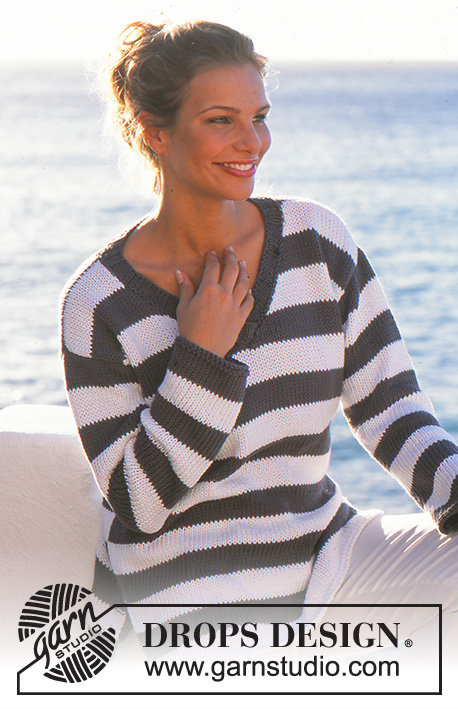
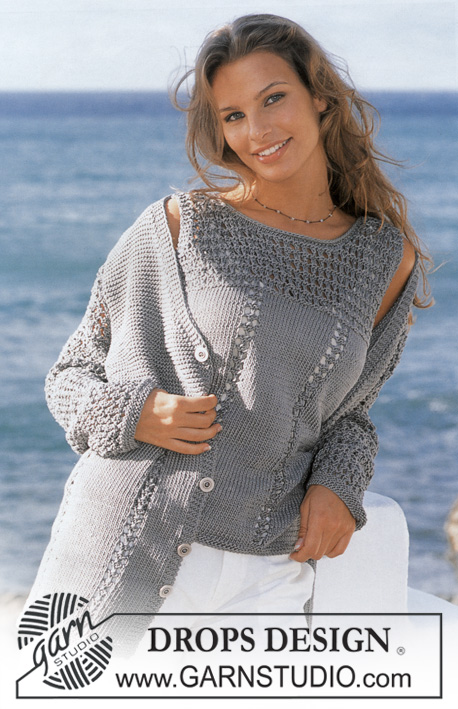
DROPS Top in Muskat
DROPS 81-6 |
|||||||||||||||||||
|
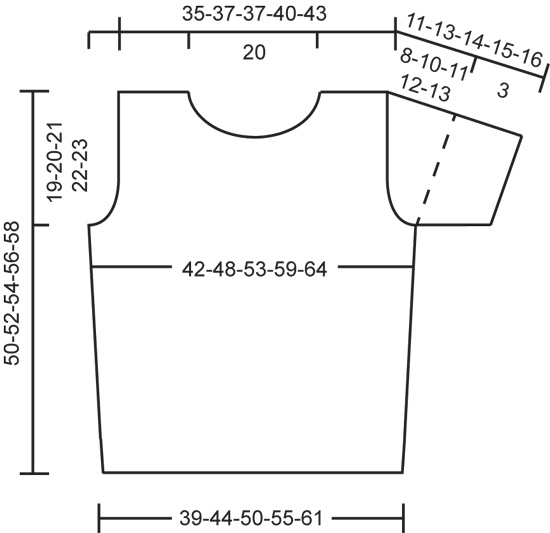
Gauge: 22 sts x 30 rows in stockinette st = 10 x 10 cm Rib: Row 1: * P 4, K 2 *, repeat from * - *. Row 2: * K 4, P 2 *, repeat from * - *. Decreasing tips-1 (for armholes on front): All decs are made on right side rows! Right side of work: Dec inside of 2 sts (1 edge st and K 1). Slip 1 as if to knit, K 1, psso. Note!! on the row back P the 2 last sts before edge st.) Left side of work: Dec inside of 5 sts (1 edge st, K 2 and P 2) like this: K 2 tog. Decreasing tips-2 (for armholes on back): All decs are made on right side rows. Dec inside of 2 sts (1 edge st and K 1) at each side as follows: After 2 edge sts: Slip 1 st as if to knit, K 1, psso. Before 2 edge sts: K 2 tog. Pattern: See chart. The pattern is seen from the right side. Front: Cast on 81-93-105-117-129 sts and establish pattern as follows: Row 1 (right side): K 1 (edge st knit in garter st), P 2, * K 2, P 4 *, repeat from * - * over 24-30-36-42-48 sts, K 2, P 5, K 3, P 4, K 4, P 7, K 2, * P 4, K 2 *, repeat from * - * over 24-30-36-42-48 sts, P 2 and K 1 (edge st knit in garter st). Row 2 (wrong side): K 1 (edge st knit in garter st), K 2, * P 2, K 4 *, repeat from * - * over 24-30-36-42-48 sts, P 2, K 7, P 4, K 4, P 3, K 5, P 2, * K 4, P 2 *, repeat from * - * over 24-30-36-42-48 sts, K 2 and K 1 (edge st knit in garter st). Repeat Rows 1 and 2 one time more, increasing on the last row the K 4 between the P 4 and P 7 to K 6 = 83-95-107-119-131 sts. Then continue as follows (right side): K 1 (edge st knit in garter st), 26-32-38-44-50 sts reversed stockinette st (wrong side out), Pattern 1 (= 27 sts), 28-34-40-46-52 sts stockinette st (with right side out) and K 1 (edge st knit in garter st). Side inc: When the piece measures 8 cm inc 1 st at each side every 3 cm 8 times, at beginning of row inc with P and at end of row inc with K = 99-111-123-135-147 sts. Armhole: When the piece measures 31-32-33-34-35 cm bind off 8 sts at each side. Dec 1 st at armhole at each side every other row – see decreasing tips-1: 3-6-12-15-18 times. When the piece measures 38-40-42-44-46 cm bind off the center 23 sts for the neck. Then bind off at each neck edge every other row: 3 sts 1 time, 2 sts 2 times and 1 st 4 times. After all armhole and neck shaping is complete 16-19-19-22-25 sts remain on each shoulder. When the piece measures 50-52-54-56-58 cm bind off all sts. Back: Cast on 98-110-122-134-146 sts and establish rib as follows: Row 1 (right side): K 1 (edge st knit in garter st), P 2, * K 2, P 4 *, repeat from * - * to last 5 sts, K 2, P 2 and K 1 (edge st knit in garter st). Row 2 (wrong side): K 1 (edge st knit in garter st), K 2, * P 2, K 4 *, repeat from * - * to last 5 sts, P 2, K 2 and K 1 (edge st knit in garter st). Continue the rib over all sts. Armhole: When the piece measures 31-32-33-34-35 cm bind off 8 sts at each side. Then dec 1 st at armhole edge every other row – see decreasing tips-2: 3-6-12-15-18 times = 76-82-82-88-94 sts. When the piece measures 47-49-51-53-55 cm put the center 38 sts on a st holder for the neck. Then bind off at each neck edge every other row: 2 sts 1 time and 1 st 1 time = 16-19-19-22-25 sts remain on each shoulder. Bind off when the piece measures 50-52-54-56-58 cm. Sleeve: Cast on 74-80-86-92-98 sts. Knit 4 rows rib, keeping 1 edge st in garter st at each side (row 1 = right side), then K 2 rows garter st,, then knit stockinette st to finished measurements. When the piece measures 3 cm bind off 8 sts at each side. Then bind off for sleeve cap at each side every other row: 3 sts 1 time, 2 sts 1 time, 1 st 9-11-12-14-15 times and then 2 sts at each side until the piece measures 10-12-13-14-15 cm, then bind off 3 sts 1 time at each side, then bind off the remaining sts. The piece measures approx. 11-13-14-15-16 cm. Assembly: Sew shoulder seams. Neckband: Pick up 114-120 sts (divisible by 6, incl. sts on st holder) around the neck on short circular needles; join and place a marker at the join. P 1 row, K 1 row and then knit 3 rows rib (= K 2, P 4) – see that the rib follows the rib over the back. Bind off in rib. Sew in sleeves. Sew sleeve and side seams using edge sts as a seam allowance. |
|||||||||||||||||||
Diagram explanations |
|||||||||||||||||||
|
|||||||||||||||||||
 |
|||||||||||||||||||
 |
|||||||||||||||||||
Have you finished this pattern?Tag your pictures with #dropspattern or submit them to the #dropsfan gallery. Do you need help with this pattern?You'll find 18 tutorial videos, a Comments/Questions area and more by visiting the pattern on garnstudio.com. © 1982-2026 DROPS Design A/S. We reserve all rights. This document, including all its sub-sections, has copyrights. Read more about what you can do with our patterns at the bottom of each pattern on our site. |
|||||||||||||||||||


With over 40 years in knitting and crochet design, DROPS Design offers one of the most extensive collections of free patterns on the internet - translated to 17 languages. As of today we count 324 catalogs and 12290 patterns - 12280 of which are translated into English (US/in).
We work hard to bring you the best knitting and crochet have to offer, inspiration and advice as well as great quality yarns at incredible prices! Would you like to use our patterns for other than personal use? You can read what you are allowed to do in the Copyright text at the bottom of all our patterns. Happy crafting!
Post a comment to pattern DROPS 81-6
We would love to hear what you have to say about this pattern!
If you want to leave a question, please make sure you select the correct category in the form below, to speed up the answering process. Required fields are marked *.