
Popular categories
Looking for a yarn?


Comments / Questions (21)
![]() Camy wrote:
Camy wrote:
Bra "amningsvärmare" i mitt favoritgarn Eskimo! =) Kanske gör jag ett försök att sticka detta förstärkningsplagg till hösten.
04.06.2013 - 18:16
![]() Nicole wrote:
Nicole wrote:
Beim Rückenteil: Dort steht: "Nach 17-18-19-20-21 cm, auf beiden Seiten, 2 R. re. über die äussersten 6-6-7-7-8 M. stricken". Beeinhaltet das auch die RM, oder soll ich noch dazurechnen? Und: Werden die RM eigentlich immer re gestrickt?
04.12.2012 - 12:32DROPS Design answered:
Liebe Nicole, die Randmasche wird immer re gestrickt und die äußersten 6-6-7-7-8 M. beinhalten auch die Randmasche. Viel Spaß beim Stricken!
04.12.2012 - 15:30DROPS Design wrote:
Hi Carmine That 1 stitch to inc at 5 cm is at the armhole side only.
09.02.2012 - 20:21Carmine wrote:
'Left front piece:..when piece measures 5cm inc 1 st each side'...this occurs while still increasing by twos. So in this instance should the increase be 3 on one side when you increase the one on the other?
09.02.2012 - 08:10Hallgerð wrote:
Den vil jeg strikke.
13.08.2006 - 18:34
![]() Cassandra wrote:
Cassandra wrote:
Flot Model!! Jeg har strikket to bluser og de ser flot ud på!;)
10.08.2006 - 18:42
![]() Berit wrote:
Berit wrote:
Bare flot og smart lad den gerne komme med
26.07.2006 - 16:25
![]() Anna Ödegaard wrote:
Anna Ödegaard wrote:
"görsnygg"
24.07.2006 - 12:40Caroline wrote:
Gillar kragen.
30.06.2006 - 23:26wrote:
denne var skikkelig stilig og røff
29.06.2006 - 19:17
|
|
DROPS 98-46 |
|
|
|
|
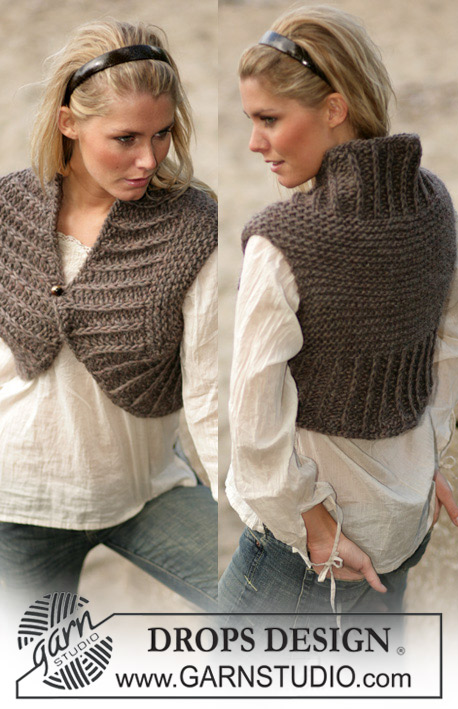
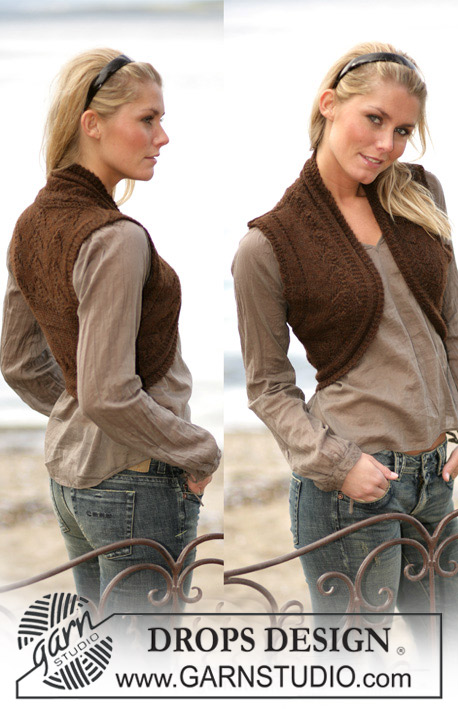
DROPS Short shrug in “Snow”
DROPS 98-46 |
|
|
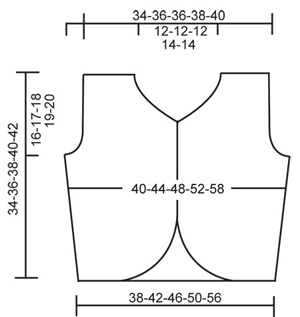
Knitting gauge: 10 sts x 14 rows on needles size 9 mm / US 13 in stockinette sts = 10 x 10 cm / 4" x 4". Garter sts (back and forth on row): Knit all rows. Decreasing tips (apply for the armhole): Dec inside the 3 edge sts in garter sts. All dec. are done from the RS. Dec as follows after 3 sts: Slip a st as if to knit, K1, psso. Dec as follows before 3 sts: K 2 tog. Button hole: bind off for button holes at the right front piece and from the RS. 1 button hole = bind off the 3rd st from the edge. On the following row cast on 1 new st at the same place. Bind off for buttonholes when the piece measures: Size S: 13 and 23 cm / 5⅛" and 9" Size M: 15 and 25 cm / 6"and 9¾" Size L: 16 and 27 cm / 6¼" and 10⅝" Size XL: 16 and 27 cm / 6¼" and 10⅝" Size XXL: 18 and 20 cm / 7" and 8" Back piece: Cast on 40-44-48-52-58 sts (includes 1 edge st each side) on needle size 9 mm / US 13 in Snow. Knit 2 rows of garter sts. Continue in stockinette sts. When the piece measure 10 cm / 4" inc 1 st each side = 42-46-50-54-60 sts. When the piece measures 17-18-19-20-21 cm / 6¾"-7"-7½"-8"-8¼" K2 rows of garter sts over the outermost 6-6-7-7-8 sts each side (continue to work the other sts in stockinette sts). On the following row bind off 3-3-4-4-5 sts each side for the armhole. Continue to dec 1 st each side on every other row – see decreasing tips: 1-2-3-4-5 times = 34-36-36-38-40 sts. Continue to knit the outermost 3 sts in garter sts throughout. When the piece measures 32-34-36-38-40 cm / 12½"-13⅜"-14¼"-15"-15¾" bind off the mid 10-10-10-12-12 sts for the neck and continue each shoulder separately. Continue and dec 1 st towards the neckline on next row = 11-12-12-12-13 sts left on shoulder. Bind off remaining sts when the piece measures 34-36-38-40-42 cm / 13⅜"-14¼"-15"-15¾"-16½". Left front piece: Cast on 14-15-17-19-22 sts (includes 1 edge st at the side) on needles size 9 mm / US 13 in Snow. Knit 2 rows of garter sts. Then continue in stockinette sts- but knit the 2 outermost front band sts in garter sts until the neck dec. At the same time after 2 rows inc for the rounded edge towards the front edge as follows: Cast on sts loosely on every other row (this means at the end of each row towards the mid front): 2 sts 4 times and 1 st 2-3-3-3-3 times – remember to knit the outermost 2 sts in garter sts. At the same time when the piece measure 5 cm / 2" (instead of 10 cm / 4") inc 1 st at side. When all increases are completed = 25-27-29-31-34 sts on needle. Please read all of the following section before continuing! Armhole: When the piece measures 17-18-19-20-21 cm / 6¾"-7"-7½"-8"-8¼" knit 2 rows of garter sts over the outermost 6-6-7-7-8 sts at the side (work the other sts as before). Then bind off for the armhole at the side as done for the back. Neckline: When the piece measures 24-26-28-28-31 cm / 9½"-10¼"-11"-11"-12¼" bind off for the neckline at beg of every row from front edge: 2 sts 4 times and then 1 st 2-2-2-3-3 times. When all dec for the armhole are completed =11-12-12-12-13 sts left on the shoulder. Bind off remaining sts when the piece measures 34-36-38-40-42 cm / 13⅜"-14¼"-15"-15¾"-16½". Right front piece: Work as the left but reverse. I addition bind off for 2 buttonholes on front band – see explanation above. Assembly: Sew the shoulder seams and sew the side seams inside 1 edge st. Sew in the buttons. Collar: Pick up 42 to 50 sts (divisible with 4 + 2) from the RS. – Note: make sure to pick up enough sts so the Rib doesn’t get to tight. K 1 row from the WS and P 1 row from the RS – then work in Rib as follows: (1st row = WS) 2 sts of garter sts, *P2, K2* repeat from *-*, finish with P2 and 2 sts of garter sts. Continue to knit K over K and P over P. When the collar measures 14 cm / 5½" K 1 row from the RS and P 1 row from the WS before binding off loosely. Crochet edge: Crochet around the edge with hook size 8 mm/L/11 (this means from the top of the side of the collar, down along the front piece, along the bottom edge and up along the other front piece towards the top of the side of the collar). Crochet in the outermost garter st. 1st row in dark lilac mix: 1 sc in the first st, *1 ch, skip 1 cm / ⅜", 1 sc in the following st*, repeat from *-*. Do not turn work. 2nd row with beige: Crochet 1 row of reverse crochet – this means 1 row of sc, but crochet in the opposite directions, i.e. from left to right. Crochet in each sc from previous row. |
|
 |
|
Have you finished this pattern?Tag your pictures with #dropspattern or submit them to the #dropsfan gallery. Do you need help with this pattern?You'll find 25 tutorial videos, a Comments/Questions area and more by visiting the pattern on garnstudio.com. © 1982-2026 DROPS Design A/S. We reserve all rights. This document, including all its sub-sections, has copyrights. Read more about what you can do with our patterns at the bottom of each pattern on our site. |


With over 40 years in knitting and crochet design, DROPS Design offers one of the most extensive collections of free patterns on the internet - translated to 17 languages. As of today we count 324 catalogs and 12290 patterns - 12280 of which are translated into English (US/in).
We work hard to bring you the best knitting and crochet have to offer, inspiration and advice as well as great quality yarns at incredible prices! Would you like to use our patterns for other than personal use? You can read what you are allowed to do in the Copyright text at the bottom of all our patterns. Happy crafting!
Post a comment to pattern DROPS 98-46
We would love to hear what you have to say about this pattern!
If you want to leave a question, please make sure you select the correct category in the form below, to speed up the answering process. Required fields are marked *.