
Popular categories
Looking for a yarn?


Comments / Questions (129)
![]() Cathrine Säll wrote:
Cathrine Säll wrote:
Jag tolkar att M1 flätan återkommer vart 8:de varv enligt mönstret. Men när jag stickar så ser det mycket glesare ut än på mönstrets foto. Använder stl 4 på stickorna för att hålla stickfastheten, kan det vara orsaken till skillnaden?
23.11.2020 - 11:44DROPS Design answered:
Hei Cathrine. Nei, det vil jeg ikke mene. Men prøv å stramme tråden når du strikker flettene, mulig det vil hjelpe. mvh DROPS design
24.11.2020 - 14:09
![]() Eulalia-Frederike wrote:
Eulalia-Frederike wrote:
Hallo, ich habe heute mit der Jacke begonnen und mir stellt sich nun folgendes Problem: wenn ich in der ersten Reihe nach 13 Maschen das Muster stricke, ist der Zopfstreifen doch im unteren Jackenbereich, wenn ich die Zeichnung mit der Strickrichtung richtig verstehe. Anders wäre es, wenn nach dem Maschenanschlag erst einmal eine Reihe Rippenmuster oder glatt rechts gestrickt werden würde. Wo ist mein Fehler? Danke und sonnige Grüße aus Berlin
25.02.2019 - 13:27DROPS Design answered:
Liebe Eulalia-Frederike, die Jacke wird mit dem rechten Vorderteil angefangen, die Skizze zeigt die Arbeit von der Innenseite (das Teil mit dem Stern wird dan über dem Rückenteil (am Armloch) gefaltet. Schauen Sie mal das Foto: Rechtes Vorderteil beginnt oben (am Hals) bis zur unteren Kante, deshalb beginnt man mit M.1 oben. Viel Spaß beim stricken!
01.03.2019 - 08:42
![]() Minou wrote:
Minou wrote:
Ik vind het lastig om de maat te bepalen op basis van de patroontekening. Er is sprake van een overslag. Kunt u vertellen welke borstomvang maat L en XL hebben. Dank u wel. Vriendelijke groeten.
01.11.2018 - 22:31DROPS Design answered:
Dag Minou,
Er is inderdaad een overslag en het linker voorpand is even breed als het rechter voorpand. De borstomvang in maat L is 2 keer 52 en in maat XL 2 keer 58 (De breedte die onderaadn de tekening staat.)
02.11.2018 - 07:39Filipa wrote:
It seems like i can not get the math together. At the beginning i casted on 90 st. Later on another 12 st (for the gusset) which equals 102 st. According to the description we continue knitting until we only have 2 st on the gusset, which equals 92 st. Later on when we put aside the 37 sleeve st it is written that we will continuing kntting on the remaining 57 st. As i see it 37st+57st=94st. This is my problem because i only have 92 st. I could really use some help. Best regards.
03.07.2018 - 09:52DROPS Design answered:
Dear Filipa, thanks for your feedback, our Design Team will have a look on this, but please be aware that it can take some time because of summer vacations. Thanks in advance for your patience.
04.07.2018 - 09:59
![]() Maura wrote:
Maura wrote:
Sono anch'io ferma al punto in cui bisogna avviare a nuovo le 12 maglie in cima alla spalla, non tante la risposta data da Lei a Anna Rita non si capisce come continare, puo' spiegarcelo grazie
08.02.2018 - 12:46
![]() LAURA CAFIERO wrote:
LAURA CAFIERO wrote:
Non capisco se le maniche vanno lavorate in tondo. Non è menzionato che vadano cucite.
15.10.2017 - 16:06DROPS Design answered:
Buonasera Laura. Sì, le maniche vengono lavorate in tondo. Buon lavoro!
15.10.2017 - 20:21
![]() Marion wrote:
Marion wrote:
Bonjour! pour le dos-devant, à 43 cm à partir du marqueur, il est indiqué "augmenter pour l’emmanchure d’1 m de chaque côté tous les 8 rangs en haut de l’épaule", mais une m de chaque coté de quoi? des 4m env, de la m lisière? merci pour votre aide. Marion
26.05.2016 - 21:37DROPS Design answered:
Bonjour Marion, on augmente 1 m en tricotant 2 fois la 1ère et la dernière m env en haut de l'épaule (l'inverse de ce qui a été fait au 1er gousset pour augmenter cette fois). Les explications ont été modifiées. Bon tricot!
27.05.2016 - 08:56
![]() Marion wrote:
Marion wrote:
Bonjour, à 29cm de hauteur, les 57m sont à tricoter sur l'endroit du travail ou sur l'envers? l'expression "vers le bord inférieur" n'est pas très claire. Personnellement, je comprends du haut vers le bas, ce qui revient à tricoter les 57m sur l'endroit. Mais je pense que je me trompe. Pouvez-vous m'aider, s'il-vous-plait? Merci beaucoup
15.05.2016 - 18:11DROPS Design answered:
Bonjour Marion, à 29 cm, vous continuez uniquement sur les 57 mailles du devant (bas de l'ouvrage vu sur l'endroit), les 37 m de la fin du rang (en haut, vu sur l'endroit = emmanchure), sont mises en attente pour la manche et seront tricotées plus tard. Bon tricot!
17.05.2016 - 10:27
![]() Anna Rita wrote:
Anna Rita wrote:
Mi scuso, ma andando avanti sempre nella spiegazione del davanti dietro non mi torna il numero delle maglie indicate dal modello. A 34 cm. metto 41 maglie ( quelle verso l'alto ) sul fermamaglie, poi dopo 2 cm di lavoro delle altre 61 maglie devo avviare 37 m. sulle m. che stavano sul fermamaglie per la manica..totale 98 m. (?) Ma 98 sono le maglie da lavorare per la manica? 41+37= 78, le altre 20 maglie da dove le prendo? Grazie per i sempre precisi e puntuali chiarimenti.
20.12.2015 - 22:03DROPS Design answered:
Buongiorno Anna Rita. Dopo aver messo le 41 m in attesa per la manica, lavora 2 cm sulle m rimaste, poi avvia 37 nuove m che sono le m della parte superiore del dietro. Le 98 m sono le m del dietro. Le maniche vengono lavorate in un secondo momento. L'ultimo grafico, dopo le spiegazioni, mostra come si svolge il lavoro: molto probabilmente le diventa più chiaro. Buon lavoro!
21.12.2015 - 08:21
![]() Anna Rita wrote:
Anna Rita wrote:
Buona sera, non mi è chiaro il passaggio della spiegazione del davanti e dietro in cui dopo aver avviato le nuove maglie in cima alla spalla (che vanno lavorate sempre a rovescio) si lavorano le maglie originali come prima e insieme le 2 maglie più esterne ad ogni estremità del tassello ogni 8 ferri fino a che restano 2 maglie. Ma per fare questo devo lavorare il tassello separato dal resto delle maglie? Spero di essere riuscita a far capire il mio dubbio. Grazie
17.12.2015 - 00:19DROPS Design answered:
Buonasera Anna Rita. Deve lavorare tutte le m sul ferro e non solo quelle del tassello. Deve solo lavorare insieme a rov le prime 2 e le ultime 2 m delle m del tassello ogni 8 ferri. Lavora le rimanenti m come già impostato. Buon lavoro!
17.12.2015 - 22:50
|
|||||||||||||
DROPS 96-3 |
|||||||||||||
 |
 |
||||||||||||
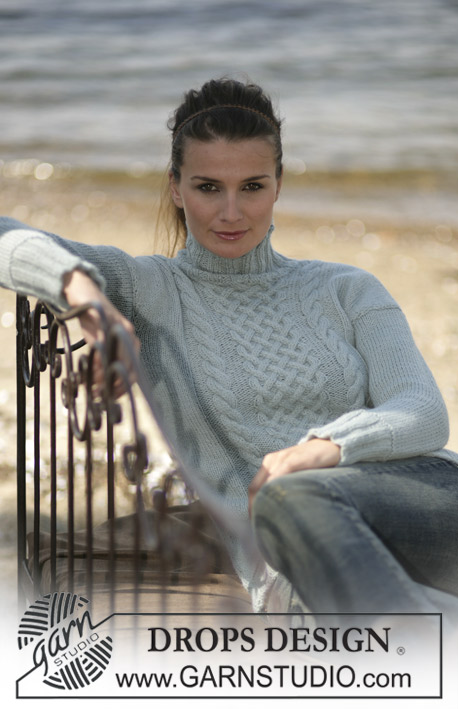
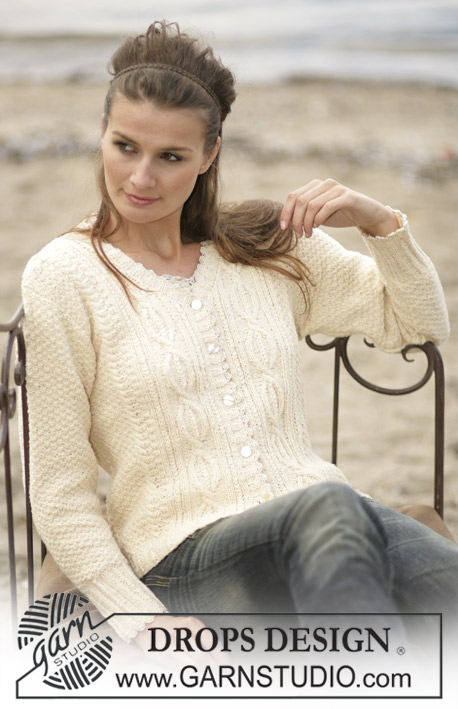
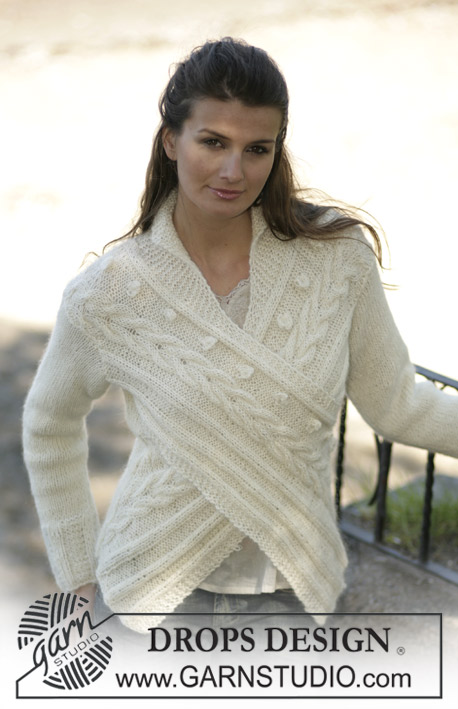
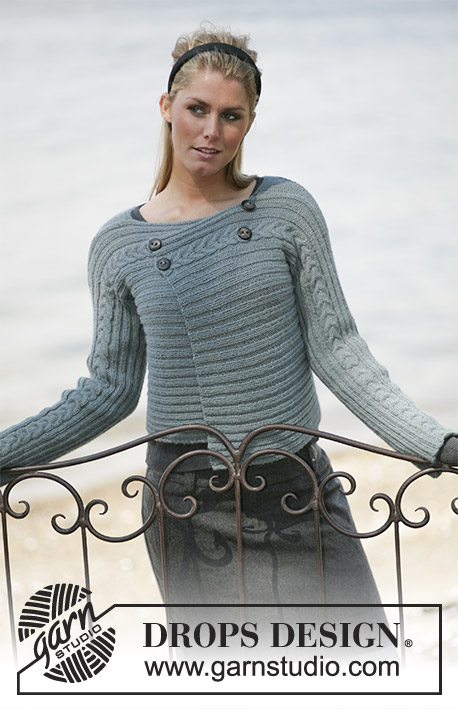
DROPS Short jacket knitted from side to side in Alpaca Size: S-XXL
DROPS 96-3 |
|||||||||||||
|
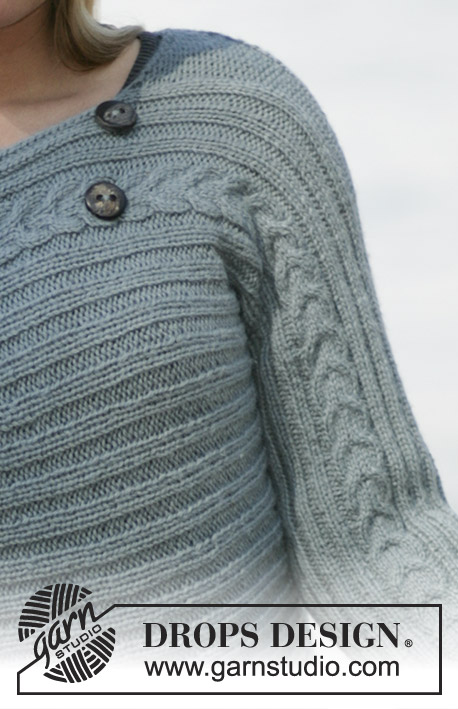
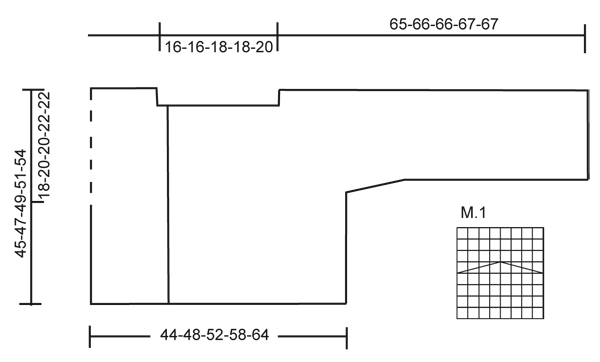
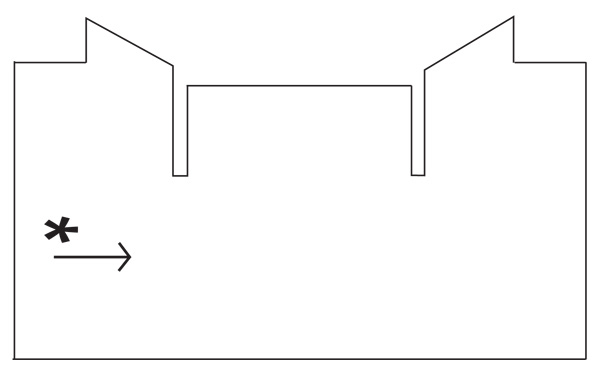
Pattern: See diagram M.1. The diagram is seen from the right side. Pattern tips: To ensure that the cable turns the same way throughout, reverse the instructions in M.1 on the back of the right sleeve and on the front of the left sleeve. This means putting stitches in front of piece when it says behind piece and vice versa. Failure to do this will make the cable twist the opposite way. -------------------------------------------------------- JACKET – SHORT OVERVIEW OF PIECE: The jacket is worked from side to side. Start mid front on right front piece, work towards the side, put stitches on thread for sleeve, cast on new stitches for sleeve. Continue over the back piece towards the other side, put stitches on thread for sleeve, cast on new stitches for sleeve and work towards mid front on left front piece. JACKET: Back and front piece: Cast on 90-94-98-102-106 stitches with 2 threads Alpaca (double thread) on needle size 4.5 mm / US 7. Work as follows (1 stitch row = RS): 1 edge stitch (knitted in garter stitches throughout) - *Knit 2, purl 2", repeat from *-* over 12 stitches, M.1 (= 8 stitches), *knit 2, purl 2*, repeat from *-* and finish with 1 edge stitch (worked in garter stitches throughout). Continue like this until piece measures 16-16-18-18-20 cm / 6¼"-6¼"-7"-7", now cast on 12-12-14-14-16 new stitches at the top of the shoulder – purl these stitches (seen from the RS) with 1 edge stitch at the side as you continue = 102-106-112-116-122 stitches (the new stitches will form a gusset at the top of the shoulder for a better fit and are to be bind off again later). Now work the original stitches as before whilst purling together the 2 outermost stitches each end of the gusset on every 8th row 6-6-7-7-8 times until there are 2 purl stitches left. At the same time when piece measures 29-31-34-37-41 cm / 11⅜"-12⅛"-13⅜"-14½"-16⅛" knit only the 57-57-61-61-65 stitches towards lower edge and put the remaining stitches on a thread for sleeve. Work 1 cm / ⅜", insert a marking thread (= right side), work 1 cm / ⅜". Now cast on 33-37-37-41-41 new stitches over the stitches on the thread for sleeve = 90-94-98-102-106 stitches. Continue in pattern as before. When piece measures 43-47-51-57-63 cm / 16⅞"-18½"-20"-22⅜"-24¾" from the marking thread, work only the 57-57-61-61-65 stitches towards lower edge - put the remaining stitches on a thread for sleeve. Work 1 cm / ⅜", insert a marking thread (= left side), work 1 cm / ⅜". Now cast on 37-41-41-45-45 new stitches over the stitches on the thread for sleeve = 94-98-102-106-110 stitches. Work as follows from the shoulder: 1 edge stitch, purl 4, *knit 2, purl 2*, repeat from *-* over 12 stitches, M.1 (= 8 stitches), *knit 2, purl 2*, repeat from *-* and finish with 1 edge stitch. Continue like this, at the same time increase for gusset on the shoulder by purling 2 stitches in the first and the last purl stitch at the top of the shoulder on every 8th row 6-6-7-7-8 time (=12-12-14-14-16 purl stitches increased) = 102-106-112-116-122 stitches. When piece measures 14-16-17-20-22 cm / 5½"-6¼"-6⅝"-7⅞"-8⅝" from the marking thread on left side bind off the upper 12-12-14-14-16 purl stitches for neck = 90-94-98-102-106 stitches. Continue in pattern, at the same time after 1 cm / ⅜" bind off for 2 buttonholes towards the top as follows: 5 stitches, bind off 2 stitches, 9 stitches, bind off 2 stitches, finish the row. On the return row cast on 2 new stitches over the bind-off stitches. Continue in pattern. Make another 2 buttonholes the same way when piece measures 28-30-33-36-40 cm / 11"-11¾"-13"-14⅛"-15¾" from the marking thread on left side. Work 2 cm / ¾" and bind off all stitches. Right sleeve: Please read Pattern tips above before continuing. Put stitches from thread for sleeve on right front piece on double pointed needles size 4.5 mm / US 7. Pick up 6 new stitches mid under arm and pick up 1 stitch in each stitch cast on over sleeve stitches on back piece. Work pattern as before – see Pattern tips above - with 6 purl stitches mid under arm. At the same time, finish the gusset mid upper arm, and decrease the 6 purl stitches mid under arm by purling together 2 stitches on every 2 cm / ¾" 4 times until 2 purl stitches remain = 70-78-79-86-86 stitches. Continue until sleeve measures 65-66-66-67-67 cm / 25½"-26"-26"-26⅜"-26⅜" from neckline and bind off. Left sleeve: Please read Pattern tips above before continuing. Put stitches from thread for sleeve on left side of back piece on double pointed needles size 4.5 mm / US 7. Pick up 1 stitch in each stitch cast on over sleeve on front piece and 6 new stitches mid under arm. Work as right sleeve. Assembly: Sew the gusset to shoulder on the back piece. Put left front piece over right front piece, slightly sloping, approximately 3-4 cm / 1⅛"-1 ½" from the neckline. Sew on buttons to fit the buttonholes. |
|||||||||||||
Diagram explanations |
|||||||||||||
|
|||||||||||||
 |
|||||||||||||
 |
|||||||||||||
Have you finished this pattern?Tag your pictures with #dropspattern or submit them to the #dropsfan gallery. Do you need help with this pattern?You'll find 18 tutorial videos, a Comments/Questions area and more by visiting the pattern on garnstudio.com. © 1982-2026 DROPS Design A/S. We reserve all rights. This document, including all its sub-sections, has copyrights. Read more about what you can do with our patterns at the bottom of each pattern on our site. |
|||||||||||||


With over 40 years in knitting and crochet design, DROPS Design offers one of the most extensive collections of free patterns on the internet - translated to 17 languages. As of today we count 324 catalogs and 12245 patterns - 12235 of which are translated into English (US/in).
We work hard to bring you the best knitting and crochet have to offer, inspiration and advice as well as great quality yarns at incredible prices! Would you like to use our patterns for other than personal use? You can read what you are allowed to do in the Copyright text at the bottom of all our patterns. Happy crafting!
Post a comment to pattern DROPS 96-3
We would love to hear what you have to say about this pattern!
If you want to leave a question, please make sure you select the correct category in the form below, to speed up the answering process. Required fields are marked *.