
Popular categories
Looking for a yarn?


|
|||||||||||||
DROPS 96-3 |
|||||||||||||
 |
 |
||||||||||||
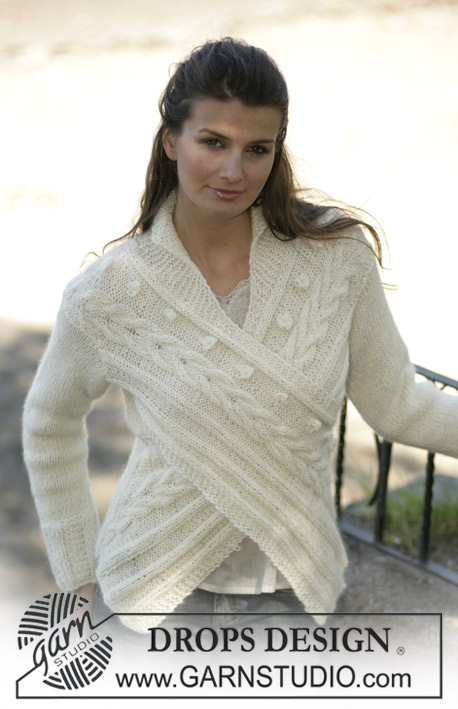
Short jacket with cables in 2 strands DROPS Alpaca. Piece is worked from side to side Size: S-XXL
DROPS 96-3 |
|||||||||||||
|
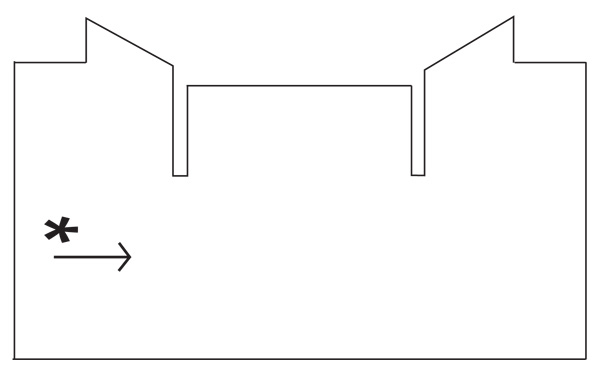
Pattern: See diagram M.1. The diagram is seen from the right side. Pattern tips: To ensure that the cable turns the same way throughout, reverse the instructions in M.1 on the back of the right sleeve and on the front of the left sleeve. This means putting stitches in front of piece when it says behind piece and vice versa. Failure to do this will make the cable twist the opposite way. -------------------------------------------------------- JACKET – SHORT OVERVIEW OF PIECE: The jacket is worked from side to side. Start mid front on right front piece, work towards the side, put stitches on thread for sleeve, cast on new stitches for sleeve. Continue over the back piece towards the other side, put stitches on thread for sleeve, cast on new stitches for sleeve and work towards mid front on left front piece. JACKET: Back and front piece: Cast on 90-94-98-102-106 stitches with 2 threads Alpaca (double thread) on needle size 4.5 mm. Work as follows (1 stitch row = RS): 1 edge stitch (knitted in garter stitches throughout) - *Knit 2, purl 2”, repeat from *-* over 12 stitches, M.1 (= 8 stitches), *knit 2, purl 2*, repeat from *-* and finish with 1 edge stitch (worked in garter stitches throughout). Continue like this until piece measures 16-16-18-18 cm, now cast on 12-12-14-14-16 new stitches at the top of the shoulder – purl these stitches (seen from the RS) with 1 edge stitch at the side as you continue = 102-106-112-116-122 stitches (the new stitches will form a gusset at the top of the shoulder for a better fit and are to be cast off again later). Now work the original stitches as before whilst purling together the 2 outermost stitches each end of the gusset on every 8th row 6-6-7-7-8 times until there are 2 purl stitches left. At the same time when piece measures 29-31-34-37-41 cm knit only the 57-57-61-61-65 stitches towards lower edge and put the remaining stitches on a thread for sleeve. Work 1 cm, insert a marking thread (= right side), work 1 cm. Now cast on 33-37-37-41-41 new stitches over the stitches on the thread for sleeve = 90-94-98-102-106 stitches. Continue in pattern as before. When piece measures 43-47-51-57-63 cm from the marking thread, work only the 57-57-61-61-65 stitches towards lower edge - put the remaining stitches on a thread for sleeve. Work 1 cm, insert a marking thread (= left side), work 1 cm. Now cast on 37-41-41-45-45 new stitches over the stitches on the thread for sleeve = 94-98-102-106-110 stitches. Work as follows from the shoulder: 1 edge stitch, purl 4, *knit 2, purl 2*, repeat from *-* over 12 stitches, M.1 (= 8 stitches), *knit 2, purl 2*, repeat from *-* and finish with 1 edge stitch. Continue like this, at the same time increase for gusset on the shoulder by purling 2 stitches in the first and the last purl stitch at the top of the shoulder on every 8th row 6-6-7-7-8 time (=12-12-14-14-16 purl stitches increased) = 102-106-112-116-122 stitches. When piece measures 14-16-17-20-22 cm from the marking thread on left side cast off the upper 12-12-14-14-16 purl stitches for neck = 90-94-98-102-106 stitches. Continue in pattern, at the same time after 1 cm cast off for 2 buttonholes towards the top as follows: 5 stitches, cast off 2 stitches, 9 stitches, cast off 2 stitches, finish the row. On the return row cast on 2 new stitches over the cast-off stitches. Continue in pattern. Make another 2 buttonholes the same way when piece measures 28-30-33-36-40 cm from the marking thread on left side. Work 2 cm and cast off all stitches. Right sleeve: Please read Pattern tips above before continuing. Put stitches from thread for sleeve on right front piece on double pointed needles size 4.5 mm. Pick up 6 new stitches mid under arm and pick up 1 stitch in each stitch cast on over sleeve stitches on back piece. Work pattern as before – see Pattern tips above - with 6 purl stitches mid under arm. At the same time, finish the gusset mid upper arm, and decrease the 6 purl stitches mid under arm by purling together 2 stitches on every 2 cm 4 times until 2 purl stitches remain = 70-78-79-86-86 stitches. Continue until sleeve measures 65-66-66-67-67 cm from neckline and cast off. Left sleeve: Please read Pattern tips above before continuing. Put stitches from thread for sleeve on left side of back piece on double pointed needles size 4.5 mm. Pick up 1 stitch in each stitch cast on over sleeve on front piece and 6 new stitches mid under arm. Work as right sleeve. Assembly: Sew the gusset to shoulder on the back piece. Put left front piece over right front piece, slightly sloping, approximately 3-4 cm from the neckline. Sew on buttons to fit the buttonholes. |
|||||||||||||
Diagram explanations |
|||||||||||||
|
|||||||||||||

|
|||||||||||||
|
|||||||||||||
|
Have you made this or any other of our designs? Tag your pictures in social media with #dropsdesign so we can see them! Do you need help with this pattern?You'll find tutorial videos, a Comments/Questions area and more by visiting the pattern on garnstudio.com. © 1982-2024 DROPS Design A/S. We reserve all rights. This document, including all its sub-sections, has copyrights. Read more about what you can do with our patterns at the bottom of each pattern on our site. |
|||||||||||||


With over 40 years in knitting and crochet design, DROPS Design offers one of the most extensive collections of free patterns on the internet - translated to 17 languages. As of today we count 304 catalogues and 11422 patterns - 11422 of which are translated into English (UK/cm).
We work hard to bring you the best knitting and crochet have to offer, inspiration and advice as well as great quality yarns at incredible prices! Would you like to use our patterns for other than personal use? You can read what you are allowed to do in the Copyright text at the bottom of all our patterns. Happy crafting!
Comments / Questions (128)
Speels Lijkt me een leuke naam
14.04.2024 - 18:49Speels Lijkt me een leuke naam
14.04.2024 - 18:47Bonjour, Je viens de mettre en attente les mailles pour la 1e manche (droite) et de remonter les 37m (taille M) au-dessus de celles en attente (soit 94m au total actuellement). Que dois-je comprendre par "continuer comme avant" ? Faut-il reprendre M1 à partir de la 14e maille (si torsade dans le dos) ? Ou faut-il reprendre simplement avec 1 m lisière puis côtes 2/2 (sans faire M1) ? Merci d'avance pour vos explications. Cordialement
04.02.2024 - 18:00Bonjour, je trouve ce modèle fort joli. Malheureusement les explications manquent beaucoup de clarté. Je pense que je vais avoir besoin d'explications supplémentaires.
08.03.2023 - 13:30Bonjour, J'ai du mal à comprendre l'astuce qui est expliquée et du coup ce qu'il faut faire au niveau des manches. Les torsades du "buste" ne vont pas dans le même sens que celles des manches ? Je suis preneuse d'explications plus précises... Merci pour vos éclaircissements! Cordialement, Marion
20.10.2022 - 21:54DROPS Design answered:
Bonjour Mme Trebos, pour que la torsade continue sur la manche droite, vous tricotez celle côté devant comme avant, mais celle du côté dos en sens inverse (car elle a été faite du devant droit vers le devant gauche), autrement dit côté dos, tricotez la torsade en mettant d'abord 2m derrière puis 2 m devant pour la 2ème torsade; pour la manche gauche, ce sera pareil mais cette fois vous continuerez celle du côté dos et tricoterez celle côté devant en sens inverse. Bon tricot!
21.10.2022 - 09:30Ik heb het vest gebreid en het is echt prachtig geworden. Nu viel mij op dat er bij staat dat het links over rechts sluit, maar dan is het toch een herensluiting? Of geld dat tegenwoordig niet meer? In ieder geval bedankt voor het mooie patroon. Hartelijke groet, Diny
07.10.2021 - 11:02Bij het minderen van de spie moet ik iedere 8e naald dan 2 steken per keer minderen? Is mij niet helemaal duidelijk. Diny
28.03.2021 - 22:38DROPS Design answered:
Dag Diny,
Ja, dat klopt; je mindert iedere 8e naald 2 averechte steken.
03.04.2021 - 11:28Buongiorno, credo ci sia un errore nelle spiegazioni, oppure sono io che non capisco. Le spiegazioni del primo ferro dicono di fare 2 dritti e 2 rovesci per 12 maglie, poi lavorare la treccia, e poi ripartire con 2 dritti e 2 rovesci. Ma, guardando la foto, per far risaltare la treccia, dopo aver lavorato le 8 maglie dello schema M1 bisognerebbe ripartire con 2 rovesci e non 2 dritti, finendo poi il ferro con 2 dritti. È corretto? Grazie.
13.12.2020 - 22:15DROPS Design answered:
Buonasera Francesca, abbiamo inoltrato la sua segnalazione al settore design: se ci dovessero essere delle correzioni verranno effettuate direttamente online. Buon lavoro!
16.12.2020 - 22:25Jag tolkar att M1 flätan återkommer vart 8:de varv enligt mönstret. Men när jag stickar så ser det mycket glesare ut än på mönstrets foto. Använder stl 4 på stickorna för att hålla stickfastheten, kan det vara orsaken till skillnaden?
23.11.2020 - 11:44DROPS Design answered:
Hei Cathrine. Nei, det vil jeg ikke mene. Men prøv å stramme tråden når du strikker flettene, mulig det vil hjelpe. mvh DROPS design
24.11.2020 - 14:09Hallo, ich habe heute mit der Jacke begonnen und mir stellt sich nun folgendes Problem: wenn ich in der ersten Reihe nach 13 Maschen das Muster stricke, ist der Zopfstreifen doch im unteren Jackenbereich, wenn ich die Zeichnung mit der Strickrichtung richtig verstehe. Anders wäre es, wenn nach dem Maschenanschlag erst einmal eine Reihe Rippenmuster oder glatt rechts gestrickt werden würde. Wo ist mein Fehler? Danke und sonnige Grüße aus Berlin
25.02.2019 - 13:27DROPS Design answered:
Liebe Eulalia-Frederike, die Jacke wird mit dem rechten Vorderteil angefangen, die Skizze zeigt die Arbeit von der Innenseite (das Teil mit dem Stern wird dan über dem Rückenteil (am Armloch) gefaltet. Schauen Sie mal das Foto: Rechtes Vorderteil beginnt oben (am Hals) bis zur unteren Kante, deshalb beginnt man mit M.1 oben. Viel Spaß beim stricken!
01.03.2019 - 08:42