
Popular categories
Looking for a yarn?


Comments / Questions (28)
![]() Gudrun Regensburger wrote:
Gudrun Regensburger wrote:
Nachdem meine Mütze viel zu kurz wurde, gehe ich davon aus, dass sich die Abnahmen nicht auf "3. und 4. Rd."= Runde, sondern 3. und 4. REIHE des Musters beziehen. Stimmt das?
15.01.2025 - 11:45DROPS Design answered:
Liebe Frau Regensburger, die Abnahmen am Ende der Mütze werden so gestrickt: *2 Runden ohne Abnahmen, 1 Runde mit Abnahmen, 3 Runde ohne, , 1 Runde mit Abnahmen * und von *bis* insgesamt 6 Mal stricken (12 Runden mit Abnahmen), dann noch 2 Runden ohne Abnahmen und 1 Runde mit Abnahmen stricken - so haben Sie abwechslungsweise in jeder 3. und in jeder 4. Runde abgenommen. Hier lesen Sie noch mehr. Viel Spaß beim Stricken!
15.01.2025 - 15:58
![]() Lili wrote:
Lili wrote:
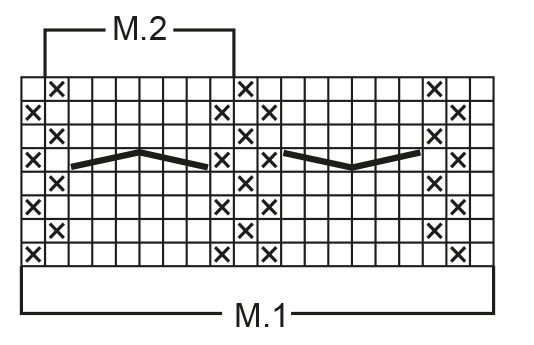
Bonjour Je ne trouve pas M1 et M2 merci de m'aider
20.11.2022 - 15:53DROPS Design answered:
Bonjour Lili, vous trouverez le diagramme M.1 et la partie M.2 à la fin des explications écrites; juste sous la légende des symboles. Pour M.1, tricotez l'intégralité du diagramme en largeur, pour M.2 tricotez seulement les mailles indiquées par l'encadré (= 8 mailles). Bon tricot!
21.11.2022 - 09:39
![]() Annette Boll wrote:
Annette Boll wrote:
Ved halsedisse, står en mærketråd i hver 6. Maske og i alt 7 mærketråde. Er det hele vejen rundt på de 112 masker? Så bliver det jo mere end 7.
14.11.2021 - 13:58DROPS Design answered:
Hej Annette. Det ska vara en mærketråd i hver 16. maske, detta är nu rättat. Tack för info! Mvh DROPS Design
16.11.2021 - 08:58
![]() Pia Anderberg wrote:
Pia Anderberg wrote:
Undrar om det numera finns en garnFÄRG till denna modell 0-96 (eller garngrupp B) som påminner om Karisma 38 (finns ju inte mer men var en underbar plommonfärg!!!) Tack!
18.09.2021 - 15:13DROPS Design answered:
Hej Pia. Om du klickar på denna länk så ser du alla lila färger vi har i garngrupp B, hoppas du hittar någon som du tycker om. Mvh DROPS Design
22.09.2021 - 09:40
![]() Lelletta wrote:
Lelletta wrote:
Buonasera! Scusatemi se insisto, forse non mi sono spiegata bene, ma mancano i simboli dei diagrammi accanto alla spiegazione... c'è scritto questo: Traduzione dei simboli del diagramma: = 1 m dir = 1 m rov = trasferire 3 m su un ferro ausiliario sul davanti del lavoro, 3 m dir, 3 m dir dal f ausiliario. = trasferire 3 m su un ferro ausiliario sul dietro del lavoro, 3 m dir, 3 m dir dal f ausiliario. E i simboli??? Vi ringrazio attendendo la correzione! Buona giornata!
06.01.2020 - 16:12DROPS Design answered:
Buongiorno Lelletta. La descrizione dei simboli in italiano segue lo stesso ordine di quella norvegese che trova sotto il diagramma M.1. Quindi 1 m dir corrisponde al quadratino bianco; 1 m rov corrisponde al quadratino con la "x" e così via. Buon lavoro!
07.01.2020 - 10:07
![]() Lelletta wrote:
Lelletta wrote:
Buonasera! Potete cortesemente correggere la spiegazione dei simboli dei diagrammi, in quanto una parte è mancante, ed un'altra (quella degli incroci della treccia) non è stata tradotta in italiano. Vi ringrazio e Vi saluto cordialmente .
28.12.2019 - 16:12DROPS Design answered:
Buonasera Lelletta, la legenda del diagramma in italiano è nell'ultima parte delle spiegazioni. Buon lavoro!
28.12.2019 - 17:44
![]() Ane Alstrup wrote:
Ane Alstrup wrote:
Hvad betyder hvid firkant, her kaldet “m”, og hvad betyder x, som her kaldes “am” Gode hilsner Ane
27.07.2019 - 11:48DROPS Design answered:
Hej Ane, Det er svensk og rm betyder ret masker og am betyder vrang masker. God fornøjelse!
01.08.2019 - 15:30
![]() Beatrice Zionts wrote:
Beatrice Zionts wrote:
Need clarification because my hat has come to a point What does this mean: alternately on every 3rd and 4th row? Does that mean every row 3 and 4 of the pattern? OR does it mean row 3 in a round and then row 4 in the next round? It is just not working out
31.01.2019 - 18:47DROPS Design answered:
Hi Beatrice! You have to increase on every 3rd or 4th row alternately, like so: work 2 row, increase on the 3rd, work 3 rows, increase on the 4th, and repeat. Happy knitting!
01.02.2019 - 07:29
![]() Beatrice Zionts wrote:
Beatrice Zionts wrote:
I just finished row 41 and have 56 stitches left on the needle. If I am to continue decreasing to only 7 stitches on the needle, it seems like I would to again knit all the rows again. What am I missing here?
30.01.2019 - 20:58DROPS Design answered:
Dear Mrs Zionts, you decrease a total of 14 sts per dec round (1 sitch on each side of each M.2 then in M.2) x 13 times = 182 dec in total, 7 sts remain. Happy knitting!
31.01.2019 - 08:27
![]() Agnès wrote:
Agnès wrote:
Bonjour, avez vous une photo ou un schéma pour voir la forme du "grand col". Merci
21.01.2019 - 00:34DROPS Design answered:
Bonjour Agnès, il n'existe que cette photo pour ce modèle. Il se tricote de haut en bas (par le col), en côtes, puis on continue en jersey en augmentant à chaque marqueur comme indiqué pour former le "cercle" autour du col roulé. Bon tricot!
21.01.2019 - 12:24
|
|||||||||||||
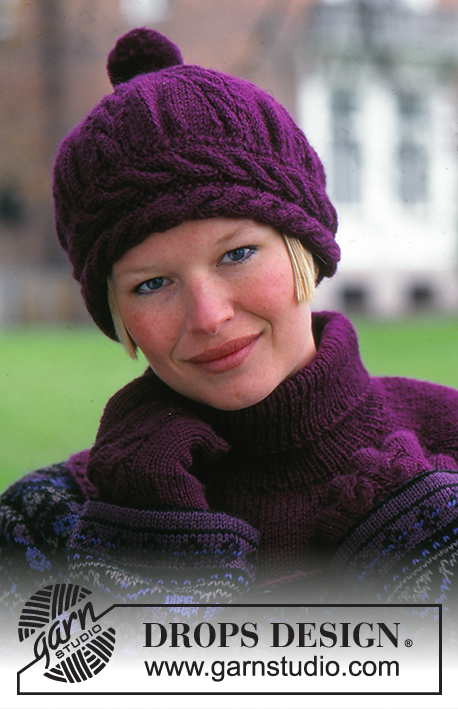
DROPS Extra 0-96 |
|||||||||||||
 |
 |
||||||||||||
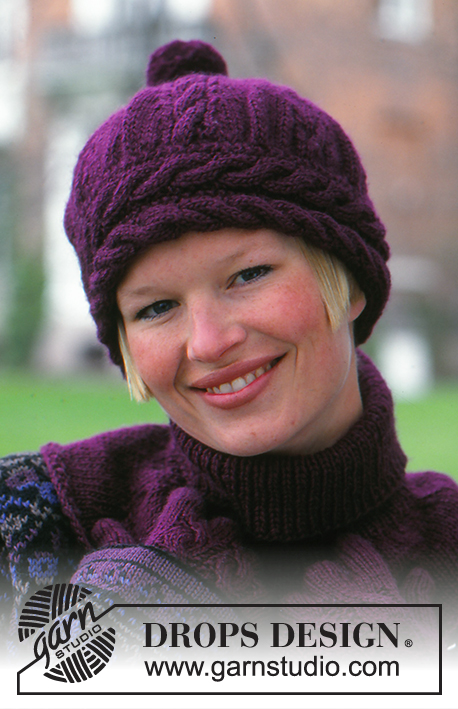
DROPS hat, neck warmer and gloves in Karisma Superwash.
DROPS Extra 0-96 |
|||||||||||||
|
HAT: Pattern: See diagram. The diagram shows all the rows in the pattern from the RS. Hat: Cast on 20 sts on needle size 4 mm / US 6 and work diagram M.1 back and forth on needle for 54 cm / 21¼". Bind off. Sew piece tog to from a ring. Pick up 189 sts on double pointed needles size 4 mm / US 6 inside the edge st on the RS of M.1. Work first round as follows: * diagram M.2, 19 stockinette sts *, repeat from *-*, at the same time dec 1 st on each side of all M.2 on every 3rd and 4th round alternately a total of 13 times (when no sts left next to M.2 dec sts in M.2) = 7 sts left. Cut the yarn, pull through remaining sts and fasten. Make a pompom with a diameter of approx 5 cm / 2" and attach to the top of hat --------------------------------------------------------- GLOVES: Gauge: 22 sts in stockinette st on needle size 3 mm / US 2or3 = width 10 cm / 4". Rib: *K1, P1 *, repeat from *-*. Seed st: Row 1: * K1, P1 *, repeat from *-*. Row 2: K over P and P over K. Repeat row 2. Gloves: Cast on 54-58 sts on double pointed needles size 2.5 mm / US 1 and work 2 cm / ¾" seed st and then 2 cm / ¾" rib, at the same time dec 10 sts evenly on last row in rib = 44-48 sts. Work next round as follows: 3-4 stockinette sts, M.2, M.2, 3-4 stockinette sts (= 22-24 sts on upper hand), 1 stockinette st (= thumb st, insert a marker in this st), 21-23 stockinette sts (= palm of hand). Now measure piece from here! When piece measures 3 cm / 1⅛" from marker inc 1 st on each side of thumb st on every 4th-3rd round a total of 5-6 times = 54-60 sts – work inc sts in stockinette st. Now slip the middle 11 sts by thumb on a stitch holder and cast on 1 new st behind these on next round = 44-50 sts. Continue until piece measures 10-11 cm / 4"-4⅜" from marker, now discontinue M.2 and complete piece in stockinette st. Work fingers as follows: Little finger: slip 4-6 sts from upper hand and 4-5 sts from palm of hand on needles and pick up 1 st towards ring finger = 9-12 sts on needles. Work 5-6 cm / 2"-2⅜" stockinette st, at the same time dec 1 st on first round. After 5-6 cm / 2"-2⅜" K2 tog all the way round, cut the thread, pull through remaining sts and fasten. Now work 3 rounds on all sts before working ring finger. Ring finger: slip 6-6 sts from upper hand and 6-7 sts from palm of hand on needles and pick up 1 st towards little finger and 1 st towards middle finger = 14-15 sts on needles. Work 6-7 cm / 2⅜"-2¾" stockinette st, at the same time dec 2 sts on first round. After 6-7 cm / 2⅜"-2¾" K2 tog all the way round, cut the thread, pull through remaining sts and fasten. Middle finger: Like ring finger, but work 7-8 cm / 2¾"-3⅛" stockinette st. Index finger: slip 6-6 sts from upper hand and 6-7 sts from palm of hand on needles and pick up 1 st towards middle finger = 13-14 sts on needles. Work like ring finger. Thumb: Pick up 12-14 sts (incl sts on stitch holder) round thumb and work 6-6.5 cm / 2⅜"-2½" stockinette st, K2 tog all the way round, cut thread, pull through remaining sts and fasten. Sew openings between fingers. ----------------------------------------------- NECK WARMER: Rib: *K1, P1 *, repeat from *-*. Cast on 112 sts on circular needle size 3.5 mm / US 4 and work 14 cm / 5½" rib – see above. Insert a marker in every 16th st = 7 markers, and continue in stockinette st. Now measures piece from here! When piece measures 2 cm / ¾" from markers inc 1 st on each side of all markers and repeat the inc when piece measures 4 and 6 cm / 2⅜" = 154 sts. When piece measures 8 cm / 3⅛" from markers work 3 rounds rib and then bind off. English explanation to pattern diagram: = K1 = P1 = slip 3 sts on cable needle in front of piece, K3, K3 from cable needle. |
|||||||||||||
Diagram explanations |
|||||||||||||
|
|||||||||||||
 |
|||||||||||||
Have you finished this pattern?Tag your pictures with #dropspattern or submit them to the #dropsfan gallery. Do you need help with this pattern?You'll find 20 tutorial videos, a Comments/Questions area and more by visiting the pattern on garnstudio.com. © 1982-2026 DROPS Design A/S. We reserve all rights. This document, including all its sub-sections, has copyrights. Read more about what you can do with our patterns at the bottom of each pattern on our site. |
|||||||||||||


With over 40 years in knitting and crochet design, DROPS Design offers one of the most extensive collections of free patterns on the internet - translated to 17 languages. As of today we count 324 catalogs and 12290 patterns - 12280 of which are translated into English (US/in).
We work hard to bring you the best knitting and crochet have to offer, inspiration and advice as well as great quality yarns at incredible prices! Would you like to use our patterns for other than personal use? You can read what you are allowed to do in the Copyright text at the bottom of all our patterns. Happy crafting!
Post a comment to pattern DROPS Extra 0-96
We would love to hear what you have to say about this pattern!
If you want to leave a question, please make sure you select the correct category in the form below, to speed up the answering process. Required fields are marked *.