
Popular categories
Looking for a yarn?


Comments / Questions (49)
![]() Bärbel wrote:
Bärbel wrote:
Welche Größenangaben stimmen nun Einmal steht da S/M. M/L, L/Xl, XL und XXL und einmal steht dort XS/S, S/M, M/L, Xl und XXL. Ich möchte die Jacke gern in S/M stricken, weiß aber nun nicht, ob ich nach der ersten oder zweiten Maschen- und cm-Angabe stricken soll.
29.04.2026 - 17:27DROPS Design answered:
Liebe Bärbel, danke für den Hinweis, dies wurde korrigiert, jetzt können Sie die richtige Größe wählen/markieren. Viel Spaß beim Stricken!
30.04.2026 - 08:45
![]() Liz wrote:
Liz wrote:
My understanding is The Body pattern is 5 stitches for front band, M1 or M2, pattern, plus 3 stocking stitches, then 5 stitches for front band. All good But the sleeves is 1x edge stitch, M1 or M2 pattern then 1x edge stitch Because there you don’t have the 3x stocking stitches the pattern for the sleeves looks totally different? Should I add 3x stocking stitches to the instructions - so for XL (92+3=95stitches in total per sleeve)
18.04.2026 - 23:22DROPS Design answered:
Dear Liz, on body you finish with 3 sts in stocking stitch to get the pattern symmetrical on both front pieces towards front band stitches, while sleeves are then sewn together in the round so you just have to work M.1 and when sewn together inside 1 edge stitch, M.1 will fit in the round. Happy knitting!
20.04.2026 - 10:06
![]() Suna wrote:
Suna wrote:
Ich habe eine Frage zur Halskante: Es steht, dass ich 116 bis 128 M (inkl. M der Hilfsfäden) aufnehmen soll. Weiter unten steht dann, dass ich alle M des Hilfsfadens wieder auf die Nadel legen soll. Aber sind die nicht schon mit den ersten Aufnahmen auf die Nadel gekommen?
24.03.2026 - 14:54DROPS Design answered:
Liebe Suna, wenn Sie alle Maschen für die Halskante (inkl. M der Hilfsfäden) aufgenommen haben, stricken Sie glatt links, und gleichzeitig stricken Sie verkürzten Reihen: 1 Masche am Ende jeder Reihe (Hin- sowie Rückreihe) stilllegen - so wird der hintere Halsblende länger als die bei den Vorderteilen (gleichzeitig nicht vergessen zuzunehmen). Viel Spaß beim Stricken!
24.03.2026 - 15:44
![]() Liz wrote:
Liz wrote:
I have a 2 xquestions about The pattern M1 for the first 4xrows after the purl set up row. Q1.Is it Row 1 = RS, Row 2 = WS, Row 3=RS and Row 4=WS Q2. What Row do you do the cable stitches on is it Row 2 or Row 3? Thank you
23.03.2026 - 09:05DROPS Design answered:
Hi Liz, Yes, row 1 is from the right side, so row 2 = WS, row 3 = RS and row 4 = WS. Cables are always worked from the right side and in this diagram they are worked in row 3. Regards, Drops Team.
25.03.2026 - 06:37
![]() Suna wrote:
Suna wrote:
Bei 35 cm (Gr. S/M) zu Nadel 4,5 wechseln und mit Glattstricken weiterfahren, gleichzeitig verteilt 23 M abketten.......... Hier ist mir nicht klar, ob in der ersten Reihe Glattstricken die 23 M abketten und wenn ja, wieso in einer Reihe abketten und nicht zusammenstricken. Danke für die Hilfe!
27.02.2026 - 21:43DROPS Design answered:
Liebe Suna, die Abnahmen nach 35 cm (M/L) sind bei der 1. Reihe glattrechts gestrickt, dh stricken Sie 1 Reihe glattrechts und gleichzeitig nehmen Sie diese 23 Maschen regelmäßig verteilt ab - benutzen Sie den Rechne, siehe "Tools" an der rechen Ecke unter der Seite. Viel Spaß beim Stricken!
02.03.2026 - 07:53
![]() BCH wrote:
BCH wrote:
Bonjour avez vous les explications avec aiguilles courte et non circulaire ? je ne comprends pas astuce encolure ? merci
01.04.2024 - 09:25DROPS Design answered:
Bonjour Mme Bch, ce gilet se tricote en allers et retours sur aiguille circulaire, vous pouvez donc simplement le tricoter sur aiguilles droites, sans rien changer aux explications. L'astuce pour l'encolure indique comment tricoter le col (correction faite). Bon tricot!
02.04.2024 - 14:59
![]() Mrs Katharine Gratton wrote:
Mrs Katharine Gratton wrote:
How do I work out the sizes in a particular pattern. I am knitting pattern number 88-4
12.10.2022 - 19:33DROPS Design answered:
Hi Mrs Gratton, You will find a size chart at the bottom of the pattern, giving you all the measurements for the different sizes. Happy crafting!
13.10.2022 - 06:58
![]() Elsa wrote:
Elsa wrote:
Hallo, eine Frage zum Stricktip zur Halskante: Bis zur letzten Masche stricken, Arbeit drehen und die Masche auf einen Faden lagen. Was bedeutet das? Ist dann jede Reihe um eine Masche reduziert und der obere Rand abgeschrägt? Könnten Sie das bitte genau erklären, was hier gemeint ist? Besten Dank
18.05.2022 - 22:00DROPS Design answered:
Liebe Elsa, wenn Sie die Halskante stricken sollen Sie die äusserste M. auf einen Hilfsfaden legen , dh wie beim verkürzten Reihen wird 1 Masche nicht gestrickt = am Ende der Reihe stricken Sie die letzte Masche auf der Nadel nicht sondern diese Masche legen Sie auf einem Faden still; wenden und am Ende der nächsten Reihe die letzte Masche nicht stricken sondern auf einem (anderen) Faden stilllegen, so weiter stricken bis die Halskante 4 cm misst, dann werden alle Maschen wieder gestrickt. Viel Spaß beim stricken!
19.05.2022 - 09:09
![]() Claudia wrote:
Claudia wrote:
Buongiorno, ho iniziato la prima manica: avviate 77 m, un giro a rovescio, fatto primo giro M1. Al secondo giro del diagrmma, dopo la maglia di vivagno, mi trovo che dovrei fare 3 maglie di diritto ma il giro precedente terminava con le ultime 4 maglie del motivo: in questo modo il motivo si sfalsa. Potreste aiutarmi, per cortesia? Grazie in anticipo.
09.03.2022 - 21:13DROPS Design answered:
Buonasera Claudia, le maniche sono lavorate in piano, con ferri di andata e ritorno. Buon lavoro!
10.03.2022 - 23:24
![]() Elsa wrote:
Elsa wrote:
Das Muster neben der Blume sieht auf dem Foto aus, als ob es kraus rechts gestrickt wird. Wieviel Reihen und dann glatt rechts? Besten Dank für die Rückmeldung.
04.03.2022 - 21:28DROPS Design answered:
Liebe Elsa, wir haben nachgeprüft und können bestätigen, daß die Jacke glatt rechts gestrickt wurde; die Anleitung stimmt so, auch wenn es vielleicht anders vom Foto aussieht. Viel Spaß beim stricken!
08.03.2022 - 23:10
|
||||||||||
DROPS 88-4 |
||||||||||
|
|
||||||||||
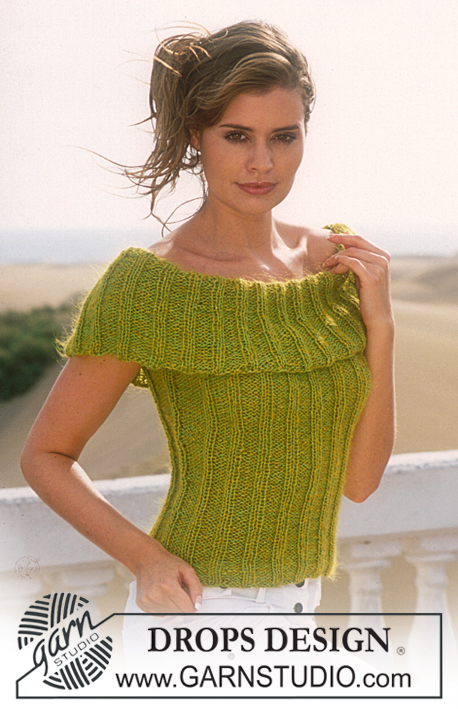
Cardigan and Brooch in Alpaca and Glitter
DROPS 88-4 |
||||||||||
|
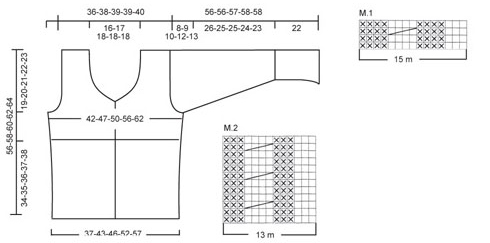
Gauge: 23 sts x 30 rows with 1 strand each Alpaca and Glitter on smaller needles in stockinette st = 10 x 10 cm 20 sts x 26 rows with 1 strand each Alpaca and Glitter on larger needles in stockinette st = 10 x 10 cm. Buttonband: The buttonband is knit in garter st. To keep the edge neat, knit a little tight. Buttonhole: Make buttonholes on right button band as follows from right side: K 1, K 2 tog, yo, K 2. On the next row, knit the yo. Make buttonholes when the piece measures: Size XS/S: 10, 20, 30 and 40 cm Size S/M: 11, 21, 31 and 41 cm Size M/L: 10, 18, 26, 34 and 42 cm Size XL: 10, 19, 27, 35 and 43 cm Size XXL: 10, 18, 27, 36 and 45 cm Pattern: See charts. The pattern is seen from the right side. Knitting tip (for neckband): * knit to end of row, turn piece and put the first st on a st holder *, repeat * - * to finished measurements. Body: Cast on 223-253-268-313-343 sts on smaller circular needles with 1 strand each Alpaca and Glitter (2 strands). P 1 row (wrong side row), then establish pattern on the next row as follows: K 5 (buttonband sts knit in garter st), Pattern 1 over the following 210-240-255-300-330 sts, K 3 (stockinette st) and K 5 (buttonband sts knit in garter st). When Pattern 1 is complete, dec all P 4 (seen from the right side) to P 3 = 195-221-234-273-299 sts. Then knit as follows: K 5 (buttonband sts), Pattern 2 over the following 182-208-221-260-286 sts, K 3 (stockinette st) and K 5 (buttonband sts knit in garter st). Make buttonholes on right buttonband – see instructions above. Read the entire next section before knitting: Yoke: When the piece measures approx. 34-35-36-37-38 cm – adjust so that you have knit 1 row after a cable – put the 5 buttonband sts at each side on st holders = 185-211-224-263-289 sts. K 2 rows garter st, change to larger needles and continue in stockinette st, decreasing 17-23-24-39-41 sts evenly distributed on the 1st row = 168-188-200-224-248 sts. Put a marker 42-47-50-56-62 sts in from each side = 84-94-100-112-124 sts between markers on back. Armhole: When the piece measures 37-38-39-40-41 cm bind off 6-6-6-8-10 sts at each side for armhole (3-3-3-4-5 sts at each side of each marker) = 78-88-94-104-114 sts on back and 39-44-47-52-57 sts on each front. Back: = 78-88-94-104-114 sts. Bind off for armhole at each side every other row: 2 sts 0-1-2-3-4 times and 1 st 3-4-4-7-9 times = 72-76-78-78-80 sts. When the piece measures 54-56-58-60-62 cm bind off the center 28-30-32-32-32 sts for the neck. Then dec 1 st at each neck edge every other row 2 times = 20-21-21-21-22 sts remain on each shoulder. Bind off when the piece measures 56-58-60-62-64 cm. Right front: = 39-44-47-52-57 sts. Bind off for armhole at the side as on back. When the piece measures 41-42-43-44-46 cm put the outermost 5-6-7-7-7 sts at the center front on a st holder for the neck. Then bind off at neck edge every other row: 2 sts 2 times and 1 st 4 times, then every 4th row: 1 st 3 times. After all armhole and neck shaping is complete 20-21-21-21-22 sts remain on shoulder. Bind off when the piece measures 56-58-60-62-64 cm. Left front: Knit the same as the right, reversing shaping. Sleeve: Loosely cast on 77-77-77-92-92 sts on smaller needles with 1 strand each Alpaca and Glitter (2 strands). P 1 row (wrong side), then knit Pattern 1, keeping 1 edge st at each side in garter st. When Pattern 1 is complete, dec all P 4 (seen from the right side) to P 3 = 67-67-67-80-80 sts. Continue with Pattern 2, keeping 1 edge st at each side in garter st. When the piece measures approx. 20 cm - adjust so that you have knit 1 row after a cable – knit 2 rows garter st. Change to larger needles and stockinette st, decreasing 13-9-7-18-16 sts evenly distributed on the 1st row = 54-58-60-62-64 sts. When the piece measures 22 cm inc 1 st at each side every 4-3-2.5-2-1.5 cm a total of 7-8-9-11-13 times = 68-74-78-84-90 sts. When the piece measures 48-47-47-46-45 cm bind off for sleeve cap at each side every other row: 4 sts 1 time, 3 sts 1 time, 2 sts 2 times and 1 st 2-4-4-7-8 times, then bind off 2 sts at each side until the piece measures 55-55-56-57-57 cm, and then bind off 3 sts 1 time at each side. Bind off the remaining sts, the piece measures approx. 56-56-57-58-58 cm. Assembly: Sew shoulder seams. Buttonband: Put the 5 sts from left front back on smaller needles. Knit garter st over all sts for approx. 7-7-7-7-8 cm (to match length up to the beginning of neck shaping), put sts on a st holder. Repeat on the right front – make buttonhole. Sew buttonbands to front edges. Neckband: Pick up approx. 116-128 sts (incl. sts from st holders) around the neck on smaller needles with 1 strand each Alpaca and Glitter (2 strands)– start on right front and pick up from right side. Knit reverse stockinette st, putting the outermost st at the end of each row on a st holder – read Knitting tip. When neckband measures 2 cm inc 1 st in every 4th st – inc 1 st by pulling up and knitting a st from the previous row = approx. 137-152 sts. When neckband measures 4 cm put sts on st holders at each side back on needles, knit 1 row stockinette st over all sts and then bind off all sts. So that the bound-off edge is not too tight, make a yo approx. every 8 sts and bind off the yo as a st – the neckband will roll. Sew sleeve seams using edge sts as seam allowance. Sew in sleeves. Sew on buttons. CROCHETED BLOSSOM: Materials: Garnstudio ALPACA small amount (approx. 10 gr) nr 3720, old rose and use: Garnstudio GLITTER small amount nr 07, lilac DROPS 3.5 mm [US D] crochet hook, or size needed to obtain correct gauge. Blossom: Ch 4 ch with 1 strand each Alpaca and Glitter (2 strands) and join into a ring with 1 sl st. 1st row: 6 sc in ring, finish with 1 sl st in 1st sc. 2nd row: 1 sc in first sc, * ch 3, 1 sc in the next sc *, repeat * - * a total of 5 times and finish with ch 3 and 1 sl st in first sc at start of row = 6 ch-loops. 3rd row: ch 1, then crochet as follows in each ch-loop: 1 sc, ch 1, 3 dc, ch 1 and 1 sc, finish with 1 sl st in first ch at start of row. 4th row: * 1 sc in sc from 2nd row (crochet on the backside of petal around sts from 3rd row, pull yarn tight), ch 5 *, repeat * - * a total of 6 times and finish with 1 sl st in first sc at start of row. 5th row: ch 1, then crochet as follows in each ch-loop: 1 sc, ch 1, 5 dc, ch 1 and 1 sc, finish with 1 sl st in first ch at start of row. 6th row: * 1 sc in sc from 2nd row (follow instructions for 4th row), ch 7 *, repeat * - * a total of 6 times and finish with 1 sl st in first sc at start of row. 7th row: ch 1, then crochet as follows in each ch-loop: 1 sc, ch 1, 1 dc, 5 tc, 1 st, ch 1 and 1 sc, finish with 1 sl st in first ch at start of row. 8th row: * 1 sc in sc from 2nd row (follow instructions for 4th row), ch 8 *, repeat * - * a total of 6 times and finish with 1 sl st in first sc at start of row. 9th row: ch 1, then crochet as follows in each ch-loop: 1 sc, ch 1, 1 dc, 3 tc, 1 ddc, 3 tc, 1 dc, ch 1 and 1 sc, finish with 1 sl st in first ch at start of row. Cut and fasten yarn. You can sew the blossom directly to the cardigan, or sew a safety pin to the back of the blossom. |
||||||||||
Diagram explanations |
||||||||||
|
||||||||||
 |
||||||||||
Have you finished this pattern?Tag your pictures with #dropspattern or submit them to the #dropsfan gallery. Do you need help with this pattern?You'll find 31 tutorial videos, a Comments/Questions area and more by visiting the pattern on garnstudio.com. © 1982-2026 DROPS Design A/S. We reserve all rights. This document, including all its sub-sections, has copyrights. Read more about what you can do with our patterns at the bottom of each pattern on our site. |
||||||||||


With over 40 years in knitting and crochet design, DROPS Design offers one of the most extensive collections of free patterns on the internet - translated to 17 languages. As of today we count 325 catalogs and 12298 patterns - 12288 of which are translated into English (US/in).
We work hard to bring you the best knitting and crochet have to offer, inspiration and advice as well as great quality yarns at incredible prices! Would you like to use our patterns for other than personal use? You can read what you are allowed to do in the Copyright text at the bottom of all our patterns. Happy crafting!
Post a comment to pattern DROPS 88-4
We would love to hear what you have to say about this pattern!
If you want to leave a question, please make sure you select the correct category in the form below, to speed up the answering process. Required fields are marked *.