
Popular categories
Looking for a yarn?


Comments / Questions (1)
![]() Kathrin wrote:
Kathrin wrote:
Liebes Team, am Ende des Rumpfteils wird ja im Rippenmuster zugenommen. Wie mache ich am besten die Zunahmen im Rippenmuster? Danke für Ihren Tipp. Viele Grüße
17.02.2026 - 13:46DROPS Design answered:
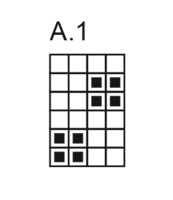
Liebe Kathrin, Sie können in jedem 2. Linksbereich von A.1 den Querfaden zwischen den Linksmaschen auffassen und links verschränkt abstricken. Dann ergibt sich nachfolgend ein Rippenmuster aus 2 M re, 2 M li, 2 M re, 3 M li. Viel Spaß beim Weiterstricken!
18.02.2026 - 14:38
|
|||||||
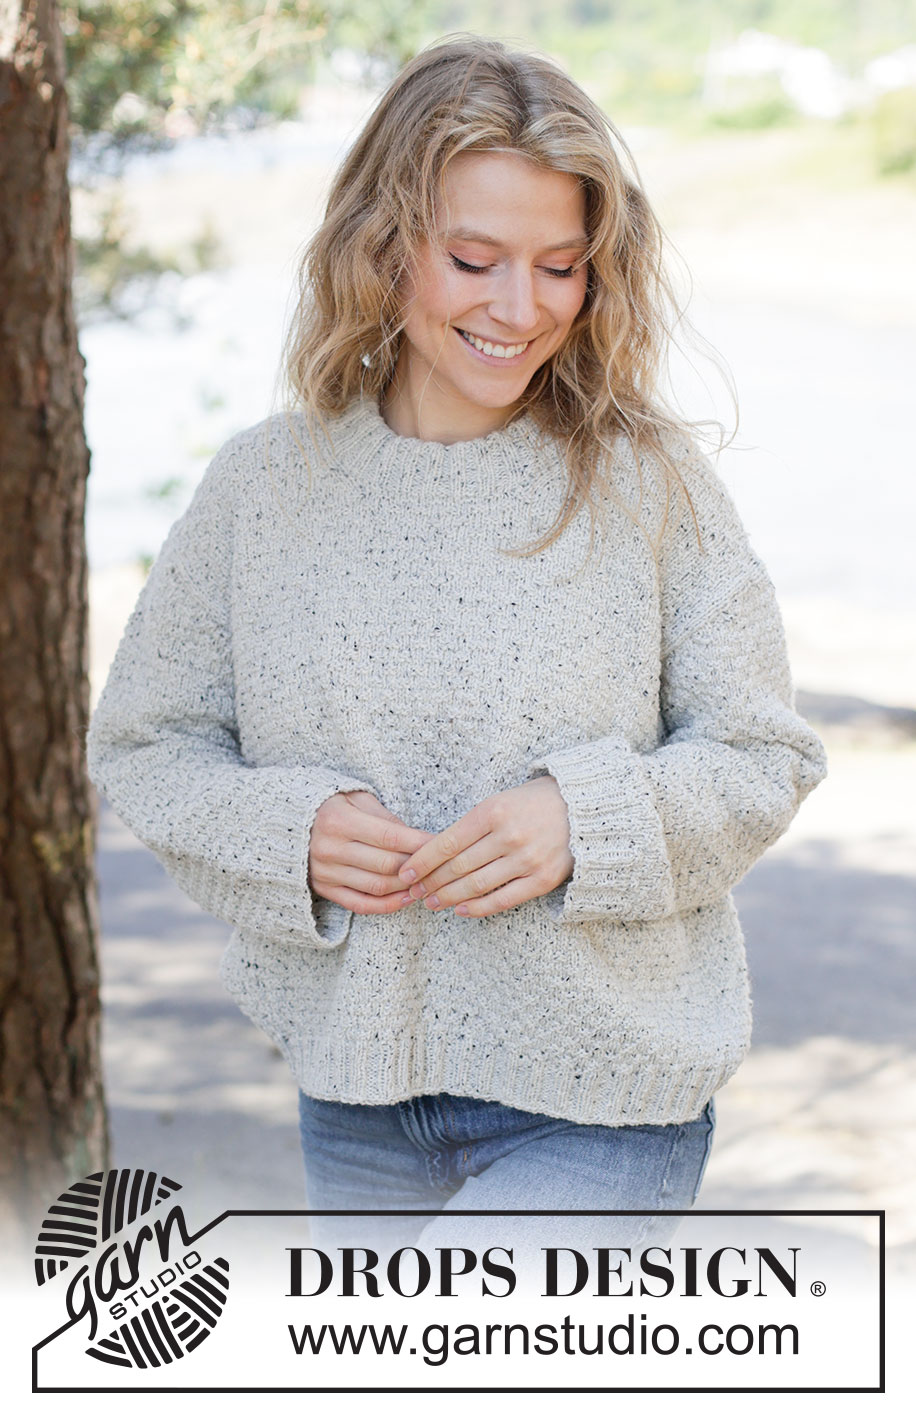
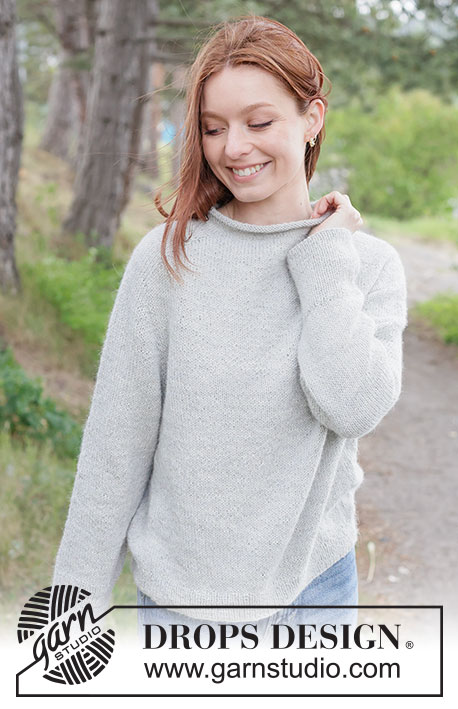
Grey Thistle Sweater#greythistlesweater |
|||||||
 |
 |
||||||
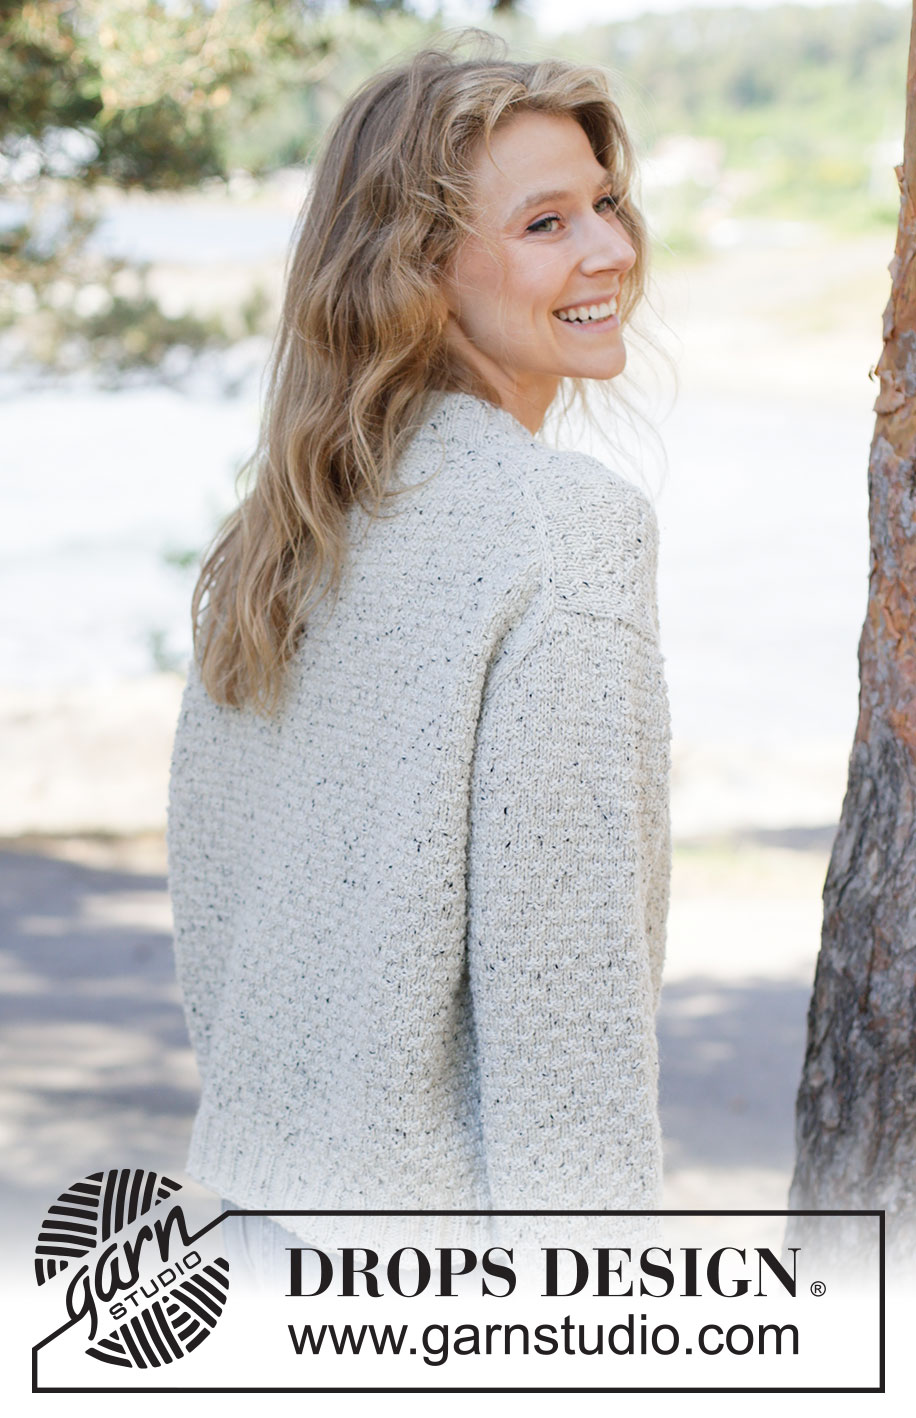
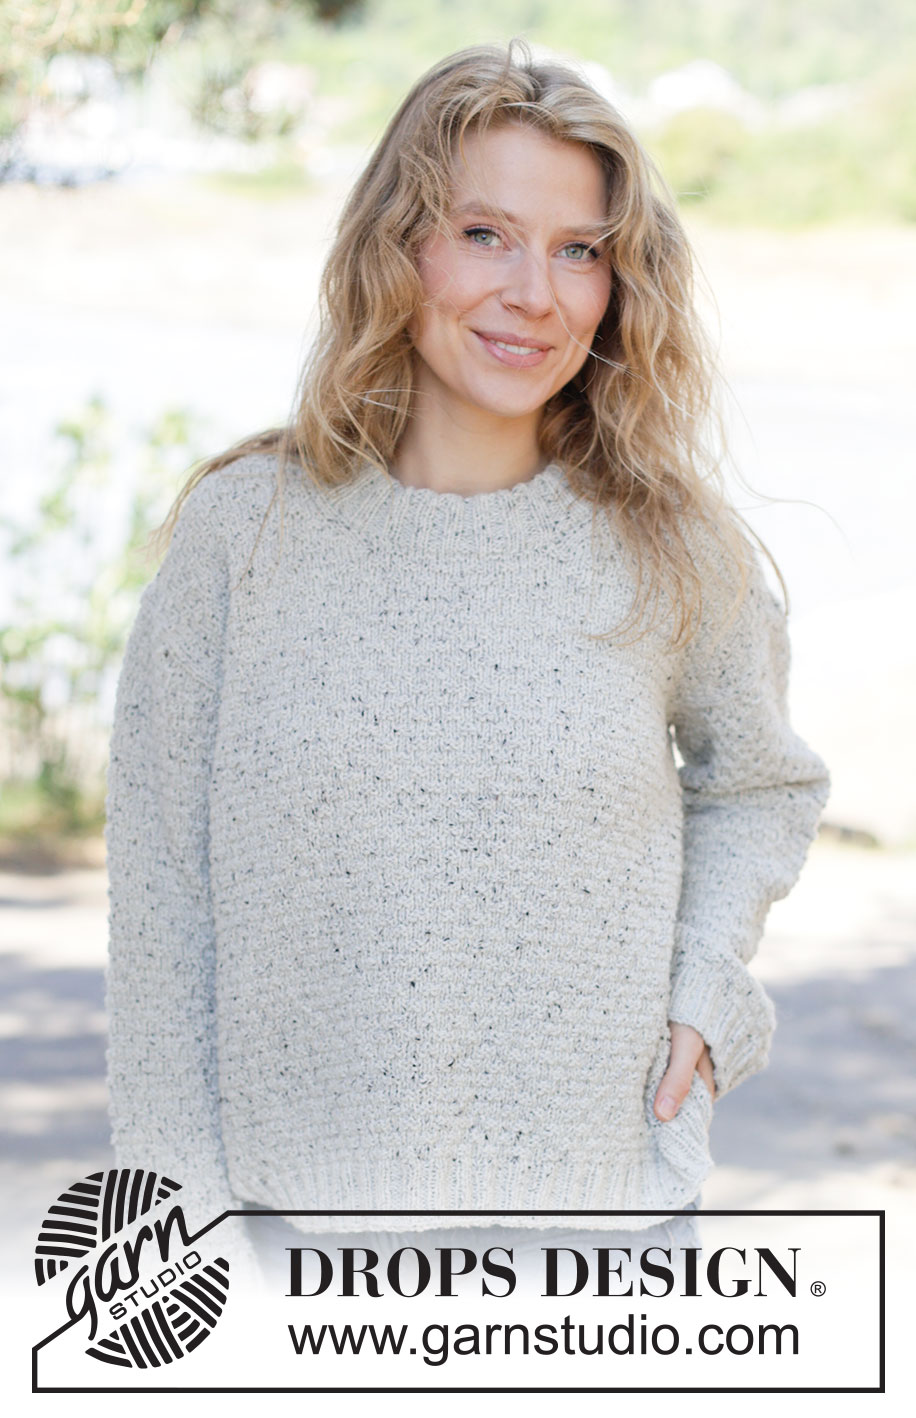
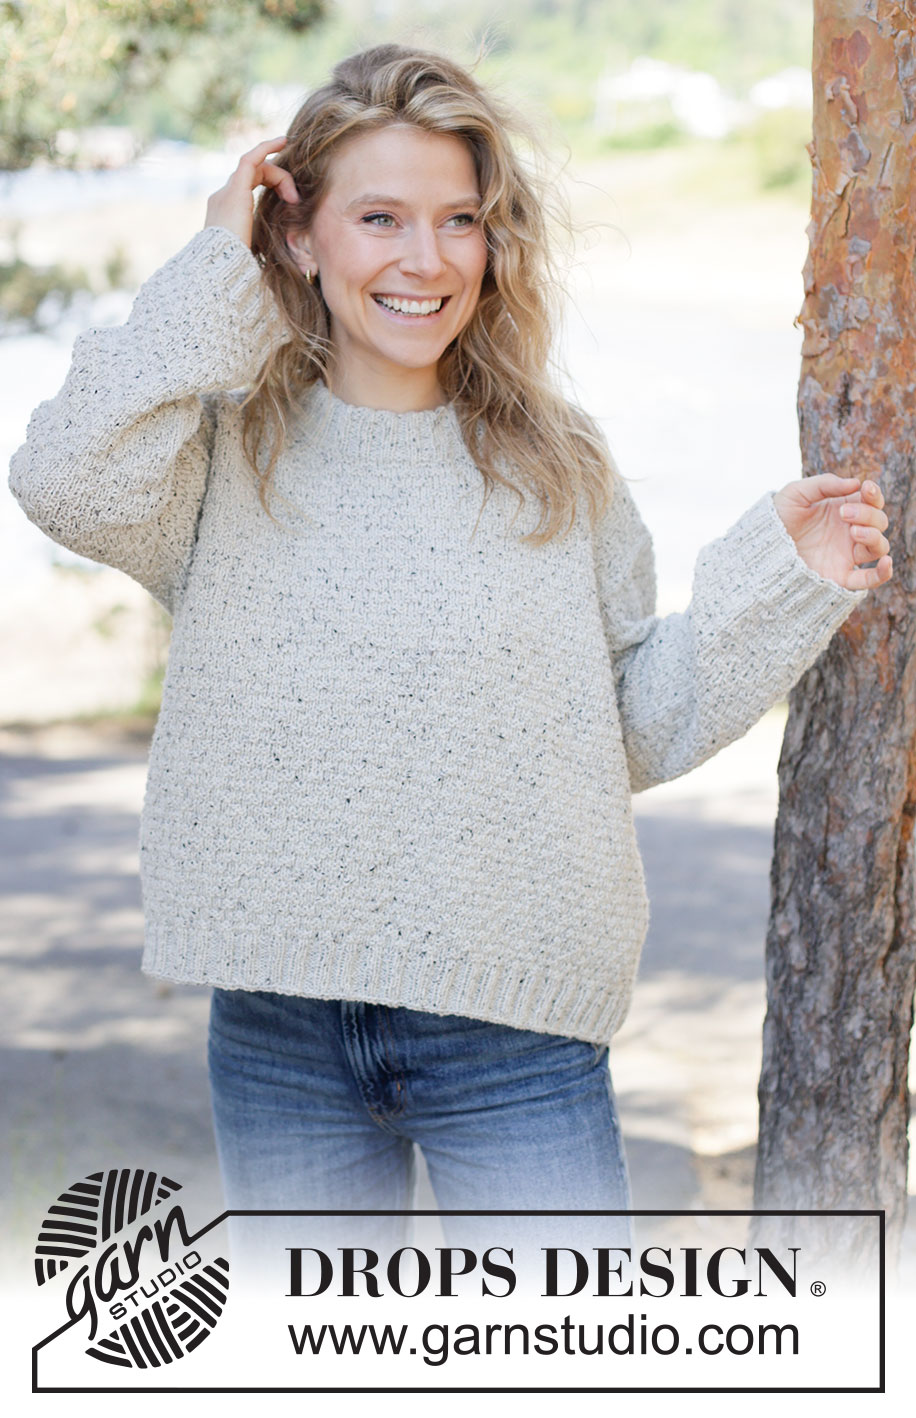
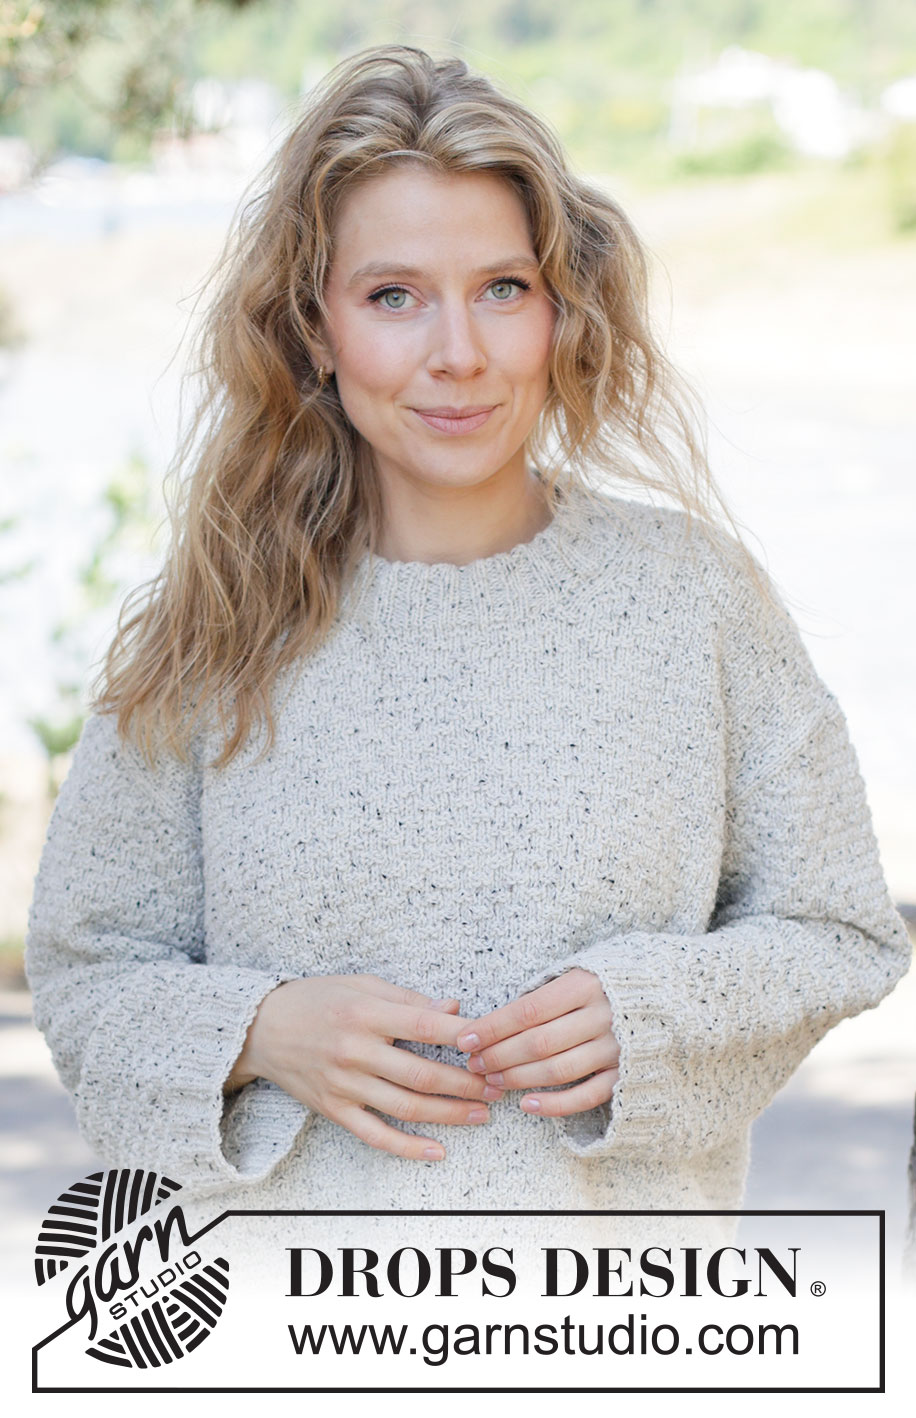
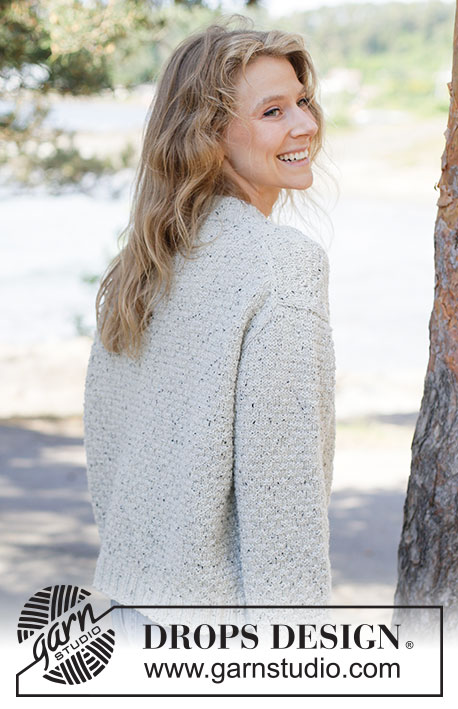
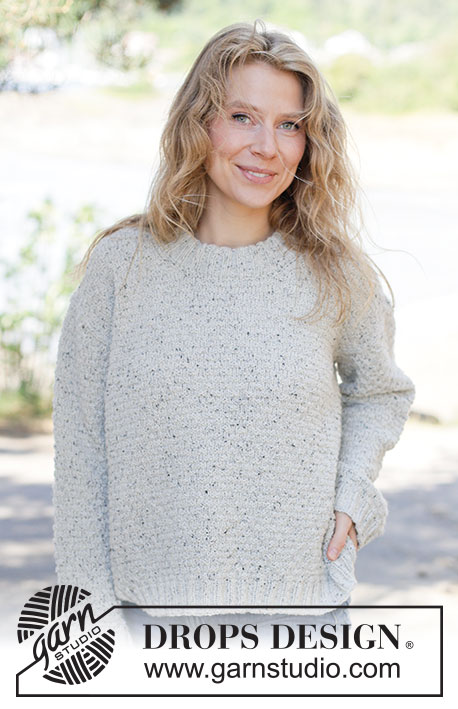
Knitted over-sized sweater in DROPS Soft Tweed. The piece is worked top down with European/diagonal shoulders, relief-pattern and double neck. Sizes XS - XXXL.
DROPS 264-36 |
|||||||
|
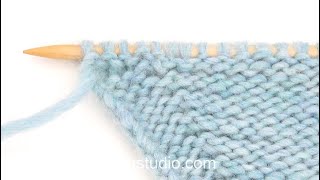
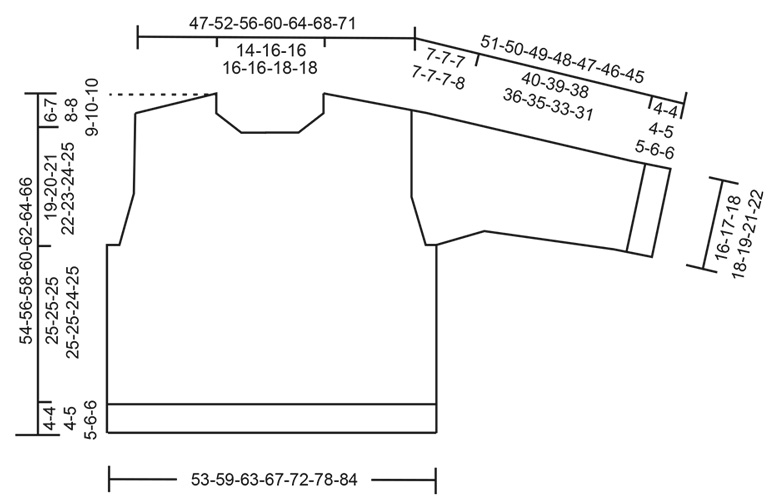
------------------------------------------------------- EXPLANATIONS FOR THE PATTERN: ------------------------------------------------------- PATTERN: See diagram A.1. The diagram shows all rows of the pattern seen from the right side. When increasing stitches in the pattern, the increased stitches are worked in stockinette stitch (knitted from right side, purled from wrong side) until there is room for a square (= 2 stitches) in width. INCREASE TIP-1: INCREASE 1 STITCH TOWARDS THE LEFT - from RIGHT SIDE: Use left needle to pick up yarn between 2 stitches from row below, pick up yarn from the front and knit in the stitch loop that is on the back of the needle. INCREASE 1 STITCH TOWARDS THE RIGHT - from RIGHT SIDE: Use left needle to pick up yarn between 2 stitches from row below, pick up yarn from the back and knit in the stitch loop that is on the front side of the needle. INCREASE TIP-2: INCREASE 1 STITCH TOWARDS THE RIGHT - from WRONG SIDE: Use left needle to pick up yarn between 2 stitches from row below, pick up yarn from the back and purl in the stitch loop that is on the front side of the needle. INCREASE 1 STITCH TOWARDS THE LEFT - from WRONG SIDE: Use left needle to pick up yarn between 2 stitches from row below, pick up yarn from the front and purl in the stitch loop that is on the back side of the needle. DECREASE TIP: Decrease 1 stitch on each side of the marker-thread as follows: Work until there are 3 stitches left before the marker-thread, knit 2 together, knit 2 (marker-thread sits between these 2 stitches) slip 1 stitch knit-wise, knit 1 and pass the slipped stitch over the knitted stitch (2 stitches decreased). KNITTING TIP: When working short rows, there will be a small hole after each turn. This hole can be closed by tightening the strand or using the technique German Short Rows as follows: Slip the first stitch purl-wise, take the strand over the right needle and tighten well from the back (2 loops on the needle). These loops are worked together on the next row. ------------------------------------------------------- START THE PIECE HERE: ------------------------------------------------------- SWEATER – SHORT OVERVIEW OF THE PIECE: The pattern uses both long and short needles; start with the length which fits the number of stitches and change when necessary. The piece is started back and forth, casting on stitches at the back of the neck and working the back piece top down, while increasing stitches on each side for the shoulders, which become slightly diagonal. The back piece is worked as far as the armholes. The front piece is then worked in 2 sections, knitting up stitches along 1 back shoulder, working pattern and increasing for the neckline. This is repeated on the other shoulder. The 2 front sections are joined when the neckline is finished and the front piece is worked back and forth down to the armholes. The front and back pieces are joined on the same circular needle and the body worked in the round. Stitches are knitted up around the armholes for the sleeves, which are started back and forth with short rows for the sleeve cap, then finished in the round. Stitches are knitted up around the neckline and the neck is worked in the round to finish. BACK PIECE: The piece is worked back and forth. Cast on 28-32-32-32-32-36-36 stitches with circular needle size 5 MM = US 8 and DROPS Soft Tweed. Work PATTERN – read explanation above, as follows: ROW 1 (wrong side): Purl. ROW 2 (right side): Read INCREASE TIP-1. Knit 3, increase 1 stitch towards the left, work A.1 until there are 3 stitches left on the row (the pattern begins and ends in the same way on both sides), increase 1 stitch towards the right, knit 3. ROW 3 (wrong side): Read INCREASE TIP-2. Purl 3, increase 1 stitch towards the right, work A.1 until there are 3 stitches left on the row (the increased stitches are worked as described in PATTERN above), increase 1 stitch towards the left, purl 3. AFTER ROW 3: Work ROWS 2 and 3 a total of 16-17-19-21-23-24-25 times (32-34-38-42-46-48-50 rows worked) = 92-100-108-116-124-132-136 stitches. Insert 1 marker outermost on one side. The piece is now measured from here! Continue the pattern with 3 stockinette stitches on each side. Remember to maintain the knitting gauge. When the piece measures 11-10-10-11-11-11-9 cm = 4⅜"-4"-4"-4⅜"-4⅜"-4⅜"-3½" from the marker, measured down the armhole, increase for the armholes. INCREASE FOR ARMHOLES: ROW 1 (right side): Remember INCREASE TIP-1. Knit 3, increase 1 stitch towards the left, continue the pattern until there are 3 stitches left on the row, increase 1 stitch towards the right, knit 3. ROW 2 (wrong side): Continue the pattern with 3 purled stitches on each side. Work ROWS 1 and 2 a total of 2-4-4-4-4-4-8 times (4-8-8-8-8-8-16 rows worked) = 96-108-116-124-132-140-152 stitches. Continue working until the piece measures 13-13-13-14-14-14-15 cm = 5⅛"-5⅛"-5⅛"-5½"-5½"-5½"-6" from the marker measured down the armhole, finishing with a row from the wrong side. Cut the strand and place the stitches on a stitch holder/thread. Work the left front piece along the left back shoulder as follows. LEFT FRONT PIECE: Find the left back shoulder as follows: Lay the back piece flat, right side up, with the stitch holder/thread towards you; left side of piece = left shoulder. Start from the right side by the neck on the left back shoulder and knit up 1 stitch in each row worked, inside the outermost stitch as far as the armhole = 32-34-38-42-46-48-50 stitches. All length-measurements on the front piece are taken from this knitted-up row. Continue the pattern as follows, with the first row from the wrong side: ROW 1 (wrong side): Purl 3, work A.1 until there are 3 stitches left, purl 3. ROW 2 (right side): Knit 3, work A.1 until there are 3 stitches left, knit 3. Continue this pattern until the piece measures 5-5-6-6-7-7-7 cm = 2"-2"-2⅜"-2⅜"-2¾"-2¾"-2¾". Now increase for the neckline as follows: ROW 1 (right side): Remember INCREASE TIP-1. Knit 3, increase 1 stitch towards the left, work pattern as before to end of row. ROW 2 (wrong side): Continue the pattern with 3 purled stitches on each side. Work ROWS 1 and 2 a total of 8 times (16 rows worked) = 40-42-46-50-54-56-58 stitches (with the next row from the right side). Cut the strand and place the stitches on a stitch holder/thread. Work the right front piece along the right back shoulder as follows. RIGHT FRONT PIECE: Start from the right side by the armhole on the right back shoulder and knit up 1 stitch in each row worked, inside the outermost stitch as far as the neck = 32-34-38-42-46-48-50 stitches. All length-measurements on the front piece are taken from this knitted-up row. Continue the pattern as follows, with the first row from the wrong side: ROW 1 (wrong side): Purl 3, work A.1 until there are 3 stitches left – NOTE: Start A.1 from the neck in the same way as A.1 finished by the neck on the left front piece, A.1 will then finish by the armhole in the same way as A.1 started by the armhole on the left front piece, i.e., the pattern is reversed, purl 3. ROW 2 (right side): Knit 3, work A.1 until there are 3 stitches left, knit 3. Continue this pattern until the piece measures 5-5-6-6-7-7-7 cm = 2"-2"-2⅜"-2⅜"-2¾"-2¾"-2¾". Now increase for the neckline as follows: ROW 1 (right side): Knit 3, work A.1 until there are 3 stitches left, increase 1 stitch towards the right, knit 3 – remember INCREASE TIP-1. ROW 2 (wrong side): Continue the pattern with 3 purled stitches on each side. Work ROWS 1 and 2 a total of 8 times (16 rows worked) = 40-42-46-50-54-56-58 stitches (with the next row from the right side). Now join the 2 front pieces as follows: FRONT PIECE: Work as follows from the right side. Continue the pattern across the right front piece, cast on 12-16-16-16-16-20-20 stitches for the neckline, continue the pattern across the left front piece = 92-100-108-116-124-132-136 stitches. Work the next row as follows from the wrong side: Purl 3, continue the pattern until there are 3 stitches left, purl 3. Work until the piece measures 23-24-26-27-29-31-29 cm = 9"-9½"-10¼"-10⅝"-11⅜"-12¼"-11⅜" from the knitted up row. Now increase for the armholes. INCREASE FOR ARMHOLES: ROW 1 (right side): Remember INCREASE TIP-1. Knit 3, increase 1 stitch towards the left, work pattern until there are 3 stitches left on the row, increase 1 stitch towards the right, knit 3. ROW 2 (wrong side): Continue the pattern with 3 purled stitches on each side. Work ROWS 1 and 2 a total of 2-4-4-4-4-4-8 times (4-8-8-8-8-8-16 rows worked) = 96-108-116-124-132-140-152 stitches. Continue working until the piece measures 25-27-29-30-32-34-35 cm = 9¾"-10⅝"-11⅜"-11¾"-12½"-13⅜"-13¾", finishing on the same row in the diagram as on the back piece, i.e., A.1 begins and ends on the front piece in the same way as on the back piece (on a row from the wrong side). The front and back pieces are now joined for the body as follows and the piece is now measured from here. BODY: Work A.1 across all the 96-108-116-124-132-140-152 stitches on the front piece (including the 3 stockinette stitches on each side, making sure the pattern continues neatly from the yoke), cast on 4-4-4-4-4-8-8 stitches (= mid-under the sleeve), continue A.1 across the 96-108-116-124-132-140-152 stitches on the back piece, cast on 4-4-4-4-4-8-8 stitches (= mid-under the sleeve) = 200-224-240-256-272-296-320 stitches. Continue this pattern in the round until the piece measures 25-25-25-25-25-24-25 cm = 9¾"-9¾"-9¾"-9¾"-9¾"-9½"-9¾" from the division, finishing after a knitted row in the pattern. Change to circular needle size 3.5 MM = US 4 and work the next round as follows: Work rib, (knit 2, purl 2) increasing 25-28-30-32-34-37-40 stitches evenly by increasing 1 stitch over every 2nd purled section in the pattern = 225-252-270-288-306-333-360 stitches. Continue the new rib (knit 2, purl 2, knit 2, purl 3) in the round for 4-4-4-5-5-6-6 cm = 1½"-1½"-1½"-2"-2"-2⅜"-2⅜". Bind off slightly loosely with knit. The sweater measures approx. 54-56-58-60-62-64-66 cm = 21¼"-22"-22¾"-23⅝"-24⅜"-25¼"-26", from the neck and down. SLEEVES: The sleeve is worked top down. Lay the piece flat and insert 1 marker at the top of the armhole. (NOTE! This is not the same place as the knitted-up row on the front piece but approx. 6-10 cm = 2⅜"-4" down the front piece). Use circular needle size 5 MM = US 8. Knit up stitches tightly (or use a smaller needle) as follows: Start in the middle of the cast-on stitches under the sleeve and knit up 68-72-76-84-88-96-100 stitches around the armhole, with equal numbers of stitches on both sides of the marker. SLEEVE CAP: For a better fit work A.1 with short rows, starting mid-under the sleeve as follows: ROW 1 (right side): Knit until there are 9-11-13-15-17-11-11 stitches left before the shoulder-marker, work A.1 across the next 18-22-26-30-34-22-22 stitches, turn – read KNITTING TIP. ROW 2 (wrong side): Continue A.1 across the first 20-24-28-32-36-26-26 stitches, working the stitches into A.1, turn. ROW 3 (right side): Work A.1 to 2-2-2-2-2-4-4 stitches past the previous turn, turn. ROW 4 (wrong side): Work A.1 to 2-2-2-2-2-4-4 stitches past the previous turn, turn. Repeat ROWS 3 and 4 until you have turned 18-18-18-18-18-18-20 times (9-9-9-9-9-9-10 times on each side, with the last row from the wrong side). AFTER THE FINAL TURN: After the last time working row 4, turn and work back to the beginning of the round from the right side (= mid-under the sleeve). Insert 1 marker-thread here, this is used when decreasing under the sleeve. Allow the thread to follow your work onwards. REST OF THE SLEEVE: Continue A.1 in the round across all stitches. AT THE SAME TIME, when the sleeve measures 2 cm = ¾" from the join, decrease 2 stitches mid-under the sleeve – read DECREASE TIP. Decrease like this every 2-2-2-2-2-1½-1½ cm = ¾"-¾"-¾"-¾"-¾"-½"-½" a total of 4-4-4-8-8-8-8 times = 60-64-68-68-72-80-84 stitches. Continue working until the sleeve measures 47-46-45-43-42-40-39 cm = 18½"-18"-17¾"-17"-16½"-15¾"-15¼" from mid-top of shoulder, finishing after a knitted round. Change to double pointed needles size 3.5 MM = US 4. Work rib (knit 2, purl 2), AT THE SAME TIME increase 7-8-8-8-9-10-10 stitches by increasing 1 stitch over every 2nd purled section in the pattern = 67-72-76-76-81-90-94 stitches. Work the new rib (knit 2, purl 2, knit 2, purl 3) until there are 4-0-4-4-0-0-4 stitches left on the round, finish with knit 2, purl 2 in sizes XS, M, L and XXXL (in sizes S, XL and XXL the rib fits the round). When the rib measures 4-4-4-5-5-6-6 cm = 1½"-1½"-1½"-2"-2"-2⅜"-2⅜", bind off slightly loosely with knit. The sleeve measures approx. 51-50-49-48-47-46-45 cm = 20"-19¾"-19¼"-19"-18½"-18"-17¾", from the top of the shoulder. DOUBLE NECK: Use circular needle size 3.5 MM = US 4. Start from the right side on one shoulder-line and knit up approx. 84-92-92-96-96-104-108 stitches inside 1 stitch around the neckline. Knit 1 round and adjust the stitch count if necessary – it must be divisible by 4. Work rib in the round (knit 2, purl 2), starting the rib so it matches the cast-on stitches mid-front of the neckline, which are continued with knit above knit and purl above purl. When the rib measures 9-9-9-10-10-11-11 cm = 3½"-3½"-3½"-4"-4"-4⅜"-4⅜", change to circular needle size 5 MM = US 8 and bind off slightly loosely. Fold the neck double to the inside and sew down. To avoid the neck being tight and rolling outwards, it is important that the seam is elastic. |
|||||||
Diagram explanations |
|||||||
|
|||||||
 |
|||||||
 |
|||||||
Have you finished this pattern?Tag your pictures with #dropspattern #greythistlesweater or submit them to the #dropsfan gallery. Do you need help with this pattern?You'll find 34 tutorial videos, a Comments/Questions area and more by visiting the pattern on garnstudio.com. © 1982-2026 DROPS Design A/S. We reserve all rights. This document, including all its sub-sections, has copyrights. Read more about what you can do with our patterns at the bottom of each pattern on our site. |
|||||||


With over 40 years in knitting and crochet design, DROPS Design offers one of the most extensive collections of free patterns on the internet - translated to 17 languages. As of today we count 324 catalogs and 12290 patterns - 12280 of which are translated into English (US/in).
We work hard to bring you the best knitting and crochet have to offer, inspiration and advice as well as great quality yarns at incredible prices! Would you like to use our patterns for other than personal use? You can read what you are allowed to do in the Copyright text at the bottom of all our patterns. Happy crafting!
Post a comment to pattern DROPS 264-36
We would love to hear what you have to say about this pattern!
If you want to leave a question, please make sure you select the correct category in the form below, to speed up the answering process. Required fields are marked *.