
Popular categories
Looking for a yarn?


Comments / Questions (7)
![]() Maryam wrote:
Maryam wrote:
Im Abschnitt Sattelschulter-Zunahmen steht 4 x in der Höhe abnehmen....das muss bestimmt zunehmen heißen ??
28.03.2026 - 17:06
![]() Maryam wrote:
Maryam wrote:
Im Abschnitt Sattelschulter-Zunahmen steht 4 x in der Höhe abnehmen....das muss bestimmt zunehmen heißen ??
28.03.2026 - 17:04DROPS Design answered:
Liebe Maryam, oh ja genau, danke für den Hinweis, eine Korrektur erfolgt. Viel Spaß beim Stricken!
07.04.2026 - 09:44
![]() Ruth wrote:
Ruth wrote:
Danke für die Anleitung,schade,sie ist zum Teil fehlerhaft.,schade. Die Masangaben sind fehlerhaft.
21.03.2026 - 13:08DROPS Design answered:
Liebe Ruth, können Sie uns bitte mehr sagen? Wo haben Sie Fehler gefunden, welche Größe? Danke im voraus für Ihr Verständnis.
23.03.2026 - 08:16
![]() Renée wrote:
Renée wrote:
Jag vill sticka denna utan mohair, eller annat tunt garn. Dvs med bara en tråd ull, gärna ur garngrupp C. Ska jag använda mindre stickor då för att den inte ska bli för gles? Hur kan jag räkna ut vilken storlek jag ska välja om jag utesluter mohairgarnet?
16.02.2026 - 00:25DROPS Design answered:
Hei Renée. Design avd har dessverre ikke mulighet til å omregne en allerede publisert oppskrift. mvh DROPS Design
16.02.2026 - 14:30
![]() Barbara wrote:
Barbara wrote:
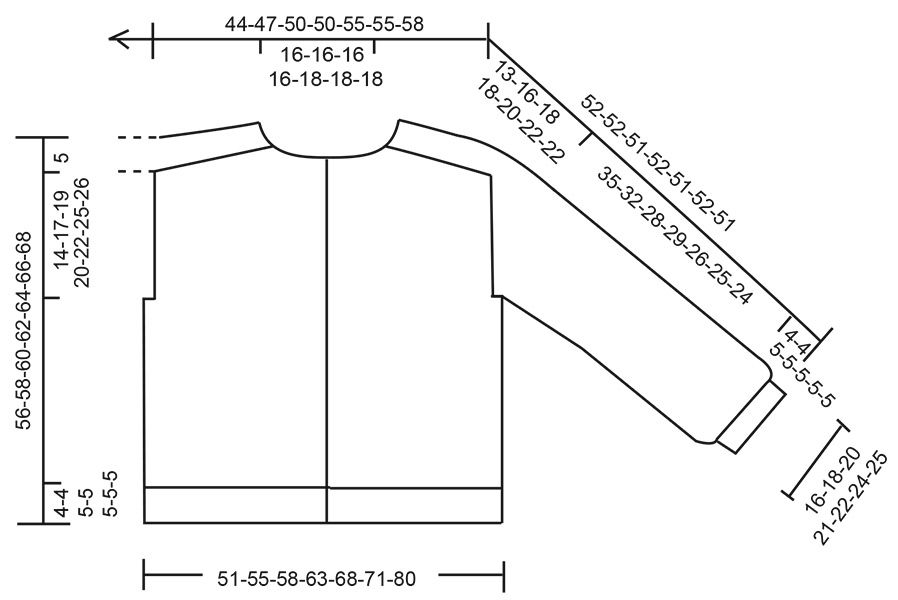
Die Arbeit hat nun eine Länge von ca. 19-22-24-25-27-30-31 cm, gemessen außen am Ärmel entlang, wenn die Arbeit an den Schultern gefaltet flach lie…. (Maß einschließlich Sattelschulter – die halbe Sattelschulter…ist ca. 5 cm lang + der Rest der Arbeit ist ca. 14-17-19-20-22-25-26 cm lang, …entlang gemessen). Ich verstehe nicht wirklich, wo gemessen wird. Ich habe mich genau an die Maschenprobe und die angegebenen Zunahmen gehalten, aber die oben angegebenen Maße passen nicht.
05.12.2025 - 14:00DROPS Design answered:
Liebe Barbara, schauen Sie mal die Maßskizze, links sehen Sie diese 2 Länge: 14 bis 26 cm für nur das Armoch und 5 cm für die Schulter (= die Hälfte der Maschen für Schulter) wenn die Jacke flach liegt. Viel Spaß beim Stricken!
05.12.2025 - 16:02
![]() Floriana wrote:
Floriana wrote:
Nella sezione scollatura non riesco a capire come fare gli aumenti. "Aumentare in una maglia a coste inglesi (maglia diritto + gettato) all’interno di entrambe le maglie di vivagno e 1 maglia rovescio al centro davanti (in modo che ci sia 1 maglia rovescio tra l’aumento e la maglia di vivagno su ogni davanti)" ???
03.11.2025 - 15:28DROPS Design answered:
Buongiorno Floriana, deve aumentare facendo in modo di lasciare 1 maglia rovescio tra l'aumento e la maglia di vivagno. Buon lavoro!
17.01.2026 - 12:36
![]() Madelene wrote:
Madelene wrote:
Hej! Om jag vill ha denna i brun, vilka garner passar då ihop?
22.09.2025 - 13:25DROPS Design answered:
Hej Madelene. Om du vill ha den i mörkbrunt så ser du vilka färger du kan kombinera här. Mvh DROPS Design
23.09.2025 - 07:19
|
|
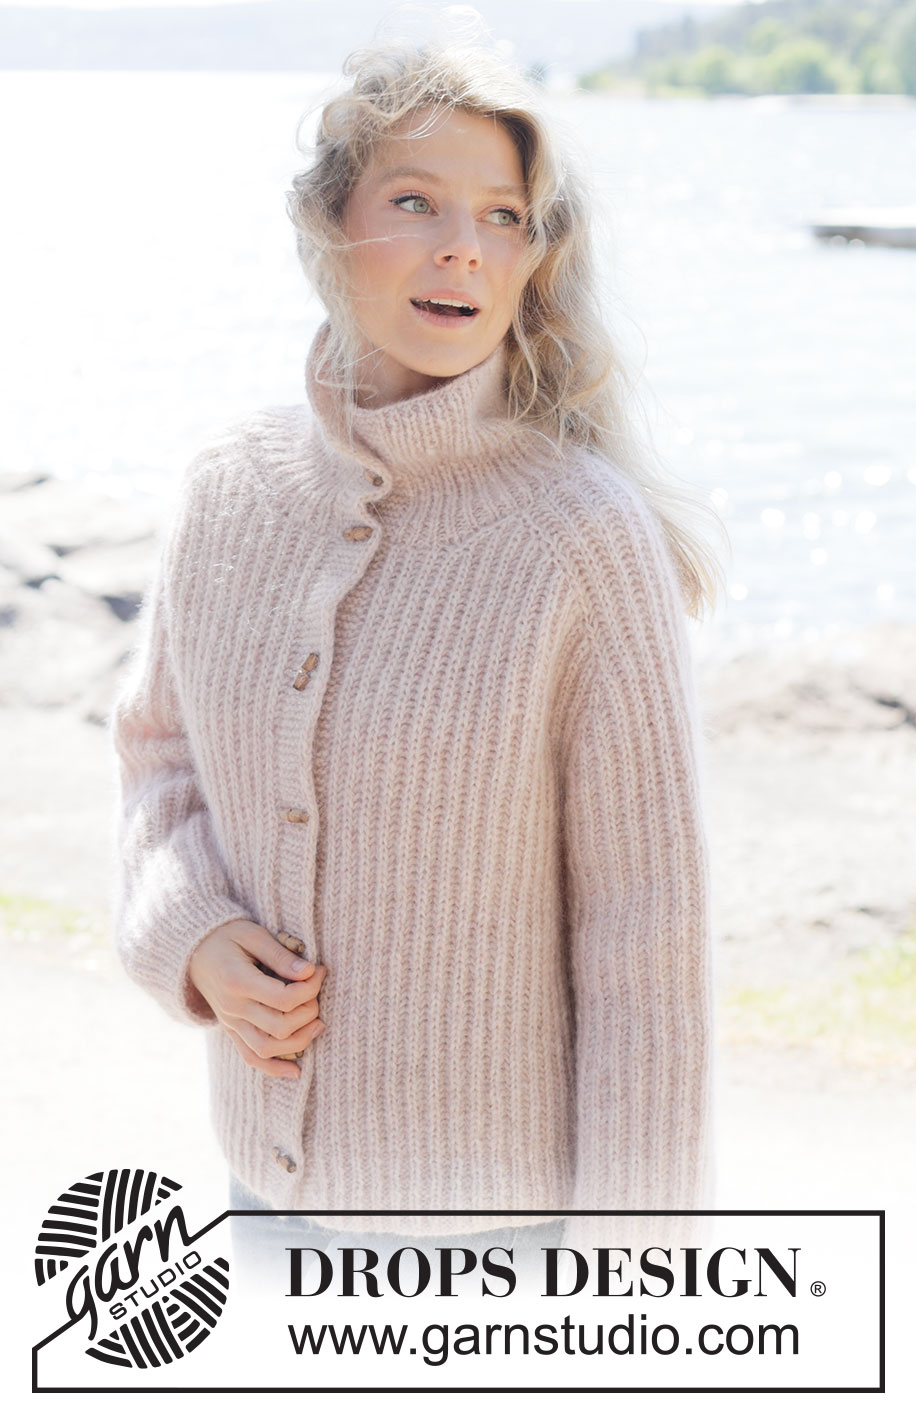
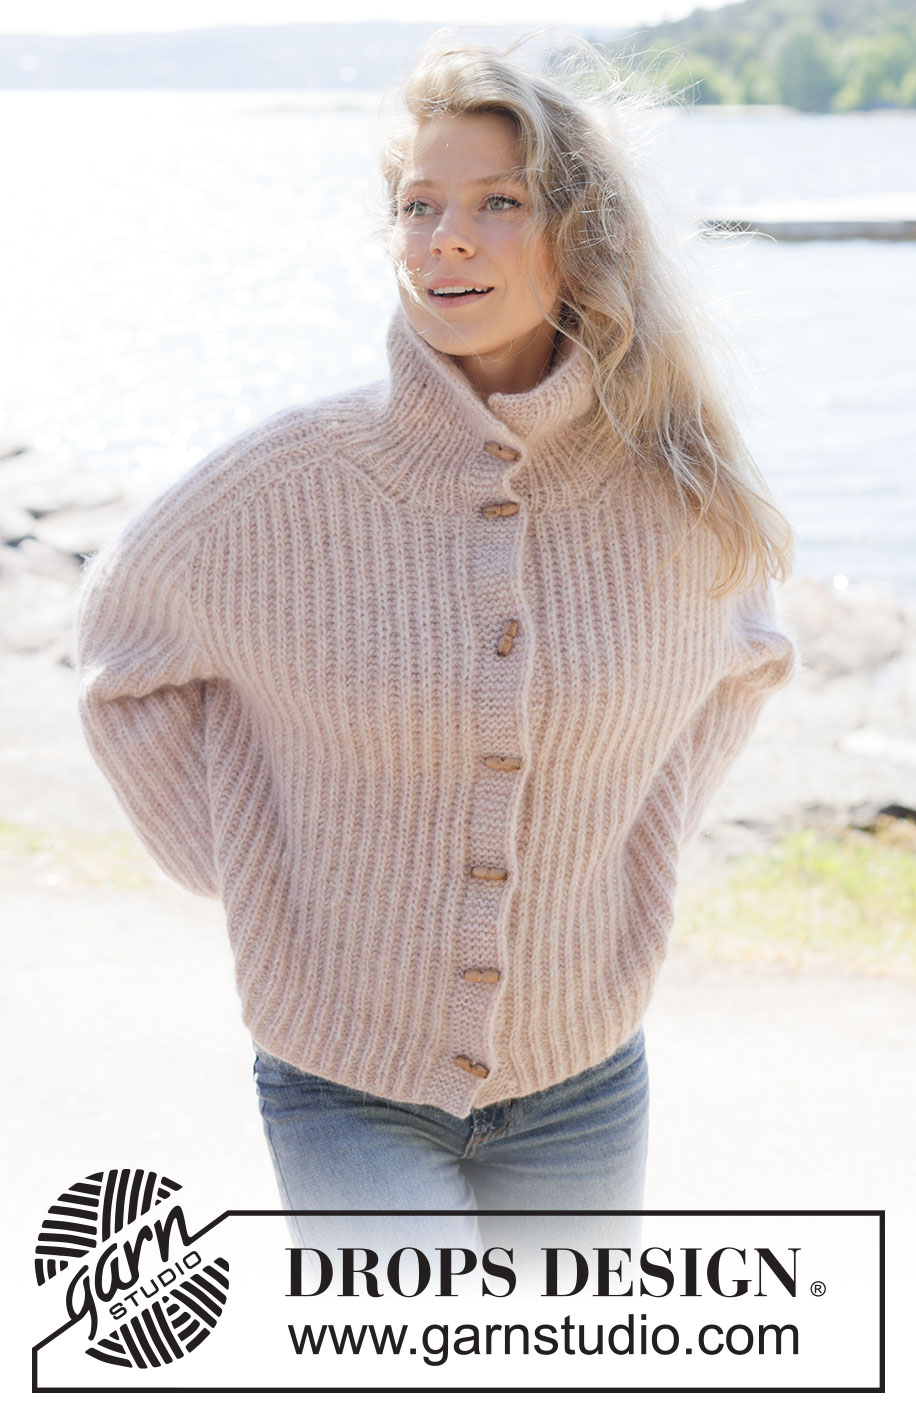
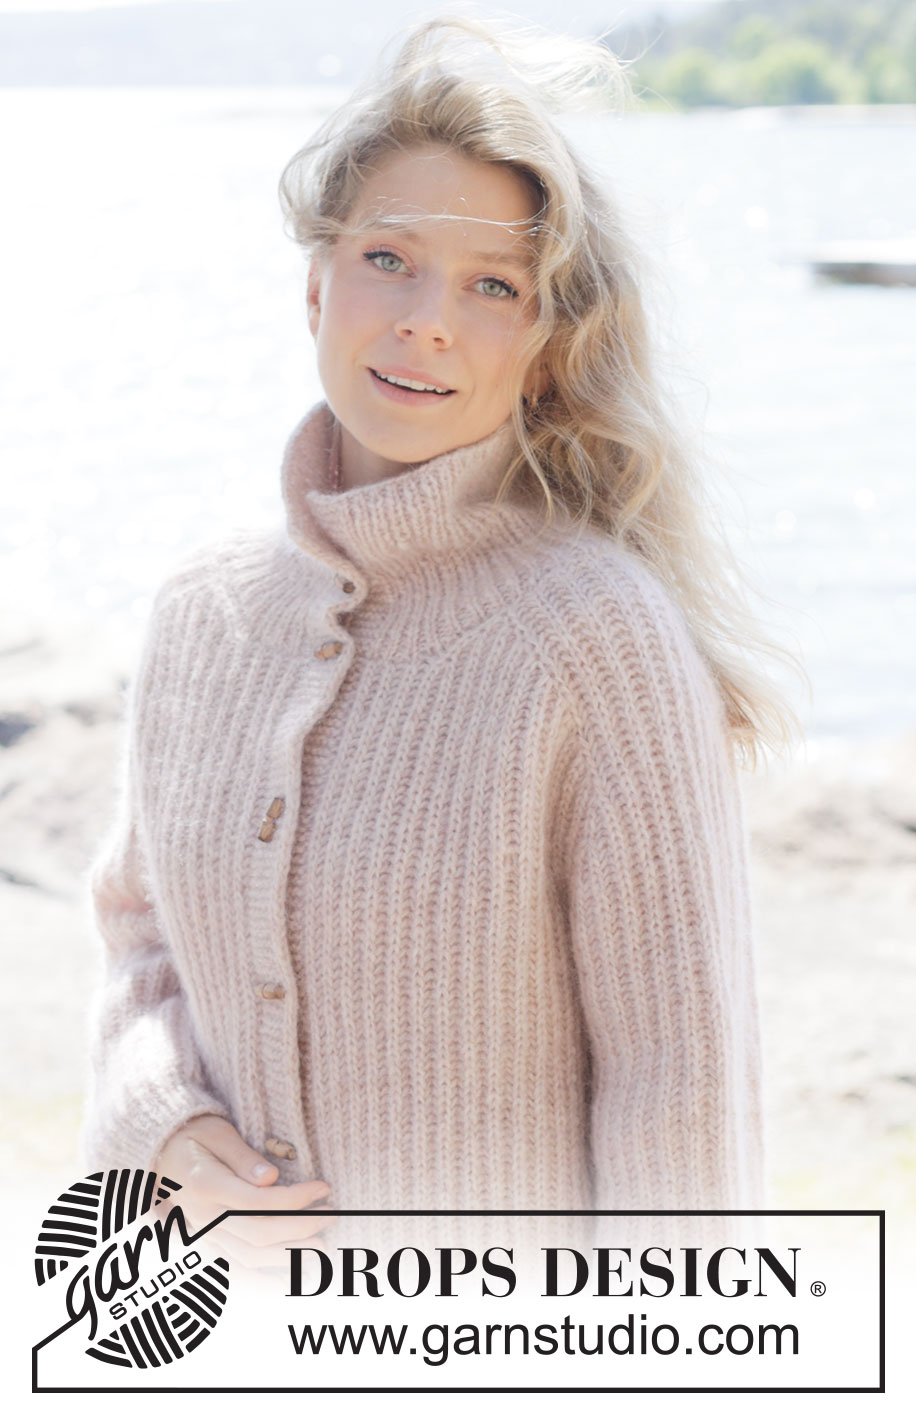
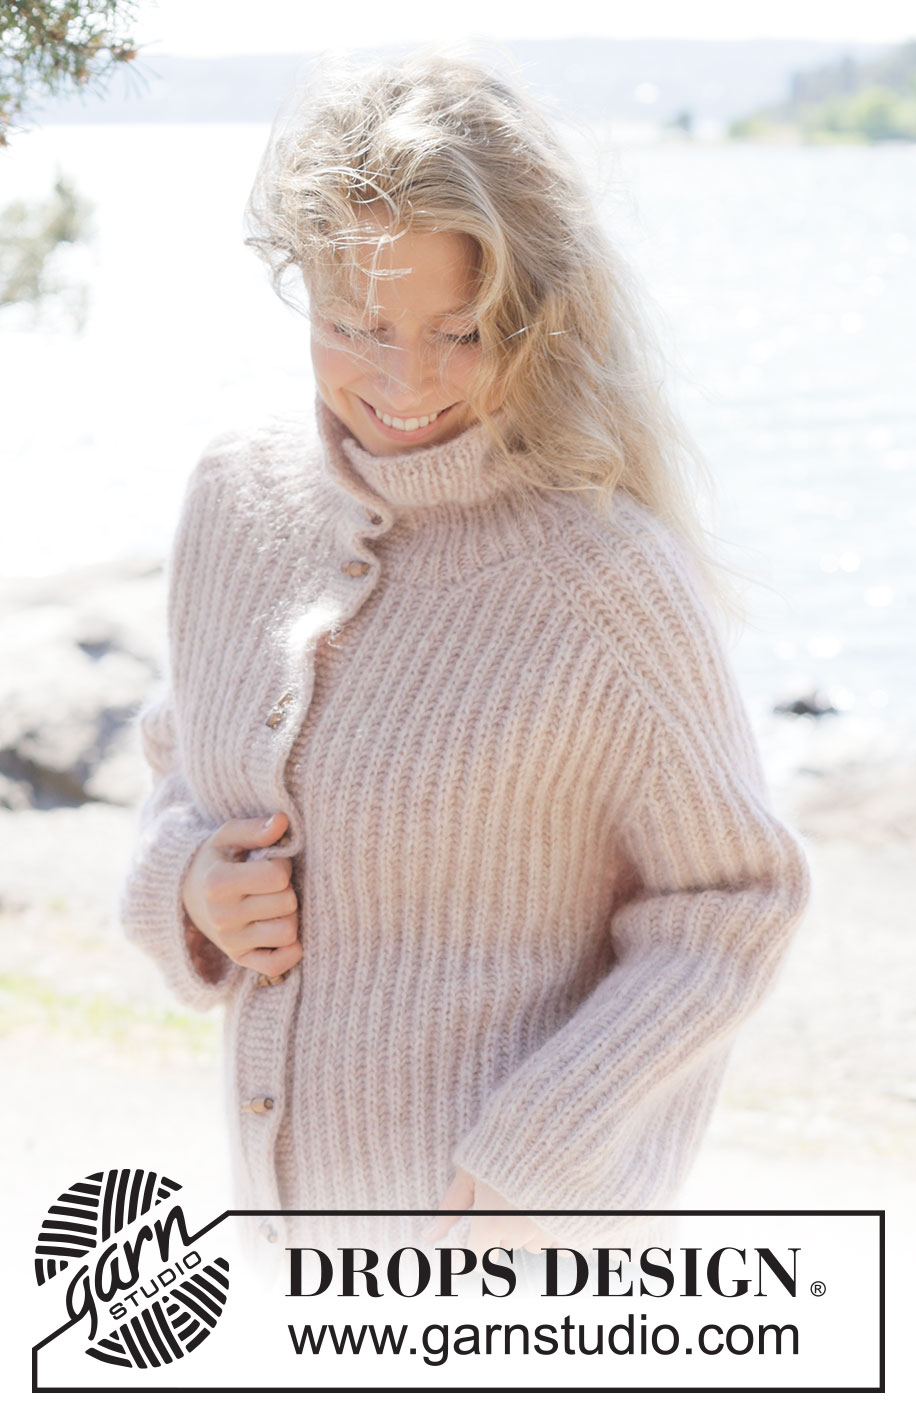
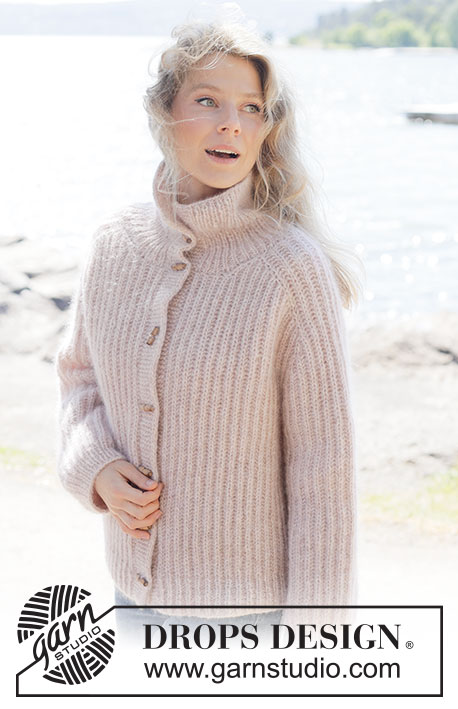
Plush and Lush Cardigan#plushandlushcardigan |
|
 |
 |
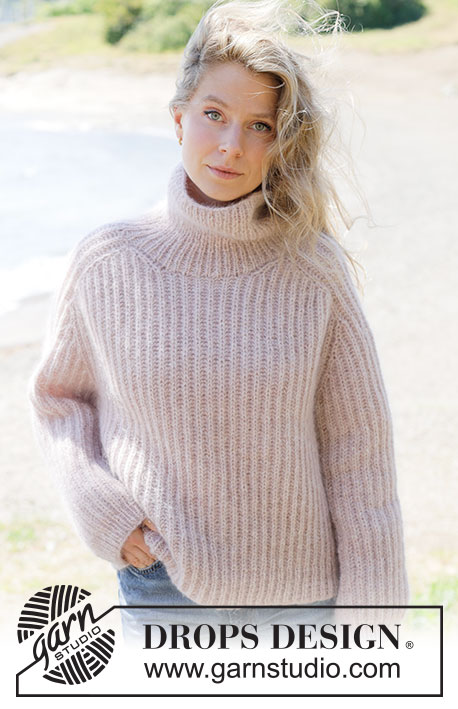
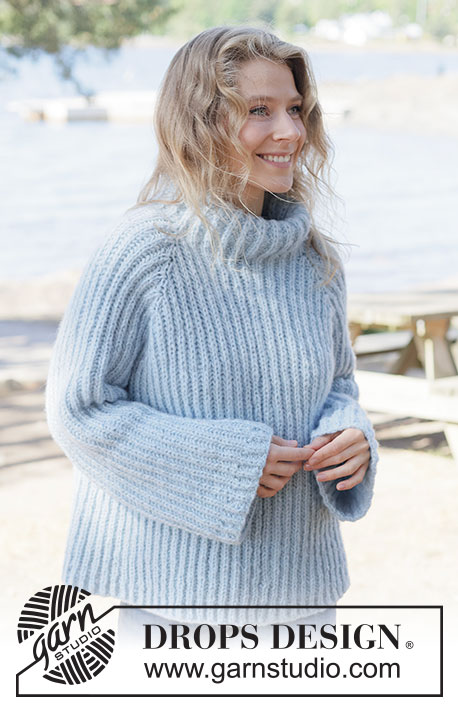
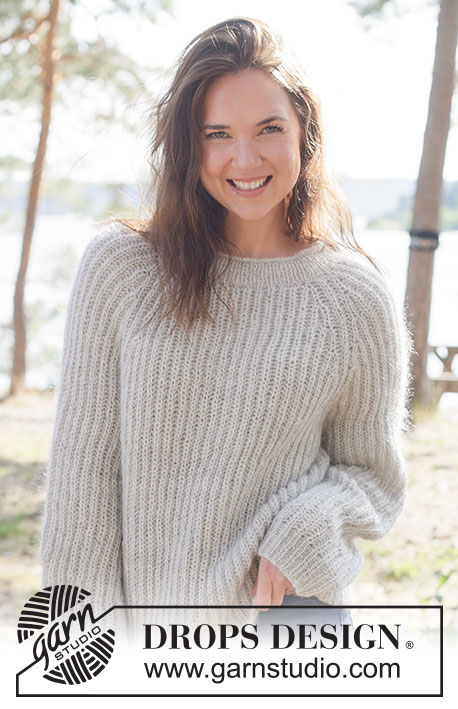
Knitted jacket in 1 strand DROPS Air and 1 strand DROPS Kid-Silk. The piece is worked top down with saddle shoulders, I-cord and English rib. Sizes XS - XXXL.
DROPS 264-4 |
|
|
------------------------------------------------------- EXPLANATIONS FOR THE PATTERN: ------------------------------------------------------- GARTER STITCH (worked back and forth): Knit all rows, from both the right and wrong side. 1 ridge in height = knit 2 rows. KNITTING TIP: When counting stitches, the yarn overs are not included. ENGLISH RIB (back and forth, applies to yoke and body): ROW 1 (wrong side): * Knit 1, make 1 yarn over, slip 1 stitch purl-wise *, work from *-* until there is 1 stitch left, knit 1. ROW 2 (right side): * Make 1 yarn over, slip 1 stitch purl-wise, knit together the yarn over and slipped stitch *, work from *-* until there is 1 stitch left, make 1 yarn over and slip 1 stitch purl-wise. ROW 3 (wrong side): * Knit together the yarn over and slipped stitch, make 1 yarn over, slip 1 stitch purl-wise, *, work from *-* until there is 1 yarn over and 1 stitch left, knit together the yarn over and slipped stitch. Repeat ROWS 2 and 3 onwards. INCREASE TIP: All increases are worked from the right side! Increase 2 stitches in a knitted stitch + yarn-over, working as follows: Knit together the yarn-over and stitch but do not slip them from the left needle, make 1 yarn over the right needle and knit together the stitch and yarn-over one more time (= 2 increased stitches). Slip the stitches off the left needle. Work the new stitches into the English rib but be aware that the increased stitches do not have yarn-overs on the next row and are therefore worked alone on this row. Always increase in the knitted stitch closest to the marker. BANDS WITH I-CORD: BEGINNING OF ROW: Work the band as follows (7 stitches): Slip 1 stitch purl-wise with yarn in front, knit 1, work 5 garter stitches. END OF ROW: Work the band as follows (7 stitches): Work until there are 7 stitches left on the row, work 5 garter stitches, slip 1 stitch purl-wise with yarn in front, knit 1. Work like this from both the right and wrong side. BUTTONHOLES: Work the buttonholes on the right band (when the garment is worn) from the right side, when there are 5 stitches left on the row as follows: ROW 1 (right side): Make 1 yarn over, knit 2 together, knit 1, slip 1 purl-wise with strand in front, knit 1. ROW 2 (wrong side): Work the band as before, knit the yarn over to leave a hole. The first buttonhole is worked when the band measures 8-9-9-8-8-8½-9 cm = 3⅛"-3½"-3½"-3⅛"-3⅛"-3¼"-3½". Then work 4-4-4-5-5-5-5 buttonholes with 8-9-9-8-8-8½-9 cm = 3⅛"-3½"-3½"-3⅛"-3⅛"-3¼"-3½" between each one. Adjust so the bottom buttonhole is worked in the transition between the English rib and the rib. The last 2 buttonholes are worked on the neck, the first one on the first row from the right side and the other when the neck measures 8-8-8-8-9-9-9 cm = 3⅛"-3⅛"-3⅛"-3⅛"-3½"-3½"-3½". ENGLISH RIB (in the round for the sleeves): ROUND 1: Begin after the 5-7-7-9-9-9-13 knitted-up stitches under the sleeve and work as follows across the stitches from the yoke * Knit together the yarn over and slipped stitch, make 1 yarn over, slip 1 stitch purl-wise, *, repeat from *-* to the middle knitted-up stitch under the sleeve, then work the new stitches in English rib but be aware that they do not have their yarn-overs on the first round. ROUND 2: * Make 1 yarn over, slip 1 stitch purl-wise, purl together the yarn over and slipped stitch, *, repeat from *-* to end of round. ROUND 3: * Knit together the yarn-over and knitted stitch, make 1 yarn over, slip 1 stitch as if to purl, * repeat from *-* to end of round. Repeat ROUNDS 2 and 3 onwards. ------------------------------------------------------- START THE PIECE HERE: ------------------------------------------------------- JACKET – SHORT OVERVIEW OF THE PIECE. The pattern uses both long and short needles; start with the length which fits the number of stitches and change when necessary. The yoke is worked back and forth with circular needle, from mid front and top down. When the yoke is finished, it is divided for body and sleeves, and the body is continued back and forth while the sleeves wait. The sleeves are worked in the round, top down. Stitches are knitted up along the neckline and the neck is worked to finish. YOKE: Cast on 53-53-53-53-55-55-55 stitches with circular needle size 5.5 MM = US 9, 1 strand DROPS Air and 1 strand DROPS Kid-Silk. Work 1 row of ENGLISH RIB (back and forth) with 1 edge stitch in GARTER STITCH on each side – read explanations above (= wrong side). Insert 4 markers without working the stitches and each marker inserted between 2 stitches as follows: Count 3 stitches (= left front piece), insert 1 marker before the next stitch, count 13 stitches (= saddle shoulder), insert 1 marker before the next stitch, count 21-21-21-21-23-23-23 stitches (= back piece), insert 1 marker before the next stitch, count 13 stitches (= saddle shoulder), insert 1 marker before the next stitch, count 3 stitches (= right front piece). Read KNITTING TIP. Continue back and forth, starting with row 2 of English rib and 1 garter stitch on each side, AT THE SAME TIME increase for the saddle shoulders and neckline. Read the next 2 sections before continuing. Remember to maintain the knitting gauge. INCREASE FOR SADDLE SHOULDERS: When you have worked 3 rows of English rib (next row from the right side), increase 2 stitches in the knitted stitch + yarn-over on each side of the 13 shoulder stitches – read INCREASE TIP (= 8 increased stitches on each increase-row). Increase like this every 4th row (i.e., every 2nd row of visible English rib stitches) a total of 4 times. NOTE! Each time you increase, there will be more stitches on the front and back pieces but the 13 stitches on each shoulder do not change. Always increase in the knitted stitch closest to the marker. NECKLINE: AT THE SAME TIME, when you increase for the shoulders for the 2nd time, begin increasing for the neckline as follows: Increase 2 stitches each side – remember INCREASE TIP (= 4 increased stitches, 2 on each front piece). Increase in an English rib stitch (knitted stitch + yarn-over) inside both the edge stitch and 1 purled stitch mid-front (so there is 1 purled stitch between the increase and the edge stitch on each front piece). Increase for the neckline every 8th row (i.e., every 4th row of visible English rib stitches) a total of 2 times. Always increase in the knitted stitch inside the 1 purled stitch + 1 edge stitch mid-front. You have increased 4 times for the shoulders and 2 times on each side for the neckline. Work back from the wrong side, continuing the pattern and cast on 12 stitches at the end of the row. Turn and work 7 band stitches according to BANDS WITH I-CORD – read explanation above, continue the English rib and cast on 12 stitches at the end of the row = 117-117-117-117-119-119-119 stitches. The neck increases are finished. Continue increasing for the shoulders as follows: Continue the English rib with 7 band stitches on each side, increasing as before until you have increased a total of 9-10-11-11-12-12-13 times in height for the shoulders (8 stitches increased every 4th row). NOTE! When the band measures 8-9-9-8-8-8½-9 cm = 3⅛"-3½"-3½"-3⅛"-3⅛"-3¼"-3½" work the first BUTTONHOLE – read explanation above. There are 157-165-173-173-183-183-191 stitches: 37-39-41-41-43-43-45 stitches on each front piece, 57-61-65-65-71-71-75 stitches on the back piece and 13 stitches on each shoulder. INCREASE FOR SLEEVES: You now only increase on the sleeves. Increase in the same knitted stitch + yarn-over as before but the new stitches are now part of the sleeves. Move the markers to the other side of the knitted stitch you have been increasing in. Always increase in the knitted stitch closest to the marker. Continue the English rib and the bands, increasing 2 stitches in the knitted stitch + yarn-over on each side of the 13 saddle shoulder stitches. Each time you increase, there will be more stitches on the sleeves, the stitch count on the front and back pieces remains the same. Increase like this every 8th row (i.e., every 4th row of visible English rib stitches) a total of 6-7-8-8-9-10-10 times = 205-221-237-237-255-263-271stitches. The sleeves measure approx. 13-16-18-18-20-22-22 cm = 5⅛"-6¼"-7"-7"-8"-8¾"-8¾". INCREASE FOR BODY: You now increase only on the front and back pieces. Increase in the same knitted stitch + yarn-over as before but the new stitches are now part of the body, not the sleeves. Move the markers to the other side of the knitted stitch you have been increasing in. Always increase in the knitted stitch closest to the marker. Continue the English rib and bands, increasing 2 stitches in the knitted stitch + yarn-over on each side of the front and back pieces. Each time you increase, there will be more stitches on the front and back pieces, the increases for the sleeves are finished. Increase like this every 4th row (i.e., every 2nd row of visible English rib stitches) a total of 1-1-1-2-2-3-4 times = 213-229-245-253-271-287-303 stitches. The piece measures approx. 19-22-24-25-27-30-31 cm = 7½"-8¾"-9½"-9¾"-10⅝"-11¾"-12¼", measured outermost along the armhole when the piece is folded at the shoulder (the measurements include the saddle shoulder: half the saddle shoulder = approx. 5 cm = 2" + approx. 14-17-19-20-22-25-26 cm = 5½"-6¾"-7½"-8"-8¾"-9¾"-10¼" down the armhole). If the piece is shorter than this, continue the pattern without further increases to the correct length. Finish after a row from the wrong side. Now divide for the body and sleeves. DIVIDE FOR BODY AND SLEEVES: Work 39-41-43-45-47-49-53 stitches as before (= front piece), place the next 37-41-45-45-49-53-53 stitches on a thread for the sleeve, cast on 5-7-7-9-9-9-13 stitches (mid-under the sleeve), work 61-65-69-73-79-83-91 stitches as before (= back piece), place the next 37-41-45-45-49-53-53 stitches on a thread for the sleeve, cast on 5-7-7-9-9-9-13 stitches (mid-under the sleeve), work the last 39-41-43-45-47-49-53 stitches as before (= front piece). The body and sleeves are finished separately. BODY: = 149-161-169-181-191-199-223 stitches. Continue the English rib and the bands until the piece measures 52-54-55-57-59-61-63 cm = 20½"-21¼"-21⅝"-22½"-23¼"-24"-24¾" from the top of the shoulder (by the neck). On the next row from the right side, begin the rib. Change to circular needle size 4 MM = US 6. Work the band as before, * purl the purled stitch, make 1 yarn over, knit together the yarn over + slipped stitch *, work from *-* until there are 8 stitches left, purl 1, make 1 yarn-over, work the band as before = 217-235-247-265-280-292-328 stitches. Work the next row as follows from the wrong side: Work the band as before, * knit 1, knit the yarn-over, purl 1*, work from *-* until there are 9 stitches left, knit 1, knit the yarn-over and work the band as before. Work rib (purl 2, knit 1) with the bands on each side. When the rib measures 4-4-5-5-5-5-5 cm = 1½"-1½"-2"-2"-2"-2"-2", bind off with rib. The jacket measures approx. 56-58-60-62-64-66-68 cm = 22"-22¾"-23⅝"-24⅜"-25¼"-26"-26¾" from the top of the shoulder. SLEEVES: Place the 37-41-45-45-49-53-53 sleeve-stitches from one thread on circular needle size 5.5 MM = US 9. Start by knitting up 1 stitch in each of the 5-7-7-9-9-9-13 stitches cast on under the sleeve = 42-48-52-54-58-62-66 stitches. To continue the English rib neatly down the sleeve, work the first round as follows: Begin after the 5-7-7-9-9-9-13 knitted-up stitches under the sleeve, * knit together the yarn-over + slipped stitch, make 1 yarn-over, slip 1 stitch purl-wise *, work from *-* to end of round – be aware that the new stitches do not have their yarn-overs on the first round. Continue ENGLISH RIB in the round – see explanation above, until the sleeve measures 35-32-28-29-26-25-24 cm = 13¾"-12½"-11"-11⅜"-10¼"-9¾"-9½" from the division, finishing after a round where the stitches and yarn overs are purled together. Change to double pointed needles size 4 MM = US 6 and work the first round as follows: * Knit together the yarn-over and knitted stitch, purl 1 *, work from *-* to end of round. Work rib (knit 1, purl 1) as follows: Knit above knit and purl above purl. When the rib measures 4-4-5-5-5-5-5 cm = 1½"-1½"-2"-2"-2"-2"-2", bind off with rib. The sleeve measures approx. 39-36-33-34-31-30-29 cm = 15¼"-14¼"-13"-13⅜"-12¼"-11¾"-11⅜" from the division. NECK: Knit up approx. 113 to 121 stitches (should be an odd number) along the neckline, using circular needle size 4 MM = US 6 – make sure you knit up 1 stitch in each stitch on both bands. Work the first row as follows from the wrong side: 7 band stitches as before, work rib (purl 1, knit 1), work until there are 8 stitches left, purl 1 and work 7 band stitches as before. Work rib (knit 1, purl 1) with the bands as before on each side – remember to work the last 2 buttonholes. When the rib measures 16-16-16-16-17-17-17 cm = 6¼"-6¼"-6¼"-6¼"-6¾"-6¾"-6¾", bind off with knit above knit and purl above purl. ASSEMBLY: Sew the buttons onto the left band. |
|
 |
|
Have you finished this pattern?Tag your pictures with #dropspattern #plushandlushcardigan or submit them to the #dropsfan gallery. Do you need help with this pattern?You'll find 25 tutorial videos, a Comments/Questions area and more by visiting the pattern on garnstudio.com. © 1982-2026 DROPS Design A/S. We reserve all rights. This document, including all its sub-sections, has copyrights. Read more about what you can do with our patterns at the bottom of each pattern on our site. |
|


With over 40 years in knitting and crochet design, DROPS Design offers one of the most extensive collections of free patterns on the internet - translated to 17 languages. As of today we count 325 catalogs and 12298 patterns - 12288 of which are translated into English (US/in).
We work hard to bring you the best knitting and crochet have to offer, inspiration and advice as well as great quality yarns at incredible prices! Would you like to use our patterns for other than personal use? You can read what you are allowed to do in the Copyright text at the bottom of all our patterns. Happy crafting!
Post a comment to pattern DROPS 264-4
We would love to hear what you have to say about this pattern!
If you want to leave a question, please make sure you select the correct category in the form below, to speed up the answering process. Required fields are marked *.