
Popular categories
Looking for a yarn?


Comments / Questions (57)
![]() Sietske Donkers wrote:
Sietske Donkers wrote:
Hallo allemaal ik ben deze top aan het breien op naald nummer 4 en Drops Belle. Ik vind het allemaal een beetje los. Klopt de naald dikte wel?
01.07.2023 - 16:41DROPS Design answered:
Dag Sietske,
Het kan zijn dat je een andere naalddikte nodig hebt om dezelfde stekenverhouding als in het patroon te krijgen. We raden altijd aan om een proeflapje te maken en eventueel de naalddikte aan te passen, zodat de stekenverhouding overeen komt. (Zelf heb ik ook altijd een dunnere naald nodig om op de juiste stekenverhouding te komen :)
03.07.2023 - 20:50
![]() Anna wrote:
Anna wrote:
Jeg vil gerne strikke 46-8. Men jeg forstår ikke, hvordan mønsterrapporten kan passe med, at jeg skal slå 195 m op i str M. 12 går jo ikke op i 193, når jeg regner de to kantmasker fra. 192 m vil passe plus 2 kantmasker = 194. Kan I mon hjælpe mig? Mvh anna
28.06.2023 - 21:57DROPS Design answered:
Hej Anna, du strikker M.1 (12 m) 16 gange = 192, så 1.m i M.1 igen (så det bliver ens i begge sider mod midt foran) + 1 kantmaske i hver side :)
29.06.2023 - 14:47
![]() Johanne Choquette wrote:
Johanne Choquette wrote:
Bonjour On doit diminuer pour l’emmanchure à deux mailles du bord en point mousse , dois-je tricoter deux mailles en point mousse et ensuite diminuer les mailles ? Cela ne fera pas trou ? Merci pour l’explication
08.04.2022 - 01:49DROPS Design answered:
Bonjour Mme Choquette, vous allez diminuer de chaque côté en tricotant 3 m ens à l'end/torse à l'end (pour diminuer 2 m de chaque côté) et 2 m ens à l'end/torse à l'end (pour diminuer 1 m de chaque côté), ainsi, vous n'aurez pas de trou: tricotez 2 m point mousse, diminuez 2 m/1 m, tricotez jusqu'à ce qu'il reste 5 m (pour diminuer 2 m), diminuez 2 m ou jusqu'à ce qu'il reste 4 m (pour diminuez 1 m), diminuez 1 m et terminez par 2 m point mousse. Bon tricot!
08.04.2022 - 11:18
![]() Martine wrote:
Martine wrote:
Merci pour votre réponse rapide. Je vais pouvoir continuer mon ouvrage . 🙂
01.10.2021 - 17:59
![]() Martine wrote:
Martine wrote:
Bonjour, Quand vous dites que le diagramme montre le motif sur l’endroit, cela signifie bien que le rang 2 se tricote à l’envers pour obtenir du jersey, est-ce exact. Quand j’ai tricoté une fois le motif M1 je n’obtiens pas du tout 19cm, je suppose qu’il faut tricoter ce motif plusieurs fois pour arriver aux 19cm ? Je trouve les explications des anciens modèles moins précises que celles des modèles plus récents… Merci
01.10.2021 - 13:35DROPS Design answered:
Bonjour Martine, tout à fait, 1 case blanche = jersey endroit (à tricoter à l'endroit sur l'endroit et à l'envers sur l'envers). Vous devez répéter M.1 en hauteur jusqu'à ce que votre ouvrage mesure 19 cm de hauteur totale, ajustez après un motif complet (= 14 rangs) ou bien 1/2 motif (7 rangs) pour que M.1 se termine plus joliment. Bon tricot!
01.10.2021 - 16:12
![]() Greetje Bekker wrote:
Greetje Bekker wrote:
Dank jullie wel voor t vlotte antwoord.
10.07.2021 - 21:55
![]() Greetje Bekker wrote:
Greetje Bekker wrote:
Dank jullie wel ,voor t vlotte antwoord.
10.07.2021 - 21:54
![]() Greetje Bekker wrote:
Greetje Bekker wrote:
Moet de teruggaande nld van het patroon ,recht of averecht.
08.07.2021 - 17:35DROPS Design answered:
Dag Greetje,
De teruggaande naald brei je averecht, zodat er tricotsteek ontstaat op de goede kant.
08.07.2021 - 18:03
![]() Ali Buisman wrote:
Ali Buisman wrote:
Dank voor jullie duidelijk en snel antwoord !
12.04.2021 - 07:45
![]() Ali Buisman wrote:
Ali Buisman wrote:
Hoe moet je bij het armsgat 2 steken minderen/afkanten naast die 2 eerste ribbelsteken?
08.04.2021 - 13:01DROPS Design answered:
Dag Ali,
Je breit inderdaad eerst de kantsteek in ribbelsteek en dan kant je af. Of beter gezegd, je mindert dan steken. Op die manier blijft de kantsteek in tact. Hier haak je straks een rand omheen. Om mooie minderingen te maken kun je het beste steeds aan de goede kant minderen. Aan het begin van de naald door 1 afhalen, 1 steek recht te breien of 2 steken recht samen te breien (afhankelijk van of er 1 of 2 steken geminderd moeten worden) en dan de afgehaalde steek over te halen. Aan het eind van de naald 2 of 3 steken recht samen breien.
11.04.2021 - 13:42
|
|||||||||||||
Cool Solace |
|||||||||||||
|
|
|||||||||||||
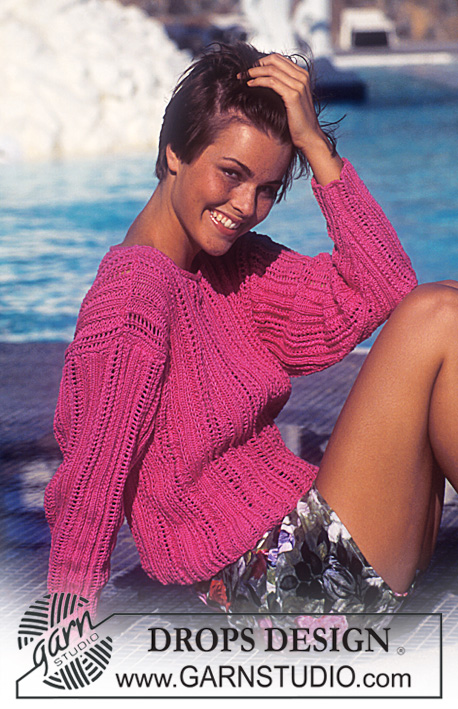
DROPS Top in Muskat with lace pattern
DROPS 46-8 |
|||||||||||||
|
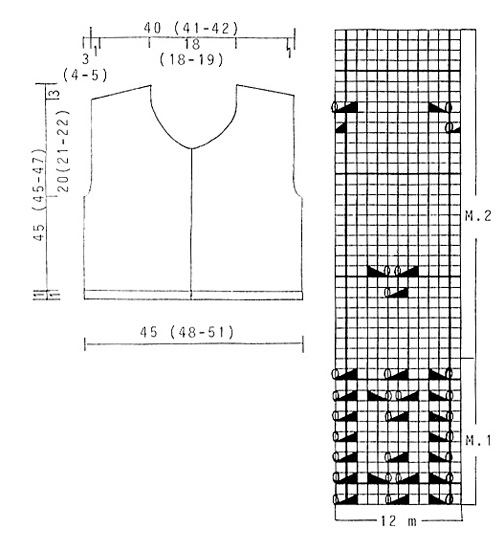
Pattern: See diagram (1 diagram = 1 pattern repeat). The diagrams are seen from the RS. Seed stitch: 1st row: K1, P1. 2nd row: K over P and P over K. Repeat 1st and 2nd row. Body: Work back and forth on circular needles. Cast on 183 (195-207) sts on circular needle sizes 4 mm/US 6 with gray and K2 rows. Then work chart M.1 with 1 edge st on each side mid front not included in pattern. Remember knitting gauge. When piece measures 19 (19-19) cm / 7½"-7½"-7½" – stop after a full repeat of M.1 – work M.2 with 1 edge st on each side mid front. At the same time when piece measures 22 (21-22) cm / 8¾"-8¼"-8¾" work next row as follows: 44 (47-50) sts front piece, bind off 4 sts for armhole, 87 (93-99) sts back piece, bind off 4 sts for armhole, 44 (47-50) sts front piece. Complete each piece separately. Front piece: = 44 (47-50) sts. Work 2 outermost sts towards armhole in garter st. Continuing bind off for armhole on every other row 2 sts 2 (2-3) times, 1 st 1 (3-3) time = 39 (40-41) sts. When piece measures 29 (29-31) cm bind off for neck on every other row: 4 (4-5) sts 1 times, 3 sts 2 times, 2 sts 1 times, 1 st 5 times and then on every 4th row: 1 st 2 times. At the same time when piece measures 42 (42-44) cm bind off for shoulders from armhole towards neckline on every other row: 5 (6-6) sts 1 time, 5 (5-5) sts 3 times. After bind off at neckline and shoulder is finished bind off remaining sts. Piece measures approx 45 (45-47) cm / 17¾"-17¾"-18½". Back piece: = 87 (93-99) sts. Continuing bind off for armhole like front piece = 77 (79-81) sts. When piece measures 42 (42-44) cm bind off for shoulder from armhole at neckline on every other row: 5 (6-6) sts 1 times, 5 (5-5) sts 3 times. At the same time when piece measures 43 (43-45) cm bind off middle 33 (33-35) sts for neck and work each side separately. Bind off 2 sts to shape the neckline on next row. After dec for neckline and shoulder bind off remaining sts. Piece measures approx 45 (45-47) cm / 17¾"-17¾"-18½". Assembly: Sew shoulder seam. Pick up approx 66-72 sts along left front piece on circular needle size 2.5 mm / US 1.5 with gray and work 2.5 cm/1" seed stitch back and forth on needle, bind off. Repeat along right front piece, but after 1 cm / ½" work 5 buttonholes evenly on row - 1 buttonhole = bind off 2 sts and cast on 2 new sts over bound off sts on next row. Pick up approx 126-130 sts round neckline on double pointed needles size 2.5 mm / US 1.5 with gray and K2 rows back and forth on needle, bind off. Now crochet an edge along bottom edge of body and around neckline with white and crochet hook size 3.5 mm/E/4as follows: 1 sc, * ch 3, 1 dc in first ch, skip 2 sts and crochet 1 sc in next st *, repeat from *-*. Continuing, crochet a row of sc (approx 95 sc) with gray and crochet hook size 3.5 mm/E/4 around armholes change to white and crochet an edge like bottom edge of body and neck. Sew in buttons. |
|||||||||||||
Diagram explanations |
|||||||||||||
|
|||||||||||||
 |
|||||||||||||
Have you finished this pattern?Tag your pictures with #dropspattern or submit them to the #dropsfan gallery. Do you need help with this pattern?You'll find 23 tutorial videos, a Comments/Questions area and more by visiting the pattern on garnstudio.com. © 1982-2026 DROPS Design A/S. We reserve all rights. This document, including all its sub-sections, has copyrights. Read more about what you can do with our patterns at the bottom of each pattern on our site. |
|||||||||||||


With over 40 years in knitting and crochet design, DROPS Design offers one of the most extensive collections of free patterns on the internet - translated to 17 languages. As of today we count 324 catalogs and 12290 patterns - 12280 of which are translated into English (US/in).
We work hard to bring you the best knitting and crochet have to offer, inspiration and advice as well as great quality yarns at incredible prices! Would you like to use our patterns for other than personal use? You can read what you are allowed to do in the Copyright text at the bottom of all our patterns. Happy crafting!
Post a comment to pattern DROPS 46-8
We would love to hear what you have to say about this pattern!
If you want to leave a question, please make sure you select the correct category in the form below, to speed up the answering process. Required fields are marked *.